Merged reference — VGCGuide (English, evergreen fundamentals & philosophy) and HARI Champions Guide (French, Pokémon Champions 2026 manual), reorganized into a single logical curriculum. All original prose preserved verbatim from each source; only chapter/section headers have been harmonized and reordered.
Sources:
- VGCGuide by Aaron Traylor, Wolfe Glick, Aaron Zheng, Max Gelman, Scarlet Andrews — vgcguide.com
- Guide Compétitif Pokémon Champions compiled by PAI from 55 videos by HARI (@HariPKMN)
Also available: /vgc-guide/ (English standalone) · /pokemon-guide/ (French standalone).
Part 1 — Welcome & Orientation
Preface
 A note from us to the reader.
Written by Aaron Traylor We wrote this guide to answer a few key questions:
“How do I get started playing VGC?” “How do I build a team?” “How do I win a VGC battle?”
These questions are easy to ask but, under the microscope, very challenging to answer in totality. VGC and competitive Pokémon are always changing, and we wanted to use our experience with the game to answer these questions for as many people as possible.
Who is this guide for?
We hope that this guide is broadly useful to everyone, no matter their competitive Pokémon experience. We wrote with these audiences in mind:
- People who are new to competitive Pokémon or VGC, and want to learn about the fundamentals
- People who have been playing VGC for a while, and have specific questions or want another perspective
- Experienced VGC players who can use the terminology, definitions, and format to express their own opinions or create their own explanatory content
What does this guide not contain?
This guide largely doesn’t contain anything that’s pertinent to *the current moment* in VGC. That means we won’t talk about metagame-relevant teams, rank Pokémon by how good we think they are, or review recent tournament results, for example.
Our goal is for this content to be useful and relevant for years, so we’ve tried to make it as context-free as we can. Some of the examples of concepts that we cite might be of years-old metagames that we have done our best to make as clear as possible. By doing this, we hope that our principles can guide players as they figure out the current moment in their own terms– that this guide can be like a teambuilding partner or battling coach frozen in time.
We hope that this guide is useful to you!
Introduction to Competitive Pokemon
 Click here if you’re new to competitive Pokemon!
Written by Aaron Traylor Welcome to the world of competitive Pokémon! If you’re reading this, Pokémon has probably been a part of your life, big or small: whether you grew up playing it, you watched the anime, you collected the cards, you play Pokémon Go, or you just like Pikachu. You might be curious what competitive Pokémon means or how Pokémon can even be competitive.
Competitive Pokémon is the natural extension of the battles in the Pokémon games: picking up where the games left off, competitive players battle against each other. There are many different ways to play Pokémon competitively, but this guide and website focus on the “official” style of competitive battling supported by The Pokémon Company. That style is called VGC, which stands for Video Game Championships. There are a couple of things that make VGC different from other forms of battling:
Double Battles
Most of the battles in the mainline Pokémon games (Red/Blue, Sword/Shield) that you might have played are Single battles: one Pokémon fights one Pokémon at a time. In VGC, two Pokémon fight against two Pokémon at a time. VGC battles are fast-paced and are all about how a trainer’s Pokémon work alongside each other.


Bring Six Pokémon, Battle With Four
Rather than fighting an opponent with your whole team, you look at their team and then pick four of your six Pokémon to bring to that battle, called “team preview”. Because you send out two Pokémon, you’ll see half of the Pokémon that your opponent chose to bring to the battle as soon as the battle starts. The person who knocks out their opponent’s 4 Pokémon first is the winner.
Allowed Pokémon
The set of Pokémon that are allowed for use in VGC changes every so often: this is usually called the VGC format or metagame (meta for short)*. VGC battles are always played on the most recent version of Pokémon (which is now Sword and Shield).
*Metagame means lots of different things, which we’ll get to later
Official Circuit
The Pokémon Company and The Pokémon Company International hold a worldwide circuit for VGC play that once a year culminates in the Pokémon World Championships, where a World Champion will be crowned. Qualification is done by gaining points through battling in person at events ranging from weekly events at your local game store to once-a-year International Championships. This year, the World Championships are in London, England on August 18 - 21. There are also different age divisions for children and teenagers:
- Juniors: Born after 2011
- Seniors: Born between 2007 and 2011
- Masters: Born before 2007
There are lots of ways to enjoy VGC that don’t revolve around the World Championships: you can follow along at home, play on the Ranked Doubles ladder in your Sword and Shield game, or join community-run tournaments online.
Here are some reasons why we like competitive Pokémon:
- Continue playing the games after you beat them. Many people have become the champion of the Pokémon League. But what comes after that? Competitive Pokémon allows you to bond with the Pokémon you’ve battled alongside in new ways.
- It’s a strategy game. There’s a lot of different elements to strategize and plan out, from the Pokémon that you select for your team to the moves that you make in battle.
- Huge amounts of customization. You’re able to customize everything about your team of Pokémon down to their stat points. This means you can create a style of play that feels totally “you”.
- No technical skill required. Pokémon is very different from other “eSports”: the strategic decisions that are made don’t rely on reaction time and muscle memory. You’ll have a good amount of thinking time.
Age doesn’t matter. Anyone can play a battle of Pokémon– we’ve competed against 8 year olds and 60 year olds.

The two main skills of Pokémon battling are teambuilding and battling:
- Teambuilding: You get to pick the six Pokémon that you bring into battle and customize their moves. You can also use a team made by someone else if you don’t want to come up with them yourself.
- Battling: Given your six Pokémon and their six Pokémon, knock out all four of your opponent’s Pokémon however you can. This is easier said than done!
Those are the basics!
From here, you’re ready to move on to the rest of the guide, where we can get you started teambuilding and battling as soon as possible. If you don’t know how the mechanics of Pokémon stats work, don’t worry: we have a light guide to get you on board quickly.
We hope you enjoy competitive Pokémon!
Coming from Breeding or Shiny Hunting
Coming from Single Battles
Start here if you have some competitive battling experience in Single battles.
Written by Aaron Traylor If you’ve played a lot of Single Battles, your experience may help you out in VGC, but many of the important facets of Singles don’t apply in VGC battling– and it’s important to know how they are different. There are only two main differences between VGC and Single Battles, but they affect how the game is played in lots of ways.
VGC Battles are Double Battles
This is the most obvious difference– in Single Battles, you have one Pokémon on the field at a time. In Double Battles, you have two. Let’s break down how that changes the battle.
Your Pokémon Help Each Other
In Single Battles, it’s your active Pokémon versus theirs, unless a player switches. In Double Battles, your Pokémon can interact and help each other out. One simple way to do this is the double target– both of your Pokémon use their attacks on one opposing Pokémon. Double targeting allows players to aggressively target Pokémon and quickly take knockouts before their opponent can respond.
EXAMPLE
Pokemon can work together in Double Battles to turn an unfavorable matchup on its head. In the Single Battle below, Charizard can’t defeat Excadrill on its own, despite dealing super effective damage. However, in the Double Battle, Hydreigon is able to add just a little damage to knock out Excadrill before it moves.
See it in showdown here and here.
Protect
Nearly every Pokémon carries Protect in Double Battles. Protect allows you to take advantage of how your Pokémon support each other, and to prevent your opponent from taking a knockout in the moment– massively reducing their options. See our Protect guide for more if you’re curious.
EXAMPLE
Protect can save your Pokemon from taking too much damage, and allow your other Pokemon to act freely. In this scenario, the Excadrill and Moltres player might expect– or “predict”– the double target attack onto Excadrill. They use Protect to put themselves in a winning position.
See it in showdown here.
Counters and Checks
In Single Battles, you might have one Pokémon that “counters” another by stopping it dead in its tracks and forcing it to switch out or risk fainting. Because the interactions between all four Pokémon on the field can be complex, it’s hard to find Pokémon that are always going to “counter” another. If a Pokémon is challenging for you to face, you might need more than one Pokémon that’s strong against it.
EXAMPLE
“Countering” a Pokemon in Double Battles is more challenging than in Single Battles, because it’s not enough to resist the Pokemon’s damage and threaten to knock it out or otherwise disrupt it. In the below battles, we compare a situation in both Single and Double battles.
See it in showdown here and here.
EXAMPLE
Furthermore, because there are two Pokemon on the field, it can be challenging to truly “counter” a Pokemon, because it may be protected by its partner in some way.
See it in showdown here.
Be Careful Setting Up
In Single Battles, you might be able to boost your Pokémon’s stats or use healing moves without your opponent having much counterplay. Some Pokémon can threaten to “sweep” an opponent’s team after getting a boost or two. Don’t expect the same luxury in Double Battles. If your Pokémon is bulky and ekes out a game over many turns, your opponent can either double target to threaten it quickly, or double target its partner until your bulky Pokémon is the only one left. Conversely, if you try boosting offensively with a Pokémon with low defensive stats, your opponent can threaten to remove it from the field with either of their Pokémon. Setup is still possible in Double Battles– you’re going to rely on moves such as Follow Me and Fake Out, which might only buy you a turn or two. For this reason (and several others), “stall” tactics that are effective in Single Battles are much less effective in Double Battles.
Spread Damage
In Double Battles, you’ll have to select targets for your moves. Most moves just hit one Pokémon, but some moves hit both enemy Pokémon at once, such as Eruption and Water Spout. Certain moves such as Surf or Earthquake affect more than just one opponent: they affect every Pokémon on the field, including your partner! When a move would hit more than one Pokémon (even Protecting Pokémon), it’s going to have its damage reduced by 25%.
EXAMPLE
Here’s a quick look at how drastic the difference in damage can be when there’s one target versus when there’s two targets.
Singles (Level 50):
252 SpA Life Orb Charizard Heat Wave vs. 252 HP / 4 SpD Bronzong: 166-198 (95.4 - 113.7%) – 75% chance to OHKO
Doubles (Level 50):
252 SpA Life Orb Charizard Heat Wave vs. 252 HP / 4 SpD Bronzong: 125-148 (71.8 - 85%) – guaranteed 2HKO
See it in showdown here and here.
Doubles Moves
There are a handful of moves that are especially important in Double Battles that are worth keeping in mind. These moves include:
Protect: As explained above, Protect prevents one of your Pokémon from taking damage while the other one moves freely.
Fake Out: Normal-type attack with increased priority that always makes the opponent flinch. This move can only be used when it’s the first turn that this Pokémon is on the field.
Follow Me / Rage Powder: Redirects all attacks to the user, thus protecting the partner. (Opposing Grass-types can still attack you through Rage Powder, but not Follow Me).
Helping Hand: Gives a boost to your partner’s attack for the turn.
Ally Switch: Switches your left Pokémon to your right side, and vice versa.
Wide Guard: Protects your team from spread damage moves.
Icy Wind/Electroweb: These moves don’t deal very much damage, but they do drop each opponent’s Speed by 1 stage.
Tailwind: Doubles your Pokémon’s Speed for 4 turns.
Trick Room: Reverses the order in which Pokémon move in for 5 turns.
You only use 4 Pokémon in a battle
The second main difference between VGC and Single Battles is that in VGC, you see all 6 of your opponent’s Pokémon, and then pick 4 of yours to bring to a battle, while your opponent does the same. This impacts the game in some subtle but important ways:
Games are Faster
VGC games take much fewer turns on average than most Single Battles, which can take 50 or more turns. VGC games take 10 to 12 turns (10-15 minutes) on average.
No Hazards
Because VGC games are much shorter, and more happens in one turn, there’s rarely any time to use the “hazard” moves, such as Stealth Rock, Spikes, Toxic Spikes, and Sticky Web. And because each player only has 4 Pokémon, they just don’t do very much in the long run. VGC players switch their Pokémon in and out just as much as Single Battles players do, but these moves are rarely effective, and are not used for the most part.
Picking a Lead / Team Preview
In Single Battles, you pick one Pokémon from your team to start out the battle– this is often a “lead” Pokémon, or a Pokémon specifically designated to lead. In Double Battles, rather than having one Pokémon set the pace on each side, each player has two– your Pokémon are going to have to work together to find success. Furthermore, because you only bring 4 Pokémon to a battle, your two lead Pokémon make up a full half of your team! Rather than having one fixed lead, most teams are more complicated. At the simplest level, some teams may have two complementary Pokémon to take advantage of some synergy, such as Drizzle Politoed and Swift Swim Kingdra. These combinations are informally called modes, and a simple strategy is to lead with a mode.
Not every team has to have that sort of synergy with their leads, however. Most players usually have some Pokémon that they prefer to lead with, and some Pokémon that they prefer to close the game with, and make a plan when they see their opponent’s team. If you’re feeling overwhelmed, we’ve got a guide to Team Preview to get you started.
Wrapping Up
Single Battles can give you some great groundwork for playing VGC, but the two battle styles are pretty different. Double Battles are pretty chaotic, especially in comparison to some of the slower-paced Single battle play. It will likely take a little bit of time to get used to the pace of Double Battles, but in time playing will feel just as natural.
The Basics of Watching a Pokemon Match
Just want to watch, but don’t know much about Pokemon? Learn enough to cheer on a friend, child, parent, or loved one.
Written by Aaron Traylor If you’re reading this article, you might want to watch Pokémon battles for fun without getting more involved, or because someone you know plays in these tournaments and you want to learn more about what they do. You may not have played Pokémon yourself– you might not even know what a Pokémon is. Here are some of the basics so that you can tune into a stream and cheer– we’ll walk you through a match from start to finish.
Pokémon
Pokémon are the creatures that the games are named after, and they use attacks on each other until they are knocked out (like a magical boxing match), as directed by the player in charge of them. In this game, the two players face each other using their Pokémon, called a “battle”. The goal of each person in a battle is to knock out all of their opponent’s Pokémon. A knockout happens when a Pokémon loses all of its health and is no longer able to battle (don’t worry– they are healed later!). Usually, the player who has less Pokémon knocked out is ahead in the match.
In tournament games, players play best of three: they’ll play three battles, and whichever player wins two of them first is the winner of the match.

Team Preview
When you go to a Pokémon tournament, often you have to choose the 6 Pokémon that you’ll use at the beginning– and you can’t change them until the tournament is over. At the beginning of each battle, each person selects 4 Pokémon from their 6 Pokémon. Those 4 are the ones that they’ll use for that battle. Once both players have selected their Pokémon, the battle will start.
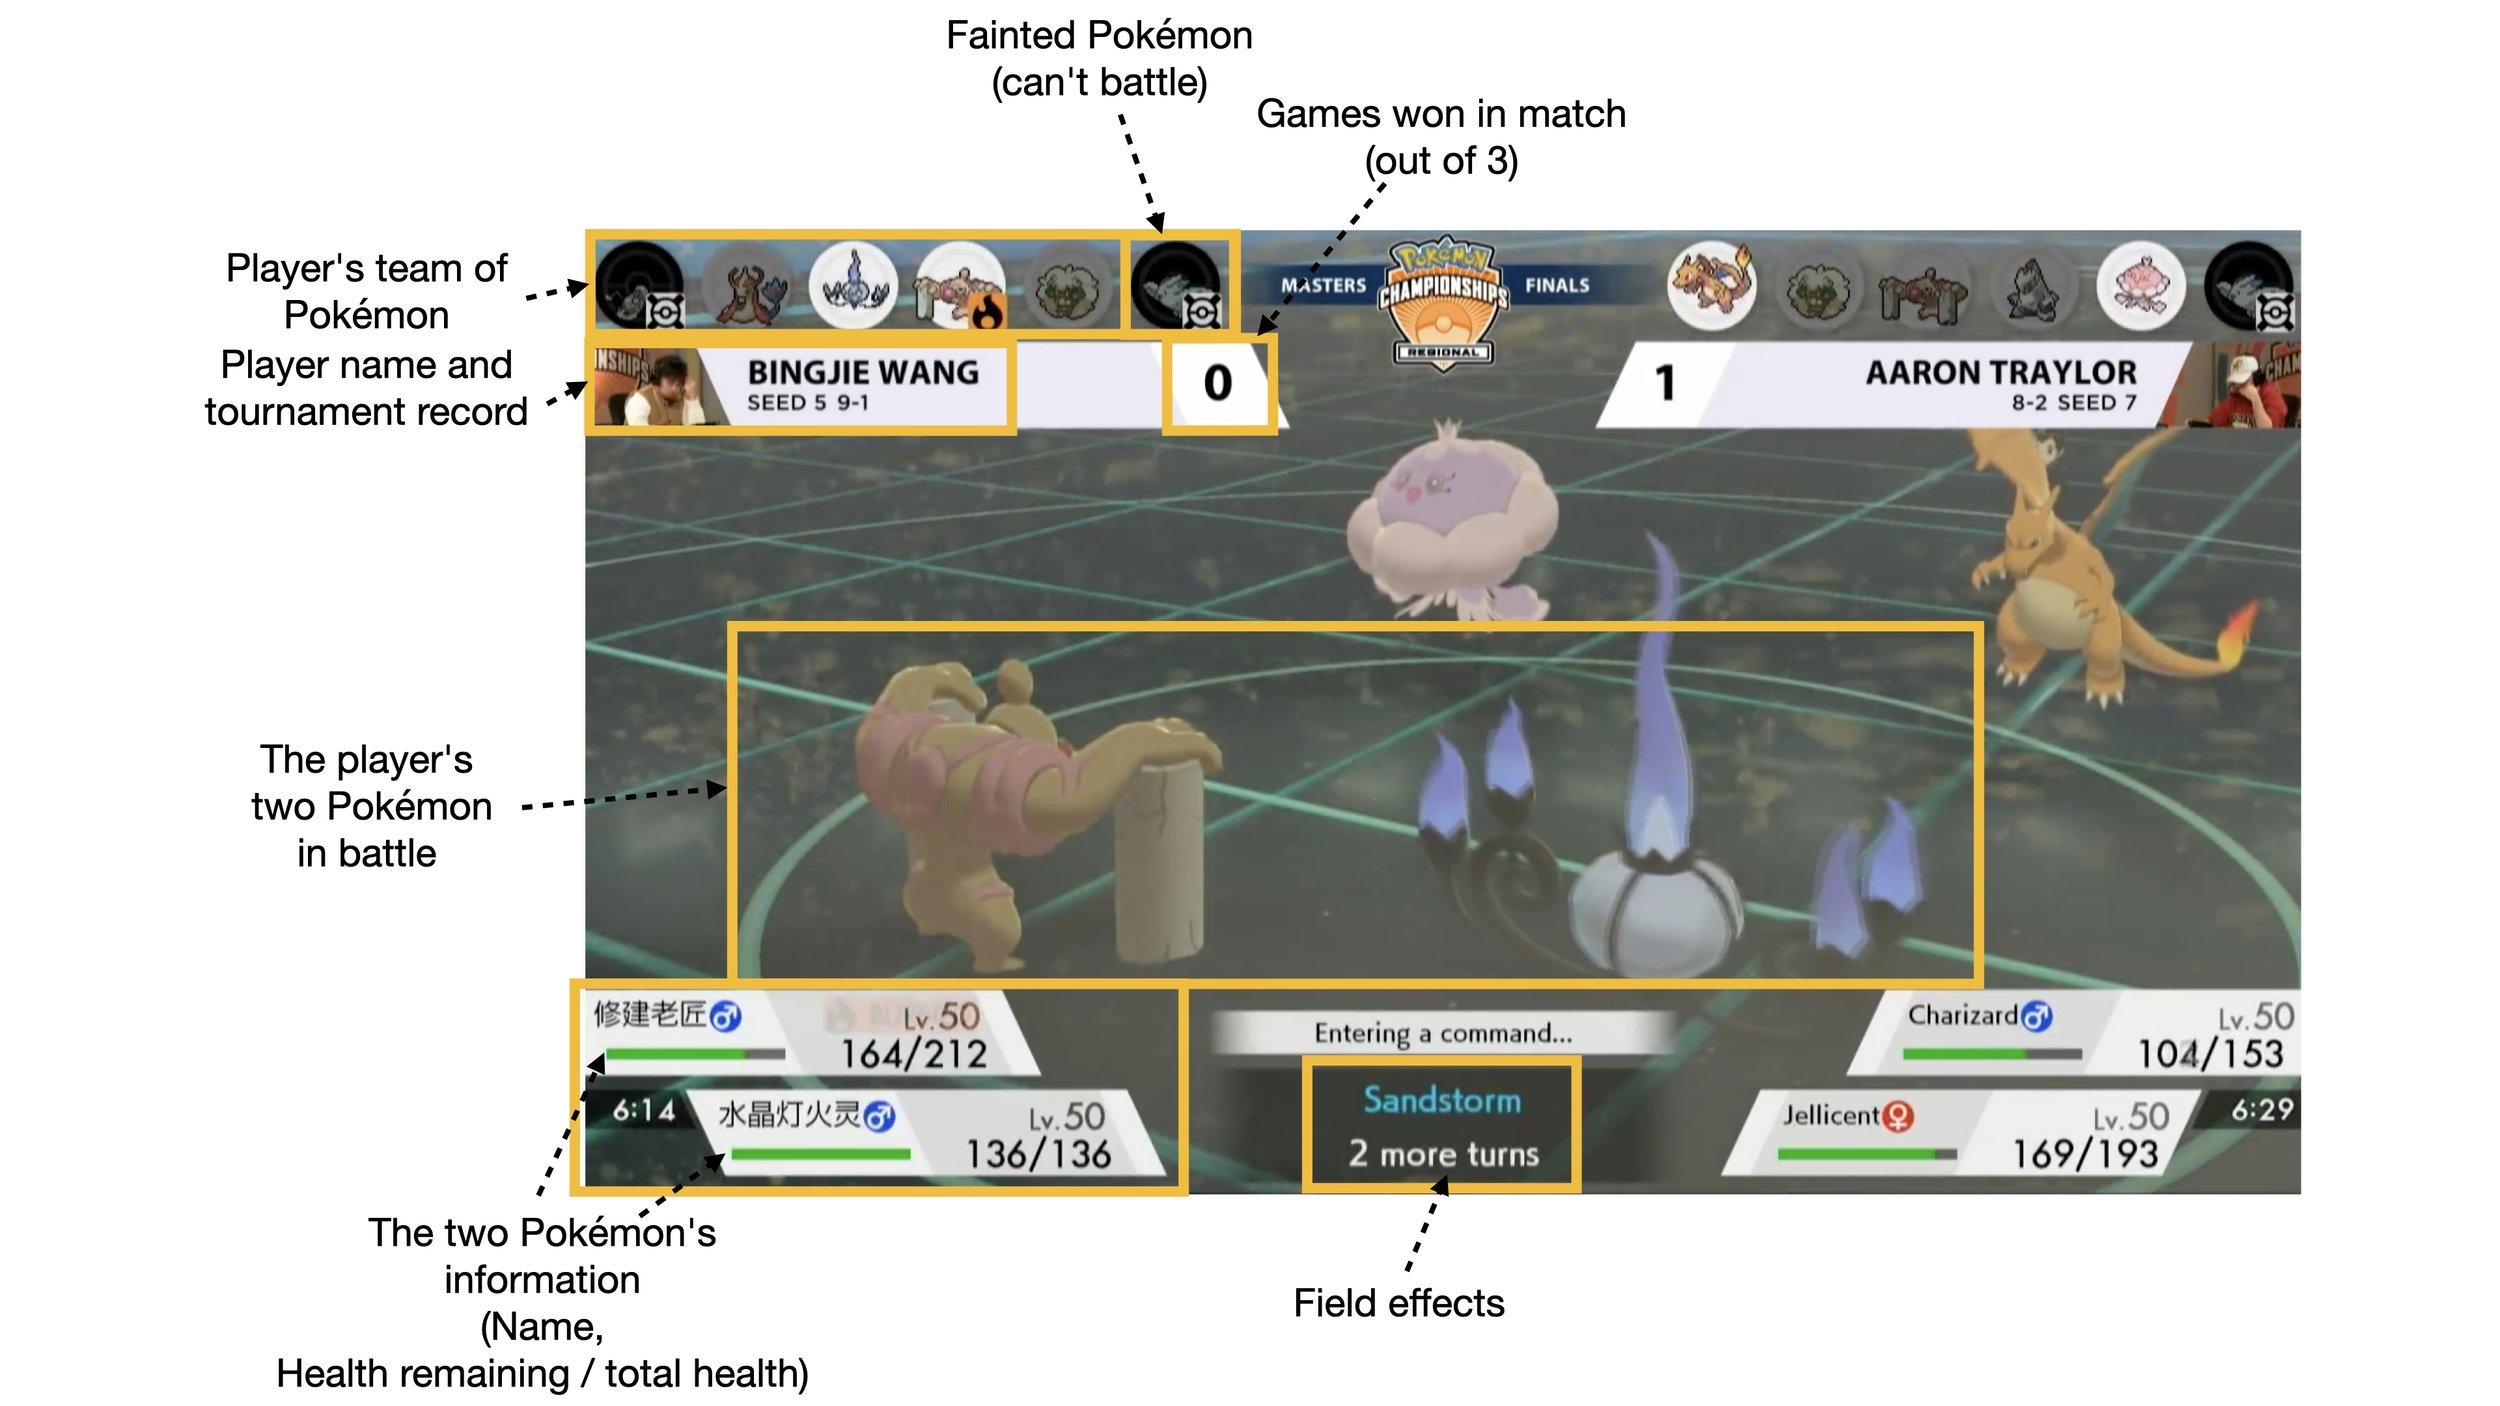
The Field
Each player can only have two Pokémon “sent out” at a time, while the rest hang back– these Pokémon are visible on the screen, or “on the field”. Pokémon on the field can be switched out for Pokémon “in the back”. The field is shown in the image above.
Turns
Both players will give orders to their Pokémon at the same time– this is called a turn. Players will have a certain amount of time to think. During a turn, all Pokémon will act one after another, in an order determined by the Pokémon’s stats.
Health
Each Pokémon has a bar representing its health. When a Pokémon is at full health, this bar is full and green; when it is at low health, this bar is almost empty and red; and when it is knocked out the bar is empty and grey. This is the easiest indicator of how a battle is going– green health bar good, red health bar bad.
Moves
Each Pokémon in a battle can take actions known as “moves”– this is how they interact with each other. Moves for the most part “deal damage”, which is the term for dropping the health of another Pokémon. Moves don’t have to deal damage– some moves heal damage instead, and some don’t change health at all. There are a lot of moves, but each Pokémon can only know 4 at a time. Different Pokémon can learn different moves, which is part of why people use various Pokémon. Some moves are stronger against some Pokémon– look out for the message “It’s super effective!”, which means that the move dealt bonus damage to that Pokémon, or “It’s not very effective…”, which means that the move dealt reduced damage.
Getting unlucky
Pokémon is a game with a lot of luck involved, and you can tell pretty easily when someone gets a little unlucky. A player or crowd will probably react to any of these events with anguish:
- A critical hit! Each move has a small chance to “crit” (about 4%), which means they do bonus damage. Some moves crit more frequently, but in general, this is a rare occurrence.
- “___’s attack missed!” Some moves have a small chance to miss their opponent entirely.
- Freeze: Some attacks literally freeze the opposing Pokémon, making them unable to attack while frozen.
- Paralysis: If a Pokémon is paralyzed, it might not move some turns.
- Flinch: That Pokémon flinched and can’t move this turn (some moves always flinch)
Conclusion
Once one person loses all 4 Pokémon, the game will end. For the most part, that’s all you need to know to watch a game of Pokémon– sometimes, odd stuff will happen beyond these basics, but you can roll with it. We hope you enjoy watching Pokémon battles!
What are the Rules of a VGC Battle?
 Learn about the special rules of official tournaments.
Written by Aaron Traylor One question you might have is– what are the rules of VGC battling? Well, they change from time to time. Keep in mind that when we use the term “VGC”, we are referring to the official competitive format as dictated by The Pokémon Company (International). Usually, these rules are the same as the Ranked Doubles ladder within the games, but not always. Furthermore, VGC is usually different from the Wi-Fi tournaments held by Pokémon (some of them have very strange rulesets).
The best source for these rules will always be pokemon.com.
Here are some battle rules that will always be true for VGC, and will never change:
- Last one standing: The winner of the battle is the trainer who has a Pokémon with HP remaining at the end (outside of timer tiebreaks).
- Double battles: Each player has up to two Pokémon on the field at a time.
- Current game: VGC games are always played using the current mainline Pokémon game. This might not always be the most recent game released with Pokémon in the name. For example, when Pokémon Let’s Go Pikachu/Eevee were released, VGC games were still played on Pokémon Ultra Sun and Ultra Moon. The current mainline Pokémon game is currently Pokémon Sword and Shield.*
- Region-native: (True of formats after 2013) Pokémon must be caught in the current game or have a battle-ready mark. This is to prevent the use of old moves on transferred Pokémon that they can’t learn anymore.
- Bring 6, Pick 4 (Team Preview): You have six Pokémon, but only four are coming to the battle. You’ll see your opponent’s team before the Pokémon begin battling, and choose which Pokémon to bring to the battle.
- Species Clause: You can only have one Pokémon of a species on your team. You can’t have six Mewtwo, for example. If two Pokémon share a Pokedex number, you can only have one: you can’t use both Rotom-Frost and Rotom-Heat.
Formats
Although the above rules will stay constant no matter what, the Pokémon and mechanics that you can bring to battle may change from time to time. These are called formats.
Formats usually fit into one of three categories:
Regional Dex: Only Pokémon from the current region’s Pokedex are allowed. This format usually happens within the first year of a game’s release. For example, VGC 2014 only featured Pokémon that could be caught natively in Pokémon X and Y’s Kalos Dex.
National Dex: Pokémon from the National Pokedex are allowed– usually, this means all available Pokémon except the most powerful legendaries are allowed. This format usually happens in the second year of a game’s release. For example, VGC 2015 allowed any Pokémon that could be caught in Pokémon X and Y or Omega Ruby and Alpha Sapphire that wasn’t a restricted legendary (e.g. Groudon, Kyogre).
Restricted: Pokémon that are usually restricted because they are so powerful (Mewtwo, Groudon, Kyogre, …) are allowed. Sometimes these are referred to as “box legendaries”. Usually, two are allowed per team (and the other Pokémon come from the National Pokedex). Restricted formats are sometimes informally called “GS Cup”. This format usually happens in the third year of a game’s release. For example, in VGC 2016, players were allowed to use two restricted Pokémon on their team– e.g. a player could use both Groudon and Kyogre. After that, the other 4 Pokémon were any Pokémon that could be caught in Pokémon X and Y or Alpha Ruby and Omega Sapphire that weren’t restricted.
Mythical Pokémon (Mew, Celebi, Jirachi,…) are never allowed in VGC.
What is the current format?
You can find that information here.
How often do formats change?
It used to be the case that a VGC format lasted for over a year, but in recent years, the VGC format has changed every few months. Formats generally roll over on the first of the month. The best way to stay up to date is to check the official Play! Pokémon rules document, located here, which will include an end date for the current format.
Wrapping up
Part of why we love VGC is that each format gives a fresh way to play the game. Some players have a particular style of format that they like– they may prefer Regional, National, or Restricted dex– but we love them all, and we hope you find the variety interesting.
*(footnote from Current Game): This doesn’t mean that you have to have the physical copy of the most recent Pokémon game, either – it just means that the battles will operate according to the mechanics of the current game and not previous games. VGC won’t ever require you to own a Pokémon cartridge that is over three years old.
What is Pokemon Showdown and How to Use it
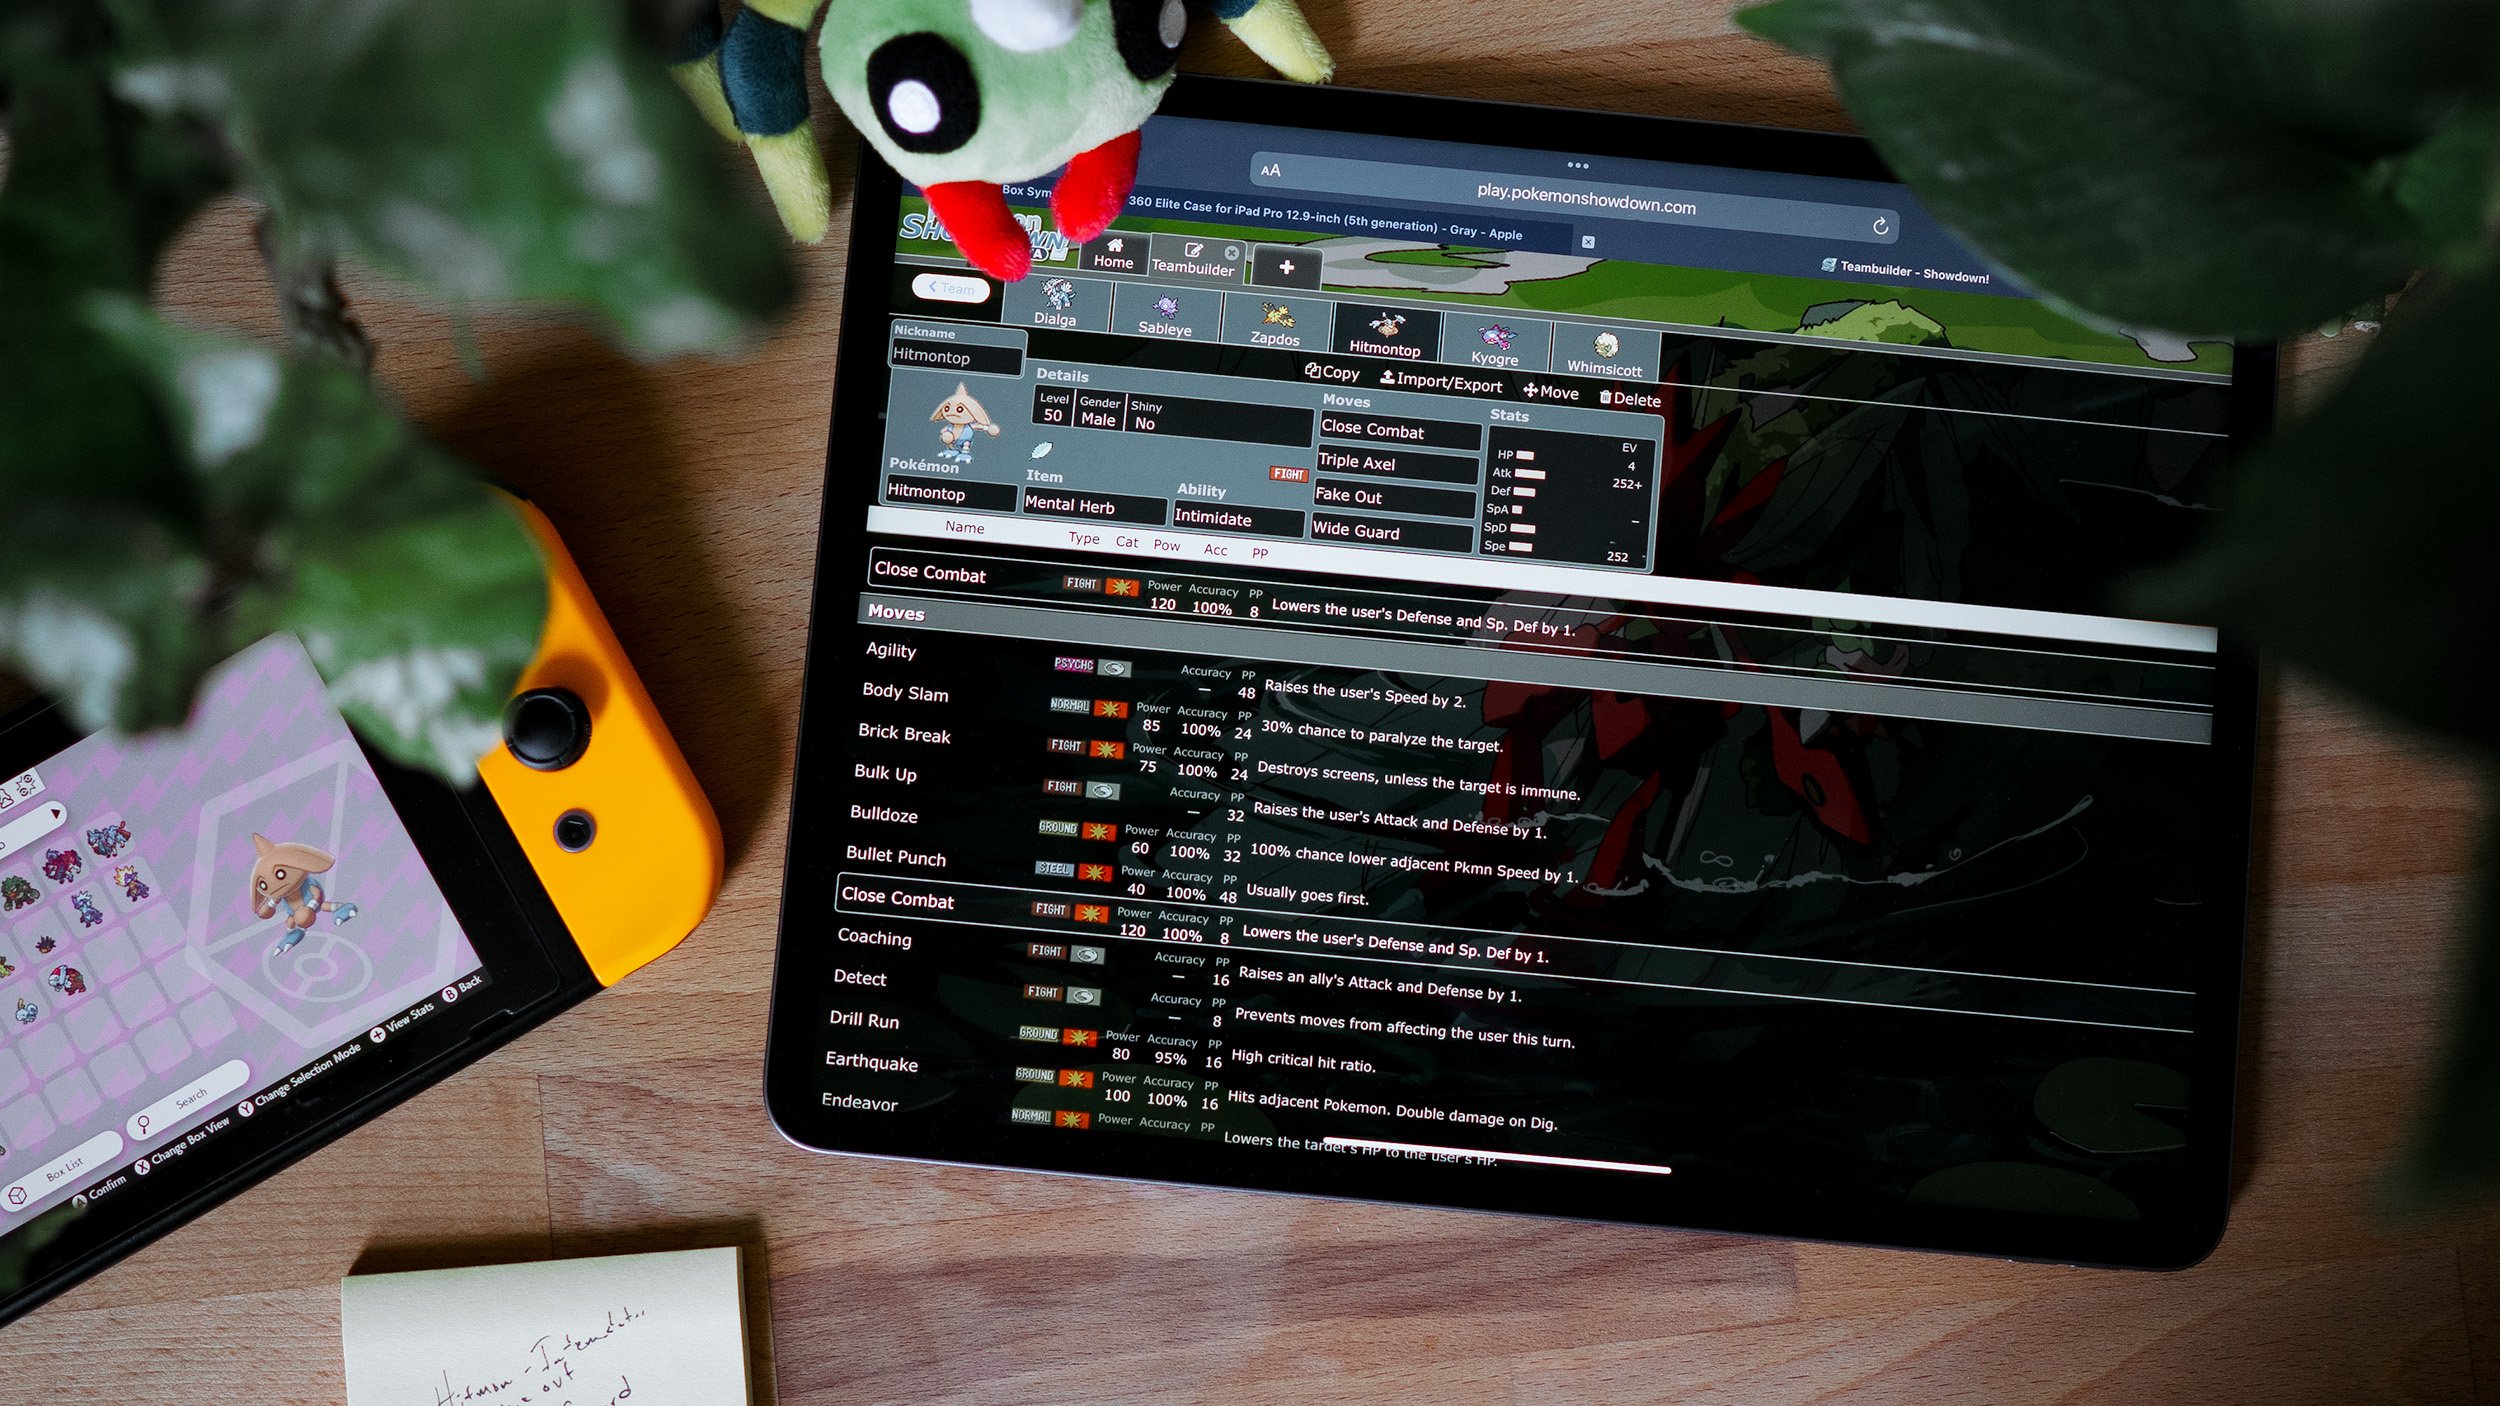 Written by Aaron Traylor
Although the main Pokémon games such as Pokémon Sword and Shield are the most common way to play and practice Pokémon battles, there are a lot of time-consuming things you have to do before you can begin competitive battling, such as completing the game, catching and breeding your team, training the Pokémon, and finishing the team with items and moves (We have resources for doing all of these things at this link!
Written by Aaron Traylor
Although the main Pokémon games such as Pokémon Sword and Shield are the most common way to play and practice Pokémon battles, there are a lot of time-consuming things you have to do before you can begin competitive battling, such as completing the game, catching and breeding your team, training the Pokémon, and finishing the team with items and moves (We have resources for doing all of these things at this link!
If you just want to play competitive battles, there’s an unofficial fanmade browser client called Pokémon Showdown. Pokémon Showdown is a simple battle simulator where it takes minutes to put together a team and find an opponent to battle against– as opposed to hours on cartridge. Many VGC players use Pokémon Showdown to put together ideas and test them out before building their teams in game. Pokémon Showdown is useful but not necessary for competitive battling, and it won’t be required in this guide, so feel free to skip this section if it doesn’t interest you. All of these steps will work on a mobile browser as well– the screen just might be a little different.
How to use Pokémon Showdown

This is the main screen of Pokémon Showdown where you have access to all of its functionality. The place to first get started is the Teambuilder:
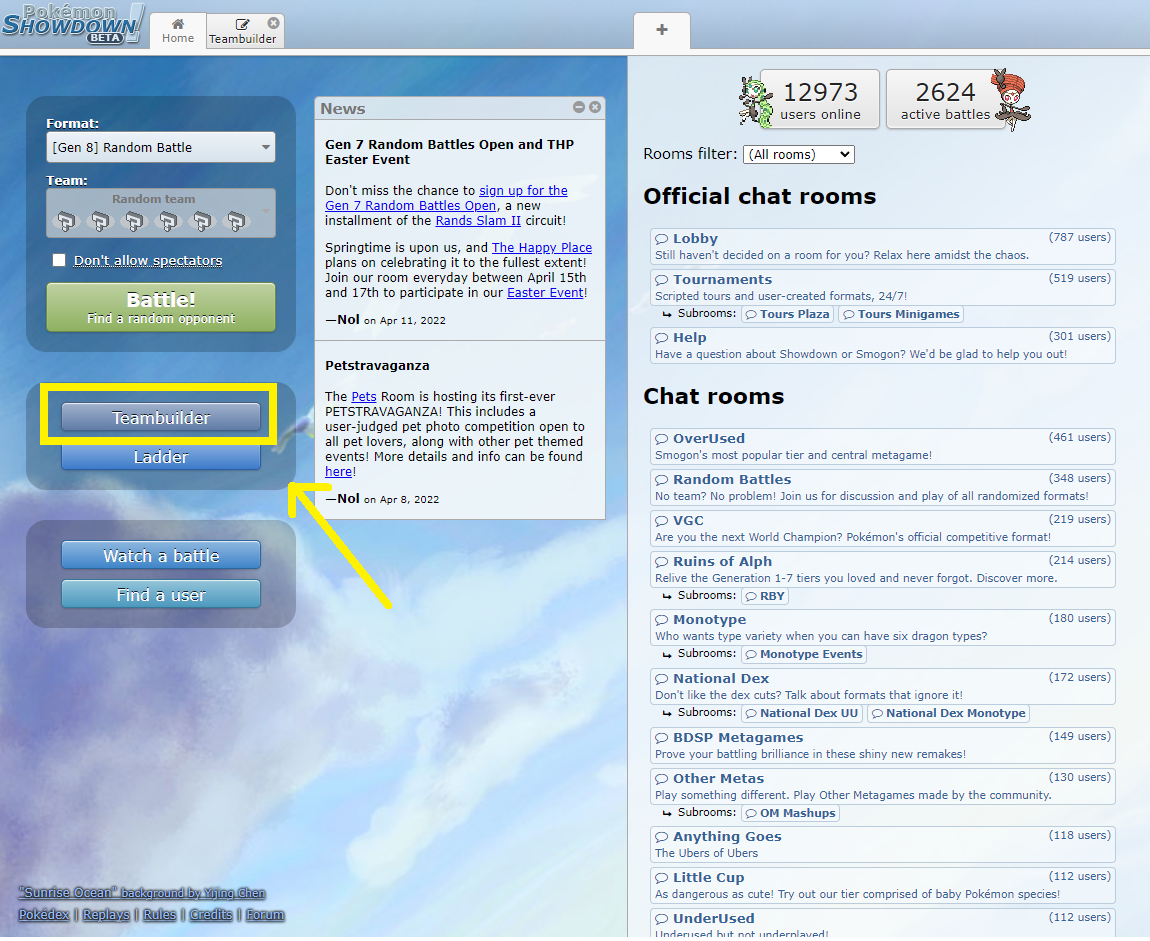
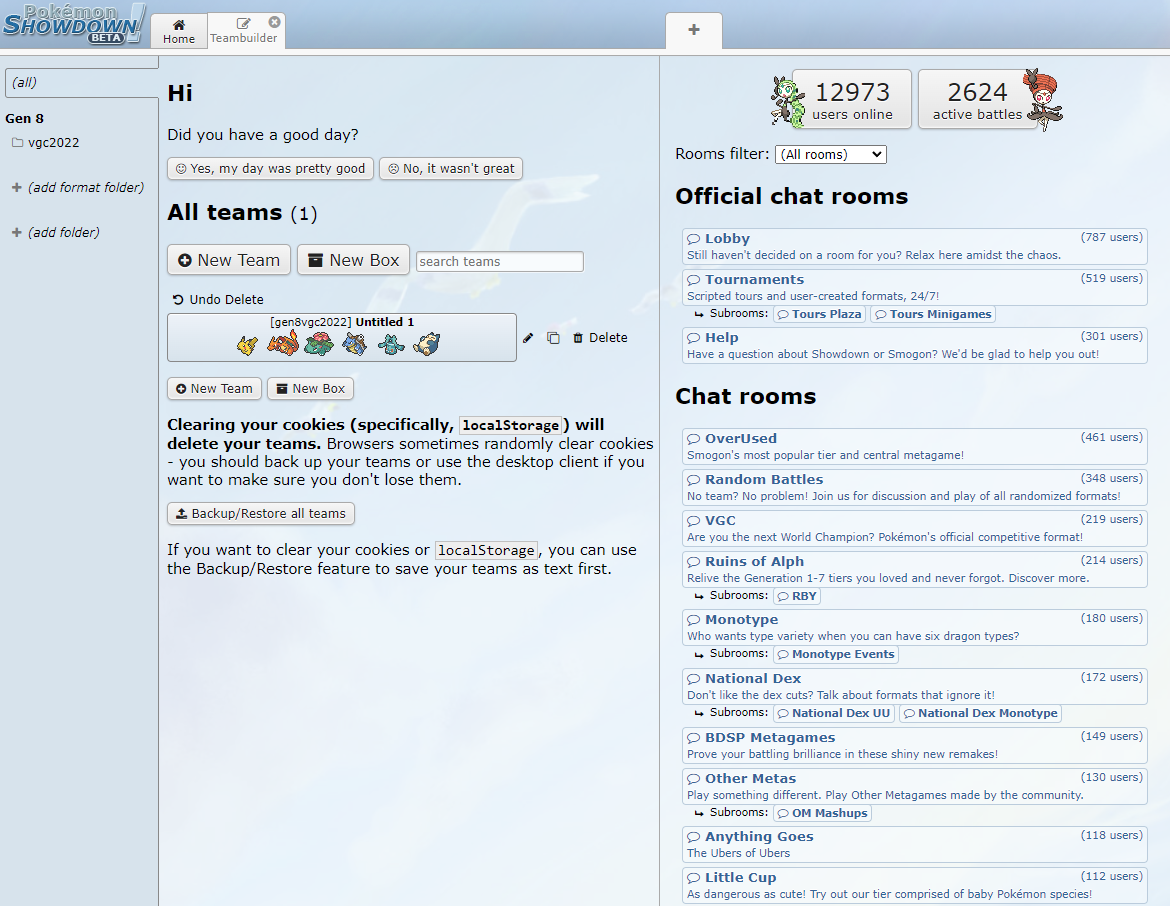
All of the teams that you make will live in the Teambuilder. It’s important to note that the teams are kept in local cookie storage. If you log in on more than one computer, you won’t have access to all your teams. This means that if you wipe the cookies on your computer, you will lose all your teams! We recommend keeping a backup once you get going, but you don’t have to worry about it for now.
Our teambuilder looks kind of empty right now! Don’t worry, if you keep using Pokémon Showdown, it will fill up with all sorts of teams and creations.

Click on “New Team” to get started:

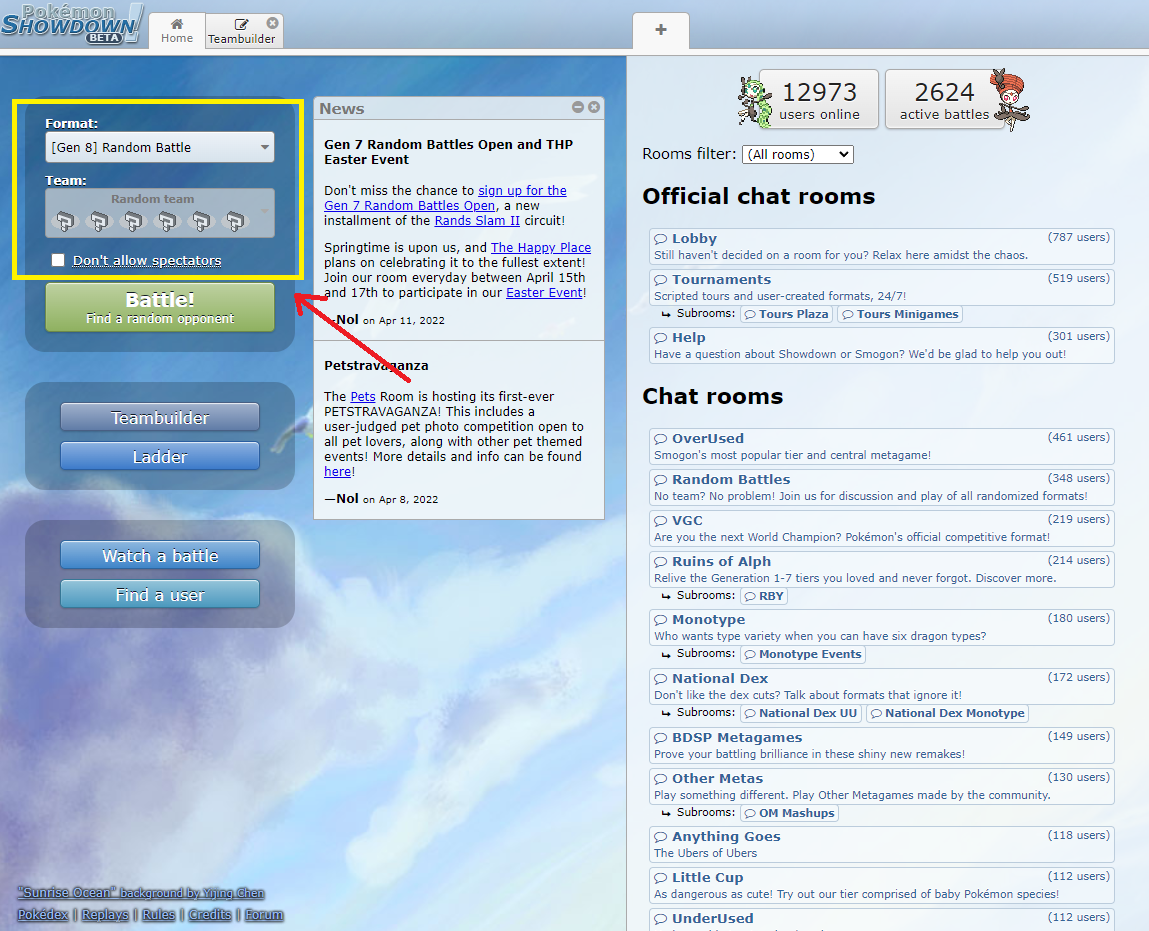
The first thing you’re going to want to do is select a format in the Formats dropdown. There are lots of formats on Pokémon Showdown for Single and Double battles, but you’re going to want to select the most recent VGC format, because most likely that is what you’re going to want to play. For me, that’s VGC 2022, but for you it could be anything else. This will help set your Pokémon to the right level (level 50), but in the long run it doesn’t matter if your Pokémon are level 100 or 50 in the sim– it’ll adjust automatically when you play.

Great! Now click on Add Pokémon to add your first Pokémon.

I’m going to add a Pikachu! If you begin typing the name of the Pokémon you want in the “Pokémon” bar, you can easily find the Pokémon you’re looking for.

Pokémon Showdown has the entirety of the Pokémon battling system included, so it’s easy to select different attributes for your Pokémon and try them out. I’m giving Pikachu the Focus Sash to hold, and having it learn Fake Out, Volt Switch, Electroweb, and Nuzzle. Once you’ve selected your moves, item, and ability, click on the box highlighted below to adjust your stats.

Now you’re going to add some EVs for Pikachu. As a general rule, ignore the suggested spread– they are meant for Single battles! Also, remember to give your Pokémon a Nature. If you don’t know what I’m talking about, check out this article.

In the Details pane, you can adjust secondary or cosmetic attributes of your Pokémon, as well as whether or not they Gigantamax:

Finally, repeat this process for six Pokémon. Give your team a name (or leave it blank) and you’ll be ready to get out there and battle!
You’re going to need a username. Click on “Choose name” in the upper right, then enter your name. Now, navigate back to the Home page.
You’re going to want to battle in the VGC tier, so make sure to select the tier you’re building for under Format in the upper left. Then click Find Battle to find an opponent to play against!

Now you’ll be in a battle against a real person, starting from the Team Preview phase. You’ll be able to select your Pokémon, moves, and targets– you can even “cancel” a move if you misclick. There is also an optional timer which your opponent may turn on– if you don’t move within the time frame, your Pokémon will pick their upper left move. You’ll be able to talk to your opponent as well– please be kind!
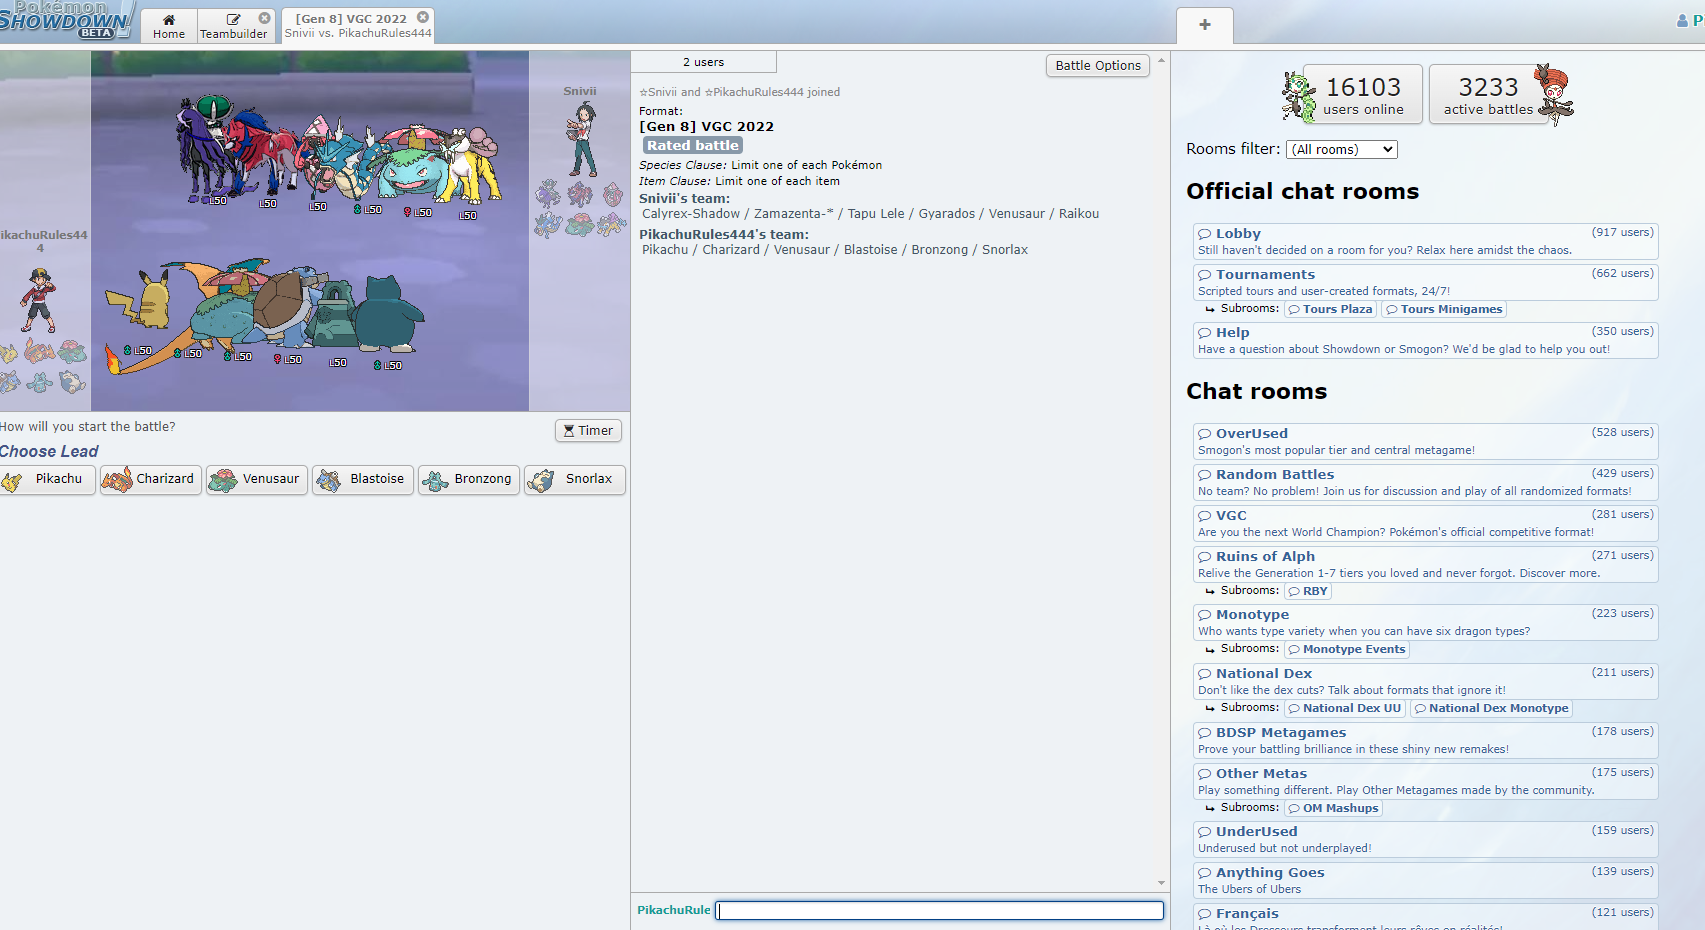
If you would prefer not to be able to chat with your opponent, you can also tweak chat settings. I like to play with the All Battles– Ignore Opponent setting.

After you win or lose a battle, you’ll win or lose ladder rating. This point value doesn’t mean very much (and here’s an article where we explain why), but if you’re curious, here are some more details on how it works.
Finally, you’ll want to register your account so you can use it again. Click “register” in the upper left, and then type a password in twice. Make sure you remember it!


That’s it for our guide to using Showdown– enjoy your battles!
Showdown Replays
Pokémon Showdown also allows you to save your replays so that they can be viewed later. To save a replay, click “Upload Replay” after your battle is done. If you set your battle to “private”, the replay will also be private– only you can view it! To view replays, go to replay.pokemonshowdown.com and search for a username. If you’re logged in on an account in the main Showdown window (play.pokemonshowdown.com), you’ll be able to view your private replays. You can save links to private replays and send them to your friends, but they are not searchable.
Here’s an example of a VGC replay: https://replay.pokemonshowdown.com/gen7vgc2019ultraseries-925148230
Base Stats, IVs, EVs
 Pokemon at its core is numerical– this article is an introduction to the building blocks of Pokemon stats.
Written by Aaron Traylor The most important thing to do when beginning to play competitive Pokémon is to pull back the curtain on the math behind Pokémon. For the most part, you won’t need to do any math yourself. However, Pokémon at its core is (in part) a numerical game and you will want to know how its mechanics work to understand teambuilding and battling as best you can.
Stats
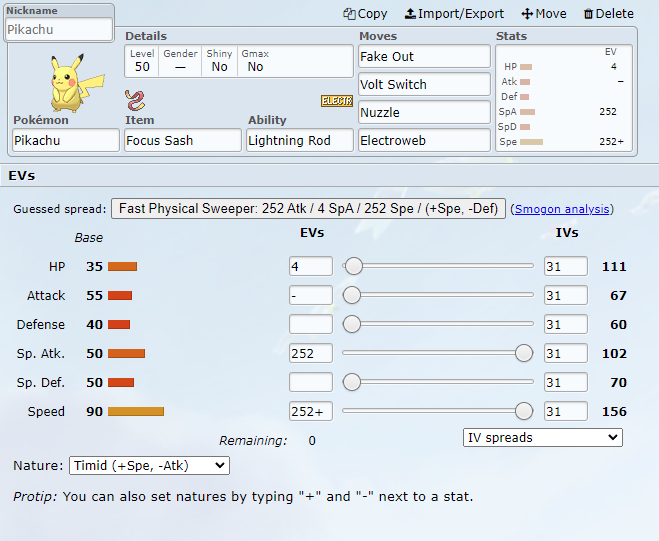
There are six core stats of Pokémon— HP, Attack, Defense, Special Attack, Special Defense, and Speed. Each Pokémon in a battle will have a different value for each of these stats.
“Stat” may also refer to the real value of that Pokemon’s stat. In the below image, Pikachu has an HP stat of 111.
Base Stats
Each Pokémon species is unique for many reasons, such as their design, typing, abilities, and more. In battle, each Pokémon species has a different value for each of the core stats. To draw an analogy to the real world, each different breed of dog is different– for example, Dachshunds and Golden Retrievers are naturally skilled at different things.
Practically speaking, each base stat is a value between 1 and 255 (higher is better), and it is the same for every Pokémon of that species. For example, Garchomp has a base Speed stat of 102. Note that this is different from the actual stat in battle at Level 50. The base stat has the largest impact on how the Pokémon’s final stats will look like– a Snorlax (base 30 Speed) won’t ever outspeed Garchomp unless the Garchomp is especially slow and the Snorlax is especially fast.
IVs
Each species will have different stats, but each Pokémon of that species will have a unique set of IVs, or “individual values”. To continue our analogy, although all Golden Retrievers may have some natural skills, dogs that are born from different parents may be naturally better or worse at each skill.
Practically speaking, each Pokémon has an IV in each stat between 0 and 31 (32 values total), where 0 is the worst and 31 is the best. As far as VGC goes, you’ll usually want Pokémon with 31s in all stats, which are fairly easy to get with our guide. One important exception is when you’d want a Pokémon with a 0 Speed IV, in order to underspeed another Pokémon in Trick Room. You can read more about this and other IV exceptions here.
EVs
Each Pokémon can then be “trained” in its stats, just like dogs can be trained to be more agile or quick (last time for the dogs metaphor, we promise!) Practically speaking, a Pokémon can have a maximum of 510 EVs, or “effort values”, that can be allocated between its stats. At Level 100 (which we don’t use in VGC), 4 EVs equals one stat point. At Level 50, the first 4 EVs equals one stat point, and then every 8 after that equals one more. A stat can have a maximum of 252 EVs in it before you can’t put any more into it (practically speaking– it goes up to 255 in game, but that will never get you a stat point).
EVs are the highest level of customization and variability that Pokémon allows, and it can be overwhelming to know how to apply them to your Pokémon. For some beginner-friendly information, click here. To learn how to apply EVs to your Pokémon in Pokémon Sword and Shield, click here.
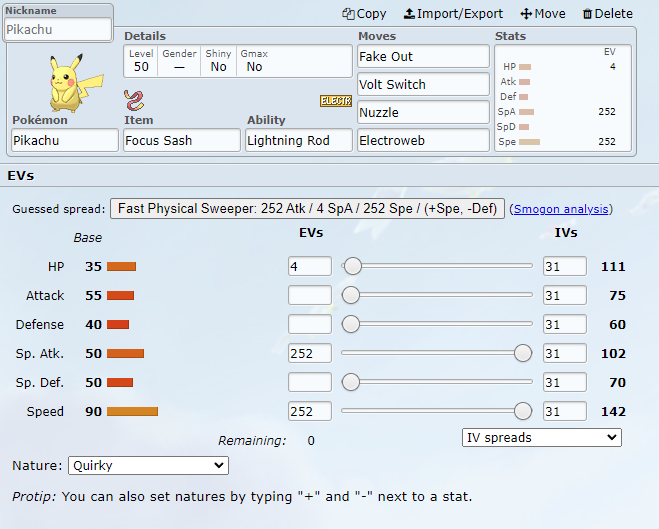
Natures
Each Pokémon has one of 25 natures, most of which drops a stat by 10% and increases a stat by 10% (some natures do nothing!). This is calculated after base stats, IVs, and EVs are applied. A Pokémon can only have one nature, but it’s easy to change a Pokémon’s nature in game using mints. Usually, you’ll use a nature to boost a high stat of a Pokémon and drop an irrelevant stat. If you want to take advantage of Gengar’s natural Speed stat, you’ll want a nature that boosts it’s Speed– and if you aren’t using physical attacks, you’ll want to drop its Attack, meaning you’d use a Timid nature.
After the Nature is applied to a Pokémon’s stats, the numbers will line up with what you see on the Summary screen for that Pokémon in game.
In the left image below, Pikachu has a nature that doesn’t affect its stats. In the right image, it has the Timid nature, which boosts its Speed stat by 10% and drops its Attack stat by 10%.
*footnote: We’re going to choose a nature which drops the Attack stat, even though Pikachu has Fake Out. This is because Fake Out is usually used for its utility and not its damage. This is a very minor optimization because Pikachu has Focus Sash anyway, but it’s the standard practice.
Damage Calculation
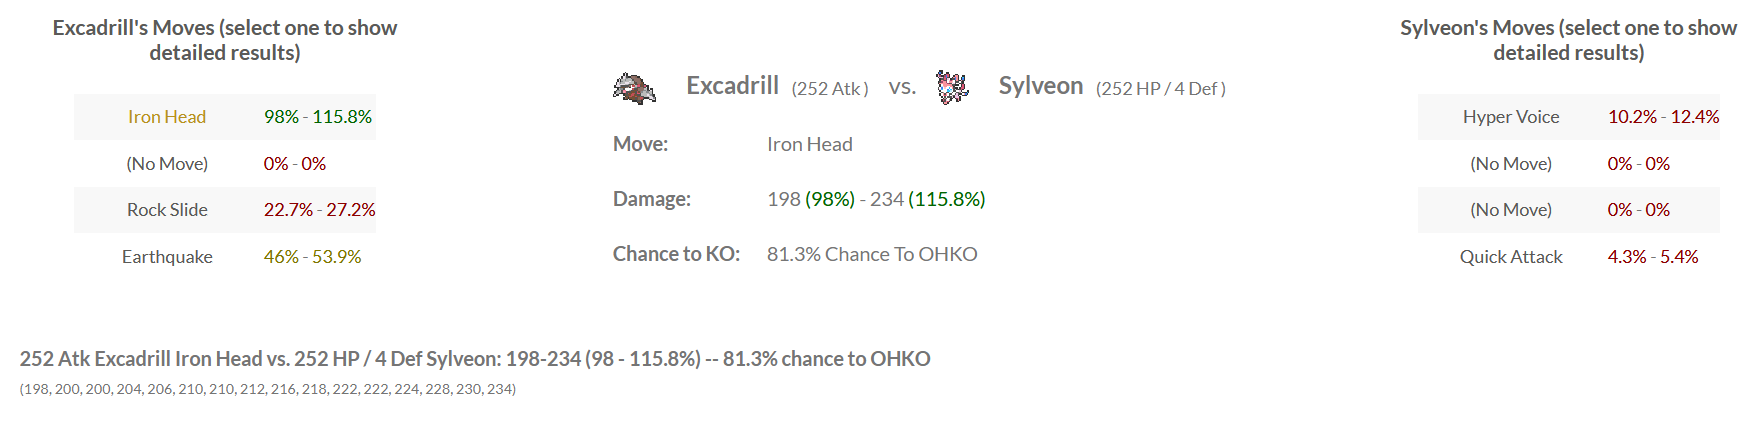
Pokémon deal damage according to the damage formula, which is affected by many things, but mostly the attacking Pokémon’s Attack or Special Attack stat (depending on the selected move), the defending Pokémon’s Defense or Special Defense, and whether the Attack is super effective or not very effective (see the Types section below). The damage formula is complex and you won’t have to learn it (none of us know it!), but you should know that moves deal damage in a range. Each damage roll can take one of 16 values, which are between a low value (called a min roll) and a high value (called a max roll). Here, we see that Excadrill’s Iron Head onto Sylveon does between 198 and 234 damage, or between 98% and 115.8% of Sylveon’s HP– so it might not always knock Sylveon out! (credit to Pikalytics ).
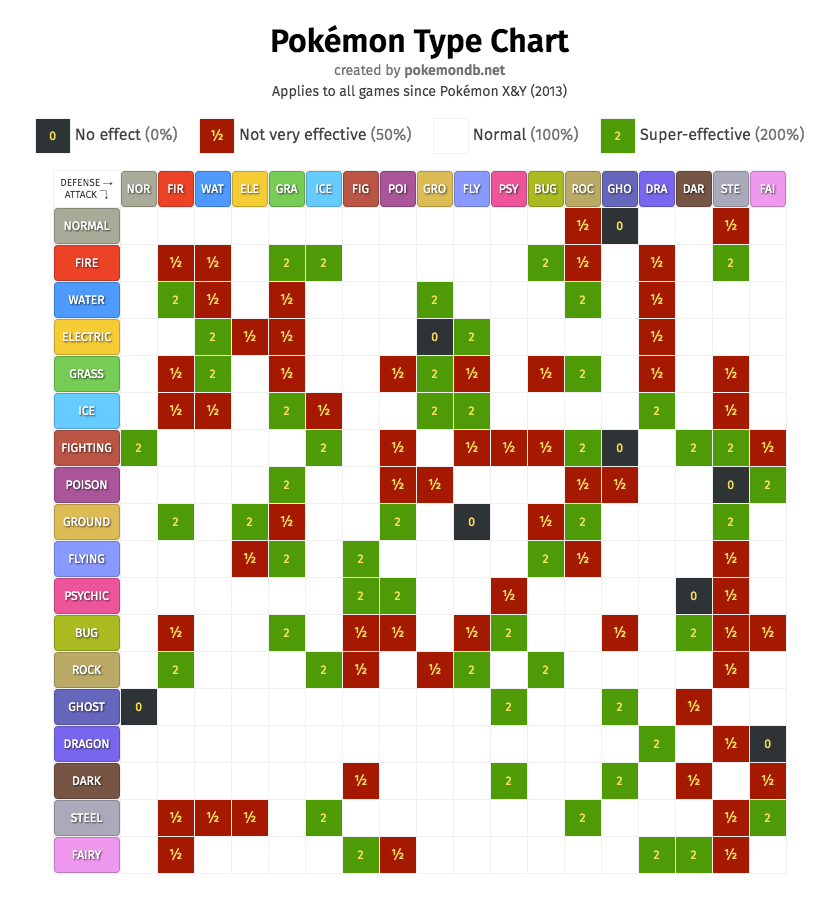
Typing
The type chart is one of the most basic elements of Pokémon– there are 18 “types” in Pokémon– each Pokémon has one or two types. When a move is used on a Pokémon, there is an attacking type (the type of the move) and defending type(s) (the types of the Pokémon the move is being used on). A damage modifier is calculated based on the interaction between the attacking and defending type(s).
Furthermore, there is a bonus damage modifier (x1.5) applied if your Pokémon uses a move of one of its types. This is called STAB (short for Same-Type Attacking Bonus). This STAB bonus makes a big difference in how much damage your moves do!
Type charts are hard to look at, and the best way to learn them is to remember them over time. If you’re playing on Pokemon Showdown, there’s a command to find out what types are weak to which other types– for example, you can type /weak Pikachu into the chatbox to find out what types Pikachu is weak to, or /data Fire to find out about the Fire-type.
Boosts and Drops
Another important piece of the numbers puzzle is boosts and drops, which are multiplicative modifiers to each stat. For example, if Scizor clicks Swords Dance, it boosts its Attack by two stages, or goes to +2 Attack. Its Bullet Punch is now twice as strong as it was the turn before. If Incineroar then Intimidates it, Scizor is at +1 Attack, or 1.5 times as strong as a normal physical attack. These reset when the Pokémon is switched out.
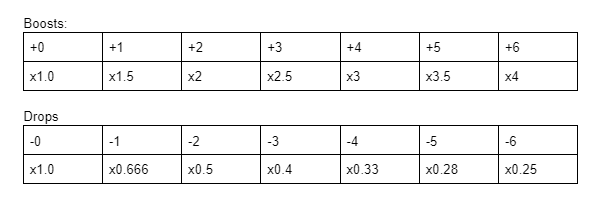
One easy way to remember what the multiplier is without looking at this chart is to remember that the multiplier is based on the fraction 2/2. When you get a boost, you add that boost to the top, and a drop is added to the bottom. A Pokémon at +3 is at 5/2, or 2.5 times. A Pokémon at -4 is at 2/6 or 0.33 modifier.
Accuracy/Evasion:
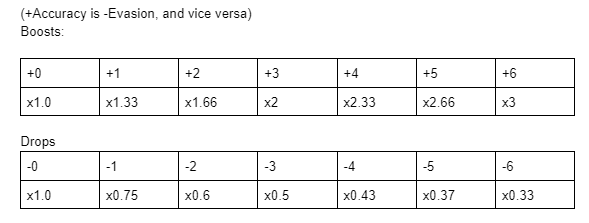
The trick for accuracy and evasion is the same as the other stats, but the fraction you modify is 3/3 instead of 2/2. At +3 accuracy, a Pokémon is at 6/3 modifier or 2x as likely to connect. At -5 accuracy a Pokémon is at 3/8 accuracy and will connect less than 40% of the time (assuming they started with a 100% accurate move.
Wrapping Up
If this is your first time looking at the math of Pokémon, it may feel like a lot to keep track of. If you’re overwhelmed, don’t worry– it took us a long time to learn these things as well. There’s no need to make flash cards in order to remember the information in this guide. Rather, you’ll learn all of the details over time as you play more competitive Pokémon. We recommend playing competitive battles and learning how all of these numbers interact during the game. One other way to learn could be to play battles in the story mode or Battle Tower of a Pokémon game, and keep track of how stats and damage multipliers change. These details will become second nature over time.
Part 2 — Competitive Mindset & Context (VGCGuide)
Everyone is Learning all the Time
 Written by Aaron Traylor
Everyone is Learning All The Time
To use a cliché: welcome to the wonderful world of Pokémon! We love this game, and before we kick you off with the rest of the guide, and get started with your first team or battles, we have one piece of preliminary advice.
Pokémon is a game that requires a lot of learning, in a way that many other games don’t. For example, there are many Pokémon, and they mostly have unique stats and a set of moves that they can use. You probably don’t know all of these yet (and a lot of competitive players don’t know all of them, either!). There’s a lot of tougher questions that you’ll have to learn the answer to, as well– what Pokémon are popular, and why? What is an opponent most likely thinking at any given time?
The amount of learning can be daunting. Here is our advice for you for learning, not only while you read this guide but throughout your Pokémon career:
Everyone is learning all the time. Even the most experienced players have to relearn everything when a new set of Pokémon becomes legal. A common thing you’ll hear at tournaments is: “Wait, that Pokémon gets THAT move?” or “Wait, that move does what?”
Never fault yourself for not knowing something. There is SO much to learn in this game that there is no possible way that any player, even World Champions, can cram it all in their head at once.
Furthermore, forgetting things during a battle happens. VGC puts heavy strain on your working memory, as there are often many mechanics or field effects at play during any given turn. “Wait, I forgot Tailwind was up!” is a normal thing to hear from an opponent at a tournament. If you lose track of an effect during a battle, keep moving– you’ll remember the mechanics and field effect durations naturally over time.
Take shortcuts to make it easier for yourself in the short term. For example, you could probably be okay going into a tournament knowing only the top 50 or so Pokémon.
Be ready to take things that surprise you in stride and move on. Part of this game is learning and adapting- even if something catches you off guard, you need to keep moving forward positively.
There’s no need to make flash cards: what you learn about Pokémon you will learn over time through your experience. By taking a look at this guide, you’ve shown that learning is something that you’re interested in. Remember that you’ll learn stats and mechanics passively over time when you battle, and if you do get surprised in a battle, it’s okay– focus and try to find a path to victory.
Subjectivity
 Written by Aaron Traylor
As a forward to this guide: Pokémon is an incredibly challenging and complex game at every step of the process. There are more Pokémon teams possible than there are atoms in the known universe. There are more options available to you in one turn of battle than you could ever hope to think through in the time you have for one turn.
Written by Aaron Traylor
As a forward to this guide: Pokémon is an incredibly challenging and complex game at every step of the process. There are more Pokémon teams possible than there are atoms in the known universe. There are more options available to you in one turn of battle than you could ever hope to think through in the time you have for one turn.
To navigate this astronomically huge space, players create principles of teambuilding and battling for themselves. This guide to VGC contains ours. Although we’ve spent a lot of time playing the game and had success at large tournaments, our principles and opinions are not the only way to play VGC, and they may be wrong in some ways. Please do not view them as authoritative or unilaterally correct, because we are still learning and growing as well. We’ve followed our own principles and come up short many times. Many players have found success in ways that we haven’t yet mastered.
In short, please use this guide to form your own opinions of how to succeed in VGC and how to play Pokémon in a way that feels good to you. Pokémon, despite its elements of luck, is a game of immense personal control and preference: you are in control of which Pokémon end up on your team and what their stats and moves are. You are in control of which teambuilding and battling theories and principles you subscribe to, and how other people’s opinions affect your own. Take what we say with a grain of salt.
Furthermore, please respect that other players will play Pokémon in a way that feels good to them– remember, it’s all subjective. If someone wants to play with their favorites, you probably are only going to annoy them by telling them to use popular Pokémon. On the other hand, if you’re asking a serious player for advice on how to use your favorite Pokémon, don’t be upset if they tell you that those Pokémon are flawed. Be kind when working with other people.
That being said, this guide contains our definitions, thoughts, and reflections about Pokémon the way we’ve learned how to play it over much of our adult lives. We hope you learn something from what we have to say!
Context Pt.1

Context
Written by Aaron Traylor
“Is this Pokémon good?” “How should I train my Pokémon’s stats to survive attacks?” “Does this Pokémon counter that one?”
These are often good questions, and they can be answered (subjectively, of course). However, when I answer these questions, I never feel like it’s a perfect answer, and I always feel like there’s a certain something that these questions are missing that I can’t impart to the question asker. Here’s why I think I have difficulty answering these questions: competitive Pokémon is all about context, and when the asker and the answerer don’t understand the context in the same way, it can be hard to provide a satisfying and complete answer. Contextual answers are also short-lived– once the context changes (for example, a new team becomes popular, or the format rotates), the answers change as well.
In this article and the next I’ll talk about the two most important contexts, to give an idea of what I’m thinking about when I hear questions such as the ones above.
The Context of the Pokémon You’ll Face
“Is so-and-so Pokémon good?”
Context in general is most impactful at the teambuilding stage, where you generally want to know the Pokémon that you’re going to fight against. Here’s a broadly general way of defining a good team: a Pokémon team is good if its Pokémon perform well against the opposing Pokémon they will face in battles. On the surface, we haven’t done much by saying this, because of course Pokémon should be able to defeat opposing Pokémon. But when we define strength in this particular way we actually warp what our goals are as players. Pokémon and their strength exist in the context of what every other player is doing– this you may know as a metagame. If Fire-type Pokémon are on everyone’s minds, and you’re the person who shows up to a tournament with a Water-type Pokémon, you’ll have a much higher percentage chance of winning. You don’t have to do what every player is doing– in fact, we highly recommend making unique choices– but if you want to find success, you do have to be loosely aware in general of what other people might be likely to do, and what strength they find in common Pokémon.
How do you go about learning this context? Of course, you’ll want to know the Pokémon that are available in the ruleset. Next, the best way to learn context is through personal experience. Ask yourself– which Pokémon are you playing against often? How are they being used? What Pokémon do you hear people talking about? This is the base for forming your understanding of the context, which you can use to inform yourself during teambuilding.
Two great resources for quickly understanding teambuilding context are usage statistics, where you can see which Pokémon are used often, and tournament results, where you can see which Pokémon and teams people use to succeed. Tournament result resources can be harder to find, as there isn’t one central location to find the results of every tournament. Furthermore, tournaments can be contextual in their own way– a team that succeeds at a small 8-person tournament will be less impactful overall than a team that wins a large international tournament, or several copies of the same team that place loosely near the top. Keep in mind that these resources are descriptive of the context, not prescriptive. Just because a Pokémon has a high usage rate or is on a tournament-winning team doesn’t mean you have to use it yourself, or even think it’s a good choice– you are the ultimate decider of your own opinions.
Example

Here’s an example of how I go through tournament results, using the Roanoke Regional Championships Top Cut from May of 2017 ( source ). Although you might not know the full context of the metagame, or why these Pokémon were chosen by these players, you can get a decent (but obviously not perfect) idea of what Pokémon you would have to think about if you were to build a team. There are a couple of things to look out for– first, how similar do teams look? When Pokémon appear often, that means you might have fewer enemy Pokémon to consider during teambuilding. In this case, there are three copies of one team (places 2, 7, and 8), and two others that are similar (3 and 4). Then, check out how often each Pokémon appears in the top cut. In this case, Arcanine is on all eight teams, and Tapu Koko is on five– these and several other repeats frequently. These usage rates are very high, and these Pokémon would be at the front of my mind during teambuilding. After this, I hypothesize why the tournament ended the way it did– players that placed higher may have made decisions that helped them against the people they faced later in the tournament. For example, Nick’s Tapu Bulu and Clefairy might have given him some help against the teams with Gigalith and Tapu Koko. I don’t have to be right when I do this– over time, the more that I make hypotheses, and incorporate what I know about the context of the event, the more I develop this skill. Finally, I find as many of the team pastes as I can to give myself full context on the choices made by each of the players.
How fast does the context change (how fast does the metagame shift)?
This question also does not have an easy answer. Sometimes, it takes a while for players in general to figure out how to defeat popular Pokémon and archetypes (such as in the Roanoke example). In this case, the context won’t change that quickly. On the other hand, sometimes you’ll notice that different teams and Pokémon are succeeding on a weekly basis. This most frequently happens when a new format is released. It’s overwhelming to try to make sense of tournament results that change every week. You don’t need to consume every tournament result ever as soon as it happens, or obsess over day-to-day trends on Pokémon Showdown. You also don’t need to change your team every time the metagame changes– sometimes, knowing and planning for what’s popular is enough. Take your time.
Conclusion
Your job as a Pokémon player is to put your finger on the pulse of context. What Pokémon are popular, and what are their usage statistics like? How are the best players creating teams to take advantage of these trends? The more that you understand about the context, the more you’ll understand about not only your team, but about the fundamentals of success in VGC.
Context Pt. 2 - Battling
Context in Battling
Written by Aaron Traylor
Does one Pokémon “beat” another? It depends.
On the other hand, situations in battles are also heavily dependent on context, in a way that often has deep consequences at the teambuilding stage. Pokémon are selected on a team for a purpose– they are chosen because of some desired effect in battle. For example, our team might be weak to Metagross, which is part Steel-type, so we’re going to add Landorus-Therian to counter it. After you come up with a reason for a Pokémon, you might think about some scenarios in battle in which it would be useful. We know that Landorus-Therian can outspeed and deal about 70% of Metagross’ health with an Earthquake, which we might deem acceptable.
It isn’t always that easy, though. Even simple questions about how a Pokémon on a team operates in battle frequently come down to the context of the situation. Does Landorus beat Metagross in all situations? Well, on the surface, Landorus-Therian is a Ground-type Pokémon, and Metagross is a Steel-type Pokémon, so it will probably have a good shot. What if the Metagross has Ice Punch? Then it could knock out our Landorus if it gets a chance to attack. What situations can it attack in? If it’s still on the field after an Earthquake, if it’s in Tailwind or Trick Room.
Those are different contexts than we first thought of when we picked Landorus for its type advantage. We’d have to think about how often those situations could come up, or whether Metagross will run Ice Punch in the first place.
Furthermore, Double Battles are extremely dynamic. To take our example further, what if Metagross is next to a Pokémon that threatens Landorus and moves first? What if Trick Room is up and Metagross attacks first? What if there’s a Fake Out Pokemon, so Landorus can’t attack Metagross this turn, but next turn it can? These are just a few of the many different contexts Landorus and Metagross could appear together in, and a savvy teambuilder will understand which of them they’re likely to run into in battle– and, based on the rest of their team, what the potential solutions are. This is inherently linked to the skill called theorymon/theorymonning, which is when you visualize these battling scenario contexts ahead of time. A highly skilled theorymonner could theoretically find success in tournament play with a team built without playing any practice battles. In practice, however, theorymonning and practice battling go hand in hand, as it’s impossible to think ahead and generate every context that a Pokémon might appear in.
Is there any way to beat a Pokémon 100% of the time? How do you even approach countering another Pokémon? We talk about that in this teambuilding article.
Next Steps
How do you get better at theorymon, and at understanding the context of inherently complex double battles? There are two options. The first is to play a lot of VGC games– over time, you’ll be able to understand how the pieces interact, think about them flexibly, and to understand your opponent’s goals. Then you’ll be able to simulate battles better in your head during teambuilding. The second way is to spend a lot of time thinking about the contextual interactions from the teambuilding stage. As is the case with many abstract concepts in VGC, theorymon skills are like a muscle: the more you do it in practice, the better you’ll get.
EXAMPLE
Wolfe and Traylor’s Player’s Cup 4 Run
Team paste
Three HTML replays of Traylor VS Wolfe
Game 1 Game 2 Game 3
Here’s a good example of when an error in theorymonning cost me a set in a tournament. Wolfe and I were building for Player’s Cup 4, in VGC 2021 Series 9. We had built five Pokemon out of six for a team that we liked– Raichu, Celesteela, Dracovish, Hippowdon, and Togekiss– and, after some testing, we needed one more to close it out. We were thinking about our matchups into common teams that we would match up against, and we found that we were weak to Gigantamax Coalossal with a Weakness Policy boost, which could outspeed and OHKO all of our Pokemon with G-Max Volcalith, Max Overgrowth, or Max Flare. We were also weak to Rillaboom, which was a common Coalossal partner. Furthermore, at that time, players were adding Dragapult to their teams with the intent to Dynamax it instead of Coalossal, and Dynamax Dragapult could also do a lot of damage to us, especially with Follow Me support. It looked bleak, but we decided to add Tapu Fini– even though it was weak to Coalossal’s Max Overgrowth and Rillaboom’s attacks, we thought that Togekiss’ Follow Me could give it enough time to OHKO Coalossal or Dragapult, even through Dynamax. We tested the matchup among ourselves and found that it was bad, but acceptable. Linked above are the games in which we tested it between ourselves.
See it in showdown here.
When I played Cedric Bernier (tridivisional Regional Champion) in the first round of the Players’ Cup, he quickly found an easy solution that Wolfe and I had overlooked in our theorymonning and beat me without much effort on his part. His solution was extremely similar to the game linked above (which Wolfe lost on the ladder). This example shows a common error with theorymonning– you don’t know how your opponent is going to solve the problem of your Pokemon, so it’s important to spend a lot of time testing your team and theory with other people. This example is also a good example of Sixth Pokemon Syndrome, when we tried to do too much with one slot- Gigantamax Coalossal and its partners had too many tools for us to try to beat it relying heavily on one Pokemon.
Competitive Pokemon is less luck than you think
Competitive Pokémon is less luck than you think
While luck/RNG is a component to competitive Pokémon, it’s less impactful than newer players may think.
Written by Aaron Zheng People often dismiss competitive Pokémon because of the luck that is associated with it - critical hits, misses, flinches, freezes, etc. While luck, or “RNG” (random number generator, which people often use synonymously), is undoubtedly a component of competitive Pokémon, it actually plays a less significant role than people think. The reality is that the best players in the world are able to consistently maneuver themselves in a way to “maximize” their own luck, both during the team-building process and the battling process. They also understand when they may need to rely on some luck to win.
Competitive Pokémon, in many ways, is like poker. While there’s a fair amount of variance, the best players are able to win consistently over a long period of time. This is especially important if you are interested in climbing the ladder or competing in a tournament - in these scenarios, you’ll be playing a lot of Pokémon.
I’m writing this article because I think it’s important for players to acknowledge the role that luck plays in competitive Pokémon. It’s certainly a part of the game, but you can reduce how luck manifests itself. One common pitfall I see players fall into when starting out is using bad luck as an excuse for their losses. I did this a lot when I first started as a player, and it definitely held me back. Rather than look at my games from an objective point of view, I’d get emotional and simply focus on the fact that I would have won if I didn’t get unlucky. While this may be the case, it prevented me from finding other opportunities where I could have improved my play. Getting out of this mindset was a major step in my development as a player.
So, with all of that said now, let’s highlight some ways luck can appear in competitive Pokémon and how you can optimize for it!
Accuracy: Missing an attack can have severe consequences in Pokémon as it essentially wastes a turn. You need to think about accuracy, both during the team-building process and while you’re actually battling.
- Team Building: When you opt to put a lower accuracy attack on a Pokémon, you have to consider that you WILL miss that attack at points. Every time you use any move that’s not 100% accurate, you have to ask yourself what the consequences of missing that move are. Can you afford missing the attack, or will missing it generally lead directly to losses? If missing does lead to losses, is it worth using?
EXAMPLE
In 2014, I used Mega Lucario at the 2014 US National Championships as a counter to Mega Charizard-Y, which I expected to be popular at the event. I knew I could get a one-hit KO onto Charizard with Stone Edge, a move that is 80% accurate. In the tournament, I faced four Charizards and only hit one Stone Edge. While frustrating at the time, in reflection, I realized why this was a sub-optimal strategy: the risk vs. reward was huge, and missing a Stone Edge effectively led to an immediate loss since Charizard could just knock out my Lucario in return. Relying on an 80% chance to immediately win/lose a match isn’t a consistent strategy, especially when you’re playing in a 9 round tournament.
- Battling: When you’re in a battle, you always need to consider the consequences of missing an attack, especially in end-game scenarios. You generally want to go for lower accuracy attacks when 1) they can gain you a major advantage 2) you don’t have a significantly better option 3) missing won’t lead to major consequences.
*Note: One reason why it’s so important to learn damage calcs in competitive Pokémon is so you know when you can rely on 100% accurate attacks to finish off games, rather than inaccurate moves!
Critical Hits: While rare, critical hits have the ability to drastically swing a battle. There are multiple ways in which your team-selection & play can lead to fewer/more critical hits:
- Attacking First: When you move before your opponent, you give yourself the opportunity to get potential luck/RNG before they get a chance to attack. Thus, if you’re using a team that generally moves after your opponent, you’ll often be more vulnerable to critical hits and other secondary effects. This is one reason why speed control is so crucial in competitive VGC.
- Defensive Pokémon/Teams: Using defensive Pokémon that rely heavily on setup, such as Calm Mind Tapu Fini or Iron Defense Ferrothorn, can lead to more critical hits as games will generally last longer given the lack of damage output.
Status Conditions: Sleep, paralysis, and freeze all add another layer of variance in competitive Pokémon, so it’s important that you have ways to properly deal with them.
- Teambuilding: Top teams will often have multiple ways to shut down Pokémon that like to inflict status conditions. Some examples include using certain items (e.g. Safety Goggles, Lum Berry), certain moves (e.g. Taunt), or Pokémon that are immune to certain moves (e.g. Grass-type Pokémon for Spore/Sleep Powder). Sleep, in particular, is common regardless of the year, so having answers to the common sleep inducing Pokémon is essential.
EXAMPLE
In 2016, Dark Void Smeargle was incredibly common. To counter this, some players used Crafty Shield Smeargle to completely nullify Dark Void.
EXAMPLE
Lum Berry is a common item on Charizard in Series 12 VGC. It prevents Charizard from getting paralyzed by Thunder Wave and allows it to demolish sets like Focus Sash Venusaur and Amoonguss.
- Battling: When playing Pokémon that can inflict status conditions (e.g. Grimmsnarl, Thundurus, Amoonguss, Venusaur), you can reduce variance by eliminating these Pokémon quickly, preventing them from getting multiple conditions off. Conversely, ignoring these Pokémon can allow them to disrupt your entire team, making you have to deal with more luck/RNG each turn.
EXAMPLE
In 2013, I lost in the semi-finals of the World Championships. In that set, Thundurus was a major problem as it was able to spread paralysis via Thunder Wave and confusion via Swagger. Because I failed to eliminate Thundurus early on, I allowed it to induce much more variance than I should have.
These are just a couple of ways that you can see luck appear in competitive Pokémon, but as you can see, you can actually control each way to a certain degree.
Before we finish, I want to briefly talk about the idea of tilt, which is a concept that originated from poker. “Going on tilt” is when a player becomes enraged about something and starts making ill-advised plays based purely on emotion. I see players go on tilt in Pokémon all the time, either midway through a match or throughout the course of a tournament.
Being able to not tilt is an essential skill in competitive Pokémon - you will undoubtedly get unlucky at some point throughout the course of a tournament or laddering session. Pokémon is a highly mental game, and you want to do everything in your power to stay on top of your game. Here are some ways that I’ve personally dealt with bad luck in Pokémon:
While Laddering / Practicing
- Try out a brand new team & shake things up a bit
- Take a break and step away from the game for a while
- Reaffirm good plays that you’ve made - e.g. “I’m proud of how I played that game. Even though I lost to a 10% miss, I put myself in a great position to win” rather than “I can’t believe I lost to such a small percentage”
At Tournaments
During a Game
- Stop focusing on what could have happened, start thinking about how I have to adjust my gameplan and what my new path to victory is
After a Game
- Find a place in the venue where I can be alone & collect my thoughts
- Listen to music that calms me down / puts me in a good mood
- Drink some water, take a deep breathe, and close my eyes briefly
Conclusion
At the end of the day, Pokémon is a game that inherently has luck/RNG. You’ll undoubtedly face some bad luck in your competitive Pokémon career – that’s part of the journey. I hope that by reading this article though, you can see that there’s a lot more depth to competitive Pokémon than meets the eye, and it’s a lot less about luck than people generally think.
Youre In Charge
You’re in Charge
You’re the one who’s ultimately making decisions about your team, so take other people’s opinions with a grain of salt.
Written by Aaron Traylor There are many opportunities in VGC to take advice and input from other people. Maybe you’re watching a YouTuber who you think knows their stuff, or you’re listening to a friend’s feedback about a team that you built. You probably regard these resources as highly trustworthy, and it can be tempting to take those opinions as fact. When talking about VGC, many people speak with an authoritative tone. You might have heard phrases like this at some point:
- “X Pokemon is great”
- “X Pokemon is bad”
- “Never use X Pokemon”
- “X Pokemon always needs Y move”
- “X team is the best right now”
And you might start to believe that whatever you’re hearing is wholly correct.
Remember that your opinion matters most when you’re making choices for yourself. You’re going to be the one playing your battles or using your team, so you need to be comfortable with the tools that you’ve given yourself. Other people’s solutions are often what work for them, but you might not like the way that their solutions work out.
If you’re changing your team, do you feel like the change is necessary? Furthermore, do you feel like you understand and agree with the solution?
And if you’re using a new team entirely, do you know how to use the new team? Do you understand the intent behind it?
Especially leading up to a tournament, it can be comforting to think that someone else has figured out something you haven’t. There is stability in those thoughts. But the truth of the matter is that there are no completely correct answers in VGC. VGC is too complex and subjective to be stable, and there are positives and negatives of every tradeoff.
Other people’s opinions are always additional information for you to integrate into your own beliefs. If you agree with feedback, or are excited about what someone else is saying, definitely follow their advice! But if you have doubts or hesitations, that’s perfectly valid. At the end of the day, remember that we’re all figuring this game out together, there are no shortcuts, and that you know yourself best.
Part 3 — Pokémon Champions — Platform & Format (HARI)
SECTION 1 : PRESENTATION DE POKEMON CHAMPIONS
1.1. Qu’est-ce que Pokémon Champions ?
Pokémon Champions est un jeu autonome, free-to-play, developpe par Game Freak et entierement dedie au combat competitif multijoueur Pokémon. Ce n’est pas un RPG traditionnel : il n’y a aucune campagne solo, aucune exploration, aucune capture de Pokémon dans la nature. Le jeu est integralement construit autour d’une seule chose : les combats competitifs en ligne.
C’est un jeu de type live service, ce qui signifie qu’il evoluera continuellement après sa sortie avec des patchs d’equilibrage, de nouveaux Pokémon, de nouvelles mécaniques et de nouvelles saisons competitives.
1.2. Plateformes et compatibilite
| Plateforme | Disponibilite |
|---|---|
| Nintendo Switch | Au lancement (8 avril 2026) |
| Nintendo Switch 2 | Au lancement (8 avril 2026), graphismes ameliores automatiquement |
| Mobile (iOS et Android) | Plus tard en 2026 (date exacte non annoncee) |
Cross-platform : Les joueurs Switch et mobile pourront s’affronter entre eux. Les joueurs Switch 2 beneficient de graphismes ameliores via mise a jour gratuite, sans cout supplementaire.
HARI note que les graphismes, même sur Switch 2, sont decevants – il les compare a ceux de Pokémon Diamant Etincelant / Perle Scintillante (les remakes 4G). Il attribue cette qualite visuelle a la necessite de maintenir la compatibilite triple-plateforme (Switch 1 / Switch 2 / Mobile), ce qui tire la qualite vers le bas. L’interface rappelle Pokémon Unite “en moins bien”, et la police d’ecriture est jugee “quelconque”.
1.3. Date de sortie
8 avril 2026 – Nintendo Switch et Nintendo Switch 2.
Source officielle : pokémon.com
1.4. Modele economique
Pokémon Champions est gratuit a telecharger et a jouer. Aucun abonnement n’est requis pour jouer, mais un abonnement Nintendo Switch Online est necessaire pour les combats en ligne (exigence standard Nintendo).
Monnaie du jeu : les VP (Victory Points / Points de Victoire)
Les VP sont la monnaie principale du jeu. Ils servent a :
- Recruter des Pokémon de maniere permanente (cout : environ 1000-2500 VP)
- Modifier les statistiques d’un Pokémon (2 VP par point de stat ajoute)
- Changer la nature d’un Pokémon (200 VP)
- Changer le talent d’un Pokémon (400 VP)
- Apprendre une nouvelle attaque (100 VP)
Point crucial pour le competitif : les VP ne peuvent PAS être achetes avec de l’argent reel. Le site officiel est explicite : “Il est impossible d’en acheter directement.” La progression competitive est donc liee au gameplay, pas aux depenses. Les VP s’obtiennent principalement en combats classes, plus “d’autres modes” non precises (potentiellement PvE, tutoriels).
Options payantes
| Option | Prix | Contenu |
|---|---|---|
| Starter Pack | ~9,99 $ | Augmente le stockage a 80 slots, facilite le recrutement initial |
| Battle Pass (Premium) | ~6,99 EUR | Piste premium de recompenses |
| Abonnement | ~4 $/mois ou ~49,99 $/an | Stockage supplementaire, slots d’equipe, missions exclusives, cosmetiques |
1.5. Pokémon Champions comme nouveau support VGC
C’est le developpement competitif le plus important : Pokémon Champions EST la nouvelle plateforme VGC (Video Game Championships). A partir de 2026, les tournois officiels Play! Pokémon transitionnent vers Champions. Pokémon Ecarlate et Violet sont progressivement abandonnes.
1.6. Calendrier competitif 2026
| Evenement | Date | Format |
|---|---|---|
| Sortie de Pokémon Champions | 8 avril 2026 | – |
| Global Challenge I | 1-4 mai 2026 | En ligne, Reglement M-A |
| Indianapolis Regional Championships | Mai-Juin 2026 | Premier evenement majeur hors ligne sur Champions |
| Turin Special Event | 6-7 juin 2026 | – |
| North America International Championships | 12-14 juin 2026 | – |
| Pokémon World Championships | 28-30 aout 2026 | San Francisco |
HARI espere un maximum d’informations lors des Worlds d’aout. Il serait “très surpris” que les Worlds 2026 ne se jouent pas sur Champions.
Structure du circuit competitif
- League Challenge : Les plus petits tournois locaux, rapportent le moins de points
- League Cup : Juste au-dessus, un peu plus de points
- Regional / Special : Les grands tournois diffuses sur Twitch (twitch.tv/pokemon) et YouTube. Regionals ont des frais d’inscription mais un cash prize ; les Specials n’ont ni frais ni cash prize mais des lots
- International Championships (Internat) : Les 3 plus gros tournois de la saison (hors Worlds). Europe, Amerique du Nord, Amerique Latine
- Worlds : Le tournoi suprême, joue chaque annee en aout
Tous les tournois majeurs utilisent le format BO3 (Best of Three, deux manches gagnantes). Les competitions en ligne (Global/Grand Challenge) utilisent le BO1 avec des equipes fermees (CTS), ce qui est moins apprecie par la communaute.
Catégories d’age
- Juniors : moins de 12 ans
- Seniors : 12 a 15 ans
- Masters : 16 ans et plus (la catégorie par defaut quand on ne precise pas)
1.7. Système de recrutement des Pokémon
Contrairement aux jeux principaux (ou l’on capture des Pokemon dans la nature), Champions utilise un système de recrutement :
Ranch de Recrutement (Roster Ranch)
- Recrutement temporaire (Location) : Gratuit (0 VP), mais le Pokémon expire après 7 jours. Utile pour tester avant d’investir.
- Recrutement permanent : Coute 1000 VP minimum. Le prix des Pokémon legendaires/restreints n’est pas confirme. Une nouvelle selection de Pokémon se rafraichit toutes les 22 heures.
- Tickets : Des Quick Coupons et Teammate Tickets obtenus via des missions permettent de recruter sans VP.
Integration Pokémon HOME
Vous pouvez transferer des Pokémon de vos jeux principaux (Ecarlate/Violet, Epee/Bouclier) ou de Pokémon GO dans Champions via HOME. Points importants :
- Pas de limite de transfert : vous pouvez envoyer autant de Pokémon que vous voulez (par lots successifs)
- Pas de cooldown sur les transferts
- Les Pokémon transferes de GO/Switch = 2500 VP d’economises par Pokémon (pas besoin de recruter ni de tout modifier)
- Les stats modifiees dans Champions restent dans Champions ; les stats des jeux Switch ne sont pas affectees
- Les Pokémon recrutes dans Champions ne peuvent PAS être envoyes dans Pokémon HOME
- HOME gratuit a une limite de 30 places, mais cela suffit pour les transferts
Conseil de HARI : Ne negligez pas Pokémon GO, surtout si vous etes free-to-play. Chaque Pokémon transfere depuis GO est un Pokémon que vous n’avez pas besoin de recruter.
Restriction importante au lancement
Seules les evolutions finales sont disponibles au lancement. Pas de Salameche, pas de Bulbizarre, pas d’evolutions intermediaires. Le producteur Masaaki Hoshino a indique que les pre-evolutions pourraient être ajoutees plus tard.
Le roster de lancement comprend environ 152 Pokémon, plus plus de 28 formes de Méga-Évolution.
1.8. Modifications de Pokémon et couts
| Action | Cout en VP |
|---|---|
| Apprendre une attaque | 100 VP |
| Changer de nature | 200 VP |
| Changer de talent | 400 VP |
| Redistribuer des points de stat | 2 VP par point ajoute |
| Total pour tout modifier | ~2500 VP |
Important : Quand on retire des points d’une stat pour les mettre ailleurs, il faut redepenser les VP pour les nouveaux points ajoutes. On ne récupère pas les points retires gratuitement. La modification se fait en une seule session : on choisit toutes les modifications, on confirme, et on voit le cout total avant validation.
Conseil stratégique de HARI : En debut de jeu, concentrez-vous sur une equipe facile a monter (Pokemon de location avec de bonnes stats de base comme Trioxydre) pour farmer les VP avant de personnaliser librement.
1.9. Interface et qualite de vie
Pokémon Champions apporte plusieurs ameliorations d’interface par rapport aux jeux precedents :
- HP adverses affiches en pourcentage (sans decimales) – facilite les calculs de degats
- Pendant le switch, on voit l’equipe adverse ET les HP restants de chacun des Pokémon
- Priorité des attaques affichee dans les menus (ex : Abri affiche “+4 de priorite”)
- Type de sous-catégorie d’attaque affiche : attaque sonore, de contact, de poing, etc.
- Probabilites exactes des effets secondaires (ex : Draco Charge affiche “20% de chance de flinch”)
- Mecanisme de probabilite pour Abri affiche : “A chaque essai successif, tu divises les chances par trois”
- Boosts et drops de stats affiches visuellement avec des triangles verts/rouges et des multiplicateurs
- Degats d’Intimidation simultanes sur les deux Pokémon adverses
- Animations accelerees : les animations partent plus vite, la recuperation des Restes est beaucoup plus rapide
En resume : “Le jeu ne te caché plus rien” (HARI).
Nouvelles appellations officielles pour les multiplicateurs de type
| Ancien terme | Nouveau terme officiel | Multiplicateur |
|---|---|---|
| (n’existait pas) | “Très peu efficace” | x0.25 (double resistance) |
| “Pas très efficace” | “Pas très efficace” | x0.5 |
| “Efficace” | “Efficace” | x1 |
| “Super efficace” | “Super efficace” | x2 |
| (n’existait pas) | “Extremement efficace” | x4 (double faiblesse) |
1.10. Patchs d’equilibrage
Pokémon Champions recevra des patchs d’equilibrage reguliers. C’est une premiere pour les jeux Pokémon officiels et cela represente une philosophie de live service. Les statistiques de base, les attaques, les talents et les movepools peuvent changer après le lancement.
Des ajustements d’equilibrage sont prevus “en surveillant de pres les tendances des joueurs”. HARI mentionne :
- Pokémon potentiellement nerfes : Zacian, Cresselia
- Pokémon potentiellement buffes : Raichu
- Pokémon “meritant des changements” : Shifours, Oyacata, Tritosor
Consequence stratégique majeure : Le méta sera vivant. Construire une equipe en avril ne sera pas la même chose que concourir aux Worlds en aout. Le suivi des patch notes et des evolutions du méta devient une obligation permanente pour les joueurs competitifs.
1.11. Pas de mode solo
Il n’y a pas de mode solo dans Pokémon Champions. Il y a quelques tutoriels très basiques (faire une attaque super efficace, etc.), mais pas de mode entrainement elabore. Vous serez lance dans le grand bain assez rapidement.
1.12. Ressources competitives
| Ressource | URL | Description |
|---|---|---|
| Pikalytics Champions | pikalytics.com/champions | Statistiques d’usage en temps reel |
| Champions Lab | championslab.xyz | Tier lists et analyse de paires basees sur simulations |
| PokeChampionsDex | pokechampionsdex.com | Guide tactique |
| Limitless VGC | limitlessvgc.com | Statistiques orientees tournoi |
| Victory Road | victoryroad.pro/champions-regulations/ | Documentation des reglements et structure des tournois |
| Pokémon Database | pokemondb.net | Stats de base, movepools (site anglophone recommande par HARI) |
| PokeKalos | pokekalos.fr | Alternative francophone |
SECTION 2 : FORMAT DE COMBAT
2.1. Le format Doubles
Pokémon Champions utilise le Combat Duo (Double Battle) comme format competitif exclusif. C’est le format officiel VGC (Video Game Championships) depuis 2009.
Principe du format Doubles
- Chaque joueur amene 6 Pokémon dans son equipe
- Avant chaque manche, pendant le Team Preview, chaque joueur voit les 6 Pokémon de l’adversaire
- Chaque joueur selectionne 4 Pokémon parmi ses 6 pour la manche
- Parmi les 4 selectionnes, 2 sont envoyes en lead (sur le terrain des le debut)
- Les 2 restants sont en back (en reserve)
- Les 2 Pokémon non selectionnes ne participent pas a la manche
- Chaque côté du terrain a donc toujours 2 Pokémon actifs simultanement
- La victoire requiert de mettre KO les 4 Pokémon selectionnes de l’adversaire, ou d’être en avance au chrono
Terminologie
- Lead : Les 2 Pokémon envoyes en premier sur le terrain
- Back (Bac) : Les 2 Pokémon gardes en reserve
- Team Preview : La phase de selection au debut de chaque manche. Plus cruciale au debut de la premiere manche, quand on decouvre l’equipe adverse
- BO1 (Best of One) : Match en une seule manche. Utilise dans les competitions en ligne. Très volatile, la communaute deteste ce format
- BO3 (Best of Three) : Match en deux manches gagnantes (standard absolu en competition)
2.2. Modes de combat
Combats Classes (Ranked)
C’est le mode competitif principal. Votre rang evolue en fonction de vos resultats, via un système de matchmaking base sur l’ELO.
Deux sous-modes :
- Solo : 3v3 (trois Pokemon par equipe)
- Duo : 4v4 (quatre Pokemon par equipe, en doubles)
Absence remarquee : Il n’y a pas de combats 6v6 classes. C’est un point de deception majeur pour HARI et les joueurs de formats alternatifs.
HARI critique le système de rang d’Ecarlate/Violet ou le rang Master Ball etait trop facile d’acces, creant d’enormes ecarts de niveau. Il espere que Champions echelonnera beaucoup mieux les rangs.
Combats Amicaux (“Mico”)
Permettent de tester les equipes sans impact sur le rang. HARI s’interroge sur le fait qu’on gagne ou non des VP en combat amical – le site ne le precise pas, ce qui laisse penser que non.
Combats Prives
Possibilite de creer un salon et d’inviter un ami ou un adversaire specifique. Les details restent flous sur les formats disponibles (solo/duo uniquement, ou possibilite de 6v6).
2.3. Reglement M-A
Le premier reglement officiel des combats classes de Pokémon Champions est le Reglement M-A (Regulation Set M-A).
Règles confirmees
- Format Doubles (4 Pokemon sur 6)
- Méga-Évolution autorisee (necessite que le Pokemon tienne sa Méga-Gemme en objet)
- Teracristallisation autorisee (chaque equipe peut Teracristalliser un Pokemon par combat)
- Actif a partir du 8 avril 2026 (lancement du jeu)
Coexistence des gimmicks
C’est le changement le plus radical par rapport aux jeux precedents. Chaque generation depuis la 6e n’avait qu’un seul “gimmick” actif a la fois :
- Generation 6 : Méga-Évolution uniquement
- Generation 7 : Capacités Z uniquement
- Generation 8 : Dynamax uniquement
- Generation 9 : Teracristallisation uniquement
Champions brise ce schema : Méga-Évolution et Teracristallisation coexistent sous le Reglement M-A. Un Pokémon Méga-Evolue ne peut PAS aussi Teracristalliser (ce sont des options distinctes sur des Pokemon differents).
Les Capacités Z sont egalement confirmees dans les mécaniques du jeu, mais leur statut exact dans le Reglement M-A reste a verifier au lancement.
2.4. Chronometrage
- Chrono de match : 20 minutes au total
- Chrono personnel : 10 minutes (augmente par rapport a Ecarlate/Violet qui etait a 7 minutes)
- 45 secondes par tour pour faire ses choix
Malgre le chrono plus genereux, les animations sont plus rapides qu’avant, ce qui permet de jouer davantage de tours. HARI suggere que 7 ou 8 minutes de chrono personnel auraient pu suffire.
2.5. Team List / Feuille d’equipe
- CTS (Closed Team Sheet) : Feuille d’equipe fermee, l’adversaire ne voit pas vos informations. Utilise en combats classes en ligne.
- OTS (Open Team Sheet) : Feuille d’equipe ouverte, l’adversaire voit vos informations (Pokemon, attaques, objets, talents) des le debut du team preview. Utilise en competition officielle en personne depuis le debut d’Ecarlate/Violet.
HARI espere que l’OTS sera maintenu dans Champions, y compris en combats classes.
2.6. Input lag
HARI rapporte que de l’input lag a ete constate lors des acces anticipes, par Wolf Glick et d’autres joueurs. Ce n’est pas assez grave pour entraver le gameplay, mais quand on est dans la panique a devoir faire ses choix dans les dernieres secondes du timer, cela peut être dangereux. “Les inputs sont plus clunky que dans Pokémon Ecarlate et Violet.”
Part 4 — Core Mechanics — Types, Stats, Moves, Priority (HARI)
SECTION 3 : LE SYSTEME DE TYPES
3.1. Introduction
Pokémon Champions reprend le système de 18 types present depuis la 6e generation. Chaque Pokémon possède un ou deux types, et chaque attaque possède un type. Les interactions entre les types determinent les degats infliges :
| Resultat | Multiplicateur | Appellation Champions |
|---|---|---|
| Double resistance | x0.25 | “Très peu efficace” |
| Resistance | x0.5 | “Pas très efficace” |
| Neutre | x1.0 | “Efficace” |
| Super efficace | x2.0 | “Super efficace” |
| Double super efficace | x4.0 | “Extremement efficace” |
| Immunité | x0.0 | “Ca n’a aucun effet” |
La table des types de base (quel type bat quel type) est un prerequis que tout joueur doit maitriser. HARI la fournit en description de ses videos et presuppose que le spectateur la connait. Nous allons ici nous concentrer sur les proprietes specifiques et cachees de chaque type, qui sont tout aussi importantes que la table elle-même.
3.2. Les 18 types et leurs proprietes speciales
TYPE NORMAL
Proprietes speciales : Aucune. Le type Normal n’a aucune propriete particulière.
Spécificité offensive : Le type Normal ne tape super efficace sur aucun autre type. C’est sa “vraie specificite” selon HARI : il touche neutrement la grande majorite des types.
Spécificité defensive :
- Une seule faiblesse : Combat
- Une seule immunité : Spectre (les attaques Normal ne touchent pas les Spectre, et inversement les attaques Spectre ne touchent pas les Normal)
Implication competitive : Malgre l’absence de couverture super efficace, le fait de toucher neutrement quasi tout le monde et de n’avoir qu’une seule faiblesse rend le type Normal defensivement interessant. Des talents comme Peau Féerique (Pixilate), Peau Celeste (Aerilate) ou Peau Glacee (Refrigerate) permettent de convertir les attaques Normal en attaques d’un autre type tout en gardant un bonus de puissance, rendant les attaques Normal offensivement viables.
Pokémon cite : Méga-Kangourex (Mega Kangaskhan).
TYPE SPECTRE
Proprietes speciales : C’est l’un des types les plus riches en proprietes cachees.
Double immunité defensive (unique parmi tous les types) :
- Immunité au type Combat (table des types)
- Immunité au type Normal (table des types)
- C’est le seul type a posseder deux immunités defensives.
Immunité a l’attaque Bluff (Fake Out) :
- L’attaque Bluff est l’une des attaques les plus importantes du jeu competitif. Les Pokémon Spectre y sont totalement immunises, ce qui est un avantage stratégique majeur puisque Bluff est omnipresente au premier tour.
Immunité aux pieges :
- Les Pokémon de type Spectre sont immunises aux pieges (attaques qui empechent normalement le switch). Ils peuvent toujours quitter le terrain librement.
Talent cite : Marque Ombre (Shadow Tag) – en lien avec le type Spectre.
Pokémon cite : Méga-Ectoplasma (Mega Gengar).
Implication competitive : Le type Spectre est extremement precieux defensivement : double immunité, immunité au Bluff (attaque omnipresente), et capacité a switcher librement grace a l’immunite aux pieges. Un Pokémon Spectre dans l’equipe offre une sortie de secours contre les stratégies de piège et contre l’omniprescence du Bluff au premier tour.
TYPE COMBAT
Proprietes speciales : Aucune. Le type Combat n’a aucun effet particulier au-dela de la table des types.
Implication competitive : Le type Combat est un type offensif puissant physiquement, souvent utilise pour ses attaques physiques devastatrices (Close Combat, Mach Punch, Vampi-Poing), mais il ne possède aucune propriete cachée supplementaire.
TYPE PSY
Proprietes speciales : Aucune propriete inherente au type lui-même.
Lien avec un Champ : Le type Psy est lie au Champ Psychique (Psychic Terrain).
Champ Psychique :
- Augmente les degats des attaques de type Psy pour les Pokémon qui touchent le sol
- Les Pokémon Vol ou ceux ayant le talent Lévitation ne beneficient PAS du boost (puisqu’ils ne touchent pas le sol)
- L’attaque Vaste Pouvoir (Expanding Force) passe de 80 a 120 de puissance et devient une attaque de zone sous Champ Psychique
Talent associe : Creapsi (Psychic Surge) – pose le Champ Psychique automatiquement a l’entree sur le terrain.
TYPE TENEBRES
Proprietes speciales :
Immunité au talent Farceur (Prankster) :
- Les Pokémon de type Ténèbres sont immunises aux attaques qui beneficient du talent Farceur.
- Le talent Farceur donne +1 en priorité aux attaques non-offensives (attaques de statut). Les Pokémon Ténèbres ignorent complètement cet avantage : les attaques boostees par Farceur n’ont tout simplement aucun effet sur eux.
- Précision importante : une attaque de statut normale (sans le talent Farceur) fonctionne toujours sur un Pokémon Ténèbres. C’est specifiquement le boost de priorité de Farceur qui est neutralise.
Implication competitive : Avoir un Pokémon Ténèbres dans l’equipe permet de contrer les stratégies basees sur Farceur (Tonnerre des Ondes en priorite, Feu Follet en priorite, Encore en priorite, etc.). C’est un anti-meta puissant. Pokemon comme Angoliath (Grimmsnarl) et Farfaduvet (Whimsicott) avec Farceur sont omnipresents, donc cette immunité est constamment pertinente.
TYPE FEE
Proprietes speciales : Pas d’effet inherent au type Fee en tant que tel.
Immunité au type Dragon (table des types) – les attaques Dragon n’ont aucun effet sur les Pokémon Fee.
Lien avec un Champ : Le type Fee est lie au Champ Brumeux (Misty Terrain).
Champ Brumeux :
- Réduit les degats des attaques Dragon de 50% pour les Pokémon au sol
- Empêche les alterations de statut pour les Pokémon qui touchent le sol
Contexte historique : Le type Fee est “le dernier type qui a ete ajoute historiquement” au jeu (Generation 6).
Talent associe : Creabrume (Misty Surge) – pose le Champ Brumeux automatiquement.
TYPE DRAGON
Proprietes speciales : Aucune. Le type Dragon n’a aucune propriete particulière ni aucun effet caché.
Implication competitive : Malgre l’absence de proprietes cachees, le type Dragon reste competitivement puissant grace aux stats généralement elevees des Pokémon Dragon. Sa force vient de ses matchups offensifs et de la puissance brute des attaques comme Draco Meteore (130 de puissance), pas de mécaniques supplementaires.
TYPE ACIER
Proprietes speciales : Deux immunités majeures.
Immunité a l’Empoisonnement :
- Les Pokémon de type Acier ne peuvent jamais être empoisonnes (ni poison, ni poison grave/toxik).
Immunité a la Tempête de Sable :
- Les Pokémon de type Acier ne subissent aucun degat de la Tempête de Sable (qui inflige normalement des degats a chaque tour a tous les Pokemon sauf Roche, Sol et Acier).
Implication competitive : Le type Acier est un pilier defensif. Avec ses nombreuses resistances (la table des types lui confere 10 resistances et 1 immunite au type Poison), son immunité au poison et son immunité aux degats de Tempête de Sable, c’est l’un des types les plus fiables pour encaisser les coups.
TYPE POISON
Proprietes speciales :
Immunité a l’Empoisonnement :
- Comme le type Acier, les Pokémon Poison ne peuvent pas être empoisonnes.
Retrait automatique des Pics Toxik :
- Lorsqu’un Pokémon de type Poison qui touche le sol entre sur le terrain, il retire automatiquement les Pics Toxik s’ils sont presents du côté de son equipe.
- Condition importante : le Pokémon Poison doit toucher le sol. Un Pokémon Poison/Vol ou un Pokémon Poison avec Lévitation ne retirera PAS les Pics Toxik.
Implication competitive : Un Pokémon Poison terrestre est un “aspirateur a Pics Toxik” naturel. Il suffit de le faire entrer sur le terrain pour nettoyer les Pics Toxik sans utiliser Anti-Brume.
TYPE SOL
Proprietes speciales :
Immunité aux degats de la Tempête de Sable :
- Les Pokémon Sol ne subissent aucun degat de chip de la Tempête de Sable (comme Acier et Roche).
Immunité au type Electrik (table des types) – les attaques Electrik n’affectent pas les Pokémon Sol.
Implication competitive : Le type Sol est un partenaire naturel des equipes Tempête de Sable et un check absolu des Pokémon Electrik grace a son immunité.
TYPE VOL
Propriete fondamentale : “Ne touche pas le sol”
C’est LA propriete cle du type Vol. Les Pokémon Vol ne touchent pas le sol, ce qui a de multiples consequences :
- Pas d’effet des Champs (Terrains) : Les Pokemon Vol ne beneficient d’aucun des quatre champs (Psychique, Brumeux, Herbu, Electrifie). Ils ne subissent pas non plus leurs effets negatifs.
- Immunité aux Pics Toxik : Ne touchant pas le sol, les Pokémon Vol ne sont pas affectes par les Pics Toxik a l’entree.
- Immunité au type Sol (table des types) – les attaques Sol ne touchent pas les Pokémon Vol.
Comparaison avec le talent Lévitation : Le talent Lévitation reproduit exactement la propriete “ne touche pas le sol” du type Vol. Un Pokémon avec Lévitation a les memes avantages (pas d’effet des champs, immunite Sol, immunite Pics Toxik) même s’il n’est pas de type Vol.
Implication competitive : Le type Vol offre une mobilite defensive unique. Ne pas toucher le sol est a la fois un avantage (immunites multiples) et un inconvenient (pas de boost des Champs favorables).
TYPE ELECTRIK
Proprietes speciales :
Immunité a la Paralysie :
- Les Pokémon de type Electrik ne peuvent jamais être paralyses. C’est crucial car la Paralysie est l’une des alterations de statut les plus handicapantes (reduction de Vitesse de 50% + risque d’immobilisation).
Lien avec un Champ : Le type Electrik est lie au Champ Electrifie (Electric Terrain).
Champ Electrifie :
- Augmente les degats des attaques Electrik pour les Pokémon qui touchent le sol
- Empêche l’endormissement des Pokémon qui touchent le sol
Talent associe : Crea Elec (Electric Surge) – pose le Champ Electrifie automatiquement.
TYPE PLANTE
Proprietes speciales : Deux immunités distinctes.
Immunité aux attaques de Poudre :
- Les Pokémon de type Plante sont immunises a toutes les attaques de type poudre/spore. Cela inclut : Poudre Dodo (Sleep Powder), Spore, Para-Spore (Stun Spore), Poudre Toxik (Poison Powder), Poudre Fureur (Rage Powder), Spore Coton (Cotton Spore).
- Le talent Effet Spore est egalement concerne : les Pokémon Plante ne sont pas affectes.
Immunité a Vampigraine (Leech Seed) :
- Les Pokémon Plante ne peuvent pas être affectes par Vampigraine, l’attaque qui draine les PV a chaque tour.
Lien avec un Champ : Le type Plante est lie au Champ Herbu (Grassy Terrain).
Champ Herbu :
- Augmente les degats des attaques Plante pour les Pokémon qui touchent le sol
- Soigne les Pokémon au sol a chaque tour (recuperation de PV passive)
- Active la priorité de l’attaque Gliss’Herbe (Grassy Glide)
Talent associe : Crea Herbe (Grassy Surge) – pose le Champ Herbu automatiquement. Pokemon principal : Gorythmique (Rillaboom).
TYPE FEU
Proprietes speciales :
Immunité a la Brulure :
- Les Pokémon de type Feu ne peuvent jamais être brules. C’est crucial car la brulure divise par 2 les degats physiques du Pokémon brule.
Lien avec la Meteo Soleil :
- Boost des attaques Feu de +50% (multiplicateur x1.5) sous le Soleil
- Reduction des attaques Eau de 50% (multiplicateur x0.5) sous le Soleil
Talents associes : Sécheresse (Drought) – pose le Soleil automatiquement a l’entree. Pokémon principal : Méga-Dracaufeu Y.
Implication competitive : L’immunite a la Brulure est particulierement precieuse pour les attaquants physiques Feu (qui ne perdent pas de puissance face a un Feu Follet).
TYPE EAU
Proprietes speciales :
Lien avec la Meteo Pluie :
- Boost des attaques Eau de +50% (multiplicateur x1.5) sous la Pluie
- Reduction des attaques Feu de 50% (multiplicateur x0.5) sous la Pluie
Talents associes : Crachin (Drizzle) – pose la Pluie automatiquement. Pokemon principaux : Tarpaud (Politoed), Bekipan (Pelipper).
TYPE ROCHE
Proprietes speciales :
Immunité aux degats de la Tempête de Sable (comme Sol et Acier).
Boost de Défense Spéciale sous Tempête de Sable :
- Sous Tempête de Sable, les Pokémon de type Roche beneficient d’un boost de +50% en Défense Spéciale (multiplicateur x1.5). C’est un boost passif automatique tant que la Tempête de Sable est active.
- Important : Ce boost ne concerne que les Pokémon de type Roche, pas les types Sol ou Acier (qui sont juste immunises aux degats).
Pokémon cite : Tyranocif (Tyranitar) – avec son talent Sable Volant (Sand Stream), il invoque automatiquement la Tempête de Sable en entrant sur le terrain, activant son propre boost de Défense Spéciale.
TYPE GLACE
Proprietes speciales :
Lien avec la Meteo Neige :
- Les Pokémon de type Glace beneficient d’un boost de +50% en Défense (Defense physique, multiplicateur x1.5) sous la Neige.
- Ce boost ne concerne que les Pokémon de type Glace.
Talent associe : Alerte Neige (Snow Warning) – pose la Neige automatiquement. Pokemon : Blizzaroi (Abomasnow), Feunard d’Alola (Alolan Ninetales), Méga-Momartik (Mega Froslass).
Implication competitive : La Neige donne aux Pokémon Glace un mur physique gratuit (+50% Defense), compensant partiellement la faiblesse defensive habituelle du type Glace. Feunard d’Alola pose la Neige (talent) ET peut poser Voile Aurore (Aurora Veil) qui ne fonctionne QUE sous la Neige.
TYPE INSECTE
Proprietes speciales : Aucune. Le type Insecte n’a aucun effet particulier au-dela de la table des types.
Pokémon cite : Cizayox (Scizor) – type Insecte/Acier, exemple de Pokémon Insecte competitif.
3.3. Resume des 4 meteos et leurs effets
| Meteo | Types immunises aux degats | Effet bonus | Effet sur les attaques |
|---|---|---|---|
| Soleil | – | – | Attaques Feu x1.5, Attaques Eau x0.5 |
| Pluie | – | – | Attaques Eau x1.5, Attaques Feu x0.5 |
| Tempête de Sable | Roche, Sol, Acier | Roche : Défense Spéciale x1.5 | Degats de chip aux autres types |
| Neige | Glace | Glace : Défense x1.5 | – |
Les meteos sont posees soit par des talents (Secheresse, Crachin, Sable Volant, Alerte Neige) soit par des attaques (Zenithe, Danse Pluie, Tempete de Sable, Danse de Neige).
3.4. Resume des 4 champs (terrains)
| Champ | Type lie | Talent | Effet offensif | Effet supplementaire |
|---|---|---|---|---|
| Champ Psychique | Psy | Creapsi | Boost attaques Psy | Bloque les attaques prioritaires |
| Champ Brumeux | Fee | Creabrume | Réduit degats Dragon -50% | Empêche les statuts |
| Champ Herbu | Plante | Crea Herbe | Boost attaques Plante | Soin passif chaque tour |
| Champ Electrifie | Electrik | Crea Elec | Boost attaques Electrik | Empêche l’endormissement |
Condition universelle : Tous les effets des champs ne s’appliquent qu’aux Pokémon qui touchent le sol. Les Pokémon de type Vol et ceux avec Lévitation sont exclus.
3.5. Resume des immunités de statut par type
| Type | Immunité de statut |
|---|---|
| Feu | Brulure |
| Electrik | Paralysie |
| Acier | Empoisonnement |
| Poison | Empoisonnement |
| Glace | Gel (implicite) |
| Plante | Poudres/Spores + Vampigraine |
| Spectre | Pieges + Bluff |
| Ténèbres | Attaques boostees par Farceur |
SECTION 4 : LE SYSTEME DE STATISTIQUES
4.1. Les six statistiques
Chaque Pokémon possède six statistiques :
| Stat | Abreviation | Rôle |
|---|---|---|
| Points de Vie (PV) | HP | Determine combien de degats le Pokémon peut encaisser avant d’être mis KO |
| Attaque | Atk | Determine les degats des attaques physiques |
| Défense | Def | Determine la resistance aux attaques physiques |
| Attaque Spéciale | Atk Spe / SpA | Determine les degats des attaques speciales |
| Défense Spéciale | Def Spe / SpD | Determine la resistance aux attaques speciales |
| Vitesse | Vit / Spe | Determine l’ordre d’attaque (le plus rapide agit en premier) |
4.2. Le niveau 50
Règle fondamentale : En combat competitif Pokémon (et dans Pokemon Champions), tous les Pokémon sont automatiquement ramenes au niveau 50, quel que soit leur niveau dans le jeu. Si votre Pokémon est niveau 30 ou niveau 100, il sera ajuste au niveau 50 pour le combat.
Consequences importantes :
- Les chiffres au niveau 50 sont plus petits et plus lisibles qu’au niveau 100
- Les Pokémon se font legerement plus de degats qu’au niveau 100, ce qui rend les combats plus dynamiques
- Tous les calculs et references dans le monde competitif sont faits au niveau 50
4.3. Les Stats de Base (Base Stats)
Les stats de base sont les statistiques inherentes a chaque espece de Pokémon. Elles representent le potentiel fondamental de ce Pokémon dans chaque stat. Tous les Pokémon d’une même espece ont les memes stats de base.
Exemple : Metalosse (Metagross)
| Stat | Base |
|---|---|
| PV | 80 |
| Attaque | 135 |
| Défense | 130 |
| Attaque Spéciale | 95 |
| Défense Spéciale | 90 |
| Vitesse | 70 |
Metalosse est clairement un attaquant physique avec d’excellentes défenses mais une vitesse mediocre.
Méga-Évolutions et stats de base
Les Méga-Évolutions gagnent +100 points de base stats au total, distribues entre les stats mais jamais en PV (les PV restent les memes).
Exemple : Méga-Metalosse
| Stat | Base | Gain |
|---|---|---|
| PV | 80 | +0 (jamais de gain en PV pour les Méga) |
| Attaque | 145 | +10 |
| Défense | 150 | +20 |
| Attaque Spéciale | 105 | +10 |
| Défense Spéciale | 110 | +20 |
| Vitesse | 110 | +40 |
Attention : Certaines Méga-Évolutions peuvent perdre des stats de base dans une stat specifique. Le total reste +100, mais certaines stats peuvent diminuer pour en augmenter d’autres davantage. Exemple : Méga-Dracolosse perd 10 points d’Attaque (de 134 a 124) mais gagne +45 en Attaque Spéciale.
L’importance de la base Vitesse
HARI insiste particulierement sur la base Vitesse comme etant la stat la plus importante a retenir :
“La Vitesse determine qui attaque en premier. C’est binaire : soit vous etes plus rapide, soit vous ne l’etes pas. Il n’y a pas de ‘un peu plus rapide’ – c’est tout ou rien.”
Contrairement a l’Attaque ou la Défense ou un ecart de quelques points peut se compenser, en Vitesse, un seul point de difference determine qui frappe le premier. Connaitre les bases Vitesse des Pokémon du metagame est fondamental.
Au-dela des stats de base
HARI previent qu’il ne faut pas evaluer un Pokémon sur ses stats de base seules :
Exemple 1 : Charkos (Rampardos) – 165 de base Attaque
- Un des chiffres les plus eleves du jeu, pourtant Charkos est “nul” en competitif. Il est lent, fragile, et n’a pas un movepool ou un talent qui compensent ses faiblesses. Avoir une attaque enorme ne sert a rien si le Pokémon ne survit pas assez longtemps pour l’utiliser.
Exemple 2 : Azumarill – 50 de base Attaque
- Seulement 50 de base Attaque, ce qui est très faible. Mais son talent Coloforce (Huge Power) double sa stat d’Attaque. Cela transforme ses 50 de base en l’equivalent de 100 de base en termes d’attaque effective.
4.4. Les IV (Individual Values) – SUPPRIMES dans Champions
Rappel : système classique des IV
Dans les jeux principaux, les IV sont des valeurs allant de 0 a 31 dans chaque stat, determinees aleatoirement a la capture ou l’eclosion. Au niveau 50, chaque 2 IV donnent +1 point de stat, pour un maximum de +15 points de stat par stat avec 31 IV.
Suppression dans Champions
Dans Pokémon Champions, les IV sont fixes a 31 pour tous les Pokémon. Le système les supprime comme variable – tous les Pokémon ont directement les IV parfaits. Il n’y a pas besoin de Capsules d’Or (Hyper Training) ni de breeding.
Consequences strategiques
Positif :
- Accessibilite massivement amelioree : plus besoin de breed pendant des heures
- Le temps de preparation d’equipe passe de plusieurs heures a quelques minutes
- N’importe quel Pokémon capture ou obtenu est immediatement utilisable
Negatif :
- Plus de micro-ajustements de Vitesse : dans les jeux classiques, les joueurs pouvaient mettre 0 IV en Vitesse pour minimiser la stat (utile en Distorsion) ou des valeurs intermediaires pour des speed ties precis. C’est fini.
- Speed ties plus frequents : sans IV variables, des Pokémon de même espece sans investissement Vitesse seront toujours a egalite. HARI cite l’exemple de Sylveroy Glace qui ne pourra plus avoir des Vitesses precises.
- Buff indirect de Tricherie (Foul Play) : les Pokémon speciaux ne peuvent plus mettre 0 IV en Attaque pour reduire les degats de Tricherie. Tous ont desormais 31 IV Attaque.
- Nerf indirect de Tricherie : inversement, la stat d’Attaque maximale de l’adversaire est un peu plus basse sans breeding specifique, donc Tricherie fait un peu moins de degats dans certains cas. HARI considere que c’est “assez negligeable”.
Nouveau minimum Vitesse (en Distorsion) : Le minimum est maintenant “juste la nature moins avec aucun investissement”. On ne peut plus aller plus bas que ca.
4.5. Le système VP (remplacement des EV)
Rappel : système classique des EV (Effort Values)
Dans les jeux principaux :
- 0 a 252 EV par stat, avec un maximum de 510 EV au total
- Chaque 8 EV donnent +1 point de stat au niveau 50
- Maximum : +32 points de stat dans une stat
Le système VP dans Champions
Champions remplace complètement le système d’EV par un système simplifie :
- 66 points de stats a distribuer au total
- Possibilite de donner de 0 a 32 points de stat dans une stat
- Distribution directe : vous choisissez combien de points de stat vous voulez dans chaque stat
Les 66 VP correspondent mathematiquement a ce que donnent 510 EV au niveau 50 dans les jeux classiques (environ 2 x 32 + 2 points residuels). HARI note une anomalie : normalement 252+252+4 = 508 EV = 65 points, mais Champions donne 66 points.
Spreads classiques vs Champions
| Spread classique (EV) | Equivalent Champions (VP) |
|---|---|
| 252/252/4 | 32/32/2 |
| 252/4/0/252/0/0 | 32/2/0/32/0/0 |
| Spreads complexes | Beaucoup plus intuitives avec des points directs |
HARI insiste : le jeu est beaucoup plus profond que la spread basique 32/32/2. Savoir bien repartir les stats prend des annees d’experience. On voit souvent des equipes avec de bons resultats mais des repartitions discutables.
4.6. Les Natures
Chaque Pokémon a une nature qui modifie ses stats :
- +10% dans une stat
- -10% dans une autre stat
Certaines natures sont neutres (aucun effet). Il n’y a qu’une seule nature neutre dans Champions : Serieux.
Important : La nature n’affecte jamais les PV. Elle ne modifie que l’Attaque, la Défense, l’Attaque Spéciale, la Défense Spéciale ou la Vitesse.
Exemples de natures courantes
| Nature | Stat boostee (+10%) | Stat reduite (-10%) | Usage typique |
|---|---|---|---|
| Rigide (Adamant) | Attaque | Attaque Spéciale | Attaquants physiques |
| Modeste (Modest) | Attaque Spéciale | Attaque | Attaquants speciaux |
| Jovial (Jolly) | Vitesse | Attaque Spéciale | Attaquants physiques rapides |
| Timide (Timid) | Vitesse | Attaque | Attaquants speciaux rapides |
| Presse (Hasty) | Vitesse | Défense | Attaquants mixtes rapides |
| Brave (Brave) | Attaque | Vitesse | Distorsion physique |
| Calme (Calm) | Défense Spéciale | Attaque | Tanks speciaux |
Conseil de HARI : Il n’est jamais optimal de donner une nature neutre a un Pokémon. On augmente généralement la stat la plus importante pour le rôle du Pokémon et on baisse une stat inutile.
Les sauts de stat (Stat Jump / Stat Bump)
A cause des arrondis (toujours a l’inferieur), l’application de la nature peut creer des “sauts” dans les stats :
Avec la nature positive (+10%) :
- Stat avant nature 99 -> 99 x 1.1 = 108.9 -> 108
- Stat avant nature 100 -> 100 x 1.1 = 110.0 -> 110
- En passant de 99 a 100 avant nature (+1), on passe de 108 a 110 après nature (+2). Un seul point brut fait gagner 2 points finaux.
Avec la nature negative (-10%) :
- Stat avant nature 110 -> 110 x 0.9 = 99.0 -> 99
- Stat avant nature 111 -> 111 x 0.9 = 99.9 -> 99
- En passant de 110 a 111 (+1), la stat finale reste a 99 dans les deux cas. Le point investi est “perdu”.
Implication competitive : Les joueurs chevronne exploitent ces paliers pour optimiser leurs spreads d’EV/VP, en placant les points de maniere a “tomber” sur les bons paliers avec la nature.
4.7. Les formules de calcul
Formule des PV
PV = partie_entiere[(2 x Base + IV + partie_entiere[EV/4]) x Niveau / 100] + Niveau + 10
Au niveau 50 avec IV = 31 (Champions) :
- Le
+ Niveau + 10devient+ 50 + 10 = + 60
Formule des autres stats
Stat = partie_entiere[(partie_entiere[(2 x Base + IV + partie_entiere[EV/4]) x Niveau / 100] + 5) x Nature]
Differences cles :
- La formule PV ajoute
+ Niveau + 10(soit +60 au niveau 50) - La formule des autres stats ajoute
+ 5(constante) - La formule des autres stats est multipliee par le modificateur de Nature (1.1, 0.9 ou 1.0)
- Les PV ne sont jamais affectes par la nature
Exemple complet : Metalosse, stat d’Attaque au niveau 50
- Base Attaque : 135
- Après formule (simplifie) : 135 + 5 = 140
- IV (31 IV = +15 points) : 140 + 15 = 155
- EV (252 EV / 32 VP = +32 points) : 155 + 32 = 187
- Nature (+10%) : 187 x 1.1 = 205 (arrondi inferieur)
Stat finale d’Attaque = 205 (avec IV 31, 32 VP investis et nature favorable).
4.8. Contribution de chaque élément au niveau 50
| Composante | Plage | Contribution max au niveau 50 |
|---|---|---|
| Stats de base | Variable par espece | La fondation de tout |
| IV | Fixes a 31 dans Champions | +15 points max par stat (automatique) |
| VP (EV) | 0 a 32 par stat (66 total) | +32 points max par stat |
| Nature | x1.1 / x0.9 / x1.0 | +/- ~10% de la stat finale |
SECTION 5 : LES MECANIQUES D’ATTAQUE
5.1. Les trois catégories principales d’attaques
Chaque attaque appartient a exactement une des trois catégories :
Physique
- Utilise la stat Attaque du lanceur
- Calcule contre la stat Défense de la cible
- Symbolise par l’icone “eclat” (etoile jaune/orange)
Spéciale
- Utilise la stat Attaque Spéciale du lanceur
- Calcule contre la stat Défense Spéciale de la cible
- Symbolise par les “ondes” (cercles concentriques bleus)
Statut
- Pas de degats
- Regroupe TOUTES les attaques non offensives : boosts, debuffs, statuts, protections, weather, terrains, etc.
- Symbolise par le symbole yin-yang (gris)
Attention a ne pas confondre : “Attaque de statut” (catégorie d’attaque non offensive comme Mur de Fer, Danse Pluie, Cage Eclair) et “Probleme de statut” (paralysie, brulure, etc.). Cage Éclair EST une attaque de statut, mais elle inflige un probleme de statut. Mur de Fer est aussi une attaque de statut, mais elle ne fait que monter la Défense.
5.2. Le STAB (Same Type Attack Bonus)
Le STAB est un bonus de +50% de degats pour les attaques du ou des types que possède le Pokémon.
Exemple : Farigiraf (type Fee/Normal) fait +50% de degats avec Pouvoir Lunaire (type Fee) et Giga Census (type Normal). Mais Vent Violent (type Vol) reste a sa puissance brute sans bonus.
Nuance importante de HARI : Parfois, une attaque stabee neutre (pas de super efficacite, mais avec le bonus STAB) tape plus fort qu’une attaque super efficace mais pas stabee, surtout s’il y a un ecart de puissance entre les deux attaques. Faites toujours le calcul !
5.3. Les attaques de zone (Spread Moves)
En combat Doubles, certaines attaques touchent plusieurs cibles :
- Attaques touchant les 2 adversaires (pas l’allie) : Canicule, Eboulement, Megaphone, Vent Glace, Aboiement
- Attaques touchant tout le monde (y compris l’allie) : Séisme, Surf
Reduction de degats de zone : Quand une attaque de zone touche plus d’une cible potentielle, les degats sont reduits de 25% (multiplicateur x0.75). C’est soit 25%, soit rien – pas de reduction supérieure même avec 3+ cibles.
Exemple : Canicule a 95 de puissance -> en Doubles, si les deux adversaires sont presents, chaque cible recoit 95 x 0.75 = ~71 de puissance effective.
5.4. Les changements de PP dans Champions
Le système de PP (Points de Pouvoir)
Les PP determinent le nombre de fois qu’une attaque peut être utilisée dans une manche. Quand un Pokémon n’a plus de PP sur aucune attaque, il est force d’utiliser Lutte (Struggle), une attaque qui inflige des degats au lanceur.
Les PP Plus sont presents dans Champions
Contrairement aux speculations initiales, les PP Plus sont bien presents dans le jeu. Des moves affiches a 12 PP (au lieu de multiples de 5 normalement) indiquent que des PP Plus ont ete appliques.
Cependant, un mystere subsiste : HARI observe que des Pokémon ont des PP Plus sur PLUS de 4 moves, ce qui est theoriquement impossible si les PP Plus ne viennent que des jeux Switch. L’obtention des PP Plus dans Champions n’est pas clairement expliquee.
Tableau des changements de PP
| PP de base (ancien) | PP de base (Champions) | PP max avec PP Plus |
|---|---|---|
| 5 | 5 | 8 |
| 10 | 10 (sauf Abri) | 12-16 |
| 15 | 15 | 16-24 |
| 20 | 20 | 20+ |
Le nerf d’Abri (Protect) – Le changement le plus impactant
Abri est passe a 5 PP de base, pour un maximum de 8 PP (avec PP Plus).
- Avant : 10 PP de base, 16 PP max
- Maintenant : 5 PP de base, 8 PP max
En VGC, Abri est universellement joue sur quasiment chaque Pokémon. Ses fonctions sont :
- Temporiser pour faire passer la meteo/Distorsion/Vent Arrière
- Scouter les choix adverses
- Protéger contre les degats de zone pendant que l’allie gere une menace
- Acheter du temps pour le timing des Méga-Évolutions
Avec 8 PP, un joueur competitif typique qui utilise Abri 3-5 fois par partie aura généralement assez de PP. Mais dans les parties longues ou grindantes (contre le stall), 8 PP creent une vraie pression de ressource.
Interactions specifiques avec le nerf d’Abri
Abri vs Couba (Counter) :
- Couba et Abri ont le même nombre de PP max (8 PP)
- Si un Pokémon a Abri et 3 attaques offensives, l’adversaire avec Couba peut spammer Couba tant qu’il a un PP d’avance
- Une fois les PP d’Abri epuises, le Pokémon est force d’utiliser une attaque offensive, et Couba le tue
Abri vs Encore :
- Si un Pokémon fait Abri et subit Encore, il est force de repeter Abri en boucle
- Avec seulement 8 PP, les PP s’epuisent vite et le Pokémon est bloque
Implication méta : Le stall devient moins viable ; les approches offensives et basees sur le tempo sont favorisees.
Impact sur les autres attaques a 5 PP
| Attaque | PP max (ancien) | PP max (Champions) | Impact |
|---|---|---|---|
| Tempête Verte | 8 | 5-8 | Majeur pour les spammeurs |
| Draco Meteore | 8 | 5-8 | Crucial pour Miraidon et les Choice |
| Soin (Recover) | 8 | 5-8 | Tanks defensifs très affaiblis |
| Vitesse Extreme | 8 | 5-8 | Choice Band cleaners limites |
| Coup Bas | 8 | 5-8 | Priorité offensive reduite |
| Encore | 8 | 5-8 | Nerf direct mais buff indirect (epuise les PP adverses) |
Talent Pression (Pressure)
Le talent Pression fait consommer 2 PP au lieu de 1 quand l’adversaire cible le Pokémon avec Pression. Avec des PP plus bas et non augmentables, Pression devient mathematiquement plus efficace. Cependant, HARI considere que la plupart des Pokémon avec Pression ont des talents alternatifs bien meilleurs (Telepathie, Rege-Force, Multiecaille, Tension), donc Pression ne deviendra probablement pas méta-definitif.
5.5. Les 44 attaques essentielles a connaitre
HARI a identifie 44 attaques que tout joueur competitif doit connaitre avant de se lancer dans Pokémon Champions. Elles sont organisees par catégorie stratégique.
Attaques de protection
1. ABRI (Protect) – Type Normal, Statut, Priorité +4
- Protège le lanceur de presque toutes les attaques pour un tour
- Spam impossible : chances divisees par 3 a chaque tentative successive (1er reussit toujours, 2e = 1/3, 3e = 1/9)
- 2 a 6 Abri par equipe. C’est LE move le plus important du jeu.
- Variantes : Detection (identique), Pico-Defense (Abri + degats de contact), Bouclier Royal (Abri + baisse Attaque au contact)
2. GARDE LARGE (Wide Guard) – Type Combat, Statut, Priorité +3
- Protège le lanceur ET son allie uniquement des attaques de zone. Ne protège PAS des attaques monocibles.
- Peut être utilisée plusieurs tours de suite sans perte d’efficacite (pas de mécanique de double Abri).
3. PAR ICI (Follow Me) – Type Normal, Statut, Priorité +2
- Redirige toutes les attaques monocibles adverses vers le lanceur. Ne fonctionne pas contre les attaques de zone.
- Variante : Poudre Fureur (même chose mais attaque de Poudre, donc n’affecte pas les Pokemon Plante).
4. CLONAGE (Substitute) – Type Normal, Statut
- Sacrifie 25% des PV du lanceur pour creer un clone qui absorbe les degats. Le clone peut survivre plusieurs attaques s’il n’est pas detruit d’un coup.
- Les effets secondaires ne peuvent pas proc a travers le clone (pas de brulure si on tape dans le clone).
- Faiblesse : les attaques sonores ignorent le clone.
Controle de l’adversaire
5. PROVOQUE (Taunt) – Type Ténèbres, Statut, Précision 100
- Empêche la cible d’utiliser des attaques non offensives pendant 3 tours. Top 5 des moves les plus importants, avec Abri.
6. ENCORE (Encore) – Type Normal, Statut, Précision 100
- Force la cible a repeter sa derniere attaque pendant 4 tours. Punit le boost, l’Abri, la passivite.
- Farfaduvet a gagne les Worlds avec Encore.
Ecrans et reduction de degats
7-8. PROTECTION (Light Screen) et MUR LUMIERE (Reflect) – Type Psy, Statut
- Divisent par 1.5 les degats subis : Protection pour le special, Mur Lumiere pour le physique. Valable pour les 2 Pokémon sur le terrain.
- Voile Aurore fait les deux en même temps (mais necessite la Neige).
Problemes de statut
9. FEU FOLLET (Will-O-Wisp) – Type Feu, Statut, Précision 85
- Brule la cible. La brulure divise par 2 les degats physiques et enleve 1/6e des PV chaque tour. Parfois plus fort que mettre KO.
10. CAGE ECLAIR (Thunder Wave) – Type Electrik, Statut, Précision 90
- Paralyse la cible. Divise la Vitesse par 2 et peut empecher d’attaquer.
11. POUDRE DODO / SPORE – Type Plante, Statut, Précision 75/100
- Endort la cible. Le Pokémon dort entre 1 et 3 tours. Spore a 100% de précision mais est beaucoup moins distribue.
Speed controle
12. VENT ARRIERE (Tailwind) – Type Vol, Statut
- Double la Vitesse de nos Pokémon pendant 4 tours (y compris le tour de la pose). Se combine avec Farceur pour être pose en priorité.
13. DISTORSION (Trick Room) – Type Psy, Statut, Priorité -7
- Inverse les vitesses pendant 5 tours. Les Pokémon lents deviennent rapides. Priorité -7 = toujours la derniere chose a se resoudre. N’inverse PAS les priorités, seulement la Vitesse.
14. VENT GLACE (Icy Wind) – Type Glace, Special, 55 puissance, Précision 95
- Attaque de zone (2 adversaires). Baisse la Vitesse des cibles de maniere garantie. Faible puissance mais outil de speed controle.
15. ABOIEMENT (Snarl) – Type Ténèbres, Special, 55 puissance, Précision 95
- Attaque de zone (2 adversaires). Baisse l’Attaque Spéciale des cibles. Neutralise les Pokémon speciaux.
Attaques de pivot (Switch)
16. DERNIER MOT (Parting Shot) – Type Ténèbres, Statut, Précision 100
- Baisse l’Attaque ET l’Attaque Spéciale de la cible, puis le lanceur sort du terrain. En général, on préféré être PLUS LENT pour donner de la securite au Pokémon qui rentre.
17. BLUFF (Fake Out) – Type Normal, Physique, 40 puissance, Priorité +3
- Ne peut être utilisée que le tour ou le Pokémon rentre sur le terrain. Flinch garanti a 100%. Top 3 des moves les plus importants.
18. CHANGE ECLAIR (Volt Switch) – Type Electrik, Special, 70 puissance
- Attaque offensive + le lanceur sort. Contrairement a Dernier Mot, etant offensive, Provoque ne l’empeche pas. Mais si l’adversaire fait Abri, on ne sort pas.
- Astuce : on peut cibler son propre allie pour sortir de maniere certaine.
19. DEMI-TOUR (U-Turn) – Type Insecte, Physique, 70 puissance
- Identique a Change Éclair mais type Insecte et physique.
20. AU REVOIR (Flip Turn) – Type Eau, Physique, ~60 puissance
- Même mécanique, type Eau.
Attaques prioritaires
21. VITESSE EXTREME (Extreme Speed) – Type Normal, Physique, 80 puissance, Priorité +2
- La plus puissante attaque prioritaire. Distribution très restreinte : Dracolosse, Arcanin.
22. COUP BAS (Sucker Punch) – Type Ténèbres, Physique, 70 puissance, Priorité +1
- Priorité +1 MAIS ne fonctionne QUE si la cible s’apprete a utiliser une attaque offensive. Echoue si la cible utilise un statut. Mind-game permanent.
23. GLISS’HERBE (Grassy Glide) – Type Plante, Physique, 55 puissance
- Priorité +1 UNIQUEMENT si le Champ Herbu est actif. Sans Champ Herbu : aucune priorité, aucun interet. Pokémon principal : Gorythmique.
Attaques de zone offensives
24. VASTE POUVOIR (Expanding Force) – Type Psy, Special, 80/120 puissance
- Sous Champ Psychique : 120 de puissance ET devient attaque de zone.
25. SEISME (Earthquake) – Type Sol, Physique, 100 puissance
- Touche TOUS les autres Pokémon y compris l’allie. Reduction de zone -25%.
26. CANICULE (Heat Wave) – Type Feu, Special, 95 puissance, Précision 90
- Touche les 2 adversaires, pas l’allie. 10% brulure. Profite du Soleil.
27. EBOULEMENT (Rock Slide) – Type Roche, Physique, 75 puissance, Précision 90
- Touche les 2 adversaires. 30% flinch chaque cible (effectivement 27% avec la precision).
28. MEGAPHONE (Hyper Voice) – Type Normal, Special, 90 puissance
- Touche les 2 adversaires. Attaque sonore (passe a travers les Clones). Combine avec Peau Féerique/Celeste/Glacee pour changer de type.
Attaques offensives a mécanique speciale
29. FACADE (Facade) – Type Normal, Physique, 70/140 puissance
- Puissance doublee si le lanceur est statut (paralysie, poison, brulure). Ignore la reduction de la brulure. Combo ultime avec le talent Cran + Orbe Flamme.
30. TACLE LOURD (Heavy Slam) – Type Acier, Physique, 40-120 puissance
- Puissance selon l’ecart de poids entre lanceur et cible. 120 si le lanceur fait 5x le poids de la cible.
31. SABOTAGE (Knock Off) – Type Ténèbres, Physique, 65/97.5 puissance
- Retire l’objet tenu par la cible. +50% degats si l’objet est retire. L’une des meilleures attaques du jeu.
32. BIG SPLASH (Body Press) – Type Combat, Physique, 80 puissance
- Utilise la Défense au lieu de l’Attaque pour calculer les degats. Se combine avec Mur de Fer et Gonflette.
33. DRACO METEORE (Draco Meteor) – Type Dragon, Special, 130 puissance, Précision 90
- -2 en Attaque Spéciale après utilisation. Clones : Surchauffe (Feu), Tempete Verte (Plante).
34. POUVOIR LUNAIRE (Moonblast) – Type Fee, Special, 95 puissance
- 30% chance de baisser l’Attaque Spéciale de la cible. Plus puissant que les classiques (90).
35. AQUATACLE (Wave Crash) – Type Eau, Physique, 120 puissance
- Recul de 1/3 des degats infliges.
Vol de vie et soin
36. VAMPIPOING (Drain Punch) – Type Combat, Physique, 75 puissance
- 50% des degats infliges rendus en PV. Se combine avec Gonflette.
37. VAMPIBAISER (Draining Kiss) – Type Fee, Special, 50 puissance
- 75% de vol de vie (au lieu de 50% pour la plupart).
38. SOIN (Recover) – Type Normal, Statut
- Récupère 50% de ses PV. Simple et efficace. Bloque par Provoque.
39. FONTAINE DE VIE (Life Dew) – Type Eau, Statut
- Récupère 25% des PV pour les DEUX Pokémon sur le terrain.
Attaques de boost
40. DANSE LAMES (Swords Dance) – Statut
- +2 en Attaque physique.
41. GONFLETTE (Bulk Up) – Statut
- +1 en Attaque ET +1 en Défense. Se combine avec Vampi-Poing et Big Splash.
42. MACHINATION (Nasty Plot) – Statut
- +2 en Attaque Spéciale.
43. PLENITUDE (Calm Mind) – Statut
- +1 en Attaque Spéciale ET +1 en Défense Spéciale.
Boost d’allie
44. COACHING (Coaching) – Type Combat, Statut
- +1 Attaque ET +1 Défense a l’ALLIE (pas au lanceur). Ne peut PAS être redirige par Par Ici.
5.6. Les sous-catégories d’attaques
Au-dela du type et de la catégorie principale (Physique/Speciale/Statut), chaque attaque peut appartenir a une ou plusieurs sous-catégories qui determinent ses interactions avec certains talents, objets et immunités.
CONTACT
Definition : Une attaque ou le Pokémon attaquant touche physiquement sa cible. La grande majorite des attaques physiques sont de contact. Cependant, certaines attaques speciales font aussi contact (piege courant pour les debutants).
Attaques speciales qui font contact (exceptions) :
- Onde Vide (Combat, speciale)
- Noeud Herbe (Plante, speciale)
- Turbo Volt (Electrik, speciale)
- Cryo-Pirouette (Glace, speciale, signature de Meloetta)
Talents qui punissent le contact :
| Talent | Effet | Pokémon notable |
|---|---|---|
| Peau Dure (Rough Skin) | 1/8 des PV de l’attaquant en degats | Carchacrok (Garchomp) |
| Pointe de Fer (Iron Barbs) | 1/8 des PV de l’attaquant en degats | Noacier (Ferrothorn) |
| Corps Ardent (Flame Body) | 30% chance de brulure | Pyrax (Volcarona) |
| Statik (Static) | 30% chance de paralysie | – |
| Point Poison (Poison Point) | 30% chance de poison | – |
Objet : Casque Brut (Rocky Helmet)
- Inflige 1/6 des PV de l’attaquant a chaque attaque de contact (plus que Peau Dure/Pointe de Fer).
- Se cumule avec Peau Dure ou Pointe de Fer ! Noacier avec Pointe de Fer + Casque Brut = ~30% des PV de l’attaquant par contact.
Objet : Gant de Boxe (Punching Glove)
- +10% aux attaques de Poing ET empêche le Pokémon de faire contact. Stratégique contre les punisseurs de contact.
Attaque : Pico-Défense (Spiky Shield)
- Fonctionne comme Abri mais en plus, inflige des degats si l’adversaire utilise une attaque de contact.
POUDRE
Definition : Attaques de statut qui dispersent une poudre ou des spores.
Liste : Poudre Dodo, Spore, Spore Coton, Poudre Fureur, Para-Spore, Poudre Toxik.
Immunités :
- Pokémon de type Plante : totalement immunises a toutes les attaques de Poudre
- Talent Envelocape (Overcoat) : immunité totale
- Objet Lunettes Filtres (Safety Goggles) : immunité totale
Implication en Doubles : Poudre Fureur est très utilise pour rediriger les attaques. Un Pokémon avec Lunettes Filtres peut ignorer la redirection.
VENT
Definition : Attaques utilisant le vent ou des courants d’air.
Liste : Vent Glace, Canicule, Aeroblast, Vent Arrière, Vent Violent, Vent Féerique, Blizzard.
Talents interagissant avec le Vent :
| Talent | Effet | Pokémon notable |
|---|---|---|
| Turbine Eolienne (Wind Power) | Touche par une attaque de Vent (même alliee) -> charge qui double les degats de la prochaine attaque Electrik | Fulgudog (Kilowattrel) |
| Aeroporte (Wind Rider) | Touche par une attaque de Vent -> +1 Attaque + immunite aux attaques de Vent | Cerbyllin (Wyrdeer) |
Synergie cruciale : Si un allie utilise Vent Arrière (classifie comme attaque de Vent), le Pokémon avec Aeroporte recoit le boost de Vitesse de Vent Arrière ET +1 Attaque en bonus !
CROC (MORSURE)
Definition : Attaques impliquant une morsure ou l’utilisation des crocs.
Liste : Morsure, Machouille, Crocs Givre, Crocs Éclair, Crocs Feu, Psycho-Croc, Crocs de la Mort.
Talent : Prognathe (Strong Jaw)
- Augmente les degats de toutes les attaques de Croc de +50%.
- Exemple : Crocs Givre (65 puissance) -> 97.5 de puissance effective avec Prognathe.
TRANCHANT (SLICING)
Definition : Attaques impliquant un coup de lame ou de griffe tranchante.
Liste classique : Coupe Psycho, Lame Sainte, Plaie-Croix, Hache de Pierre, Tranche, Lame d’Air, Lame-Feuille, Tranche-Nuit.
NOUVEAUTE CHAMPIONS – Attaques AJOUTEES a la catégorie Tranchant :
- Griffe Ombre (Shadow Claw) – type Spectre -> NOUVEAU tranchant
- Draco-Griffe (Dragon Claw) – type Dragon -> NOUVEAU tranchant
Talent : Incisif (Sharpness)
- Augmente les degats de toutes les attaques Tranchantes de +50%.
- Avec l’ajout de Griffe Ombre et Draco-Griffe, les Pokémon Incisif ont maintenant une couverture de types beaucoup plus large.
- Pokémon principal : Scalpereur (Ceruledge).
BALISTIQUE
Definition : Attaques ou le Pokémon lance un projectile spherique.
Liste : Bombe Beurk, Ball’Ombre, Canon Graine, Boule Pollen, Aura Sphère, Balle Graine, Boulet Roc, Gyro Ball, Eco-Sphère.
Talent : Pare-Balles (Bulletproof)
- Immunise totalement le Pokémon aux attaques Balistiques.
- Pokémon notables : Blindépique (Chesnaught), Ekaiser (Kommo-o).
SON
Definition : Attaques utilisant le son, la voix ou les ondes sonores.
Liste : Aboiement, Requiem, Execu-Son (Boomburst, 140 puissance), Bug Buzz, Megaphone (Hyper Voice), Grincement.
Propriete unique : Traversent les Clones (Substitute) Les attaques Sonores ignorent complètement le Clone et touchent directement le Pokémon derriere. C’est extremement important en competitif car Clonage est une stratégie repandue.
Talent : Anti-Bruit (Soundproof) – Immunise aux attaques Sonores.
Talent : Hydrata-Son (Liquid Voice) – Convertit toutes les attaques Sonores en type Eau. Megaphone (90 puissance, Normal) devient une attaque Eau. Pokemon : Oratoria (Primarina).
POING
Les attaques de Poing interagissent avec :
- Le Gant de Boxe : +10% degats + supprime le contact
- Le talent Poing de Fer (Iron Fist) : boost les attaques de Poing
Tableau synthetique des sous-catégories
| Sous-catégorie | Talent offensif (boost) | Talent defensif | Objet associe |
|---|---|---|---|
| Contact | – | Peau Dure, Pointe de Fer, Corps Ardent | Casque Brut, Gant de Boxe |
| Poudre | – | Envelocape | Lunettes Filtres |
| Vent | Turbine Eolienne, Aeroporte | Aeroporte | – |
| Croc | Prognathe (+50%) | – | – |
| Tranchant | Incisif (+50%) | – | – |
| Balistique | – | Pare-Balles | – |
| Son | Hydrata-Son | Anti-Bruit | – |
| Poing | Poing de Fer | – | Gant de Boxe (+10%) |
SECTION 6 : LE SYSTEME DE PRIORITE
6.1. Principe fondamental
La priorité est le premier critere pour determiner l’ordre des actions dans un tour. Ce n’est qu’ensuite qu’on regarde la Vitesse.
Ordre de resolution complet d’un tour :
- On compare les priorités de chaque action choisie
- L’action avec la priorité la plus haute s’execute en premier
- Si deux Pokémon ont choisi des actions de même priorité, ALORS on regarde la stat de Vitesse
- Le Pokémon le plus rapide agit en premier (sauf sous Distorsion, ou c’est l’inverse)
- Si même priorité ET même Vitesse : c’est aleatoire (50/50)
En resume : Priorité > Vitesse > Hasard
6.2. Tableau complet des priorités (de -7 a +5)
| Priorité | Attaques |
|---|---|
| +5 | Coup d’Main (Helping Hand) |
| +4 | Abri (Protect), Detection (Detect), Tenacite (Endure), Pico-Defense (Spiky Shield), Bouclier Royal (King’s Shield) |
| +3 | Bluff (Fake Out), Prevention (Quick Guard), Garde Large (Wide Guard) |
| +2 | Vitesse Extreme (Extreme Speed), Ruse (Feint), Interversion (Ally Switch), Par Ici (Follow Me), Poudre Fureur (Rage Powder) |
| +1 | Vive-Attaque (Quick Attack), Mach Punch, Aqua-Jet, Eclat Glace (Ice Shard), Ombre Portee (Shadow Sneak), Pisto-Poing (Bullet Punch), Onde Vide (Vacuum Wave), Jet Punch, Coup Bas (Sucker Punch, conditionnel), Gliss’Herbe (Grassy Glide, conditionnel au Champ Herbu), Sheauriken (Water Shuriken), Point Sonique (signature de Super Dauphin, 60 puissance) |
| 0 | L’immense majorite des attaques (plusieurs centaines) |
| -1/-2 | (aucune attaque actuellement) |
| -3 | Avalanche, Bec-Canon (Beak Blast), Mitra-Poing (Focus Punch, 150 puissance), Carapillage (Shell Trap) |
| -4 | (aucune attaque actuellement) |
| -5 | Riposte (Counter), Voile Miroir (Mirror Coat) |
| -6 | Hurlement (Roar), Cyclone (Whirlwind), Draco-Queue (Dragon Tail), Projection (Circle Throw), Teleport |
| -7 | Distorsion (Trick Room) |
HARI note qu’il n’y a aucune attaque a -1 et -2, et ne sait pas pourquoi les attaques a -3 ne sont pas directement a -1.
6.3. Detail par niveau de priorité
Priorité +5 : Coup d’Main (Helping Hand)
L’attaque avec la plus haute priorité du jeu.
- Augmente la puissance de l’attaque de votre allie de 50% pour le tour
- N’echoue jamais, ne peut pas être bloquee par Abri (cible l’allie, pas l’adversaire)
- Exclusif au Double/Multi Battle
- A +5, passe avant TOUT, même Abri (+4) et Bluff (+3)
Priorité +4 : Les protections
Abri (Protect) et variantes :
- Protège de presque toutes les attaques pour un tour
- Taux de succès diminue si utilisée consecutivement (1/3 au 2e tour, 1/9 au 3e)
- Pico-Défense : Abri + degats au contact (1/8 PV)
- Bouclier Royal : Abri + baisse l’Attaque au contact. Signature d’Exagide (Aegislash) pour passer en Forme Bouclier.
Tenacite (Endure) :
- Ne bloque PAS les degats mais garantit de survivre avec 1 PV
- Utile pour survivre un coup precis et riposter au tour suivant
Priorité +3 : Controle immediat
Bluff (Fake Out) :
- Flinch garanti a 100%
- Ne fonctionne QUE le premier tour ou le Pokémon est en jeu (ou après un switch)
- En Double, neutralise une action adverse pendant un tour complet
Prevention (Quick Guard) :
- Protège le côté ENTIER (utilisateur + allie) contre toutes les attaques prioritaires
- Contre-move parfait contre les equipes abusant de priorité
Garde Large (Wide Guard) :
- Protège le côté ENTIER contre les attaques multi-cibles (Seisme, Eboulement, Surf, etc.)
- Ne bloque PAS les attaques monocibles
Priorité +2 : Controle avance
Vitesse Extreme (Extreme Speed) :
- 80 puissance, Physique, Normal, +2
- Bat toutes les attaques +1 en ordre de priorité
- Distribution limitee : Arcanin, Dracolosse, Entei, Raikou
Ruse (Feint) :
- 30 puissance seulement, MAIS brise Abri/Protect et ses variantes
- Indispensable contre le stall d’Abri
Par Ici (Follow Me) et Poudre Fureur (Rage Powder) :
- Redirection : forcent les attaques adverses mono-cible a viser l’utilisateur au lieu de son allie
- Essentiels en Double pour protéger un allie fragile ou en setup
- Poudre Fureur est bloquee par les Pokémon Plante, Envelocape et Lunettes Filtres
Interversion (Ally Switch) :
- Echange les positions en Double pour rediriger une attaque vers un Pokémon qui y resiste mieux
Priorité +1 : Les attaques prioritaires standard
Ce sont des attaques a 40 de puissance (sauf exceptions) qui passent avant les attaques de priorité 0 :
| Attaque | Type | Puissance | Notes |
|---|---|---|---|
| Vive-Attaque | Normal | 40 | La plus classique |
| Mach Punch | Combat | 40 | Combo avec Cran/Poing de Fer |
| Aqua-Jet | Eau | 40 | – |
| Éclat Glace | Glace | 40 | – |
| Ombre Portée | Spectre | 40 | – |
| Pisto-Poing | Acier | 40 | Combo avec Griffe Dure (Mega Metalosse) |
| Onde Vide | Combat | 40 | Spéciale (exception rare) |
| Jet Punch | Eau | 40 | – |
| Point Sonique | Eau | 60 | Signature de Super Dauphin |
| Gliss’Herbe | Plante | 55 | Conditionnel au Champ Herbu |
| Coup Bas | Ténèbres | 70 | Conditionnel (cible doit attaquer) |
Coup Bas (Sucker Punch) : 70 puissance avec priorité est enorme, mais echoue si la cible utilise un move de statut. Mind-game permanent.
Gliss’Herbe (Grassy Glide) : Priorite +1 uniquement si le Champ Herbu est actif. Pokemon principal : Gorythmique (qui pose le Champ Herbu avec Crea Herbe en entrant).
Priorités negatives
Priorité -3 : Attaques qui ont besoin d’agir en dernier
| Attaque | Puissance | Mécanique |
|---|---|---|
| Avalanche | 60 (120 si touche) | Double de puissance si le Pokémon a ete touche ce tour |
| Mitra-Poing | 150 | Echoue si le Pokémon est touche avant d’attaquer |
| Bec-Canon | 100 | Brule l’attaquant au contact pendant la charge |
| Carapillage | 150 | Active si touche par une attaque physique |
Priorité -5 : Riposte et Voile Miroir
- Riposte : Renvoie le double des degats physiques subis
- Voile Miroir : Renvoie le double des degats speciaux subis
- Doivent agir en dernier pour fonctionner (subir les degats PUIS les renvoyer)
Priorité -6 : Phasing (ejection)
- Hurlement, Cyclone : Forcent l’adversaire a switch aleatoirement
- Draco-Queue, Projection : Font des degats ET forcent le switch
- Teleport : L’utilisateur switch (pas l’adversaire)
Priorité -7 : Distorsion (Trick Room)
- L’attaque la moins prioritaire de tout le jeu
- Inverse l’ordre d’attaque pendant 5 tours : les plus lents agissent en premier
- CRUCIAL : La Distorsion n’inverse PAS les priorités. Elle inverse seulement l’ordre au sein d’un MEME niveau de priorité.
- Exemple : Sous Distorsion, un Pokémon lent avec Mach Punch (+1) agira toujours AVANT un Pokemon rapide avec Seisme (+0). Ce qui change : entre deux Pokemon utilisant des attaques a la même priorite (ex: les deux a +0), c’est le plus LENT qui agit en premier.
6.4. Talents qui modifient la priorité
Farceur (Prankster)
- Donne +1 de priorité a TOUS les moves de statut (non-offensifs)
- Transforme Vent Arrière en priorité +1, Cage Éclair en priorité +1, Feu Follet en priorité +1, Encore en priorité +1, Provoque en priorité +1, Distorsion en priorité -6 (au lieu de -7)
- IMMUNITE DES TYPES TENEBRES : Les Pokémon Ténèbres sont totalement immunises aux moves boostes par Farceur. Un Cage Éclair booste par Farceur n’affectera pas un Pokémon Ténèbres.
- Pokémon principaux : Farfaduvet (Whimsicott), Angoliath (Grimmsnarl), Trousselin (Klefki), Fulguris (Thundurus), Boreas (Tornadus)
Ailes Bourrasque (Gale Wings)
- Donne +1 de priorité aux attaques de type Vol
- Condition PV : Ne fonctionne QUE quand le Pokémon est a PV maximum (pleine vie). Le moindre degat (y compris Piege de Roc) desactive le talent.
- Pokémon principal : Flambusard (Talonflame) avec Flamme Audacieuse (Brave Bird) en priorité +1
Triage
- Donne +3 de priorité aux moves de soin
- Pokémon : Comfey principalement
- Flora Soin en priorité +3 = soigner un allie avant presque tout sauf les protections (+4) et Coup d’Main (+5)
6.5. Stratégies competitives liees a la priorité
Bluff + Setup : Bluff (+3) pour flinch un adversaire pendant que l’allie se boost (Danse Lames, Gonflette)
Distorsion + Cogneur lent : Poser Distorsion pour que des Pokémon très lents mais puissants (Beto-Chef) agissent en premier
Redirection + Setup : Par Ici / Poudre Fureur (+2) pour absorber les attaques pendant que l’allie se renforce
Priority + Cleanup : Garder un Pokémon avec des attaques prioritaires pour finir les adversaires affaiblis en fin de partie
Prevention contre les equipes prioritaires : Prevention (+3) bloque toutes les attaques prioritaires du tour
Gorythmique auto-suffisant : Crea Herbe pose le Champ Herbu -> Gliss’Herbe prioritaire (+1). Mais l’adversaire qui remplace le champ neutralise complètement la stratégie
Coup Bas en mind-game : 70 de puissance avec +1 est puissant, mais l’adversaire peut utiliser un statut pour le faire echouer
Bouclier Royal d’Exagide : Protection + retour en Forme Bouclier + punition du contact
Ruse contre Abri : Quand l’adversaire stall avec Abri, Ruse (+2) brise la protection
Farceur + Vent Arrière : Farfaduvet avec Farceur pose Vent Arrière en priorité +1, avant que quiconque n’agisse
6.6. Points cles a retenir (selon HARI)
- Vous n’avez pas besoin de retenir le tableau par coeur, mais il faut connaitre les interactions cles
- Les attaques a 40 de puissance ne sont pas nulles – leur priorité leur donne une vraie valeur stratégique
- La priorité est le PREMIER critere avant la Vitesse
- La Distorsion n’inverse PAS les priorités, seulement l’ordre au sein d’un même bracket
- Les types Ténèbres sont immunises a Farceur – ne l’oubliez jamais
- Ailes Bourrasque ne marche qu’a PV max – un seul point de degat le desactive
- Coup Bas est un mind-game permanent – l’adversaire peut le faire echouer avec un statut
Fin de la Partie 1 : Fondamentaux du Jeu (Sections 1-6)
La Partie 2 couvrira : Les Talents, Les Objets, La Teracristallisation, La Méga-Évolution, Les Meteos et Champs en detail, Le Teambuilding, et la Méta de lancement.
Sources : HARI (@HariPKMN) – Serie de guides debutant Pokemon Champions (YouTube), recherches web communautaires (Serebii, Bulbapedia, Pikalytics, Champions Lab, Victory Road, Game8, GameRant, CBR, Insider Gaming), donnees d’acces anticipes compiles par Joe Merrick, Wolf Glick, Aaron Zheng, Johnny Chu et Famitsu.
Part 5 — Battle Conditions — Weather, Status, Stat Stages (HARI)
SECTION 7 : METEOS ET CHAMPS
D’après la video “Les METEOS & les CHAMPS - GUIDE DEBUTANT” par HARI — 44 minutes
Les meteos et les champs sont des conditions de terrain qui modifient profondement le deroulement d’un combat. Maitriser ces mécaniques est absolument essentiel en competitif : une equipe construite autour d’une meteo ou d’un champ peut dominer complètement un match, tandis qu’une equipe qui ne sait pas les contrer sera systematiquement desavantagee.
7.1 — PRINCIPES FONDAMENTAUX
7.1.1 — Coexistence meteos / champs
Le premier point a comprendre est que les meteos et les champs sont deux systèmes complètement independants. Ils coexistent sans probleme :
- On peut avoir une meteo ET un champ actifs en même temps (par exemple : Soleil + Champ Psychique).
- Leurs effets se cumulent normalement — ils ne s’annulent pas, ne s’interferent pas.
- Les meteos s’affichent en haut de l’ecran de combat.
- Les champs s’affichent en bas de l’ecran de combat.
En revanche, a l’interieur de chaque catégorie :
- On ne peut PAS avoir plusieurs meteos en même temps.
- On ne peut PAS avoir plusieurs champs en même temps.
- Si une nouvelle meteo est posee, elle remplace l’ancienne.
- Si un nouveau champ est pose, il remplace l’ancien.
7.1.2 — En debut de partie
Au debut d’un combat, il n’y a ni meteo ni champ actif. Le terrain est complètement neutre. La seule exception : si un Pokémon entrant possède un talent qui active automatiquement une meteo ou un champ (comme Secheresse pour le soleil, ou Crea Herbe pour le champ herbu). Dans ce cas, la meteo ou le champ s’active immediatement lorsque ce Pokémon entre en jeu.
7.1.3 — Duree
Règle universelle : toute meteo ou champ dure exactement 5 tours, y compris le tour ou la condition est posee.
Autrement dit, si vous posez le soleil au tour 3, il sera actif aux tours 3, 4, 5, 6 et 7, puis disparaitra. Une fois la duree ecoulee, le terrain redevient neutre (ni meteo ni champ).
Point critique : on ne peut PAS prolonger une meteo ou un champ déjà actif en renvoyant le poseur. Si vous retirez un Pokémon avec le talent Sécheresse puis le renvoyez au combat, son talent ne se reactive pas si le soleil est déjà en place. La mécanique fonctionne de la même facon que Protection, Vent Arrière, et les autres effets temporaires — une fois pose, le compteur tourne et ne peut pas être “rafraichi”.
7.1.4 — La guerre de meteo (Weather War)
Quand deux poseurs de meteo entrent en jeu en même temps (par exemple au tour 1, en lead), l’ordre de resolution est crucial :
- Le Pokémon le plus rapide active son talent en premier.
- Le Pokémon le plus lent active son talent en second.
- Resultat : c’est la meteo du Pokémon le plus LENT qui reste, car elle remplace celle du plus rapide.
Exemple concret : Bequipan (rapide, talent Crachin) et Chartor (lent, talent Secheresse) arrivent tous les deux en lead. Bequipan active Crachin → la pluie se met en place. Puis Chartor active Sécheresse → le soleil remplace la pluie. Resultat : Bequipan est coince sous le soleil adverse.
Ce principe est strictement identique pour les champs. Exemple : si Gorithmique et Wimessir entrent en même temps, le champ du plus lent des deux s’imposera.
Consequence stratégique majeure : dans la construction d’equipe, avoir un poseur de meteo LENT est un avantage dans les weather wars. C’est pour cela que Chartor (très lent) est le poseur de soleil le plus joue — il gagne systematiquement les confrontations de meteo.
7.2 — LES 4 METEOS
7.2.1 — SOLEIL (pose par l’attaque Zenite)
Comment poser le Soleil
Par attaque :
- Zenite — attaque de statut qui installe le soleil pour 5 tours.
- Farfaduvet l’utilise via le talent Farceur (priorite +1 sur les attaques de statut), ce qui permet de poser le soleil avant que l’adversaire n’agisse.
- Boreas utilise egalement Farceur pour poser Zenite.
Par talent :
- Sécheresse — active automatiquement le soleil quand le Pokémon entre en jeu.
- Feunard de Kanto — poseur classique et historique
- Chartor — poseur principal en competitif. Très lent, donc gagne la majorite des weather wars
- Groudon — legendaire restreint, extremement puissant
- Mega Dracaufeu Y — obtient Sécheresse via la Méga Évolution (le Dracaufeu de base n’a PAS ce talent)
Attention : Coridon n’a PAS le talent Sécheresse. Son talent est different (Paleosynthese). HARI ne couvre pas les mécaniques de Primo Groudon, Coridon et Paleosynthese dans cette video.
Effets du Soleil
| # | Effet | Detail |
|---|---|---|
| 1 | +50% de degats sur les attaques de type Feu | Multiplicateur x1,5 applique a toutes les attaques Feu |
| 2 | Degats divises par 2 sur les attaques de type Eau | Multiplicateur x0,5 — la reduction est plus forte que la hausse (x0,5 vs x1,5) |
| 3 | Impossibilite de geler un Pokémon | Tant que le soleil est actif, aucun Pokémon ne peut être gele. ATTENTION : un Pokémon déjà gele ne sera PAS degele si le soleil est pose après coup |
Talents synergiques avec le Soleil
Chlorophylle — Double la vitesse du Pokémon sous le soleil :
- Florizarre — historiquement très joue avec ce talent
- Cotovol — joue en combinaison avec Chartor
- Noadecoco — option disponible
- Fragilady de Hisui — excellente synergie avec Chartor, jouee depuis la 9e generation
Force Soleil — +50% d’attaque speciale sous le soleil, mais le Pokémon perd 1/8e de ses PV maximaux a chaque fin de tour :
- Dracaufeu (forme de base, sans Mega Evolution) — Marco Silva a remporte le championnat d’Amerique Latine 2024 avec une equipe comprenant Dracaufeu + Cotovol (Zenite) + Chartor (Secheresse) + Lunettes Choix
- Mega Demolosse — option disponible
- Dracaufeu Gigamax — utilise en 2022 avec Groudon
Attaques impactees par le Soleil
Attaques a charge instantanee sous le soleil :
- Lance-Soleil — attaque Plante speciale. Normalement necessite 1 tour de charge avant de frapper. Sous le soleil, la charge est supprimee et l’attaque est instantanee.
- Lame Solaire — attaque Plante physique, un peu plus puissante que Lance-Soleil. Aussi instantanee sous le soleil. Utilisable avec Fragilady de Hisui, mais en pratique on préféré souvent Lame-Feuille pour ne pas être trop dependant du soleil.
- Fulgurayon (attaque signature de Ponderalugon) — 120 de puissance, Électrique speciale, 100 de precision. Normalement 1 tour de charge + boost d’attaque speciale pendant la charge. Sous la PLUIE (pas le soleil), la charge est supprimee. D’ou la synergie entre Ponderalugon et Bequipan.
Attaques de soin modifiees par la meteo :
| Attaque | Sans meteo | Sous le Soleil | Sous une autre meteo |
|---|---|---|---|
| Synthèse | Récupère 50% des PV | Récupère 2/3 des PV | Récupère seulement 1/4 des PV |
| Rayon Lune | Récupère 50% des PV | Récupère 2/3 des PV | Récupère seulement 1/4 des PV |
| Aurore | Récupère 50% des PV | Récupère 2/3 des PV | Récupère seulement 1/4 des PV |
Exemples d’utilisateurs : Méganium (Synthese), Noctali (Rayon Lune), Arcanin de Kanto (Aurore, joue en 2017).
Balle Meteo — attaque signature de Morpheo, distribuee a d’autres Pokémon :
- Normalement : attaque Normale speciale a 50 de puissance
- Sous une meteo : passe a 100 de puissance et prend le type de la meteo active
- Sous le soleil → type Feu, 100 de puissance
- Utilisateurs competitifs : Chartor (plus puissant que Lance-Flamme tant qu’il maintient le soleil, et contourne Garde Large), Bequipan (meilleure option d’attaque Eau precise sous la pluie), Florizarre (option Feu inattendue)
7.2.2 — PLUIE (posee par l’attaque Danse Pluie)
Comment poser la Pluie
Par attaque :
- Danse Pluie — attaque de statut qui installe la pluie pour 5 tours.
- Boreas l’utilise via Farceur
- Farfaduvet l’utilise aussi via Farceur
Par talent :
- Crachin — active automatiquement la pluie quand le Pokémon entre en jeu.
- Tartard — a remporte au moins un tournoi majeur en 9e generation
- Bequipan — le poseur de pluie le plus joue. Sa synergie est excellente grace a son type Vol qui lui donne un avantage contre les Pokémon Plante adverses (qui resistent normalement a l’Eau)
- Kyogre — legendaire restreint, historiquement l’un des Pokémon les plus importants du VGC
HARI note que la pluie est “la seule meteo qui n’a que des bons poseurs” — chacun des trois poseurs est competitivement viable.
Effets de la Pluie
| # | Effet | Detail |
|---|---|---|
| 1 | +50% de degats sur les attaques de type Eau | Multiplicateur x1,5 |
| 2 | Degats divises par 2 sur les attaques de type Feu | Multiplicateur x0,5 |
| 3 | Aucun effet sur les problemes de statut | Contrairement au soleil qui bloque le gel, la pluie n’a aucun impact sur les statuts |
HARI : “Ca fait pas grand-chose en apparence, mais la pluie a enormement de synergies.”
Talents synergiques avec la Pluie
Glissade — Double la vitesse du Pokémon sous la pluie :
- Hyporoi — classique des equipes pluie
- Ludicolo — autre classique historique
- Paragruel — option disponible
- Aquaquak — a remporte le championnat du Japon en 2017 grace a Glissade
- Mega Laggron — obtient Glissade via la Méga Évolution. La vitesse est “dynamique” : le bonus est effectif des le tour de la Méga Évolution
Attaques a précision parfaite sous la pluie :
- Vent Violent — utilisable en toute securite sous la pluie (ne peut plus rater). Surtout utilise avec Bequipan
- Fatal Foudre — surtout utilise avec Kyogre historiquement (illustre par Raichu dans la video de HARI)
- Fulgurayon (Ponderalugon) — se charge instantanement sous la pluie (pas sous le soleil !)
Synergie Ponderalugon + Bequipan : La complementarite de types est exceptionnelle. Ponderalugon est faible aux types Sol et Combat. Bequipan est immunise au Sol (type Vol) et resiste au Combat. Cette paire se protège mutuellement.
7.2.3 — TEMPETE DE SABLE (posee par l’attaque Tempete de Sable)
Comment poser la Tempête de Sable
Par attaque :
- Tempête de Sable — attaque de statut. En pratique, on n’utilise JAMAIS cette attaque en competitif pour poser cette meteo. On passe toujours par les talents. HARI precise que Grolem et Exagel ne sont PAS des Pokémon interessants pour poser la tempête de sable via l’attaque.
Par talent :
- Sable Volant — active automatiquement la tempête de sable quand le Pokémon entre en jeu.
- Tyranocif — poseur principal, très utilise historiquement
- Hippodocus — alternative solide
- Gigalite — option disponible
- Mega Tyranocif — possède un avantage unique de double activation. Si un adversaire entre et change la meteo, la Méga Évolution (qui se declenche en debut de tour) reactive Sable Volant et reprend le controle de la weather war
Effets de la Tempête de Sable
| # | Effet | Detail |
|---|---|---|
| 1 | Degats de 1/16e des PV a chaque fin de tour | Affecte tous les Pokémon qui ne sont PAS de type Roche, Sol ou Acier |
| 2 | +50% de défense speciale pour les types Roche | Compense les faiblesses defensives naturelles du type Roche |
| 3 | Aucun bonus/malus de degats sur un type d’attaque | Contrairement au soleil et a la pluie, la tempête de sable ne booste aucun type offensivement |
Exception importante du dernier tour : Au 5e tour (le dernier), les effets de la tempête s’appliquent normalement PENDANT le tour, mais les degats de fin de tour ne sont PAS infliges. Le jeu affiche “La tempête de sable est terminee” AVANT de tenter d’infliger les degats. C’est une nuance qui peut compter dans les calculs de survie.
Talents synergiques avec la Tempête de Sable
Baigne Sable — Double la vitesse sous la tempête de sable :
- Minotaupe — principal utilisateur. La doublette Tyranocif + Minotaupe est l’un des duos les plus historiques du VGC
- Lougaroc — vu au debut de la 9e generation, mais moins interessant que Minotaupe
Voile Sable — Multiplie par x0,75 la précision des attaques visant le porteur du talent (soit une reduction de 25% de la precision adverse) :
- Carchacrok — le meilleur (et potentiellement le seul) exemple competitif viable. A remporte le championnat d’Europe 2017 avec Gigalite dans l’equipe
Force Sable — +30% de degats sur les attaques de type Sol, Roche et Acier (les 3 types immunises aux degats de tempete) :
- Minotaupe (mais on le joue surtout avec Brise Moule ou Baigne Sable)
- Mega Steelix
- HARI : “C’est pas très interessant. Preoccupez-vous pas trop de ca.”
Attaque de soin sous tempête de sable :
- Amassable (utilisée par Trepassable) : de base, récupère 50% des PV. Sous la tempête de sable, récupère 2/3 des PV. Contrairement a Synthèse/Rayon Lune/Aurore, ce soin n’est PAS reduit sous une meteo defavorable.
7.2.4 — NEIGE (posee par l’attaque Chute de Neige)
Comment poser la Neige
Par attaque :
- Chute de Neige — anciennement nommee “Grele”, rework complet en 9e generation. HARI ne revient pas sur l’ancien fonctionnement. En pratique, on n’utilise quasiment jamais cette attaque en competitif.
Attaque speciale :
- Neigeu de Mots — attaque signature de Roigada de Galar. Pose la neige et fait quitter le terrain au lanceur (comme Dernier Mot de Fifolette). Anecdotique, jamais jouee en competitif.
Par talent :
- Alerte Neige — active automatiquement la neige quand le Pokémon entre en jeu.
- Feunard d’Alola — 99% du temps, c’est lui le poseur de neige en competitif, grace a l’excellence du reste de son kit
- Blizzaroi — option disponible
- Sorbouboul — vu au debut de la 8e generation
- Dragmara — HARI ne se souvenait même pas que ce Pokémon avait ce talent
- Mega Blizzaroi — possibilite de double activation (même avantage que Mega Tyranocif)
Effets de la Neige (fonctionnement moderne post-rework 9G)
| # | Effet | Detail |
|---|---|---|
| 1 | +50% de défense pour les types Glace | Enorme pour un type qui souffre de gros problemes defensifs naturels |
| 2 | C’est tout comme effet direct | Le reste des synergies vient des talents et attaques lies |
HARI : “C’est pas grand-chose en quantite d’effet, mais pour des Pokémon qui ont des gros problemes defensifs au niveau de leur type, c’est très très bon a prendre.”
Talents synergiques avec la Neige
Chasse-Neige — Double la vitesse sous la neige :
- Aucun Pokémon n’a vraiment eu de succès competitif avec ce talent selon HARI.
Rideau Neige — Multiplie par x0,75 la précision des attaques visant le porteur (identique a Voile Sable mais pour la neige) :
- Artikodin — a remporte un tournoi majeur en 2024 aux côtés de Feunard d’Alola. Beaucoup de RNG autour de lui (entre Rideau Neige et les chances de gel de Blizzard)
- Givrali — pas de succès historique
Attaques a précision parfaite sous la neige :
- Blizzard — ne peut plus rater sous la neige. Surtout utilise avec Artikodin
Attaques des Genies a précision parfaite sous meteo :
- Typhon Hivernal (Boreas) — 80 de précision de base → précision parfaite sous la pluie
- Typhon Fulgurant (Fulguris) — précision parfaite sous meteo
- Typhon Pirosable (Demeteros) — précision parfaite sous meteo
L’attaque cle : Voile Aurore
- Ne peut être lancee QUE si la neige est active — sinon, l’attaque echoue
- Pose un mur qui fait office de Protection ET Mur Lumiere simultanement — reduit les degats physiques ET speciaux
- Feunard d’Alola est le meilleur utilisateur : il pose la neige avec Alerte Neige ET utilise Voile Aurore dans la foulee. Sa vitesse elevee lui permet d’agir rapidement.
- Le rework de la neige (+50% defense pour les types Glace) compense la faible défense physique naturelle de Feunard d’Alola.
HARI : “Rien que cette attaque peut justifier de jouer Feunard d’Alola même si AUCUN autre Pokémon de la team ne profite de la neige.”
7.3 — OBJETS D’EXTENSION DE DUREE
| Objet | Meteo concernee | Effet |
|---|---|---|
| Roche Chaude | Soleil | Etend la duree a 8 tours au lieu de 5 |
| Roche Humide | Pluie | Etend la duree a 8 tours au lieu de 5 |
| Roche Lisse | Tempête de Sable | Etend la duree a 8 tours au lieu de 5 |
| Roche Glace | Neige | Etend la duree a 8 tours au lieu de 5 |
Verdict competitif de HARI : ces objets ne sont quasi jamais joues a haut niveau. Trois raisons :
- Les parties sont trop courtes (8-12 tours en général) — la meteo a rarement le temps d’arriver a 5 tours, encore moins 8
- En situation de weather war, la meteo est remplacee frequemment — inutile d’etendre a 8 tours si elle ne dure que 2 tours avant d’être remplacee
- L’emplacement d’objet est trop precieux pour être “gaspille” sur une extension de duree
Seule exception recente : Roche Chaude sur Chartor dans une equipe qui misait enormement sur le soleil et avait besoin de garantir la duree.
7.4 — TALENT ANTI-METEO : CIEL GRIS / AIRLOCK
Ciel Gris et Airlock sont deux talents avec des noms differents mais un effet strictement identique.
Effet : Ne retire PAS la meteo en cours, mais neutralise tous ses effets. La meteo continue de decompter ses tours normalement, mais aucun effet ne s’applique — pas de degats de tempête de sable en fin de tour, pas de boost des attaques Eau ou Feu, etc. C’est comme si la meteo etait présenté mais desactivee.
Pokémon porteurs :
- Altaria (Ciel Gris)
- Aquaquak (Ciel Gris)
- Dracolosse / Draby (Ciel Gris)
- Rayquaza (Airlock)
HARI : “Historiquement on s’est pas beaucoup servi de Ciel Gris parce que les Pokémon avec ce talent sont assez faibles.”
7.5 — MECANIQUES AVANCEES DES MEGAS ET WEATHER WAR
Les Mega Évolutions qui possedent un talent poseur de meteo offrent un avantage tactique unique dans les weather wars grace a la double activation :
Scenario type :
- Tyranocif est déjà sur le terrain avec Sable Volant (tempete de sable active)
- L’adversaire envoie Bequipan — Crachin s’active et remplace la tempête par la pluie
- Si Tyranocif Mega Evolue ce tour-la, la Méga Évolution intervient après le switch de Bequipan
- Mega Tyranocif reactive Sable Volant → la tempête de sable remplace la pluie
Stratégie avancee : On peut volontairement retarder la Méga Évolution pour garder cette carte en main. Ne pas Mega Evoluer immediatement donne une option de “reprise de meteo” pour un tour ulterieur, ce qui peut surprendre l’adversaire qui pensait avoir pris le controle de la meteo.
7.6 — LES 4 CHAMPS (TERRAINS)
7.6.1 — Principes communs a tous les champs
Les champs partagent plusieurs règles communes avec les meteos, mais ont aussi des specificites importantes :
Points communs avec les meteos :
- Duree : 5 tours (identique)
- Poses par attaques ou talents
- Se remplacent mutuellement (un seul champ actif a la fois)
- Le Pokémon le plus lent s’impose si deux poseurs entrent en même temps
Spécificité critique des champs — la notion de “toucher le sol” :
Les effets des champs ne s’appliquent qu’aux Pokémon qui touchent le sol. C’est la difference fondamentale avec les meteos (qui affectent tout le monde). Un Pokemon avec le type Vol, le talent Levitation, ou tenant un Ballon ne “touche pas le sol” et ne beneficie pas des effets du champ (ni ne subit certains effets negatifs).
Précision sur qui doit toucher le sol :
- Pour les boosts de degats offensifs : c’est le lanceur de l’attaque qui doit toucher le sol
- Pour les resistances/protections : c’est la cible qui doit toucher le sol
- Exception importante : les Graines (objets lies aux champs) fonctionnent même si le Pokémon ne touche pas le sol
7.6.2 — Comment poser les champs
Par attaque :
- Champ Electrifie (existe depuis la 6G)
- Champ Herbu (existe depuis la 6G)
- Champ Brumeux (existe depuis la 6G) — le seul qu’on pourrait vouloir poser a la main
- Champ Psychique (apparu en 7G avec Tokopisco)
HARI : “On ne prend jamais la peine de poser les champs avec les attaques, contrairement a Zenite/Danse Pluie. Champ Brumeux est l’exception mais ca reste secondaire.”
Par talent :
| Talent | Champ pose | Pokémon porteurs |
|---|---|---|
| Crea Elec | Champ Electrifie | Tokorico (Tapou, pas dispo au debut de Champions), Watapic |
| Crea Herbe | Champ Herbu | Tokotoro (Tapou), Gorithmique — l’un des meilleurs Pokémon du jeu |
| Crea Brume | Champ Brumeux | Tokopisco (Tapou), Smogogo de Galar (mais joue pour Gaz Inhibiteur, pas pour Crea Brume) |
| Crea Psy | Champ Psychique | Tokopiyon (Tapou), Wimessir (femelle ET male — les deux formes posent le champ psychique) |
Probleme majeur : En dehors des Tapou (absents de Champions au lancement), il n’y a qu’un seul bon poseur par champ. C’est pourquoi le champ electrifie n’existe quasiment jamais en dehors de Miraidon en format restreint.
7.6.3 — Objet d’extension des champs
- Champ d’Ui — fonctionne pour les 4 champs, ajoute 3 tours supplementaires
HARI : “Absolument jamais joue. C’est très très nul.” Encore plus inutile que les Roches d’extension pour les meteos.
7.6.4 — CHAMP ELECTRIFIE
Effets
| # | Effet | Detail |
|---|---|---|
| 1 | +30% de degats sur les attaques Electriques | Pour les Pokémon qui touchent le sol. Etait +50% en 7G, nerfe a 30% en 8G |
| 2 | Impossibilite de s’endormir | Pour les Pokémon qui touchent le sol |
| 3 | Baillement ne peut même pas être pose | Nuance importante par rapport au champ brumeux (qui soigne le statut mais n’empeche pas Baillement d’être pose) |
Exemple : Raichu touche le sol → profite du boost électrique. Electhor est type Vol → ne touche pas le sol → ne profite PAS du boost.
Talent lie : Surf Caudal
- Raichu d’Alola — Double sa vitesse sous champ electrifie. Joue un peu en 2017. C’est le seul talent directement lie aux champs — il n’en existe aucun autre equivalent pour les autres champs.
Attaque liee : Monte Tension
- Attaque Électrique speciale, normalement 70 de puissance
- Sous champ electrifie : passe a 140 de puissance (doublee)
- A cela s’ajoute le +30% du champ → degats totaux enormes
- Utilisateurs : Regieleki (2022), potentiellement Mega Elecsprint dans Pokémon Champions
HARI : “L’avenir de Mega Elecsprint depend de Monte Tension.”
Graine Électrique (objet)
- S’active quand le champ electrifie est actif
- Donne un boost de +1 en Défense
- Fonctionne même si le Pokémon ne touche pas le sol (exception aux règles normales des champs)
- Exemple competitif : Lunala avec Graine Électrique + Miraidon (qui pose le champ) — compense la double faiblesse Ténèbres de Lunala, rend Sabotage beaucoup moins menacant
7.6.5 — CHAMP HERBU
Effets
| # | Effet | Detail |
|---|---|---|
| 1 | +30% de degats sur les attaques Plante | Pour les Pokémon qui touchent le sol |
| 2 | Degats divises par 2 sur Séisme, Pietisol et Ampleur | UNIQUEMENT ces 3 attaques — PAS toutes les attaques Sol. Lame Pangeeenne de Groudon n’est PAS concernee |
| 3 | Recuperation de 1/16e des PV en fin de tour | Pour TOUS les Pokémon qui touchent le sol — même effet que l’objet Restes |
ATTENTION CRITIQUE : Le soin de 1/16e des PV en fin de tour soigne aussi les Pokémon ADVERSES qui touchent le sol. C’est la faiblesse principale de ce champ — vous aidez involontairement l’equipe adverse.
Attaque liee : Glisserbe
- Attaque Plante, 55 de puissance (nerfee en 9G)
- Sous champ herbu : devient prioritaire (+1 en priorite)
- Pas très puissante, mais donne une option pour finir un Pokémon ou frapper avant les attaques non-prioritaires
- Utilisateur quasi-exclusif : Gorithmique (qui pose lui-même le champ herbu). 99,9% des Glisserbe en competitif viennent de Gorithmique.
- Ogo (Augerbe Feu) l’a aussi utilise marginalement.
Graine Herbe (objet)
- S’active quand le champ herbu est actif
- Donne un boost de +1 en Défense
- Activation immediate : même si le champ est immediatement remplace, la graine a le temps d’être consommee
Exemple detaille : Gorithmique + Farfurex vs Wimessir → Gorithmique pose le champ herbu → Farfurex consomme immediatement sa Graine Herbe → Wimessir remplace le champ herbu par le champ psychique. Mais la graine est déjà consommee, le boost est acquis.
HARI : “Tu peux pas juste counter la graine d’un Pokémon. S’il veut la consommer, il peut forcer cette situation.”
Synergies avec Delestage et Acrobatie
Delestage (talent) : quand l’objet est consomme, la vitesse du Pokémon double. Combine avec les Graines :
- Grodrive (2017)
- Farfurex (reglement H, 2024-2025)
Acrobatie (attaque Vol) : plus puissante si le Pokémon ne tient pas d’objet. Une fois la graine consommee, Acrobatie tape beaucoup plus fort.
Combo complète sur Farfurex : Graine Herbe + Delestage (double vitesse après consommation) + Acrobatie (booste sans objet) + Terravol (STAB Vol si Terastallise).
7.6.6 — CHAMP BRUMEUX
Effets
| # | Effet | Detail |
|---|---|---|
| 1 | PAS de boost de degats pour un type quelconque | Idée recue très repandue : beaucoup de joueurs croient que les attaques Fee sont boostees sous champ brumeux. C’est FAUX |
| 2 | x2 de resistance aux attaques Dragon | Pour les Pokémon qui touchent le sol. C’est la cible qui doit toucher le sol, pas le lanceur |
| 3 | Protection contre TOUS les problemes de statut | Brulure, paralysie, gel, empoisonnement, sommeil — pour les Pokémon qui touchent le sol |
| 4 | Protection contre la confusion aussi | Même si la confusion n’est pas un statut “dur” |
| 5 | NE protège PAS contre Provoc, Entrave, etc. | Ce sont des effets d’une autre catégorie |
Précision sur la resistance Dragon : Carchacrok lance Draco Meteor → peu importe si Carchacrok touche le sol ou non. La question est : la cible touche-t-elle le sol ? Si oui (ex: un autre Carchacrok au sol), les degats Dragon sont reduits de moitie. Si non (ex: un Electhor en vol), pas de reduction.
Utilité competitive principale : C’est un effet anti-RNG precieux. Il empêche par exemple le gel aleatoire de Blizzard, empêche Orbeflamme de bruler accidentellement Ursaking (qui a besoin du talent Cran actif via sa brulure volontaire), etc.
Attaque liee : Explobrume
- Attaque suicide de type Fee, speciale, 100 de puissance
- Sous champ brumeux : passe a 150 de puissance
- “Pas vraiment important” selon HARI — peu utilise en competitif
Graine Brumeuse (objet)
- S’active quand le champ brumeux est actif
- Donne un boost de +1 en Défense Spéciale
7.6.7 — CHAMP PSYCHIQUE
Effets
| # | Effet | Detail |
|---|---|---|
| 1 | +30% de degats sur les attaques Psy | Pour les Pokémon qui touchent le sol |
| 2 | Blocage des priorités positives adverses | Visant vos Pokémon qui touchent le sol — c’est l’effet le plus complexe |
NUANCES CRITIQUES sur le blocage des priorités (très important a maitriser) :
Ce que le champ psychique bloque :
- Les attaques prioritaires qui visent un adversaire : Aqua-Jet, Vitesse Extreme, Bluff, etc.
- Les attaques non-offensives avec priorité positive visant l’adversaire : par exemple, Farfaduvet avec Farceur + Provoc est bloque
Ce que le champ psychique NE bloque PAS :
- Abri (Protection) — car on le fait sur soi-même, pas sur un adversaire
- Aqua-Jet sur un allie — toute priorité visant un Pokémon de votre equipe passe normalement
- Les priorités negatives (comme Hurlement)
Condition cle : La cible doit toucher le sol pour être protegee. Un Trioxydre (talent Levitation) se fera quand même toucher par Bluff sous champ psychique, car Trioxydre ne touche pas le sol.
HARI : “C’est le plus complexe des quatre champs. Les gens me demandent souvent pourquoi un Pokémon s’est fait Bluffer sous champ psychique — c’est souvent parce qu’ils oublient la notion de toucher le sol.”
Attaque liee : Vaste Pouvoir
- Attaque Psy speciale
- Normalement : 80 de puissance, monocible
- Sous champ psychique : 120 de puissance ET devient une attaque de zone (touche les deux adversaires)
- A cela s’ajoute le +30% du champ psy
- Utilisateurs competitifs : Sorcilence (beaucoup utilise), Carmadura (profite de Distorsion), Chef de Fer (vu en finale du championnat d’Europe avec Wimessir femelle)
Graine Psychique (objet)
- S’active quand le champ psychique est actif
- Donne un boost de +1 en Défense Spéciale
7.7 — ATTAQUES ET MECANIQUES TRANSVERSALES
7.7.1 — Balle Meteo (pour les meteos)
- Attaque Normale speciale, 50 de puissance de base
- Sous n’importe quelle meteo : 100 de puissance + prend le type de la meteo active
- Sous le soleil → type Feu | Sous la pluie → type Eau | Sous tempête de sable → type Roche | Sous la neige → type Glace
- Utilisateurs : Chartor (type Feu), Bequipan (type Eau), Florizarre (option Feu)
7.7.2 — Champlification (pour les champs)
- Exactement le même concept que Balle Meteo mais pour les champs
- 50 de puissance → 100 de puissance + type du champ actif
- Moins interessant que Balle Meteo car les boosts de champs ne sont que de 30% (et 0% pour le champ brumeux)
- C’est une attaque de type “pulse/blast” → boostee par le talent Mega Blaster (Megaator Tank, Gamblast)
- “Jamais joue” en competitif selon HARI
7.7.3 — Attaques qui retirent le champ
| Attaque | Type | Puissance | Particularite |
|---|---|---|---|
| Crio Pirouette | Glace, physique | 80 | Retire le champ même si la cible ne touche pas le sol. Utilise avec Baogian, aussi Dracolosse |
| Metallirou | Acier | 130 | Aucun defaut de précision, ne fonctionne QUE s’il y a un champ (et le retire). Utilise avec Roue de Fer (finale championnat d’Europe 2025, bon contre Miraidon) |
| Anti-Brume | — | — | Retire le champ, mais “jamais joue en competitif” |
7.7.4 — Force Nature (attaque disparue)
Force Nature etait une attaque non-offensive qui profitait du talent Farceur (Farfaduvet). Elle invoquait une attaque differente selon le champ actif :
| Champ actif | Attaque invoquee |
|---|---|
| Champ Electrifie | Tonnerre |
| Champ Herbu | Eco-Sphère |
| Champ Brumeux | Pouvoir Lunaire |
| Champ Psychique | Psycho |
Avec l’attaque Z en 2017, elle invoquait l’attaque Z du type correspondant.
Anecdote Worlds 2017 : Z Force Nature de Farfaduvet (via Farceur) devait toucher un Leurtitre en super efficace, mais comme c’est un move Farceur et Leurtitre est type Tenebres (immunise a Farceur), ca n’a rien fait du tout.
L’attaque a disparu avec Epee et Bouclier et n’existe plus dans les jeux recents.
7.8 — LES GRAINES (OBJETS LIES AUX CHAMPS) — RECAPITULATIF
| Graine | Champ requis | Boost accorde |
|---|---|---|
| Graine Électrique | Champ Electrifie | +1 Défense |
| Graine Herbe | Champ Herbu | +1 Défense |
| Graine Brumeuse | Champ Brumeux | +1 Défense Spéciale |
| Graine Psychique | Champ Psychique | +1 Défense Spéciale |
Règles importantes :
- S’activent immediatement quand le champ correspondant est pose
- Fonctionnent MEME si le Pokémon ne touche pas le sol (exception majeure aux règles normales des champs)
- L’objet est consomme après activation (usage unique)
- Synergie avec Delestage (double vitesse après consommation) et Acrobatie (plus puissante sans objet)
- Exemple competitif cle : Lunala + Graine Électrique/Herbe avec Miraidon/Gorithmique
7.9 — TABLEAU RECAPITULATIF STRATEGIQUE
| Meteo/Champ | Force principale | Faiblesse principale |
|---|---|---|
| Soleil | Degats Feu enormes + anti-Eau + anti-gel + soins boostes + Lance-Soleil + Chlorophylle | Depend d’un poseur lent (Chartor) ou restreint (Groudon) |
| Pluie | Degats Eau enormes + anti-Feu + Glissade + attaques precises + Fulgurayon | Uniquement des bons poseurs, très competitif — difficile a battre en weather war |
| Tempête de Sable | Degats chip 1/16e + def spe Roche + Baigne Sable (Minotaupe) | Synergies moins fortes que Soleil/Pluie, pas de boost offensif de type |
| Neige | Def +50% Glace + Voile Aurore + Rideau Neige + Blizzard | Synergies limitees en quantite, beaucoup de RNG |
| Champ Electrifie | Boost Elec + anti-sommeil + Monte Tension | Un seul bon poseur (hors Tokorico) |
| Champ Herbu | Boost Plante + soins 1/16e + anti-Séisme + Glisserbe + Graines | Soigne aussi l’adversaire |
| Champ Brumeux | Anti-statut complet + resistance Dragon x2 | Aucun boost offensif du tout |
| Champ Psychique | Boost Psy + anti-priorité + Vaste Pouvoir | Le plus complexe, depend entierement de qui touche le sol |
SECTION 8 : PROBLEMES DE STATUT
D’après la video “Les PROBLEMES de STATUT - GUIDE DEBUTANT” par HARI — 25 minutes
Les problemes de statut sont des conditions qui affectent negativement un Pokémon en combat. Même si le sujet parait simple et banal en apparence, HARI insiste sur le fait que les nuances et les enjeux aleatoires (RNG) de chaque statut sont mal compris par beaucoup de joueurs. Si on ne connait pas les probabilites exactes de chaque evenement, on est amene a prendre la mauvaise decision en pratique.
8.1 — DISTINCTION FONDAMENTALE : STATUTS DURS vs STATUTS VOLATILES
C’est la premiere chose a comprendre. HARI fait une distinction cruciale entre deux catégories de problemes de statut.
8.1.1 — Problemes de statut DURS (non volatiles)
- Ce sont des statuts qui restent sur le Pokémon même quand il sort du terrain.
- Ils sont affiches par une petite etiquette (icone) a côté des points de vie du Pokémon.
- Liste exhaustive : Brulure, Paralysie, Gel, Sommeil, Empoisonnement (standard et grave).
- HARI utilise le terme “etiquette” pour designer l’indicateur visuel, et trouve ce terme parlant pour differencier les deux catégories.
8.1.2 — Problemes de statut VOLATILES
- Ce sont des statuts qui sont retires automatiquement lorsque le Pokémon sort du terrain.
- De la même facon que les changements de stat (boosts/drops) sont remis a zero quand un Pokémon sort.
- Le seul statut volatile couvert dans cette video est la confusion.
- La confusion n’a pas de logo/etiquette affiche sur le Pokémon.
Note sur la somnolence : L’effet de Baillement (qui pose la “somnolance” avant d’endormir au tour suivant) est techniquement dans une catégorie a part. Ce n’est pas exactement un statut volatile comme la confusion. On ne soigne PAS la somnolance avec une Baie Prine (contrairement a la confusion).
8.1.3 — Règle d’exclusivite
Un Pokémon ne peut avoir qu’UN SEUL probleme de statut dur a la fois.
Si un Pokémon est déjà brule, il ne peut pas être paralyse, empoisonne, gele ou endormi en plus. L’attaque de statut echouera simplement.
En revanche : un statut volatile (confusion) peut se cumuler avec un statut dur. Un Pokémon peut être paralyse ET confus en même temps.
Consequence stratégique majeure : On peut volontairement imposer un statut a son propre Pokémon (ou allie) pour le protéger d’un statut plus dangereux. Exemple : bruler son allie avec Feu Folet pour l’empecher de se faire endormir par Spore.
8.2 — LA PARALYSIE
Effets
La paralysie a deux effets distincts :
1. Speed control — Vitesse divisee par 2
La vitesse du Pokémon paralyse est divisee par 2. C’est un ralentissement massif qui peut complètement inverser l’ordre de jeu.
Note historique : avant la 6e generation, la vitesse etait divisee par 4. C’etait encore plus devastateur.
2. Immobilisation — 25% de chance par tour
A chaque tentative d’attaque, le Pokémon paralyse a 25% de chance (une chance sur quatre) d’être complètement immobilise (il ne peut pas agir ce tour).
Précision cruciale de HARI sur les probabilites : La RNG est independante a chaque tour. Cela ne signifie PAS qu’on attaque systematiquement 3 fois sur 4. A chaque tour, le jeu tire a 25% independamment du resultat precedent. On peut très bien être bloque plusieurs tours de suite ou attaquer 50 tours d’affilee sans être immobilise. Chaque tirage est independant des autres.
HARI : “A Pokémon, ca marche comme ca. Si je fais 10 fois Lance-Flamme, je vais forcement bruler le Pokémon une fois. Non, ca marche pas comme ca.”
Duree
Permanente. Un Pokémon paralyse ne sort jamais tout seul de sa paralysie. Il reste paralyse jusqu’a guerison par un objet, un talent ou une attaque specifique.
Note importante
La paralysie ne bloque PAS le retrait d’un Pokémon. On peut toujours switcher un Pokémon paralyse normalement.
Attaques qui infligent la paralysie
Attaques de statut directes :
- Cage Éclair — l’attaque principale pour paralyser. Utilisée principalement avec des Pokémon possedant le talent Farceur (priorite +1 sur les attaques de statut) :
- Grimmsnarl (Angoliath) — le plus courant
- Trousselin (Klefki) — option
- Tenebfix (Sableye) — eventuellement
Attaques offensives avec paralysie garantie :
- Frot’fous (Nuzzle) — attaque offensive qui fait très peu de degats mais a 100% de chance de paralyser la cible. Distribution assez limitee :
- Pachirisu
- Raichu d’Alola (probablement)
Attaques offensives avec paralysie en effet secondaire :
- Tonnerre — environ 10% de chance de paralyser
- Fatal-Foudre — peut aussi paralyser en effet secondaire, moins présenté en competitif
Talent lie : Statik (Statique)
- Se retrouve chez Elektross/Elector
- Quand un Pokémon fait contact sur un porteur de Statique, il a 30% de chance d’être paralyse
- Se combine avec les attaques a multi-coups de contact (comme Taillade) qui multiplient les chances de declencher Statique
- Combinaison possible : Casque Brut + Statique — les degats du Casque Brut s’ajoutent a la menace de paralysie
Resume competitif
En général, la paralysie provient d’un Pokémon Farceur utilisant Cage Éclair. Plus rarement, elle arrive par hasard via Tonnerre ou Fatal-Foudre en effet secondaire.
8.3 — LE GEL
Effets
Un Pokémon gele est complètement immobilise — il ne peut pas attaquer du tout (contrairement a la paralysie ou on a 75% de chance d’agir).
A chaque tentative d’attaque, le Pokémon gele a 20% de chance (une chance sur cinq) de se degeler automatiquement. Si le degelage se produit, le Pokémon agit normalement ce tour-la.
Difference cruciale avec la paralysie : Un Pokémon paralyse ne sort JAMAIS tout seul de sa paralysie. Un Pokémon gele PEUT se degeler de lui-même (20% par tour).
Duree
Variable et aleatoire. Le Pokémon reste gele jusqu’a ce que :
- Il se degele lui-même (20% de chance par tour)
- Il utilise certaines attaques specifiques (en tant que lanceur — voir ci-dessous)
- Il subisse une attaque Feu offensive (en tant que cible)
- Il soit soigne par un objet ou un talent
Attaques qui INFLIGENT le gel
Le gel ne se pose JAMAIS directement comme Cage Éclair pour la paralysie. C’est uniquement un effet secondaire d’attaques offensives. Il n’existe pas d’equivalent de Cage Éclair pour le gel.
| Attaque | Chance de gel | Note |
|---|---|---|
| Laser Glace | 10% | Source la plus frequente de gel en competitif |
| Blizzard | 10% | Attaque de zone qui cible les DEUX adversaires — le risque de gel existe pour chacun d’eux |
La paire Feunard d’Alola + Artikodin est particulierement detestee par certains joueurs a cause du cumul de RNG : Rideau Neige (esquive) + chances de gel de Blizzard sur les deux adversaires.
Attaques qui DEGELENT le lanceur (en tant que lanceur)
Liste très restreinte donnee par HARI — seules ces attaques permettent a un Pokémon gele de se degeler en les utilisant :
| Attaque | Pokémon associe | Note |
|---|---|---|
| Flamme Croix | Reshiram | Exclusif |
| Roue de Feu | — | “Trop faible pour être utilise” |
| Feu Sacre | Ho-Oh | Exclusif |
| Bout de Feu (Pyro Ball) | Divers Pokémon Feu | “Une attaque vraiment commune” — la plus pertinente |
| Ebullition (Scald) | Divers Pokémon Eau | “Plus aussi distribue qu’avant” |
| Jet de Vapeur | Volcanion | Exclusif a un fabuleux (jamais autorise en VGC) |
IDEE RECUE CORRIGEE PAR HARI : Surchauffe NE PERMET PAS de degeler un Pokémon qui l’utilise. HARI dit avoir lui-même cru cela pendant un moment. C’est faux.
Degelage en tant que cible
Toutes les attaques Feu offensives (qui font des degats) degelent la cible si elle est gelee. Ce n’est PAS limite aux attaques Feu qui peuvent bruler. Même Flammeche (très faible) degele. Même Eruption (très puissante) degele. L’important est que ce soit une attaque Feu directe/offensive qui inflige des degats.
Aspect competitif
Le gel est un probleme de statut extremement RNG :
- RNG dans la maniere dont il est inflige (effet secondaire aleatoire a 10%)
- RNG dans la duree (20% de chance de degeler par tour)
- Aucun des deux joueurs ne peut prevoir combien de temps le gel durera
HARI : “C’est un probleme de statut qu’on n’aime pas, qui ne recompense pas grand-chose et qui meriterait d’être modifie.”
8.4 — LE SOMMEIL
Effets
Un Pokémon endormi est complètement immobilise (ne peut pas attaquer), comme le gel.
Le tour de sommeil ne decompte que quand le Pokémon est sur le terrain et essaie d’attaquer (“quand le jeu nous dit que le Pokemon dort encore/fait dodo”). Un Pokémon qui sort du terrain ne fait PAS avancer ses tours de sommeil.
Duree : le système de probabilites (SECTION CRITIQUE)
Le sommeil dure 1, 2 ou 3 tours — ce sont les trois seules possibilites, chacune avec une probabilite egale de 1/3.
HARI detaille la succession de probabilites tour par tour. C’est l’un des passages les plus importants de la video :
Tour 1 (garanti) :
- Le Pokémon est forcement immobilise.
- 0% de chance de se reveiller. On ne peut PAS se reveiller au premier tour.
- C’est un tour perdu garanti.
Tour 2 :
- Il y a 3 possibilites encore en jeu :
- Le sommeil dure 1 tour → je me reveille maintenant (probabilite 1/3)
- Le sommeil dure 2 tours → je reste endormi (probabilite 1/3)
- Le sommeil dure 3 tours → je reste endormi (probabilite 1/3)
- Resultat : 33% de chance de se reveiller (1 chance sur 3)
Tour 3 :
- Si on ne s’est pas reveille au tour 2, il ne reste que 2 possibilites :
- Le sommeil durait 2 tours → je me reveille maintenant (probabilite 1/2)
- Le sommeil durait 3 tours → je reste endormi (probabilite 1/2)
- Resultat : 50% de chance de se reveiller (1 chance sur 2)
Tour 4 :
- Si on est encore endormi, il ne reste qu’une seule possibilite (sommeil de 3 tours)
- Resultat : 100% de chance de se reveiller
Succession resumee des probabilites de reveil : 0% → 33% → 50% → 100%
HARI insiste : ni le joueur qui inflige le sommeil, ni celui qui le subit, ne peut savoir a l’avance combien de tours cela durera.
Cas special : l’attaque Repos (Rest)
L’attaque Repos soigne tous les PV et le probleme de statut en cours, mais endort le Pokémon.
- Le sommeil de Repos dure forcement 2 tours fixes (PAS aleatoire).
- Sequence : Repos → dort 1 tour → dort 2 tours → se reveille forcement.
HARI : “Tu imagines, tu fais Repos, tu soignes tous tes PV, tu dors mais tu sais pas combien de temps tu dors. Non, c’est horrible.” D’ou la duree fixe.
ATTENTION : Un Pokémon déjà paralyse peut être immobilise (25%) quand il essaie d’utiliser Repos, et donc rater l’attaque. Même chose si le Pokémon est gele.
Attaques qui infligent le sommeil
| Attaque | Précision | Pokémon principaux | Notes |
|---|---|---|---|
| Spore | 100% | Amoonguss (Golet) | “L’un des tout meilleurs Pokémon de l’histoire du jeu.” Le poseur de sommeil par excellence |
| Poudre Dodo | ~75% | Florizarre, Fragilady de Hisui | Moins precise, mais distribuee a plus de Pokémon |
| Baillement | 100% (pose la somnolance) | Nymphali (Sylveon) | Ne pose pas le sommeil immediatement — endort a la fin du tour SUIVANT |
| Griffe Funeste | 50% d’infliger un statut aleatoire | Farfurex, Ursaluna Bloodmoon | 1/6e de chance d’endormir specifiquement |
Details sur Baillement :
- Pose l’effet de somnolance sur la cible
- Le Pokémon s’endort a la fin du tour suivant (pas immediatement)
- La somnolance est techniquement un statut volatile mais dans une catégorie a part
- Elle ne se soigne PAS avec une Baie Prine (contrairement a la confusion)
Details sur Griffe Funeste :
- 50% de chance qu’un statut soit inflige
- Si un statut est inflige, il est choisi aleatoirement entre empoisonnement, paralysie et sommeil (1/3 chacun)
- Donc 1 chance sur 6 pour chaque statut specifique
- C’est la seule attaque offensive autorisee qui peut endormir sa cible (a part Chant Antique de Meloetta, fabuleux donc jamais autorise en VGC)
HARI qualifie Farfurex de “Pokémon abject niveau RNG” — trois statuts differents dont le sommeil, c’est “assez horrible.”
Note sur les attaques de poudre : Spore et Poudre Dodo sont des attaques de poudre, ce qui est pertinent pour les contres (les Lunettes Filtres protegent specifiquement contre les attaques de poudre).
8.5 — LA BRULURE
Effets — DEUX effets distincts
1. Degats recurrents : Inflige 1/16e des PV maximaux du Pokémon brule en degats a la fin de chaque tour.
2. Reduction des degats physiques : Divise par 2 les degats physiques du Pokémon brule.
Précision cruciale de HARI sur la reduction physique
Ce sont les degats physiques qui sont divises par 2, PAS la statistique d’Attaque. Ce n’est pas dans les “stat stages” — c’est un multiplicateur séparé applique au calcul final des degats.
Consequence importante : Un Pokémon a +4 en Attaque (multiplicateur x3 des stat stages) qui est brule ne se retrouve PAS simplement a l’equivalent de +2. En realite, ses degats physiques finaux sont divises par 2. Donc au lieu de x3 de degats, il fait x3/2 = x1,5. C’est significativement plus faible que ce qu’on pourrait croire naïvement.
Interactions specifiques avec la brulure
Tricherie (Foul Play) :
- Si l’adversaire utilise Tricherie contre un Pokémon brule : la brulure du Pokémon brule n’est PAS prise en compte (car Tricherie utilise la stat d’Attaque de la cible, pas du lanceur)
- Par contre, si un Pokémon brule utilise lui-même Tricherie : sa brulure EST prise en compte et reduit les degats
Coups critiques et brulure :
- On n’ignore PAS la brulure sur un coup critique. La reduction de degats physiques s’applique toujours, même sur un coup critique. C’est une exception au fonctionnement habituel des coups critiques.
Duree
Permanente. La brulure reste tant qu’elle n’est pas soignee.
Attaques qui infligent la brulure
Attaque de statut directe :
- Feu Folet (Will-O-Wisp) — l’attaque principale pour bruler en competitif. Utilisée par :
- Ectoplasma (Gengar) et Mega Ectoplasma comme support
- Beaucoup de Pokémon Spectre apprennent Feu Folet — HARI note que “ca a plus une vibe de Pokémon Spectre que de Pokémon Feu”
- Tenebfix (Sableye) avec le talent Farceur : “C’est, je crois, le seul Farceur avec Feu Folet.” — ce qui en fait un Pokémon unique pour bruler en priorité
Attaques offensives avec forte chance de brulure :
| Attaque | Chance de brulure | Note |
|---|---|---|
| Feu Sacre | 50% | “Niveau proba, c’est a peu pres un coin flip” (en tenant compte du 10% de rate) |
| Ebullition (Scald) | 30% | “N’est plus aussi distribuee qu’avant” — Milobellus peut l’apprendre |
Attaques offensives avec faible chance de brulure :
- Bout de Feu, Lance-Flamme, etc. — les attaques Feu classiques ont généralement 10% de chance de bruler en effet secondaire
8.6 — L’EMPOISONNEMENT
L’empoisonnement existe sous deux formes distinctes qu’il faut absolument distinguer.
8.6.1 — Empoisonnement STANDARD (Poison simple)
- Inflige 1/8e des PV maximaux de la cible en degats a la fin de chaque tour
- C’est tout. Pas d’autre effet. Les degats sont constants a chaque tour (toujours 1/8e)
- HARI : “C’est vraiment très très simple.”
8.6.2 — Empoisonnement GRAVE (Toxic / Badly Poisoned)
Le logo affiche est different : en général un degrade de couleur pour l’empoisonnement grave (plus visible sur Pokemon Ecarlate et Violet).
Les degats augmentent de facon cumulative :
- Tour 1 : 1/16e des PV max
- Tour 2 : 2/16e (= 1/8e) des PV max
- Tour 3 : 3/16e des PV max
- Tour 4 : 4/16e (= 1/4) des PV max
- Tour 5 : 5/16e des PV max
- Et ainsi de suite…
IDEE RECUE CORRIGEE : Les degats ne doublent PAS a chaque tour. On ajoute 1/16e supplementaire a chaque tour. C’est une progression lineaire, pas exponentielle.
8.6.3 — Comparaison chiffree Standard vs Grave
| Tour | Degats Standard (cumul) | Degats Grave (cumul) | Avantage |
|---|---|---|---|
| 1 | 1/8 (= 2/16) | 1/16 | Standard fait plus |
| 2 | 2/8 (= 4/16) | 3/16 (1/16 + 2/16) | Standard fait plus |
| 3 | 3/8 (= 6/16) | 6/16 (1/16 + 2/16 + 3/16) | Egalite |
| 4+ | — | — | Grave fait definitivement plus |
8.6.4 — Le “timer” de l’empoisonnement grave
L’empoisonnement grave met un veritable timer sur la tête du Pokémon. Même s’il a de quoi se soigner, un Pokémon gravement empoisonne ne peut pas rester sur le terrain indefiniment. Au bout d’un moment, il perdra 50% de ses PV en un seul tour.
Remise a zero du compteur : On peut remettre a zero l’echelonnement en sortant le Pokémon du terrain. Quand il revient, on repart a 1/16, puis 2/16, puis 3/16, etc. Mais le poison lui-même reste — seul le compteur progressif est reinitialise.
8.6.5 — Attaques qui infligent l’empoisonnement
Empoisonnement STANDARD :
| Attaque/Hazard | Précision | Cible | Pokémon principaux |
|---|---|---|---|
| Bombe Beurk | — | Un adversaire | Ectoplasma (Gengar) |
| Gaz Toxik | 90 | Les DEUX adversaires | Smogogo (Weezing) — “Pas du tout ininteressante” |
| 1 rangee de Pics Toxik | — | Tout Pokémon entrant qui touche le sol | Poseur divers |
Empoisonnement GRAVE :
| Attaque/Hazard | Précision | Cible | Note |
|---|---|---|---|
| Toxik | 90 | Un adversaire | Inflige directement l’empoisonnement grave |
| 2 rangees de Pics Toxik | — | Tout Pokémon entrant qui touche le sol | Si 2 couches sont posees (maximum), c’est grave au lieu de standard |
8.6.6 — Interactions des types Poison avec les Pics Toxik
- Un Pokémon de type Poison qui entre sur le terrain marche sur les Pics Toxik et les retire (les absorbe). C’est un contre naturel aux Pics Toxik.
- Les Pics Toxik ne peuvent jamais empoisonner un Pokémon Poison ou Acier, même si le Pokémon qui les a poses avait le talent Corrosion.
8.6.7 — Le talent Corrosion
- Talent de Salazzle (Florcla)
- Permet d’empoisonner un Pokémon Acier ou Poison avec l’attaque Toxik — normalement impossible
- IMPORTANT : Les Pics Toxik poses par un Pokémon avec Corrosion ne se “souviennent” PAS du talent Corrosion. Ils ne pourront donc jamais empoisonner un Pokémon Poison ou Acier, même s’ils ont ete poses par un Pokémon Corrosion.
8.6.8 — Le talent Depot Toxik (Toxic Debris)
- Egalement mentionne pour Salazzle — ce talent pose automatiquement des Pics Toxik quand le Pokémon est touche par une attaque physique.
8.7 — LA CONFUSION (Statut VOLATILE)
Effets
- 1 chance sur 3 (33%) de ne pas lancer son attaque ET de se taper soi-même
- “Se taper soi-même” signifie : le Pokémon se fait l’equivalent d’une attaque physique sans type a 40 de puissance
- C’est une attaque physique : un Pokémon qui a gagne en Attaque physique (via des boosts) se fera plus de degats a lui-même quand il se frappe
- HARI pense que la brulure n’est PAS prise en compte sur les degats de confusion (il a verifie avant la video)
Note historique : avant la 7e generation, la confusion donnait 50% de chance (1 sur 2) de se taper soi-même. C’est maintenant 33% (1 sur 3). Le nerf a significativement reduit son impact competitif.
Duree
1 a 3 tours (comme le sommeil). Le Pokémon peut ne jamais se frapper et sortir directement de la confusion, ou se frapper 3 fois de suite. C’est impossible a prevoir.
Volatilite
C’est un probleme de statut volatile : il est retire automatiquement quand le Pokémon sort du terrain. C’est donc le statut le plus facile a “soigner” — il suffit de switcher.
Attaques qui infligent la confusion
- Vent Violent (Hurricane) — précision mediocre sans la pluie, mais avec la pluie, ne peut pas rater. Quand elle touche : 30% de chance de rendre la cible confuse. Utilise par Bequipan notamment.
- Vantardise (Swagger) — historiquement très problematique. Combinee avec Farceur sur Fulguris (Tornadus) :
- Fulguris Farceur avec Cage Éclair + Vantardise etait “assez abject” niveau RNG
- A l’epoque (5G), Vantardise etait plus precise ET la confusion etait 50% de se taper soi-même (au lieu de 33%)
- “Fulguris a fait crier pas mal de monde” en 5e generation
HARI : En pratique, on ne va pas vraiment essayer de poser la confusion volontairement. Ca sera plutot un effet secondaire de Vent Violent ou d’attaques similaires.
8.8 — LES TYPES ET LEURS IMMUNITES AUX STATUTS
| Type | Immunité |
|---|---|
| Electrik | Ne peut pas être paralyse |
| Glace | Ne peut pas être gele |
| Feu | Ne peut pas être brule |
| Poison | Ne peut pas être empoisonne |
| Acier | Ne peut pas être empoisonne |
Exception : le talent Corrosion (Salazzle) permet d’empoisonner les types Poison et Acier avec Toxik.
8.9 — CONTRES AUX PROBLEMES DE STATUT
8.9.1 — Objets
Baie Prine (Lum Berry) :
- Soigne n’importe quel probleme de statut (dur OU volatile, y compris la confusion)
- Consommable : fonctionne une seule fois par combat
- L’objet de guerison de statut le plus polyvalent
Baie Marron (Chesto Berry) :
- Soigne specifiquement le sommeil uniquement
- Utile si le sommeil est la seule menace a couvrir dans la méta
- HARI mentionne qu’en 2016, on pouvait voir des equipes avec a la fois une Baie Prine ET une Baie Marron tellement le sommeil etait present
Lunettes Filtres (Safety Goggles) :
- Protegent contre les attaques de poudre (Spore, Poudre Dodo, Poudre Fureur, etc.)
- Ne protegent PAS contre les problemes de statut eux-memes — seulement contre la catégorie d’attaques “poudre”
- “Très très souvent, on va vouloir jouer les Lunettes Filtres” pour repondre a Amoonguss dans la méta
- Utiles aussi contre : Cotovol, Florizarre, Fragilady de Hisui, Tuffroyable avec Poudre Fureur
Cape Obscure (Covert Cloak) :
- Protège des effets secondaires des attaques offensives
- Ne protège PAS contre les attaques de statut directes (ex: Cage Eclair)
- MAIS protège contre : la paralysie de Tonnerre, le gel de Laser Glace, etc.
- Utilité principale : contre le flinch de Bluff (Fake Out), contre la baisse de vitesse de Vent Glace
- Avantage notable : immunise aux problemes de statut provenant de Griffe Funeste de Farfurex (car ce sont des effets secondaires d’une attaque offensive)
HARI : “Être immunise au type Poison, ca te demande d’avoir le type Acier, et si tu as le type Acier, tu as probablement la faiblesse Combat” — ce qui fait de la Cape Obscure une alternative plus flexible que l’immunite de type.
Orbe Flamme (Flame Orb) :
- Utilise volontairement pour s’auto-bruler en fin de premier tour
- Combinaison phare : Ursaluna (Ursaking) + Cran (Guts) + Facade
- “On n’a jamais joue autre chose que l’Orbe Flamme avec Ursaking.”
8.9.2 — Attaques defensives
Repos (Rest) :
- Soigne le probleme de statut en cours en le remplacant par le sommeil
- Soigne aussi tous les PV
- Le sommeil de Repos dure forcement 2 tours (fixe, pas aleatoire)
- ATTENTION : si le Pokémon est paralyse, il peut être immobilise (25%) quand il essaie d’utiliser Repos
- Mentionne avec Ronflex (Snorlax) comme utilisateur
Blabla Dodo (Sleep Talk) :
- Pas un contre aux statuts, mais une combo avec le sommeil
- Le Pokémon endormi utilise une de ses autres attaques au hasard
- Exemple historique : Championnat du Japon 2016 — Flambusard (Talonflame) avec Blabla Dodo + Rapace + Bout de Feu
Rune Protect (Safeguard) :
- Fonctionne comme un mur (Protection/Mur Lumiere)
- Protège les deux Pokémon de votre côté du terrain contre les problemes de statut
- ATTENTION : ca n’empeche PAS de s’endormir avec votre propre attaque (auto-sommeil)
8.9.3 — Talents defensifs/offensifs lies aux statuts
Farceur (Prankster) :
- Donne priorité +1 aux attaques de statut
- Utilise offensivement (Cage Eclair, Feu Folet, Vantardise) ET defensivement (Rune Protect)
Cran (Guts) :
- Multiplie l’Attaque quand le Pokémon a un probleme de statut
- L’attaque Facade et le talent Cran permettent d’ignorer la reduction de degats physiques de la brulure — on ne prend que les benefices du boost
- Combinaison phare : Ursaluna (Ursaking) + Orbe Flamme + Cran + Facade = “potentiel de degats immense”
8.9.4 — Stratégies d’auto-infligement de statut
- En cours de partie : On peut faire Feu Folet sur son propre allie pour l’empecher de se faire endormir par Spore (“ca, c’est quelque chose qui peut arriver”)
- C’est un outil situationnel, pas une stratégie de construction d’equipe (sauf pour Ursaking + Orbe Flamme qui est planifie des le team building)
8.10 — TABLEAU RECAPITULATIF COMPLET
| Statut | Type | Effet principal | Effet secondaire | Duree | Peut-on en sortir seul ? |
|---|---|---|---|---|---|
| Paralysie | Dur | Vitesse /2 | 25% immobilisation par tour | Permanente | Non, jamais |
| Gel | Dur | Immobilisation totale | — | Variable | Oui, 20% par tour |
| Sommeil | Dur | Immobilisation totale | — | 1-3 tours | 0% → 33% → 50% → 100% |
| Brulure | Dur | 1/16e PV/tour | Degats physiques /2 | Permanente | Non, jamais |
| Poison standard | Dur | 1/8e PV/tour | — | Permanente | Non, jamais |
| Poison grave | Dur | 1/16e + 1/16e/tour (cumulatif) | — | Permanente (compteur reset au switch) | Non, jamais |
| Confusion | Volatile | 33% auto-degats (40 puissance physique) | Rate l’attaque | 1-3 tours | Oui, retrait = guerison |
SECTION 9 : BOOSTS ET DROPS DE STATISTIQUES
D’après la video “Les BOOSTS (et les drops) - GUIDE DEBUTANT” par HARI — 36 minutes
Les boosts et les drops sont des effets qui multiplient ou divisent les statistiques d’un Pokémon pendant le combat. Contrairement aux stats de base (calculees en amont avec les EV, IV, nature, etc.), les boosts et drops s’appliquent en temps reel pendant la partie. C’est toujours (ou presque) une bonne chose d’augmenter ses stats : on devient plus fort. On peut aussi vouloir baisser les statistiques de l’adversaire pour le rendre moins performant.
Il y a enormement d’attaques et de talents en rapport avec les boosts et les drops. Cette section couvre tout ce qui est necessaire pour les maitriser.
9.1 — REPRESENTATION VISUELLE EN COMBAT
- Les boosts (augmentations) sont representes par une aura rouge qui monte, accompagnee du son “ploup ploup”.
- Les drops (baisses) sont symbolisees par une aura bleue qui descend, accompagnee du son “ploup ploup ploup”.
Affichage en jeu : On peut consulter les stat stages d’un Pokémon en affichant ses conditions en combat. Les boosts sont symbolises par des fleches vers le haut, les drops par des fleches vers le bas. Par exemple : un Suicune pourrait afficher +3 en attaque speciale, +3 en défense speciale (fleches vers le haut) et -2 en vitesse (fleches vers le bas).
HARI insiste : ce qui concerne les boosts et les drops a proprement parler, c’est bien le “ploup ploup” et “ploup ploup ploup”. C’est le meilleur moyen de les differencier visuellement de tous les autres effets qui influencent les degats mais qui ne sont PAS des stat stages.
9.2 — TERMINOLOGIE
HARI utilise le terme anglais “stat stages” (mentionne dans sa video lexique). Un commentateur avait propose “palier de stat” comme traduction francaise. Le terme anglais reste le plus utilise dans la communaute francophone.
Autres termes courants : stack (un cran/palier), boost (augmentation), drop (baisse), stacks (au pluriel pour les crans accumules).
9.3 — DISTINCTION CRUCIALE : STAT STAGES vs. AUTRES EFFETS
Il faut absolument faire la difference entre les stat stages et les autres multiplicateurs. Si on melange tout, on fera des erreurs dans les calculs de degats — et ces erreurs peuvent couter un match.
Ce qui EST un stat stage :
- Intimidation (c’est -1 en Attaque)
- Danse Lame (c’est +2 en Attaque)
- Vent Glace (c’est -1 en Vitesse sur les adversaires)
Ce qui N’EST PAS un stat stage :
- Coloforce (Huge Power) d’Azumarill — double l’Attaque, mais c’est un talent fixe, pas un stat stage
- Bandeau Choix / Mouchoir Choix — multiplie une stat, mais c’est un objet, pas un stat stage
- Protection (Mur Lumiere/Protection) — reduit les degats, mais ce n’est pas un stat stage
- Force Soleil — +50% attaque speciale sous le soleil, mais ce n’est pas un stat stage
- Brulure — divise par 2 les degats physiques, mais ce n’est pas un stat stage
HARI : “Si tu dis ‘ca va faire deux fois plus de degats’ et qu’en fait c’est x2,25, tu vas prendre un KO que tu pensais pas prendre.”
Pourquoi c’est important : Les stat stages ont des règles specifiques : ils sont reinitialises quand le Pokémon sort, ils peuvent être reset par Bue Noire, ils sont affectes par les coups critiques (voir section 9.12). Les autres multiplicateurs ne suivent PAS ces règles.
9.4 — LE TABLEAU COMPLET DES MULTIPLICATEURS
C’est la reference a connaitre. HARI detaille les multiplicateurs pour chaque palier, de -6 a +6.
9.4.1 — Attaque, Défense, Attaque Spéciale, Défense Spéciale, Vitesse
Pour ces 5 statistiques principales, chaque stack supplementaire ajoute un increment de 0,5 au multiplicateur :
| Stage | Multiplicateur | Fraction | Description |
|---|---|---|---|
| -6 | x0,25 | 2/8 | Divise par 4 |
| -5 | ~x0,286 | 2/7 | Divise par 3,5 |
| -4 | ~x0,333 | 2/6 = 1/3 | Divise par 3 |
| -3 | x0,4 | 2/5 | Divise par 2,5 |
| -2 | x0,5 | 2/4 = 1/2 | Divise par 2 |
| -1 | ~x0,667 | 2/3 | Divise par 1,5 |
| 0 | x1 | 1 | Neutre |
| +1 | x1,5 | 3/2 | Multiplie par 1,5 |
| +2 | x2 | 4/2 = 2 | Multiplie par 2 |
| +3 | x2,5 | 5/2 | Multiplie par 2,5 |
| +4 | x3 | 6/2 = 3 | Multiplie par 3 |
| +5 | x3,5 | 7/2 | Multiplie par 3,5 |
| +6 | x4 | 8/2 = 4 | Maximum — multiplie par 4 |
Points a retenir :
- A +3, ca ne multiplie PAS par 3 — c’est x2,5. L’increment est toujours de 0,5.
- A +6 (le maximum absolu), c’est x4.
- Les valeurs negatives suivent une logique inverse mais pas exactement symetrique.
- Le maximum est +6 et le minimum est -6. On ne peut pas depasser ces bornes.
9.4.2 — Précision et Esquive
Pour ces deux statistiques, le calcul est different. Les increments sont de 1/3 (et non 0,5) :
| Stage | Multiplicateur | Fraction |
|---|---|---|
| -6 | x0,333 | 3/9 |
| -5 | x0,375 | 3/8 |
| -4 | ~x0,429 | 3/7 |
| -3 | x0,5 | 3/6 |
| -2 | x0,6 | 3/5 |
| -1 | x0,75 | 3/4 |
| 0 | x1 | 3/3 |
| +1 | ~x1,333 | 4/3 |
| +2 | ~x1,667 | 5/3 |
| +3 | x2 | 6/3 |
| +4 | ~x2,333 | 7/3 |
| +5 | ~x2,667 | 8/3 |
| +6 | x3 | 9/3 |
Exemple concret de HARI : Poudre Dodo a 75% de précision de base. A +1 en précision, on multiplie par 4/3 (soit ~1,333). Calcul : 75 x 1,333 = 100. Donc Poudre Dodo ne peut plus rater si on est a +1 de précision. “Concretement, tu prends 1/3 de 75, tu arrives a 100.”
HARI note que connaitre les changements exacts en précision/esquive est beaucoup moins important en pratique que pour les stats offensives/defensives. La précision est une question de probabilite. En revanche, pour l’attaque et la défense, ca influe directement sur les calculs de degats. Pour la vitesse, c’est crucial pour savoir qui depasse qui.
9.5 — REGLE FONDAMENTALE : SORTIE DU TERRAIN
Un Pokémon qui sort du terrain PERD TOUS ses changements de stat. Quand il rentre a nouveau, toutes ses stats sont a +0.
C’est une règle absolument cruciale. Elle signifie que :
- Tous les boosts gagnes peniblement sont perdus au switch
- Toutes les drops infligees par l’adversaire sont aussi effacees
- C’est l’une des raisons pour lesquelles le cycle (envoyer et retirer des Pokemon regulierement) est si puissant en competitif
9.6 — LES OBJETS QUI INTERAGISSENT AVEC LES BOOSTS/DROPS
9.6.1 — Herbe Blanche (White Herb)
Effet : Soigne les drops de stat. Consommable (une seule utilisation par combat).
Règles de fonctionnement :
- Marche pour plusieurs drops d’un coup : Si Farfurex fait Close Combat et perd en Défense ET en Défense Spéciale en même temps, l’Herbe Blanche soigne les deux baisses d’un coup.
- Marche même pour 2 stacks d’un coup : Si on fait Dracometéor (qui donne -2 en Attaque Speciale), l’Herbe Blanche remet a +0.
- Contre Intimidation : Si le porteur se prend Intimidation, il consomme l’Herbe Blanche et soigne la baisse d’Attaque.
Usage competitif : Pas très joue en général, mais vu recemment en reglement H sur Farfurex.
9.6.2 — Talisman Sain (Clear Amulet)
Apparu en 9e generation. HARI : “C’est l’un des meilleurs objets du jeu. C’est vraiment très très fort.”
Effet : Protège le porteur des baisses de statistiques causees par les autres Pokémon. Mais PAS de celles qu’il s’inflige a lui-même.
Exemples :
- Si Carchacrok fait Marteau Force (qui baisse sa propre vitesse) : le Talisman Sain ne le protege pas (c’est auto-inflige)
- Si Carchacrok subit Vent Glace ou Intimidation : le Talisman Sain empêche la baisse (c’est externe)
Vent Glace specifiquement : C’est un move offensif, donc les degats sont infliges normalement, mais le porteur du Talisman Sain ne subit pas la baisse de vitesse.
Contre Intimidation : Le Talisman Sain bloque complètement l’effet d’Intimidation sur son porteur.
La difference avec l’Herbe Blanche : le Talisman Sain n’est PAS consommable. Il protège en permanence tant que le Pokémon le tient. L’Herbe Blanche ne fonctionne qu’une fois.
9.6.3 — Sac Fuite (Eject Pack)
Effet : Force le porteur a sortir du terrain lorsqu’il subit une ou plusieurs drops de stat (y compris auto-infligees).
Usage historique : Utilise quasi-exclusivement sur Chartor.
Pourquoi ? Pas pour pouvoir refaire Surchauffe sans penalite, mais parce que ca permet de remettre Chartor sur le terrain plus tard pour reposer le soleil, ou simplement pour ceder la place a un Pokémon plus offensif.
Scenario type : Chartor entre, active Sécheresse (le soleil se met en place), se fait intimider par Fafinferno → le Sac Fuite s’active → Chartor sort → on envoie un attaquant offensif comme Flambusard qui profite du soleil. Chartor peut revenir plus tard pour reposer le soleil si necessaire.
HARI : “Très dependant de la méta en question.”
9.6.4 — Spray Gorge (Throat Spray)
Effet : Objet consommable qui s’active lorsqu’on utilise une attaque sonore (comme Megaphone). Donne +1 en Attaque Spéciale après l’attaque.
Important : Le boost arrive après l’attaque — le premier Megaphone ne profite donc pas du boost. C’est a partir du deuxieme que les degats augmentent.
On peut aussi utiliser une attaque sonore non-offensive pour activer le Spray Gorge (exemple : l’attaque signature de Kaiser/Squalinon).
Usage competitif : Joue sur Nymphali et potentiellement sur Farigiraf.
9.6.5 — Les Graines (Seeds)
Quatre graines qui s’activent en presence du champ correspondant (voir Section 7 pour les details complets) :
| Graine | Champ requis | Boost |
|---|---|---|
| Graine Électrique | Champ Electrifie | +1 Défense |
| Graine Herbe | Champ Herbu | +1 Défense |
| Graine Brumeuse | Champ Brumeux | +1 Défense Spéciale |
| Graine Psychique | Champ Psychique | +1 Défense Spéciale |
Exemple : Farigiraf avec Graine Électrique + Miraidon (poseur de champ electrifie) pour mieux resister aux attaques physiques.
9.6.6 — Vulne Assurance (Weakness Policy)
Effet : Objet consommable qui s’active lorsque le porteur subit une attaque super efficace. Donne +2 en Attaque ET +2 en Attaque Spéciale.
HARI : “C’est un objet high risk, high reward.”
- Beaucoup joue avec le Dynamax car ca synergisait bien (le Dynamax donne plus de PV pour survivre au coup super efficace).
- Aussi possible sur Carmadura (Ceruledge).
- Il faut survivre a l’attaque super efficace pour que l’objet s’active. On peut utiliser une combinaison (un allie fait une attaque super efficace faible) pour en profiter de facon controlee.
9.6.7 — Feuille Copieuse (Mirror Herb)
Effet : S’active quand un Pokémon adverse gagne des statistiques. Le porteur copie ces boosts.
Cas pratique : Fafinferno intimide un Scalproie → Scalproie active Acharne et gagne +2 en Attaque → Fafinferno avec la Feuille Copieuse copie ces +2 en Attaque. “Ca permet de compenser l’activation du talent Acharne de l’adversaire.”
Aussi utilise sur Tauros de Paldea.
HARI : “Pas super joue. Vous cassez pas forcement trop la tête avec ca.”
9.6.8 — Herbe Pouvoir (Power Herb)
Effet : Permet d’utiliser une attaque a deux tours en un seul tour (consomme l’objet).
Usage critique : Combinee avec Geo Controle de Xerneas pour lancer instantanement cette attaque de boost (qui normalement necessite un tour de chargement).
9.6.9 — Baie Citrus
Interaction avec Cognobidon : Après avoir sacrifie 50% de ses PV avec Cognobidon, la Baie Citrus récupère 25% des PV. “Tu es pas autant en danger que si tu avais juste fait Cognobidon.”
9.6.10 — Objets qui boostent les coups critiques
| Objet | Effet |
|---|---|
| Griffe Rasoir | +1 palier de coup critique |
| Lentilscope | +1 palier de coup critique (même bonus que Griffe Rasoir) |
9.7 — LES TALENTS QUI INTERAGISSENT AVEC LES BOOSTS/DROPS
9.7.1 — Intimidation (Intimidate)
Effet : Baisse l’Attaque des Pokémon adverses de -1 quand le porteur entre sur le terrain.
Pokémon principaux : Fafinferno, Léviator, Drattak, Misdigit.
C’est le talent le plus cite et discute de toute la video. Intimidation est l’un des piliers du metagame competitif depuis des annees.
9.7.2 — Inconscient (Unaware)
Pokémon principal : Oyakata (Dondozo)
Effet : Ignore les changements de stat dans les deux sens lors des calculs de degats :
- Quand Oyakata attaque un Pokémon booste en défense → il ignore ces boosts
- Quand un Pokémon booste en attaque attaque Oyakata → Oyakata ignore ces boosts
Attention — l’inconvenient : Ca marche aussi dans le sens positif pour l’adversaire. Si on a intimide un Carchacrok a -1 en Attaque et qu’il attaque Oyakata, Inconscient ne tient pas compte de cette drop — le Carchacrok tape comme s’il etait a +0.
HARI : “C’est en général un avantage mais c’est parfois un inconvenient.” Contre un Pokémon qui spam Dracometéor, il tape tout le temps a pleine puissance car Inconscient ignore ses propres drops d’Attaque Spéciale.
9.7.3 — Corsin (Clear Body)
Effet : Protège des baisses de stat causees par les autres Pokémon. Litteralement la même chose que le Talisman Sain, mais en tant que talent.
HARI note que Corsin existe depuis bien plus longtemps que le Talisman Sain.
9.7.4 — Esprit Contraire (Contrary)
Effet : Inverse TOUS les boosts et les drops. Si le Pokémon se fait intimider, il gagne en Attaque au lieu d’en perdre. Si il fait Tempête Verte (qui normalement donne -2 en Attaque Speciale), il gagne +2 en Attaque Spéciale a la place.
MAIS : Ca inverse aussi les boosts normaux en drops. Un Pokémon avec Esprit Contraire ne peut PAS utiliser Enroulement (qui booste normalement Attaque, Defense et Precision) — avec Esprit Contraire, il perdrait dans ces trois stats.
Pokémon principal : Majaspic — naturellement pas très fort, mais une fois qu’il a fait une Tempête Verte, il se met a taper très fort car il gagne en Attaque Spéciale a chaque utilisation.
9.7.5 — Acharne (Defiant)
Effet : Quand le Pokémon subit une baisse de stat causee par un Pokémon adverse (ne marche PAS quand ca vient de l’allie), il gagne +2 en Attaque.
Principalement un contre a Intimidation : On prend -1 en Attaque (via Intimidation) mais on gagne +2 en Attaque (via Acharne) → bilan net de +1 en Attaque. On est en fait PLUS fort qu’avant !
Contre aussi : Vent Glace, Aboiement, et toute autre baisse de stat causee par l’adversaire.
Pokémon principal : Scalproie
9.7.6 — Battant (Competitive)
Effet : Même principe qu’Acharne mais sur le Special. Quand le Pokémon subit une baisse de stat causee par l’adversaire, il gagne +2 en Attaque Spéciale.
HARI : “Ca punit plus lourdement Intimidation” — même si Intimidation cible l’Attaque physique, Battant donne un boost en Attaque Spéciale. Si le Pokémon est un attaquant special, le -1 physique est peu genant tandis que le +2 special est enorme.
9.7.7 — Armure Miroir (Mirror Armor)
Pokémon principal : Corvaillus
Effet : Renvoie les baisses de stat vers le Pokémon qui les a infligees.
- Si Fafinferno entre face a Corvaillus, l’Intimidation rebondit et c’est Fafinferno qui perd en Attaque
- Marche aussi pour les moves offensifs : Si Corvaillus subit Vent Glace, plutot que de perdre en Vitesse, c’est le Pokémon qui a lance Vent Glace qui perd en Vitesse
9.7.8 — Turbo (Speed Boost)
Effet : Booste la Vitesse du porteur de +1 a la fin de chaque tour, a condition que le Pokémon ait passe l’integralite du tour sur le terrain (present au debut ET a la fin du tour).
HARI : “Tu peux pas juste envoyer ton Blaziken sur le terrain et prendre un boost a la fin du tour. Non, il doit être la au debut du tour et a la fin du tour.”
Pokémon : Brazegali (Blaziken) et Mega Brazegali
9.7.9 — Telecharge (Download)
Pokémon principal : Porygon 2
Effet : Quand le porteur entre sur le terrain, il recoit +1 soit en Attaque physique, soit en Attaque Spéciale, selon les défenses adverses.
Calcul : Le jeu calcule la somme de Défense et la somme de Défense Spéciale des deux Pokémon adverses. Le boost est donne dans la stat offensive qui exploite la moyenne la plus faible :
- Si la somme de Défense physique adverse < somme de Défense Spéciale → boost en Attaque physique
- Si la somme de Défense Spéciale adverse < somme de Défense physique → boost en Attaque Spéciale
HARI : “Tu fais la somme de Défense physique des deux poke en face. Tu fais la somme de Défense Spéciale des deux poke en face. Tu regardes laquelle somme est la plus faible et tu prends un boost qui correspond.”
Historiquement, c’est surtout le boost en Attaque Spéciale qui a ete utile (Laser Glace, Terra Explosion).
9.7.10 — Lunatique (Moody)
Pokémon principal : Colorior (Smeargle)
Effet : A la fin de chaque tour, booste une stat aleatoire de +2 et baisse une autre stat aleatoire de -1. Les deux stats ne peuvent pas être la même.
Scenario stratégique : Colorior peut gagner +2 en Vitesse, devenir très rapide, et utiliser Spore avec une grande vitesse. Perdre en Attaque/Attaque Spéciale n’est pas un probleme (il n’attaque pas offensivement). Perdre en Defense/Defense Speciale non plus (il ne tient rien et compte sur sa Ceinture Force pour survivre un coup).
HARI : “Tu as une chance sur 5 de gagner en Vitesse et tu as aussi une chance sur 5 de perdre en Vitesse.” Mathematiquement, Lunatique + Spore est souvent interessant.
9.7.11 — Chanceux (Super Luck)
Pokémon principal : Togekiss
Effet : Donne +1 palier de coup critique permanent (voir section 9.12 sur les coups critiques).
9.8 — LES ATTAQUES QUI BOOSTENT NOS STATISTIQUES
9.8.1 — Attaques de boost en Attaque
| Attaque | Effet | Pokémon cites |
|---|---|---|
| Danse Lame (Swords Dance) | +2 en Attaque | Carchacrok, Scalproie |
| Gonflette (Bulk Up) | +1 Attaque, +1 Défense | Corvaillus, Kurouinge |
| Grondement (Howl) | +1 Attaque du lanceur ET de l’allie | Arcanin, Feu Percant (reglement F) |
| Coaching | +1 Attaque, +1 Défense a l’allie uniquement | Farfurex, Kurouinge |
| Point Boost (Power-Up Punch) | +1 Attaque a chaque coup qui touche (42 puissance, Combat, physique) | Mega Kangourex (frappe 2x = +2/tour) |
| Cognobidon (Belly Drum) | Sacrifie 50% PV → se met a +6 en Attaque (quels que soient les stages actuels) | Azumarill, Ronflex |
| Napage (signature de Charmilly) | +2 Attaque ET +2 Att. Spe a l’allie | Charmilly, Colorior |
Details importants :
Coaching : Ne fonctionne que sur l’allie, pas sur soi-même ni sur l’adversaire. Ne se fait PAS rediriger par Par Ici (Follow Me). Plus efficace avec un Pokemon rapide comme Farfurex ou un Pokemon immunise a Bluff (Kurouinge).
Point Boost + Mega Kangourex : Le talent Lien Parental de Mega Kangourex fait frapper deux fois. Chaque coup donne +1, donc +2 en Attaque par tour. “Il devient monstrueux.” Disponible en 6G, perdu en 7G, present dans Pokémon Legends Z-A, probable dans Champions.
Cognobidon : Ne fonctionne que si on a plus de 50% de ses PV. Si on est a 50% pile ou moins, l’attaque echoue. Même a -6 avant, ca met directement a +6 (x4 en Attaque). Azumarill en profite immediatement grace a la priorité d’Aqua-Jet. Combinaison avec Baie Citrus : perd 50% mais récupère 25%.
Napage : Attaque signature de Charmilly. En dehors de Charmilly, seul Colorior peut l’apprendre. Se fait rediriger par Par Ici (contrairement a Coaching).
9.8.2 — Attaques de boost en Défense
| Attaque | Effet | Pokémon cites |
|---|---|---|
| Mur de Fer (Iron Defense) | +2 en Défense | Kaiser/Squalinon, Corvaillus |
| Gonflette (Bulk Up) | +1 Attaque, +1 Defense | (voir ci-dessus) |
Combinaison Mur de Fer + Big Splash : Big Splash est une attaque offensive qui utilise la Défense comme stat offensive (au lieu de l’Attaque). Donc Mur de Fer booste a la fois la survie ET la puissance offensive de Big Splash. Corvaillus combine egalement Gonflette + Rapace + Big Splash.
9.8.3 — Attaques de boost en Attaque Spéciale
| Attaque | Effet | Pokémon cites |
|---|---|---|
| Machination (Nasty Plot) | +2 en Attaque Speciale | Gros Mago (Hatterene) |
9.8.4 — Attaques de boost en plusieurs stats
| Attaque | Effet | Pokémon cites |
|---|---|---|
| Plénitude (Calm Mind) | +1 Att. Spe, +1 Def. Spe | Mega Gardevoir |
| Papillodanse (Quiver Dance) | +1 Att. Spe, +1 Def. Spe, +1 Vitesse | Pyrax, Fragilady |
| Geo Controle (Geomancy) | +2 Att. Spe, +2 Def. Spe, +2 Vitesse (1 tour de charge) | Xerneas |
| Danse Draco (Dragon Dance) | +1 Attaque, +1 Vitesse | Mega Drattak (Worlds 2018) |
HARI : Plénitude est “litteralement la Gonflette du Special” — les deux sont arrivees en 3e generation, ce sont des paralleles exacts.
Papillodanse est “vraiment premium comme attaque de boost” car elle booste 3 stats a la fois. Le defaut de Pyrax est sa défense physique (pas sa defense speciale), mais Papillodanse le rend rapide, puissant et plus resilient sur le special.
Geo Controle + Herbe Pouvoir : Xerneas etait extremement fort en 2016 et 2019 grace a cette combinaison qui permet de lancer Geo Controle instantanement (sans le tour de charge). En revanche, il etait pas du tout fort en 2022 (meta differente).
9.8.5 — Note stratégique sur les boosts de Vitesse
HARI : “Se booster en vitesse avec les stat stages, c’est pas quelque chose qu’on va vouloir faire en général. On va plutot baisser la vitesse des adversaires avec Vent Glace, Toile Elec, etc. C’est en général plus interessant que se booster en vitesse soi-même.”
L’attaque Hate (+2 Vitesse) ou Polyroch n’ont jamais vraiment ete jouees pour cette raison. Baisser la vitesse adverse a l’avantage de beneficier a TOUTE votre equipe (pas juste au Pokemon qui s’est booste).
9.8.6 — Attaque Puissance (Focus Energy)
- Effet : +2 paliers de coup critique
- Necessite un tour pour s’utiliser, mais combinee avec un objet comme Lentilscope/Griffe Rasoir (+1), ca donne +3 au total = 100% de coups critiques (voir section 9.12)
9.9 — LES ATTAQUES QUI BAISSENT LES STATS ADVERSES
9.9.1 — Attaques offensives qui baissent les stats des adversaires
| Attaque | Type | Cat. | Puissance | Précision | Cible | Effet |
|---|---|---|---|---|---|---|
| Abattage (Lunge) | Insecte | Physique | 80 | 100 | Un adversaire | -1 Attaque adversaire |
| Aboiement (Snarl) | Ténèbres | Special | 55 | 95 | Les 2 adversaires | -1 Att. Spe adversaires |
| Vent Glace (Icy Wind) | Glace | Special | 55 | 95 | Les 2 adversaires | -1 Vitesse adversaires |
| Toile Elec (Electroweb) | Électrique | Special | 55 | 95 | Les 2 adversaires | -1 Vitesse adversaires |
| Pietisol (Bulldoze) | Sol | — | — | — | Tous les adjacents | -1 Vitesse (mais touche AUSSI votre partenaire !) |
| Dernier Mot (Parting Shot) | Ténèbres | Statut | — | — | Un adversaire | -1 Attaque ET -1 Att. Spe de la cible, puis le lanceur sort du terrain |
| Bain de Smog (Clear Smog) | Poison | Special | 50 | Ne rate jamais | Un adversaire | Reset tous les changements de stat de la cible |
Dernier Mot + Fafinferno : Très utilise car ca baisse Attaque ET Attaque Spéciale de la cible (peu importe si elle tape physique ou special), puis Fafinferno sort et peut revenir plus tard pour re-Intimider. “Fafinferno est un Pokémon qui cycle extremement bien.”
Bain de Smog : Attaque offensive donc pas bloquee par Provoque. Ne peut pas rater (comme Aeropique). MAIS les Pokemon Acier sont immunises (pas de degats = pas d’effet). Moins pratique que Bue Noire car il faut viser un Pokemon specifique (bloquable par un redirecteur).
9.9.2 — Attaques offensives avec drops auto-infligees
Ces attaques puissantes ont un cout : elles baissent les stats du lanceur après utilisation.
| Attaque | Type | Cat. | Puissance | Effet sur le lanceur |
|---|---|---|---|---|
| Close Combat | Combat | Physique | 120 | -1 Défense, -1 Def. Spe |
| Assaut Frontal (Headlong Rush) | Sol | Physique | 120 | -1 Défense, -1 Def. Spe |
| Surchauffe (Overheat) | Feu | Special | Très eleve | -2 Att. Spe au lanceur |
| Dracometéor (Draco Meteor) | Dragon | Special | Très eleve | -2 Att. Spe au lanceur |
| Tempête Verte (Leaf Storm) | Plante | Special | Très eleve | -2 Att. Spe au lanceur |
| Surpuissance (Superpower) | Combat | Physique | — | -1 Attaque, -1 Défense |
Considerations strategiques :
- Close Combat + Mega Lucario : “C’est pas l’une des meilleures Megas, mais il fait quand même très très mal.” Mega Lucario est déjà fragile, donc la baisse de défenses change peut-être pas grand-chose.
- Assaut Frontal + Ursaking : Ursaking a de bonnes stats defensives, donc les drops sont “beaucoup plus chiantes pour lui. Il a vraiment interet a pas rater le KO quand il utilise Assaut Frontal.”
- Surchauffe + Mega Dracaufeu Y : “C’est monstrueux sous le Soleil, mais tu peux pas spam l’attaque avec toujours les memes degats.” Stratégie : faire Surchauffe, être a -2, sortir du terrain, revenir, et retaper a pleine puissance.
- Dracometéor + Trioxydre : Même logique de cycle.
9.10 — ATTAQUE SPECIALE : LAMINE (Sacred Sword)
Lamine est une attaque Combat physique de 90 de puissance qui possède un effet unique : elle ignore tous les changements de stat de la cible (augmentations ET baisses de Defense, ainsi que les augmentations d’Esquive).
Bon contre : Oyakata booste en Défense → Lamine ignore ces boosts et frappe comme si Oyakata etait a +0.
Pas bon contre : Shifours qui a perdu en Défense avec Close Combat → Lamine ignorerait cette baisse avantageuse et frapperait comme si Shifours etait a +0 en Défense.
Pokémon cites : Baanba (Baxcalibur), Samurott de Hisui (pas le meilleur representant), Galame (meilleur exemple — profite de son talent Incisif car Lamine est une attaque tranchante).
9.11 — BUE NOIRE (HAZE) ET BAIN DE SMOG (CLEAR SMOG) — LES RESET
9.11.1 — Bue Noire (Haze)
Effet : Reset tous les changements de stat de TOUS les Pokémon sur le terrain a 0. Tout le monde revient a +0 dans toutes les stats.
Proprietes :
- Attaque non-offensive (statut) → peut être bloquee par Provoque (Taunt)
- Ne necessite pas de viser un adversaire — on vise son propre Pokémon (comme Protection ou Zenite). Ca concerne tous les Pokémon sur le terrain, même ceux qui font Abri
- Pokémon principal : Cornebre (Murkrow) avec le talent Farceur. Etant de type Tenebres, il se fait rarement provoquer (les attaques Farceur ne marchent pas sur les types Tenebres, mais Provoc sur Cornebre viendrait rarement d’un Pokemon Farceur)
- Super efficace contre : Oyakata booste, tous les Pokémon qui sacrifient quelque chose pour se booster lourdement, Keisterer avec son attaque signature
9.11.2 — Bain de Smog (Clear Smog)
Effet : Reset tous les changements de stat d’un seul Pokémon cible.
9.11.3 — Comparaison Bue Noire vs Bain de Smog
| Critere | Bue Noire | Bain de Smog |
|---|---|---|
| Type d’attaque | Statut | Offensif (50 puissance, Poison, Special) |
| Cible | Tous les Pokémon du terrain | Un seul Pokémon |
| Bloque par Provoque ? | Oui | Non (c’est une attaque offensive) |
| Peut rater ? | Non | Non (ne rate jamais, comme Aeropique) |
| Fonctionne sur Pokémon Acier ? | Oui | Non (immunise au type Poison → pas de degats → pas d’effet) |
| Bloque par redirecteur ? | Non (ne vise pas un adversaire) | Oui (vise un Pokemon specifique) |
9.12 — LES COUPS CRITIQUES ET LEUR INTERACTION AVEC LES STAT STAGES
9.12.1 — Règle fondamentale
Les coups critiques ignorent les baisses offensives du lanceur ET les augmentations defensives de la cible.
Concretement :
- Si je suis a -1, -2, ou -6 en Attaque, mes coups critiques font les memes degats que si j’etais a +0
- Si je tape un Pokémon booste en Défense (comme Oyakata a +3 Defense), le coup critique ignore ces +3 et calcule comme si la Défense etait a +0
Exemple concret de HARI : Shifours (Urshifu) vs Fafinferno. L’attaque Torrent de Coups (Surging Strikes) de Shifours a 100% de chance de coup critique. Fafinferno utilise Intimidation (-1 Attaque sur Shifours), mais les coups critiques ignorent cette baisse. Donc Shifours tape toujours a pleine puissance malgre l’Intimidation.
Note sur la brulure : On n’ignore PAS la brulure quand on fait un coup critique. La reduction de degats physiques de la brulure s’applique toujours (voir section 8.5).
9.12.2 — Degats des coups critiques
Un coup critique applique un multiplicateur de x1,5 sur les degats (+50% de degats).
9.12.3 — Probabilites de coups critiques par palier
| Palier d’effets critiques | Probabilite | Pourcentage |
|---|---|---|
| +0 (defaut, majorite des attaques) | 1/24 | 4,17% |
| +1 | 1/8 | 12,5% |
| +2 | 1/2 | 50% |
| +3 ou plus | 1/1 | 100% |
Note historique : le palier +0 etait a 1/16 avant la 7e generation, passe a 1/24 en 7G (rendu plus rare).
9.12.4 — Attaques a fort taux de coup critique
Quand une attaque est decrite comme ayant un “fort taux de coup critique”, cela signifie +1 palier de coup critique naturel. Aucune attaque n’est naturellement a +2 — c’est toujours +1.
Cas speciaux :
- Torrent de Coups (Shifours) : 100% coup critique en tant que propriete intrinseque — cas unique
- Massue Lianne (attaque signature de toutes les formes d’Ogerpon) : +1 palier naturel (= 12,5% de base)
9.12.5 — Combinaisons pour atteindre 100% de coups critiques
Combinaison Togekiss Dynamax (debut 8G) :
- Talent Chanceux (Super Luck) : +1
- Objet Griffe Rasoir (Razor Claw) : +1
- Total : +2 = 50% de coup critique sur TOUTE attaque (même sans taux critique naturel)
HARI : “Il etait très oppressant et il y avait pas mal de RNG a cause de ca. C’etait très très relou.”
Combinaison Trioxydre (debut 9G) :
- Objet Lentilscope ou Griffe Rasoir : +1
- Attaque Puissance (Focus Energy) : +2
- Total : +3 = 100% de coup critique
- Utilise avec Dracometéor : les coups critiques ignorent les drops d’Att. Spe auto-infligees (car coup critique ignore les baisses offensives du lanceur), ignorent les boosts en Def. Spe d’Oyakata, ET ajoutent un bonus de +50% de degats
HARI : “C’etait très très bon a prendre.”
9.12.6 — Affichage en jeu
Dans les conditions du Pokémon, c’est affiche comme “Boost de coup critique”. Quelle que soit la quantite de boost (+1, +2, +3), ca affiche toujours juste “Boost coup critique” — il n’y a pas de distinction visuelle. L’affichage pourrait être different dans Pokémon Champions.
9.13 — STRATEGIES COMPETITIVES MAJEURES IMPLIQUANT LES BOOSTS/DROPS
Stratégie 1 : Cognobidon + Aqua-Jet (Azumarill)
Azumarill fait Cognobidon (+6 Attaque, sacrifie 50% PV), tient la Baie Citrus (recupere 25%), puis spamme Aqua-Jet (priorite) pour frapper immediatement malgre une Vitesse mediocre. Avec Coloforce (x2 Attaque via talent, hors stat stages) + x4 (stat stage +6), Azumarill devient une “veritable machine de guerre”.
Stratégie 2 : Geo Controle + Herbe Pouvoir (Xerneas)
Xerneas utilise Geo Controle (1 tour de charge normalement), l’Herbe Pouvoir supprime le tour de charge. Resultat : +2 Att. Spe, +2 Def. Spe, +2 Vitesse d’un seul coup. Dominant en 2016 et 2019.
Stratégie 3 : Puissance + Lentilscope = 100% Crits (Trioxydre)
Trioxydre tient Lentilscope (+1 crit), utilise Puissance (+2 crits) = +3 = 100% coups critiques. Dracometéor ignore ses propres drops d’Att. Spe car les crits ignorent les baisses offensives. Devastateur.
Stratégie 4 : Cycle Fafinferno
Fafinferno entre (Intimidation -1 Attaque adverse) → fait Dernier Mot (-1 Att, -1 Att. Spe de la cible, puis sort) → revient plus tard pour re-Intimider. “Fafinferno est un Pokémon qui cycle extremement bien.”
Stratégie 5 : Sac Fuite + Chartor
Chartor pose le Soleil (Secheresse), se fait intimider ou utilise Surchauffe → active le Sac Fuite → sort → on envoie un attaquant offensif. Chartor peut revenir plus tard pour reposer le Soleil.
Stratégie 6 : Tempête Verte + Esprit Contraire (Majaspic)
Grace a Esprit Contraire, les -2 Att. Spe de Tempête Verte deviennent +2 Att. Spe. Majaspic spamme cette attaque puissante en se boostant a chaque utilisation.
Stratégie 7 : Togekiss Chanceux + Griffe Rasoir (Dynamax)
50% de coups critiques sur chaque attaque grace au cumul Chanceux + Griffe Rasoir. Oppressant avec le Dynamax.
Stratégie 8 : Feuille Copieuse contre Acharne
Fafinferno intimide un adversaire avec Acharne → l’adversaire gagne +2 Attaque → Fafinferno avec Feuille Copieuse copie ces +2 Attaque pour compenser le desavantage.
Stratégie 9 : Bue Noire + Farceur (Cornebre)
Cornebre utilise Bue Noire en priorité grace a Farceur pour reset tous les boosts adverses, même si les Pokémon boostes sont plus rapides que lui.
Stratégie 10 : Lunatique + Spore (Colorior)
Colorior mise sur la chance d’obtenir +2 Vitesse via Lunatique pour pouvoir lancer Spore avant les adversaires. Ceinture Force pour survivre un coup. Les drops dans les autres stats ne comptent pas car il n’attaque pas.
Stratégie 11 : Mur de Fer + Big Splash (Kaiser/Squalinon)
Big Splash utilise la Défense comme stat offensive. Mur de Fer (+2 Defense) booste donc a la fois la survie ET la puissance de Big Splash.
Stratégie 12 : Mega Kangourex + Point Boost
Mega Kangourex frappe 2 fois avec Point Boost (talent Lien Parental) → +2 Attaque par tour. Monstrueux après un seul tour.
9.14 — NOTE SUR L’ESTIMATION DES DEGATS
HARI : “En voyant des games et en voyant les Pokémon se booster ou prendre des drops, vous allez mieux estimer les degats qui peuvent être faits et ca va venir avec le temps.”
L’experience pratique est irremplacable. Regarder des parties commentees, jouer des matchs, et observer les resultats des calculs de degats avec differents niveaux de boost permettra petit a petit de developper une intuition fiable sur les seuils de KO a chaque niveau de stat stage.
9.15 — TOUS LES POKEMON MENTIONNES (SECTION 9)
| Pokémon | Contexte dans la video |
|---|---|
| Suicune | Exemple d’affichage des stat stages |
| Azumarill | Cognobidon + Aqua-Jet + Coloforce + Baie Citrus |
| Ronflex | Cognobidon egalement |
| Farfurex | Herbe Blanche, Close Combat, Coaching |
| Carchacrok | Danse Lame, exemples d’Intimidation |
| Scalproie | Danse Lame, Acharne (contre Intimidation) |
| Corvaillus | Gonflette, Armure Miroir, Mur de Fer, Big Splash, Rapace |
| Kurouinge | Gonflette, Coaching |
| Fafinferno | Intimidation, Dernier Mot, Feuille Copieuse, cycle pivot |
| Chartor | Sac Fuite + Sécheresse |
| Nymphali | Spray Gorge + Megaphone |
| Farigiraf | Spray Gorge, Graine Électrique |
| Kaiser/Squalinon | Mur de Fer + Big Splash + attaque sonore |
| Miraidon | Champ Electrifie pour Graine Électrique |
| Carmadura (Ceruledge) | Vulne Assurance |
| Oyakata (Dondozo) | Inconscient, boosts Défense, cible de Lamine et Bue Noire |
| Mega Lucario | Close Combat |
| Ursaking (Ursaluna) | Assaut Frontal, Cran + Orbe Flamme |
| Mega Dracaufeu Y | Surchauffe sous le Soleil |
| Trioxydre | Dracometéor, combo Puissance + Lentilscope |
| Majaspic | Esprit Contraire + Tempête Verte |
| Porygon 2 | Telecharge |
| Colorior (Smeargle) | Lunatique, Spore, Napage, Ceinture Force |
| Cornebre (Murkrow) | Bue Noire + Farceur |
| Mega Drattak | Danse Draco (vainqueur Worlds 2018) |
| Xerneas | Geo Controle + Herbe Pouvoir (dominant 2016, 2019) |
| Pyrax | Papillodanse |
| Fragilady | Papillodanse |
| Mega Gardevoir | Plénitude |
| Gros Mago (Hatterene) | Machination |
| Arcanin | Grondement |
| Mega Kangourex | Point Boost (frappe 2x via Lien Parental) |
| Charmilly (Alcremie) | Napage (signature) |
| Togekiss | Chanceux + Griffe Rasoir (Dynamax) |
| Shifours (Urshifu) | Torrent de Coups (100% crit) |
| Ogerpon | Massue Lianne (fort taux critique) |
| Léviator | Intimidation |
| Drattak | Intimidation |
| Misdigit | Intimidation |
| Baanba (Baxcalibur) | Lamine |
| Galame | Lamine + talent Incisif |
| Brazegali (Blaziken) | Turbo (Speed Boost) |
Fin de la Partie 2 — Conditions de Combat
La Partie 3 couvrira les sections suivantes du guide.
GUIDE COMPETITIF POKEMON CHAMPIONS – PARTIE 3 : OUTILS COMPETITIFS
Auteur de reference : HARI (@HariPKMN) – Analyses issues de ses guides video francophones Public : Debutant complet souhaitant comprendre TOUS les outils strategiques du PvP Pokémon Format : Doubles (2 contre 2), le format officiel de toutes les competitions Pokémon
TABLE DES MATIERES – PARTIE 3
- Section 10 – Les Attaques Essentielles (44+)
- Section 11 – Les Talents Essentiels (70+)
- Section 12 – Les Objets Tenus
Part 6 — Competitive Tools Reference (HARI)
SECTION 10 : LES ATTAQUES ESSENTIELLES (44+)
Introduction
En competitif Pokémon, les attaques ne se limitent pas a “tapez le plus fort possible”. La majorite des attaques qui font la difference sont des attaques strategiques : protection, redirection, controle, speed controle, pivotement, et effets secondaires uniques. Cette section couvre les 44 attaques et plus que tout joueur competitif doit connaitre par coeur.
Rappels mécaniques importants :
- Catégorie physique : utilise la stat Attaque du lanceur et la stat Défense de la cible.
- Catégorie speciale : utilise la stat Attaque Spéciale du lanceur et la stat Défense Spéciale de la cible.
- Catégorie statut : ne fait pas de degats directs. Pas de puissance affichee.
- Degats de zone : quand une attaque de zone touche plus d’une cible potentielle, les degats sont reduits de 25%. C’est soit 25%, soit rien – il n’y a pas de reduction supérieure.
- Vitesse dynamique (depuis la 8G) : les changements de vitesse en cours de tour prennent effet immediatement dans le même tour. C’est crucial pour Cage Éclair, Vent Glace et similaires.
- Précision : si aucune précision n’est affichee, l’attaque ne peut pas rater (mais peut potentiellement echouer, comme Abri utilise deux fois de suite).
CATEGORIE 1 : LES ATTAQUES DE PROTECTION
1. ABRI (Protect)
| Propriete | Valeur |
|---|---|
| Type | Normal |
| Catégorie | Statut |
| Puissance | – |
| Précision | Ne rate pas (mais peut echouer) |
| Priorité | +4 |
Effet : Protège le lanceur de presque toutes les attaques (offensives et non offensives) jusqu’a la fin du tour.
Mécanique cruciale – L’echec du double Abri : On ne peut PAS spammer Abri. Si on tente plusieurs Abri consecutifs, les chances de réussite se divisent par 3 a chaque tentative successive :
- 1er Abri : reussit toujours (100%)
- 2e Abri consecutif : 1 chance sur 3 (~33%)
- 3e Abri consecutif : 1 chance sur 9 (~11%)
- Et ainsi de suite…
Utilité stratégique :
- Preserver un Pokémon faible face a l’adversaire
- Faire passer de la meteo, du speed controle (Distorsion, Vent Arriere) sans risque
- Temporiser pour observer ce que fait l’adversaire
- Decaler le timing pour permettre a un allie de finir un KO
- L’enjeu dans beaucoup de tours est : “est-ce que le Pokémon en face va s’abriter ? Si oui, ca ne sert a rien de le cibler.”
Frequence : On retrouve Abri 2 a 6 fois par equipe. Très peu d’equipes ne jouent pas Abri ou un equivalent. C’est LE move le plus important du jeu, sans discussion.
Variantes :
- Detection (Detect) : même effet qu’Abri, moins de PP. Utile si on veut eviter que l’adversaire devine le move avec Provoque ou detection d’attaque.
- Pico Défense (Spiky Shield) : comme Abri, mais inflige en plus des degats aux Pokemon qui attaquent au contact (même mécanique que les Piques de Fer).
- Bouclier Royal (King’s Shield) : variante d’Exagide, protège et baisse l’Attaque de 2 crans pour les attaquants de contact.
2. GARDE LARGE (Wide Guard)
| Propriete | Valeur |
|---|---|
| Type | Combat |
| Catégorie | Statut |
| Puissance | – |
| Précision | Ne peut pas echouer (en soi) |
Effet : Protège le lanceur ET son allie uniquement des attaques de zone (offensives et non offensives). Ne protège PAS des attaques monocibles.
Mécanique cruciale : Garde Large ne peut pas echouer en soi, MAIS elle compte dans la mécanique du double Abri. Si on fait Garde Large puis Abri au tour suivant, c’est considere comme une tentative de double Abri (donc 1 chance sur 3 de reussir). Deux Garde Large de suite puis un Abri = tentative de double Abri (pas triple, car Garde Large ne peut pas echouer).
Exemple concret :
- Betochef fait Garde Large. Son allie Ursaking fait Séisme (qui touche normalement l’allie) : Betochef est protège par sa propre Garde Large.
- L’adversaire fait une attaque de zone (Surf, Canicule…) : les deux Pokémon du lanceur sont proteges.
- MAIS : Garde Large ne protège PAS le Pokémon allie de l’adversaire. Seuls les Pokémon de votre côté du terrain sont proteges.
Pokémon notable : Zamazenta aux Worlds 2025, souvent joue avec Garde Large + Abri.
CATEGORIE 2 : REDIRECTION
3. PAR ICI (Follow Me)
| Propriete | Valeur |
|---|---|
| Type | Normal |
| Catégorie | Statut |
| Puissance | – |
| Précision | – |
| Priorité | +2 |
Effet : Redirige toutes les attaques monocibles des Pokémon adverses vers le lanceur, même si elles visaient l’allie.
Limitations importantes :
- Ne fonctionne PAS contre les attaques de zone (dans ces cas, Garde Large est pertinente, pas Par Ici).
- Ne peut PAS rediriger les attaques qui ne peuvent viser que l’allie du lanceur (ex : Coaching ne peut viser que l’allie, donc ne peut pas être redirige).
Utilité stratégique : Des Pokémon sont dedies a se sacrifier pour protéger un allie. Par exemple, Famignol faisait Par Ici pour protéger Courrousinge qui voulait prendre le temps de se booster avec Gonflette. Le redirecteur absorbe toute la pression pendant que l’allie se met en place.
Variante : Poudre Fureur (Rage Powder) – même effet que Par Ici, mais c’est une attaque de poudre, donc elle n’affecte pas les Pokemon de type Plante (qui sont immunises aux poudres) et peut être bloquee par les Lunettes Filtre ou le talent Enveloppe.
CATEGORIE 3 : MECANIQUES SPECIALES DE PROTECTION
4. CLONAGE (Substitute)
| Propriete | Valeur |
|---|---|
| Type | Normal |
| Catégorie | Statut |
| Puissance | – |
| Précision | – |
Effet : Sacrifie 25% des PV du lanceur pour creer un clone qui absorbe les degats a sa place. Le clone a l’equivalent des PV sacrifies. Il faut avoir au moins 25% de ses PV pour lancer l’attaque.
Mécanique detaillee :
- Le clone prend les attaques a la place du Pokémon. Même si une attaque devait faire 200% des PV, le clone absorbe tout.
- Si l’attaque ne fait pas assez de degats pour detruire le clone, il reste en place (ce n’est PAS un usage unique). Le nombre de PV restants du clone n’est pas affiche a l’ecran.
- Les effets secondaires des attaques ne peuvent pas proc sur le Pokémon si ca tape dans le clone (ex : Bout de Feu dans un clone = pas de brulure).
- Protège aussi de la plupart des attaques non offensives (Feu Folet, Cage Eclair…).
Faiblesse : Les attaques sonores (ex : Megaphone) ignorent le clone et tapent directement le Pokémon derriere.
Synergies :
- Se combine bien avec des Pokémon qui recuperent leurs PV (ex : Exagide avec les Restes).
- Efficace sur des Pokémon qui ont très peur de certaines attaques et veulent un bouclier temporaire.
CATEGORIE 4 : CONTROLE DE L’ADVERSAIRE
5. PROVOQUE (Taunt)
| Propriete | Valeur |
|---|---|
| Type | Ténèbres |
| Catégorie | Statut |
| Puissance | – |
| Précision | 100 |
Effet : Empêche la cible d’utiliser des attaques non offensives pendant 3 tours. Le Pokémon peut sortir du terrain mais ne peut pas utiliser d’attaque non offensive tant que Provoque est actif.
Utilité : Empêche de poser Distorsion, de se booster avec Gonflette, de faire Par Ici… Très efficace contre les Pokémon qui veulent se booster ou qui sont purement supports.
Attention : Précision de 100, donc ca PEUT techniquement rater (via des modifications de precision/esquive).
Frequence : Present dans toutes les metas. Souvent porte par des supports eux-memes, ou par des Pokémon offensifs qui se contentent de 2 attaques offensives + Provoque + Abri.
Importance : Eventuellement le meilleur move du jeu avec Abri. Top 5 des moves les plus importants, c’est certain.
6. ENCORE (Encore)
| Propriete | Valeur |
|---|---|
| Type | Normal |
| Catégorie | Statut |
| Puissance | – |
| Précision | 100 |
Effet : Force la cible a repeter sa derniere attaque utilisée pendant 4 tours.
Distribution : Beaucoup moins distribue que Provoque – peu de Pokémon l’apprennent.
Utilité :
- Punit les Pokémon qui se boostent : si Courrousinge fait Gonflette et subit Encore, il est force de faire Gonflette en boucle (ca peut sembler bien, mais l’adversaire prend des tours gratuits).
- Punit l’Abri : si un Pokémon fait Abri et subit Encore, il est force de repeter Abri – avec la mécanique de double Abri qui le fait souvent echouer (1 chance sur 3, puis 1 chance sur 9…).
- Punit la passivite en général.
Pokémon notable : Farfaduvet a gagne les Worlds avec l’attaque Encore.
CATEGORIE 5 : ECRANS ET REDUCTION DE DEGATS
7. PROTECTION (Light Screen)
| Propriete | Valeur |
|---|---|
| Type | Psy |
| Catégorie | Statut |
| Puissance | – |
| Précision | – |
Effet : Divise par 1,5 les degats subis des attaques speciales pendant 5 tours. Valable pour les deux Pokémon sur le terrain (pas juste le lanceur).
8. MUR LUMIERE (Reflect)
| Propriete | Valeur |
|---|---|
| Type | Psy |
| Catégorie | Statut |
| Puissance | – |
| Précision | – |
Effet : Divise par 1,5 les degats subis des attaques physiques pendant 5 tours. Valable pour les deux Pokémon sur le terrain.
Pokémon dedies aux ecrans : Trouscelin, Angoliath (encore plus commun).
Mentions supplementaires :
- Voile Aurore (Aurora Veil) : combine Protection + Mur Lumiere en une seule attaque, mais ne peut être utilise que sous la Neige.
- Rune Protect (Safeguard) : protège des problemes de statut pendant 5 tours, mais beaucoup moins commun.
Synergie avec Lumargile (objet) : La Lumargile etend la duree des ecrans de 5 a 8 tours (voir Section 12).
CATEGORIE 6 : PROBLEMES DE STATUT
9. FEU FOLET (Will-O-Wisp)
| Propriete | Valeur |
|---|---|
| Type | Feu |
| Catégorie | Statut |
| Puissance | – |
| Précision | 85 |
Effet : Brule la cible. Pas de degats directs, juste la brulure. La brulure :
- Divise par 2 les degats physiques du Pokémon brule
- Enleve 1/6e des PV a la fin de chaque tour
Utilité : Moyen de neutraliser un Pokémon physique. Parfois PLUS fort que mettre KO, car un Pokémon brule devient un poids mort sur le terrain – il ne tape plus, il perd des PV, et il prend une place sur le terrain.
Attention : Précision de 85 seulement – ca rate regulierement.
10. CAGE ECLAIR (Thunder Wave)
| Propriete | Valeur |
|---|---|
| Type | Électrique |
| Catégorie | Statut |
| Puissance | – |
| Précision | 90 (depuis la 7G) |
Effet : Paralyse la cible. La paralysie :
- Divise par 2 la vitesse du Pokémon (avant la 7G, c’etait divise par 4)
- Peut empecher d’attaquer (environ 25% de chance chaque tour)
Utilité : Souvent utilise avec des Pokémon ayant le talent Farceur (Angoliath, Trouscelin) pour avoir la priorite et profiter immediatement de la baisse de vitesse grace a la vitesse dynamique (le ralentissement s’applique dans le même tour).
11. POUDRE DODO (Sleep Powder) / SPORE (Spore)
| Propriete | Poudre Dodo | Spore |
|---|---|---|
| Type | Plante | Plante |
| Catégorie | Statut | Statut |
| Précision | 75 | 100 |
Effet : Endort la cible. Le Pokémon dort entre 1 et 3 tours :
- 1er tour : dort obligatoirement
- 2e tour : 1/3 de chance de se reveiller
- 3e tour : 1/2 de chance de se reveiller
- 4e tour : se reveille a coup sur
Difference : Spore a 100 de précision mais est beaucoup moins distribue (très peu de Pokemon l’apprennent). On utilise plus souvent Spore que Poudre Dodo quand c’est disponible, mais au debut de Pokémon Champions, on n’a pas vu d’utilisateur de Spore – par contre Florizarre apprend Poudre Dodo.
Rappel : Les attaques de poudre n’affectent pas les Pokémon de type Plante, et sont bloquees par les Lunettes Filtre et le talent Enveloppe.
CATEGORIE 7 : SPEED CONTROLE
Le speed controle est l’ensemble des mécaniques qui permettent de controler l’ordre dans lequel les Pokémon attaquent. C’est l’un des aspects les plus importants du jeu competitif.
12. VENT ARRIERE (Tailwind)
| Propriete | Valeur |
|---|---|
| Type | Vol |
| Catégorie | Statut |
| Puissance | – |
| Précision | – |
Effet : Double la vitesse de tous les Pokémon de votre côté pendant 4 tours, y compris le tour ou on pose Vent Arrière.
Utilité : L’un des tout premiers moves de speed controle. On a tout a gagner a attaquer avant l’adversaire. En général, on veut le poser avec un Farceur (priorite +1 sur les attaques de statut) ou avec un Pokémon très rapide.
Pokémon notables :
- Flambusard : talent Bourrasque (Gale Wings) – tant qu’il a tous ses PV, ses attaques Vol sont prioritaires. Comme Vent Arrière est de type Vol, il le pose en priorité.
- Rugi Lune avec Booster Énergie en vitesse : super rapide, peut poser Vent Arrière avant presque tout le monde.
13. DISTORSION (Trick Room)
| Propriete | Valeur |
|---|---|
| Type | Psy |
| Catégorie | Statut |
| Puissance | – |
| Précision | – |
| Priorité | -7 |
Effet : Inverse les vitesses pendant 5 tours (y compris le tour ou c’est pose). Les Pokémon lents deviennent rapides et inversement.
Mécanique cruciale – Sous-priorité : Distorsion a une priorité de -7, ce qui en fait toujours la derniere attaque utilisée dans le tour. Donc on n’en profite que les 4 tours suivants.
Attention – Vitesse vs Priorité : On parle d’inversion de VITESSE, pas de PRIORITE. Si on fait Kouba (Sucker Punch, priorite +1) pendant la Distorsion, on attaque quand même avant les Pokémon qui n’utilisent pas de priorité. Les brackets de priorité ne sont PAS inversees.
Utilité :
- Valorise des Pokémon avec des stats offensives/defensives elevees mais une vitesse très basse (comme Ursaking, Metaloss, Sorcilence).
- Des equipes tournent totalement autour de la Distorsion.
- Certaines equipes combinent Vent Arrière et Distorsion avec des Pokémon a vitesse moyenne pour avoir les deux options.
- La Distorsion peut aussi servir a PUNIR un Vent Arrière adverse en inversant l’avantage de vitesse.
14. VENT GLACE (Icy Wind)
| Propriete | Valeur |
|---|---|
| Type | Glace |
| Catégorie | Special |
| Puissance | 55 |
| Précision | 95 |
Effet : Attaque de zone (touche les 2 Pokemon adverses, PAS l’allie). Baisse la vitesse des cibles de maniere GARANTIE si l’attaque touche.
Utilité : Outil de speed controle. 55 de puissance = très faible (les attaques offensives normales sont entre 80 et 120), mais ce n’est pas pour les degats qu’on le joue. Un Pokemon très rapide avec Vent Glace peut baisser la vitesse adverse et permettre a l’allie d’en profiter dans le même tour (grace a la vitesse dynamique).
15. ABOIEMENT (Snarl)
| Propriete | Valeur |
|---|---|
| Type | Ténèbres |
| Catégorie | Special |
| Puissance | 55 |
| Précision | 95 |
Effet : Attaque de zone (2 Pokemon adverses, PAS l’allie). Baisse l’attaque SPECIALE des cibles (pas la vitesse). Même puissance et précision que Vent Glace.
Utilité : Moyen de neutraliser les Pokémon speciaux adverses. Mieux fait par un Pokémon plus rapide que ceux d’en face. Peut aussi “interdire” a un Pokémon agressif de rentrer sur le terrain – s’il rentre en prenant une baisse d’attaque speciale, il est neutralise des son arrivee.
Attaques similaires : Toile Elek (Electroweb, baisse la vitesse), Abattage (baisse l’attaque physique).
CATEGORIE 8 : ATTAQUES DE PIVOT (SWITCH)
Les attaques de pivot permettent au lanceur de quitter le terrain tout en faisant quelque chose d’utile. C’est une mécanique fondamentale du jeu competitif car elle permet de garder de la flexibilite et de la pression.
16. DERNIER MOT (Parting Shot)
| Propriete | Valeur |
|---|---|
| Type | Ténèbres |
| Catégorie | Statut |
| Puissance | – |
| Précision | 100 |
Effet : Baisse l’attaque ET l’attaque speciale de la cible, puis le lanceur sort du terrain (on choisit quel Pokemon envoyer a la place).
Utilité : Neutralise un Pokémon adverse tout en permettant de rentrer de maniere securisee un Pokémon qui a besoin d’être bien lance. En général, on préféré être PLUS LENT pour faire Dernier Mot, afin de donner de la securite au Pokémon qui rentre derriere (il arrive sur un adversaire affaibli).
Pokémon roi : Felin Ferno (Incineroar). Angoliath l’a aussi et peut en profiter avec Farceur (mais utilisation differente – il fait Dernier Mot en priorite grace a Farceur).
Importance : Attaque extremement forte. Felin Ferno a a la fois Dernier Mot et Bluff – c’est pourquoi il est aussi bon.
Interaction avec Corps Sain : Si la cible a le talent Corps Sain, les baisses de stats sont bloquees et le lanceur ne sort pas du terrain (car Dernier Mot echoue).
17. BLUFF (Fake Out)
| Propriete | Valeur |
|---|---|
| Type | Normal |
| Catégorie | Physique |
| Puissance | 40 |
| Précision | 100 |
| Priorité | +3 |
Effet : Ne peut être utilisée que le tour ou le lanceur vient de rentrer sur le terrain (premier tour de la partie, ou quand il revient après un switch). Si utilisée a un autre moment, echoue automatiquement. Flinch GARANTI a 100% de la cible (l’empeche d’attaquer ce tour).
Utilité : Temporiser d’une maniere differente d’Abri. Top 5 voire Top 3 des attaques les plus importantes. Combine parfaitement avec Dernier Mot : Felin Ferno fait Bluff en entrant, puis peut faire Dernier Mot pour sortir et revenir utiliser Bluff plus tard. C’est un cycle de pression permanent.
Pokémon notables : Felin Ferno, Gorithmique, Capoera, Simia Braz. “Un Pokémon qui n’a pas grand-chose dans son kit mais qui a Bluff peut souvent se debrouiller.”
Contres :
- Le talent Attention (Inner Focus) bloque le flinch de Bluff.
- Les Pokémon anti-priorité (Armure Caudale, Prestance Royale, Champ Psychique) bloquent Bluff car c’est une attaque prioritaire.
18. CHANGE ECLAIR (Volt Switch)
| Propriete | Valeur |
|---|---|
| Type | Électrique |
| Catégorie | Special |
| Puissance | 70 |
| Précision | 100 |
Effet : Attaque offensive + le lanceur sort du terrain. Contrairement a Dernier Mot, c’est une attaque OFFENSIVE – donc on ne peut PAS être empêche de le faire par Provoque. Par contre, si l’adversaire fait Abri, l’attaque n’atterrit pas et on ne sort pas du terrain.
Astuce : Parfois, on fait Change Éclair ou Demi-Tour sur notre PROPRE allie pour être certain de sortir du terrain et mettre un Pokémon en securite. L’allie prend peu de degats et le lanceur pivote librement.
Pokémon notable : Megga Larprint (talent Intimidation : quand il méga-evolue, il intimide, fait Change Eclair, sort, et quand il revient il intimide encore – cycle d’Intimidation).
19. DEMI-TOUR (U-Turn)
| Propriete | Valeur |
|---|---|
| Type | Insecte |
| Catégorie | Physique |
| Puissance | 70 |
| Précision | 100 |
Effet : Identique a Change Éclair mais type Insecte et physique. Plus utilise que Change Éclair d’après HARI car le type Insecte est distribue a plus de Pokémon utiles.
20. AU REVOIR (Flip Turn)
| Propriete | Valeur |
|---|---|
| Type | Eau |
| Catégorie | Physique |
| Puissance | ~60 |
| Précision | 100 |
Effet : Même mécanique que Change Éclair/Demi-Tour mais type Eau et physique. Un peu moins puissant mais même principe de pivot.
CATEGORIE 9 : ATTAQUES PRIORITAIRES
Les attaques prioritaires s’executent avant les attaques normales, quelle que soit la vitesse des Pokémon. Mais la priorité n’est PAS inversee par la Distorsion – seule la vitesse l’est.
21. VITESSE EXTREME (Extreme Speed)
| Propriete | Valeur |
|---|---|
| Type | Normal |
| Catégorie | Physique |
| Puissance | 80 |
| Précision | 100 |
| Priorité | +2 |
Effet : Attaque prioritaire a +2 (pas juste +1 comme la plupart des attaques prioritaires basiques comme Aqua Jet, Pisto Mac Punch…). Plus puissante que les priorités classiques.
Distribution très restreinte : Dracolosse, Arcanin, et très peu d’autres.
Note : Sans la Teracristalisation, Dracolosse a un peu de mal a s’en servir (type Normal sans STAB sauf Teracristalisation Normal).
22. KOUBA / COUP BAS (Sucker Punch)
| Propriete | Valeur |
|---|---|
| Type | Ténèbres |
| Catégorie | Physique |
| Puissance | 70 (depuis la 7G) |
| Précision | 100 |
| Priorité | +1 |
Effet : Priorité +1 MAIS ne fonctionne QUE si la cible s’apprete a utiliser une attaque offensive. Echoue si :
- La cible a déjà attaque ce tour
- La cible s’apprete a utiliser une attaque non offensive
- Un Pokémon plus rapide avec la même priorité attaque en premier (la cible a déjà fait son action)
Interactions complexes :
- Face a Dracolosse avec Vitesse Extreme (+2), Kouba (+1) perd car Vitesse Extreme est plus prioritaire ET aura déjà ete executee.
- Face a un Pokémon qui fait Aqua Jet (+1) et qui est naturellement plus rapide, l’adversaire attaque en premier car même niveau de priorité.
- Entre deux utilisateurs de Kouba, la vitesse compte pour savoir qui reussit.
Consequence : Des tours souvent instables et imprevisibles. Kouba cree des situations de jeu mental intenses.
23. GLYCER / HERBE GLISSANTE (Grassy Glide)
| Propriete | Valeur |
|---|---|
| Type | Plante |
| Catégorie | Physique |
| Puissance | 55 |
| Précision | 100 |
Effet : De base, pas une attaque prioritaire. MAIS si le Champ Herbu est actif, elle devient prioritaire (+1). Si le Champ est remplace (ex : un Wimessir rentre et pose le Champ Psychique), Glycer n’est plus prioritaire.
Subtilite : Si Glycer n’est pas prioritaire (pas de Champ Herbu), elle n’est PAS bloquee par le Champ Psychique (qui bloque les priorites positives).
Pokémon roi : Gorithmique – pose lui-même le Champ Herbu avec son talent (Crea Herbe) en entrant sur le terrain, puis utilise Glycer. Il synergise sur lui-même. D’autres Pokemon peuvent en profiter a côté de Gorithmique (Ogerpon, Ponfeu).
CATEGORIE 10 : ATTAQUES DEPENDANTES DU CHAMP
24. VASTE POUVOIR (Expanding Force)
| Propriete | Valeur (base) | Valeur (Champ Psy) |
|---|---|---|
| Type | Psy | Psy |
| Catégorie | Special | Special |
| Puissance | 80 | 120 |
| Précision | 100 | 100 |
| Cible | Monocible | Zone |
Effet : Sous Champ Psychique, devient 120 de puissance ET une attaque de zone (touche les 2 adversaires). Avec la reduction de degats de zone (-25%), ca revient a environ 90 de puissance sur chaque cible – ce qui reste excellent.
Faiblesse : Quand l’adversaire conteste le champ (le remplace), l’attaque redevient mediocre. Bataille de champs similaire a la bataille de la meteo.
CATEGORIE 11 : ATTAQUES DE ZONE
25. SEISME (Earthquake)
| Propriete | Valeur |
|---|---|
| Type | Sol |
| Catégorie | Physique |
| Puissance | 100 |
| Précision | 100 |
| Cible | Tous les Pokémon sauf le lanceur |
Effet : Attaque de zone qui touche TOUS les autres Pokémon sur le terrain, Y COMPRIS l’allie. Reduction de 25% des degats quand il y a plus d’une cible potentielle.
Importance : Top 5 des attaques les plus connues. Puissante mais dangereuse car elle touche l’allie – il faut s’assurer que l’allie a Lévitation, est de type Vol, ou peut survivre.
26. CANICULE (Heat Wave)
| Propriete | Valeur |
|---|---|
| Type | Feu |
| Catégorie | Special |
| Puissance | 95 |
| Précision | 90 |
| Cible | 2 adversaires (PAS l’allie) |
Effet : Attaque de zone qui touche les 2 Pokémon adverses mais PAS l’allie. 10% de chance de bruler chaque cible. Profite de la meteo Soleil.
Pokémon notable : Megga Dracofeu Y (pose le Soleil avec Secheresse et a de gros degats de zone).
27. EBOULEMENT (Rock Slide)
| Propriete | Valeur |
|---|---|
| Type | Roche |
| Catégorie | Physique |
| Puissance | 75 |
| Précision | 90 |
| Cible | 2 adversaires (PAS l’allie) |
Effet : Attaque de zone. 30% de chance de flinch (apeurer) chaque Pokemon touche. En combinant avec la precision de 90, ca donne 27% de chance effective de flinch sur chaque Pokemon adverse (si on est plus rapide qu’eux – le flinch ne marche que si vous attaquez avant la cible).
Utilité : Attaque a respecter – un utilisateur d’Eboulement plus rapide que vous risque de vous faire perdre des actions. Peut être utilise pour “jouer au loto” contre des Pokémon qui posent Distorsion, par exemple (si le flinch passe, Distorsion ne se pose pas).
28. MEGAPHONE (Hyper Voice)
| Propriete | Valeur |
|---|---|
| Type | Normal |
| Catégorie | Special |
| Puissance | 90 |
| Précision | 100 |
| Cible | 2 adversaires (PAS l’allie) |
Effet : Attaque de zone. C’est une attaque SONORE – elle passe a travers les Clones (Substitute).
Utilité principale : En général, pas utilisée de maniere basique en type Normal. On la combine avec des talents qui changent le type des attaques Normal :
- Peau Féerique (Pixilate) : les attaques Normal deviennent type Fee + 20% de bonus. Pokémon notables : Nymphali, Mega Gardevoir.
- Peau Celeste (Aerilate) : les attaques Normal deviennent type Vol + 20% de bonus. Pokémon : Mega Drattak.
- Peau Glacee (Refrigerate) : les attaques Normal deviennent type Glace + 20% de bonus. Pokémon : Dragmara.
Avec ces talents, Megaphone devient une excellente attaque de zone avec STAB + 20% bonus supplementaire.
CATEGORIE 12 : ATTAQUES OFFENSIVES A MECANIQUE SPECIALE
29. FACADE (Facade)
| Propriete | Valeur (base) | Valeur (avec statut) |
|---|---|---|
| Type | Normal | Normal |
| Catégorie | Physique | Physique |
| Puissance | 70 | 140 |
| Précision | 100 | 100 |
Effet : Si le lanceur a un probleme de statut parmi paralysie, empoisonnement ou brulure, la puissance double a 140. En cas de brulure, Facade IGNORE la reduction de degats physiques de la brulure ET a la puissance boostee.
Combo ultime – Cran + Orbe Flamme + Facade : Le talent Cran (Guts) donne +50% d’attaque quand le Pokémon est statut. Facade a 140 + Cran = equivalent de 210 de puissance effective. C’est l’un des combos les plus devastateurs du jeu.
Pokémon roi : Ursaking (Ursaluna) – excellente stat d’attaque, talent Cran, joue l’Orbe Flamme (se brule automatiquement a la fin du 1er tour). Monstrueusement puissant mais prend du temps a mettre en place, et c’est type Normal (tape neutre sur beaucoup, resiste par peu).
30. TACLE LOURD (Heavy Slam)
| Propriete | Valeur |
|---|---|
| Type | Acier |
| Catégorie | Physique |
| Puissance | 40 a 120 (variable) |
| Précision | 100 |
Effet : La puissance depend de l’ecart de poids entre le lanceur et la cible, par paliers :
- Lanceur 5x plus lourd que la cible : 120 de puissance (maximum)
- Lanceur 4x plus lourd : 100
- Lanceur 3x plus lourd : 80
- Lanceur 2x plus lourd : 60
- Sinon : 40
Necessite une certaine connaissance des poids des Pokémon pour estimer la puissance.
Pokémon potentiels : Megga Metaloss (très lourd), Megga Styx.
Attaques similaires :
- Gyrobal (Gyro Ball) : puissance selon l’ecart de vitesse – plus on est lent par rapport a la cible, plus on tape fort. Ideal sous Distorsion.
- Noeud Herbe (Grass Knot) et Balayage (Low Kick) : puissance par palier selon le poids de la CIBLE (peu importe le poids du lanceur).
31. SABOTAGE (Knock Off)
| Propriete | Valeur (base) | Valeur (objet retire) |
|---|---|---|
| Type | Ténèbres | Ténèbres |
| Catégorie | Physique | Physique |
| Puissance | 65 | 97,5 |
| Précision | 100 | 100 |
Effet : Retire l’objet tenu par la cible (si retirable). Si l’objet est effectivement retire, les degats sont augmentes de 50% (65 x 1,5 = 97,5). Certains objets ne peuvent PAS être retires (Mega Gemmes, Masques/objets de forme).
Subtilite : Si la cible a un objet mais qu’il ne peut pas être retire, on reste a 65 de puissance. Le bonus est LIE au retrait effectif de l’objet.
Double utilité : Degats corrects + retrait de l’objet (un Pokemon sans objet est souvent diminue : Oyakata sans Restes perd sa regeneration de PV, Dracolosse sans De Pipe perd sa garantie sur le nombre de coups).
L’une des meilleures attaques du jeu.
32. BIG SPLASH (Body Press)
| Propriete | Valeur |
|---|---|
| Type | Combat |
| Catégorie | Physique |
| Puissance | 80 |
| Précision | 100 |
Effet : Au lieu d’utiliser la stat d’Attaque pour calculer les degats, utilise la stat de DEFENSE physique. La défense devient la stat offensive.
Synergies :
- Mur de Fer (Iron Defense) : booste la défense de +2 stacks, ce qui augmente directement les degats de Big Splash.
- Gonflette (Bulk Up) : booste attaque +1 ET défense +1. Le boost en défense augmente Big Splash, le boost en attaque augmente une autre attaque offensive standard.
Pokémon notables :
- Corvaillus joue Big Splash + Rapace + Gonflette (boost en attaque pour Rapace, boost en defense pour Big Splash).
- Ekaiser avec Mur de Fer + Big Splash.
33. DRACOMETEORE (Draco Meteor)
| Propriete | Valeur |
|---|---|
| Type | Dragon |
| Catégorie | Special |
| Puissance | 130 |
| Précision | 90 |
Effet : Très puissant mais baisse de DEUX stacks l’attaque speciale du lanceur après utilisation. Si on spam, on finit par ne plus faire de degats.
Attaques clones : Surchauffe (type Feu, même mechanique), Tempete Verte (type Plante, même mechanique).
34. POUVOIR LUNAIRE (Moonblast)
| Propriete | Valeur |
|---|---|
| Type | Fee |
| Catégorie | Special |
| Puissance | 95 |
| Précision | 100 |
Effet : Un peu plus puissant que les attaques “standards” a précision parfaite (Tonnerre, Lanceflamme, Laser Glace = 90 de puissance). 30% de chance de baisser l’attaque speciale de la cible.
35. AQUATACLE (Wave Crash)
| Propriete | Valeur |
|---|---|
| Type | Eau |
| Catégorie | Physique |
| Puissance | 120 |
| Précision | 100 |
Effet : Très puissant mais inflige des degats de recul au lanceur : 1/3 des degats infliges vous sont infliges.
Pokémon principaux : Paragruel, Super Dauphin (Palafin).
Attaque similaire : Fracass’Tete – très puissante mais moins precise, 50% des degats infliges en recul (plus penalisant).
CATEGORIE 13 : VOL DE VIE ET SOIN
36. VAMPIPOING (Drain Punch)
| Propriete | Valeur |
|---|---|
| Type | Combat |
| Catégorie | Physique |
| Puissance | 75 |
| Précision | 100 |
Effet : 50% des degats infliges sont restitues au lanceur sous forme de PV. Valorise contre des Pokémon avec beaucoup de PV (on vole plus). Se combine souvent avec Gonflette.
Pokémon : Courrousinge (Vampi-Poing + Gonflette est un classique), Mega Cizayox.
37. VAMPIBAISER (Draining Kiss)
| Propriete | Valeur |
|---|---|
| Type | Fee |
| Catégorie | Special |
| Puissance | 50 |
| Précision | 100 |
Effet : Pas très puissant mais 75% de vol de vie (au lieu de 50% pour la plupart des autres attaques de vol de vie). Assez marginal mais peut se combiner avec Plenitude (boost attaque speciale + defense speciale).
38. SOIN (Recover)
| Propriete | Valeur |
|---|---|
| Type | Normal |
| Catégorie | Statut |
| Puissance | – |
| Précision | – |
Effet : Récupère 50% de ses PV. Simple et efficace. Si on est Provoque, on ne peut PAS s’en servir (c’est non offensif).
Variantes : Synthèse, Rayon Lune (50% de PV recuperes, mais plus sous le Soleil pour Synthese).
39. FONTAINE DE VIE (Life Dew)
| Propriete | Valeur |
|---|---|
| Type | Eau |
| Catégorie | Statut |
| Puissance | – |
| Précision | – |
Effet : Récupère 25% des PV pour les DEUX Pokémon sur le terrain (lanceur + allie). La ou Soin c’est 50% sur un Pokémon, Fontaine de Vie c’est 25% sur les deux. L’un des rares moyens de soigner un allie et l’un des plus interessants.
Pokémon notable : Melofe (Clefairy).
CATEGORIE 14 : ATTAQUES DE BOOST
40. DANSE LAMES (Swords Dance)
| Propriete | Valeur |
|---|---|
| Type | Normal |
| Catégorie | Statut |
Effet : Donne +2 stacks en attaque physique. Un boost massif en un seul tour. Peut être interessant avec un utilisateur de Vampi-Poing (plus on tape fort, plus on se soigne).
41. GONFLETTE (Bulk Up)
| Propriete | Valeur |
|---|---|
| Type | Combat |
| Catégorie | Statut |
Effet : +1 stack en attaque ET +1 stack en défense. Le boost en attaque profite aux attaques physiques normales, le boost en défense profite a Big Splash. Se combine excellemment avec Vampi-Poing (attaque pour taper + defense pour survivre + vol de vie pour durer).
Pokémon : Courrousinge (Gonflette + Vampi-Poing), Corvaillus (Gonflette + Big Splash + Rapace).
42. MACHINATION (Nasty Plot)
| Propriete | Valeur |
|---|---|
| Type | Ténèbres |
| Catégorie | Statut |
Effet : +2 stacks en attaque speciale. Equivalent special de Danse Lames.
43. PLENITUDE (Calm Mind)
| Propriete | Valeur |
|---|---|
| Type | Psy |
| Catégorie | Statut |
Effet : +1 en attaque speciale ET +1 en défense speciale. Equivalent special de Gonflette. Peut se combiner avec Vampibaiser.
CATEGORIE 15 : BOOST D’ALLIE
44. COACHING (Coaching)
| Propriete | Valeur |
|---|---|
| Type | Combat |
| Catégorie | Statut |
Effet : Booste l’ALLIE en attaque (+1) et en defense (+1). Ne peut viser QUE l’allie du lanceur (c’est pourquoi Par Ici ne peut pas le rediriger). L’une des rares attaques qui boost un autre Pokémon que le lanceur.
Utilité : Donne par un support a un Pokémon offensif qui ne peut pas se booster lui-même. Par exemple : Scalpereur avec Veste de Combat ne peut pas jouer Danse Lames en plus (la Veste interdit les attaques de statut), mais est bien content qu’un allie fasse Coaching.
Pokémon notable : Farfurex (avec Lest Vert et une Graine pour activer Delestage).
ATTAQUES SUPPLEMENTAIRES ESSENTIELLES
AIDE (Helping Hand)
| Propriete | Valeur |
|---|---|
| Type | Normal |
| Catégorie | Statut |
| Priorité | +5 |
Effet : Booste la puissance de la prochaine attaque de l’allie de 50% ce tour. Ne fonctionne que sur l’allie et uniquement pour une attaque offensive. Priorité très elevee (+5) donc s’execute quasi toujours en premier.
Utilité : Permet de garantir un KO qui ne passerait pas autrement. Très joue sur les Pokémon support purs.
GRIMACE (Scary Face)
| Propriete | Valeur |
|---|---|
| Type | Normal |
| Catégorie | Statut |
| Précision | 100 |
Effet : Baisse la vitesse de la cible de 2 stacks. Un outil de speed controle alternatif, moins utilise que Vent Glace mais parfois pertinent.
NITROCHARGE (Flame Charge)
| Propriete | Valeur |
|---|---|
| Type | Feu |
| Catégorie | Physique |
| Puissance | 50 |
| Précision | 100 |
Effet : Attaque faible mais booste la vitesse du lanceur de +1 stack après l’attaque. Permet a un Pokémon moyennement rapide de prendre l’avantage de vitesse progressivement.
SECTION 11 : LES TALENTS ESSENTIELS (70+)
Introduction
Chaque Pokémon possède obligatoirement un talent (aussi appele “passif” ou anciennement “capacite speciale” avant la 6G). Chaque espece de Pokémon a acces a 1 a 3 talents differents, mais un Pokémon individuel ne peut en avoir qu’un seul a la fois.
Exemple : Farfaduvet a acces a Farceur, Chlorophylle et Infiltration – mais un seul parmi les trois est clairement supérieur aux autres (Farceur).
Cette section couvre d’abord les 50+ talents standard (les plus courants et importants du PvP), puis les 22+ talents uniques (talents exclusifs ou exceptionnels qui changent fondamentalement le fonctionnement d’un Pokemon).
PARTIE A : TALENTS STANDARD (50+)
A1 – INTIMIDATION ET ANTI-INTIMIDATION
1. INTIMIDATION (Intimidate)
Effet : Lorsqu’un Pokémon possedant Intimidation entre sur le terrain, il baisse l’Attaque des deux Pokémon adverses d’un cran (-1 stack).
Pokémon exemples : Felin Ferno (le representant principal), Léviator, Arcanin, Arcanin de Hisui
Importance stratégique : C’est considere comme le talent le plus fort/important du jeu. La presence ou l’absence d’un intimidateur dans l’equipe adverse change complètement la maniere de jouer. Les equipes agressives sont celles qui se passent le plus souvent de ce talent. Intimidation ne baisse que l’Attaque physique – un Pokémon qui tape sur le Special s’en fiche.
2. CORPS SAIN (Clear Body)
Effet : Protège le porteur de toute baisse de statistique venant d’autres Pokémon (adversaires ET allies). Par contre, il ne protege PAS des baisses de stats causees par ses propres attaques (ex : Marteau Force baisse sa Vitesse, Dracometeore baisse sa propre Attaque Speciale).
Pokémon exemples : Metaloss (representant principal), Lancesorien
Interactions cles :
- Protège d’Intimidation (pas de perte d’Attaque)
- Protège de Vent Glace (pas de perte de Vitesse)
- Protège de Grimace
- Protège de Dernier Mot (et comme il n’y a pas de drop, le Pokemon n’est PAS retire du terrain par Dernier Mot)
Note importante : Metaloss perd Corps Sain quand il Méga-evolue, donc après Mega Évolution, il peut se faire intimider.
Equivalent objet : Fonctionne exactement comme le Talisman Sain (Clear Amulet, voir Section 12).
3. ACHARNE (Defiant)
Effet : Quand le porteur subit une baisse de stat de la part d’un Pokémon adverse (pas de l’allie, pas de lui-même), il gagne +2 en Attaque.
Pokémon exemples : Courrousinge, Scalpereur
Interaction avec Intimidation : Intimidation donne -1 Attaque, puis Acharne s’active et donne +2 Attaque. Resultat net : +1 en Attaque. Un Scalpereur intimide se retrouve BOOSTE au lieu d’affaibli.
Autres activations : S’active aussi contre Vent Glace, Aboiement, Dernier Mot. Pour Dernier Mot (qui baisse Attaque ET Attaque Speciale = 2 drops differentes), Acharne s’active DEUX FOIS, donnant +4 en Attaque. Resultat net avec les drops : +3 en Attaque (monstrueux).
Impact méta : Scalpereur et Courrousinge ont ete très presents en 9G. Courrousinge a même ete “designe pour deranger Felin Ferno”.
4. BATTANT (Competitive)
Effet : Exactement comme Acharne, mais booste l’Attaque Spéciale au lieu de l’Attaque physique (+2 en Attaque Speciale quand on subit une baisse de stat adverse).
Pokémon exemples : Mil Bellus, Pingoleon
Avec Intimidation : On prend -1 Attaque (on s’en fiche si on tape en Special) mais on gagne +2 en Attaque Spéciale. On profite d’Intimidation.
Avec Dernier Mot : Comme pour Acharne, Battant s’active deux fois (2 drops = 2 activations), donnant +4 en Attaque Spéciale, resultat net : +3.
5. BENET (Oblivious)
Effet de base : Protège des attaques Provoque et d’Attraction.
Buff depuis la 8G : Protège desormais aussi d’Intimidation.
Pokémon exemples : Oyakata (principal – très souvent joue avec Benet), Mamochon
Stratégie : L’interet principal de Benet en competitif, c’est la protection contre Intimidation, pas vraiment Provoque.
6. ATTENTION (Inner Focus)
Effet de base : Protège du flinch (on ne peut pas se faire apeurer / faire sursauter).
Buff depuis la 8G : Protège aussi d’Intimidation.
Pokémon exemples : Dracolosse (excellent – ne se fait ni flinch par Bluff ni intimider par Felin Ferno = double avantage), Shaofouine, Mega Lockpin, Kangourex (non Mega)
Interaction Dracolosse vs Felin Ferno : Avec Attention, Dracolosse ne prend pas le flinch de Bluff et ne perd pas d’Attaque face a Intimidation. Avec son autre talent Multiecaille, il perdrait ces deux avantages. Le choix entre les deux talents est un dilemme reel.
7. QUERELLEUR (Scrappy)
Effet de base : Permet aux attaques Normal et Combat de toucher les Pokémon Spectre (bypass de la table des types – on fait du neutre au lieu de l’inefficace).
Buff depuis la 8G : Protège aussi d’Intimidation.
Pokémon exemples : Kangourex (non Mega), Mega Lockpin, Flamoule/Flamingo
Stratégie : Un Kangourex Querelleur peut Bluffer un Ectoplasma (type Spectre), ce qui est normalement impossible. Kangourex a d’ailleurs 2 de ses 3 talents qui protegent d’Intimidation (Querelleur + Attention).
Tableau recapitulatif : Anti-Intimidation
| Talent | Reaction a Intimidation | Pokémon cle |
|---|---|---|
| Corps Sain | Bloque complètement | Metaloss |
| Acharne | -1 Att puis +2 Att = net +1 | Courrousinge, Scalpereur |
| Battant | -1 Att (osef) puis +2 Att.Spe | Mil Bellus |
| Benet | Bloque complètement | Oyakata |
| Attention | Bloque complètement | Dracolosse |
| Querelleur | Bloque complètement | Kangourex |
A2 – FARCEUR ET SYSTEME DE PRIORITE
8. FARCEUR (Prankster)
Effet : Donne +1 de priorité sur les attaques NON OFFENSIVES (= les attaques de statut, qui ne font pas de degats directs).
Pokémon exemples : Angoliath, Farfaduvet, Trousselin, Cornebre, Ténéfix, Migrix
Attaques qui EN PROFITENT : Vent Arrière, Protection, Mur Lumiere, Cage Éclair, Crocolarme, Provoque, Dernier Mot
Attaques qui N’EN PROFITENT PAS : Pouvoir Lunaire (Farfaduvet), Choc Emotionnel (Angoliath) – ce sont des attaques offensives, même si elles font peu de degats.
RESTRICTION MAJEURE : Les attaques boostees par Farceur ne fonctionnent PAS sur les Pokémon de type Ténèbres. Exemple : Provoque via Farceur sur Felin Ferno (type Tenebres) = ne marche pas. C’est un des rares “hard counters” de type dans le jeu.
Stratégie : Farceur est considere comme aussi important qu’Intimidation. Un Angoliath peut poser les Murs avant que les adversaires ne tapent, un Farfaduvet peut poser Vent Arrière en priorité pour redonner l’avantage de vitesse a son equipe.
9. AILES BOURRASQUE (Gale Wings)
Effet : Donne +1 de priorité sur les attaques de type Vol, mais uniquement quand le Pokémon a tous ses PV (nerf en 7G – avant, ca marchait tout le temps).
Pokémon exemple : Flambusard (talent quasi-exclusif)
Attaques concernees : Vent Arrière (non offensif), Rapace (offensif), Acrobatie, Double Volet – toutes les attaques Vol, offensives ou non.
10. ARMURE CAUDALE (Armor Tail) – Anti-Priorité
Effet : Bloque les priorités positives venant de l’adversaire (pas les priorites negatives).
Pokémon exemple : Fari-Girafe
Ce que ca bloque : Bluff, Kouba, les attaques boostees par Farceur (tant qu’elles visent quelqu’un). Vent Arriere n’est PAS bloque car il ne vise personne (il affecte tout le côté du terrain).
Equivalent : Fonctionne comme le Champ Psychique pour le blocage des priorités.
11. PRESTANCE ROYALE (Queenly Majesty)
Effet : Exactement la même chose qu’Armure Caudale – bloque les priorités positives adverses.
Pokémon exemple : Sucreine
Comparaison : Sucreine est beaucoup plus fragile que Fari-Girafe, mais moins passif.
12. ANTI-PRIORITE (Dazzling)
Effet : Même effet que les deux precedents.
Pokémon exemple : Anchistratos (“le poisson moche de la 7G”)
Impact stratégique global des anti-priorité : Quand l’adversaire a une equipe avec 2 Bluffeurs + Coup Bas ou Vitesse Extreme, un Pokémon anti-priorité peut casser toute une partie de la stratégie adverse d’un coup.
13. MIROIR MAGIQUE (Magic Bounce)
Effet : Renvoie les attaques non offensives au lanceur – comme si le Pokémon renvoyait Provoque, Spore, Feu Folet, Dernier Mot, etc. Le lanceur subit sa propre attaque de statut.
Pokémon exemples : Sorcilence (principal), Mentali, Exatu (pas joues)
Interaction avec Provoque : Très important pour les poseurs de Distorsion (comme Sorcilence). Si l’adversaire essaie de Provoquer Sorcilence pour l’empecher de poser Distorsion, Miroir Magique renvoie Provoque – c’est l’adversaire qui se retrouve provoque.
Avec Spore/Poudre Dodo : L’adversaire s’endort lui-même (sauf si c’est un Pokemon Plante qui le lance – immunite aux poudres). Pareil pour Cage Eclair (souvent lance par un Pokemon Électrique, donc immunise a la paralysie).
A3 – METEOS ET CHAMPS
Talents qui posent une Meteo
14. SECHERESSE (Drought)
Effet : Quand le Pokémon entre sur le terrain, pose le Soleil intense pendant 5 tours.
Pokémon exemples : Feunard de Kanto, Groudon, Mega Dracofeu Y
15. CRACHIN (Drizzle)
Effet : Quand le Pokémon entre sur le terrain, pose la Pluie pendant 5 tours.
Pokémon exemples : Léviator (non, c’est Politoad), Kyogre, Amphibi
16. SABLE VOLANT (Sand Stream)
Effet : Quand le Pokémon entre sur le terrain, pose la Tempête de Sable pendant 5 tours.
Pokémon exemples : Hippodocus, Tyranitar
17. ALERTE NEIGE (Snow Warning)
Effet : Quand le Pokémon entre sur le terrain, pose la Neige pendant 5 tours (depuis la 9G, plus la grele – la Neige ne fait plus de degats de fin de tour).
Pokémon exemples : Sorbouboul, Blizzaroi, Feunard d’Alola
Mécanique générale des meteos : Quand un Pokémon avec un de ces talents entre sur le terrain, c’est comme s’il utilisait automatiquement l’attaque meteo correspondante. Si une meteo est déjà en cours, elle est remplacee. Duree : 5 tours. C’est ainsi que commencent les “guerres de meteo” – le dernier talent de meteo a s’activer impose sa meteo.
Talents qui doublent la Vitesse sous Meteo
18. GLISSADE (Swift Swim) – Pluie
Effet : Double la Vitesse du porteur sous la Pluie.
Note importante : C’est un x2 sur la stat Vitesse, independant des boosts/stacks. Si on fait l’attaque Hate (+2 en Vitesse via stacks), ca se cumule separement. Le jeu n’affiche pas ce doublement – c’est invisible.
19. BAIGNE SABLE (Sand Rush) – Tempête de Sable
Effet : Double la Vitesse du porteur sous la Tempête de Sable.
20. CHLOROPHYLLE (Chlorophyll) – Soleil
Effet : Double la Vitesse du porteur sous le Soleil.
Pokémon exemples : Florizarre (qui a aussi Poudre Dodo en support), Heliorisk
21. CHASSE-NEIGE (Slush Rush) – Neige
Effet : Double la Vitesse du porteur sous la Neige.
Autres talents lies a la Meteo
22. CIEL GRIS (Cloud Nine)
Effet : Tant que le Pokémon porteur est sur le terrain, la meteo en cours n’a AUCUN effet (elle ne disparait pas, mais elle est neutralisee).
Pokémon exemples : Aquaquack, Drayol
Equivalent : Airlock de Rayquaza fait la même chose.
Consequences : Fatal Foudre peut rater (normalement garanti sous la Pluie), Lance-Soleil doit charger un tour (normalement instantane sous le Soleil), les Pokémon Roche n’ont pas leur bonus Défense Spéciale sous Tempête de Sable, etc.
23. ENVELOPPE (Overcoat)
Effet : Protège des degats de fin de tour de la Tempête de Sable + protège des effets des poudres (Spore, Poudre Fureur, pas de redirection par Poudre Fureur).
Pokémon exemple : Ekaiser (representant principal)
Equivalent objet : Même effet que les Lunettes Filtre (Safety Goggles, voir Section 12).
Talents qui posent un Champ
24. CREA ELEC (Electric Surge)
Effet : Quand le Pokémon entre sur le terrain, pose le Champ Electrifie pendant 5 tours.
Pokémon exemples : Watapic, Tokorico
25. CREA BRUME (Misty Surge)
Effet : Quand le Pokémon entre sur le terrain, pose le Champ Brumeux pendant 5 tours.
Pokémon exemples : Smogogo de Galar, Tokopisco
26. CREA HERBE (Grassy Surge)
Effet : Quand le Pokémon entre sur le terrain, pose le Champ Herbu pendant 5 tours.
Pokémon exemples : Gorithmique, Tokotoro
27. CREA PSI (Psychic Surge)
Effet : Quand le Pokémon entre sur le terrain, pose le Champ Psychique pendant 5 tours.
Pokémon exemples : Wimessir (femelle et male), Tokopillon
Note historique : Les Tokos (Tokorico, Tokopisco, Tokotoro, Tokopillon) etaient les premiers Pokémon a avoir ces talents en 7G. Epee/Bouclier a introduit des Pokémon non-semi-legendaires avec ces talents.
28. DELESTAGE (Unburden)
Effet : Quand le Pokémon porteur perd son objet (condition precise : il faut avoir eu un objet et le perdre, pas simplement ne pas en avoir), sa Vitesse est doublee.
Condition : L’effet se perd si le Pokémon est retire du terrain.
Pokémon exemples : Farfurex (representant principal), Gros Drive (historique)
Synergie majeure avec les Graines : Combinaison classique : Gorithmique (Crea Herbe) arrive, pose le Champ Herbu. Le Farfurex a côté porte la Graine Herbe, qui se consomme automatiquement (donne un boost Defense). Farfurex n’a plus d’objet -> Delestage s’active -> Vitesse doublee. Double benefice : boost defensif + vitesse doublee.
Note technique : Le doublement de Vitesse par Delestage est un boost passif, PAS un changement de stat. Le talent Inconscient ne l’ignore PAS.
A4 – INCONSCIENT
29. INCONSCIENT (Unaware)
Effet : Le Pokémon porteur ignore les changements de statistiques de la cible (= de l’autre Pokemon).
Pokémon exemples : Oyakata (representant principal), Mélodelfe
Fonctionnement offensif : Si Oyakata Inconscient tape un Pokémon qui s’est booste en Défense (ex: via Graine Herbe), il ignore ce boost. Le Pokémon defend comme s’il n’avait pas de boost.
Fonctionnement defensif : Si un Farfurex booste a +2 en Attaque attaque Oyakata Inconscient, Oyakata ignore les boosts d’Attaque de Farfurex.
Le porteur garde SES propres boosts : Si Oyakata est booste grace a un allie, il garde ses propres boosts quand il attaque.
Ce qu’Inconscient IGNORE : Les changements de stat (boosts/drops en stacks). Donc il ignore un boost d’Attaque Speciale de Paratonnerre (c’est une stack).
Ce qu’Inconscient N’IGNORE PAS :
- Le boost de degats de Torche (c’est un multiplicateur sur les attaques, pas un changement de stat)
- Les boosts passifs des talents comme Delestage (doublement de Vitesse)
A5 – TALENTS OFFENSIFS
30. COLOFORCE (Huge Power)
Effet : Multiplie la stat d’Attaque par 2.
Pokémon exemples : Azumarill (petite Attaque de base, mais doublee ca donne une vraie bonne Attaque), Mega Mysdibule
31. FORCE PURE (Pure Power)
Effet : Identique a Coloforce – multiplie la stat d’Attaque par 2.
Pokémon exemples : Charmina, Mega Charmina
32. ADAPTABILITE (Adaptability)
Effet : Augmente le bonus STAB de x1.5 a x2 (soit une augmentation d’un tiers des degats sur les attaques du même type que le Pokemon).
Pokémon exemples : Paragruel (même sans enorme Attaque, fait de gros degats grace au STAB x2 sur Eau et Spectre), Mega Lucario (STAB x2 sur Combat et Acier)
33. PROTEIN (Protean)
Effet : Change le type du porteur pour correspondre au type de l’attaque utilisée. Garantit donc toujours le STAB.
NERF 9G : Ne fonctionne plus qu’une seule fois par entree sur le terrain (avant, ca marchait a chaque attaque).
Pokémon exemples : Amphinobi (talent cache), Miascarade
Fonctionnement : Amphinobi fait Laser Glace -> devient type Glace. Fait Vibrobscur -> devient type Ténèbres. Avantage offensif (STAB garanti) + potentiel avantage defensif (changer de type pour gagner des resistances).
34. PEAU FEERIQUE (Pixilate)
Effet : Transforme les attaques Normal en attaques type Fee + boost de 20% de degats.
Pokémon exemples : Nymphali, Mega Gardevoir
Stratégie : Megaphone (attaque de zone Normal) devient une excellente attaque de zone Fee avec STAB + 20% bonus. Eclat Magique (vraie attaque Fee de zone) est beaucoup moins puissante en comparaison.
35. PEAU CELESTE (Aerilate)
Effet : Transforme les attaques Normal en attaques type Vol + boost de 20% de degats.
Pokémon exemples : Mega Drattak, Mega Scarabrute
Stratégie : Damocles sur Mega Drattak = attaque Vol avec STAB + excellente Attaque + 20% bonus = degats monstrueux.
36. PEAU GELEE (Refrigerate)
Effet : Transforme les attaques Normal en attaques type Glace + boost de 20% de degats.
Pokémon exemple : Dragmara
37. SANS LIMITE (Sheer Force)
Effet : Supprime les effets secondaires des attaques mais ajoute +30% de degats. Ne supprime PAS les proprietes des attaques.
Pokémon exemples : Betochef, Mega Camerupt, Demeteros Forme Avatar
Difference effets secondaires vs proprietes :
- Effets secondaires (SUPPRIMES par Sans Limite) : Poing Éclair ne peut plus paralyser, Eboulement ne peut plus flinch, Vent Glace ne baisse plus la Vitesse.
- Proprietes (NON SUPPRIMEES) : Vampi-Poing soigne toujours, Nitrocharge booste toujours la Vitesse du lanceur.
SYNERGIE CRUCIALE AVEC L’ORBE VIE : C’est la combinaison magique – Sans Limite retire aussi la perte de PV liee a l’Orbe Vie. On obtient +30% (Sans Limite) + 30% (Orbe Vie) sans aucun inconvenient. C’est pour ca que Demeteros Orbe Vie ne prend pas de degats de recul.
“C’est même dommage de jouer Sans Limite sans l’Orbe Vie.”
38. CRAN (Guts)
Effet : Quand le porteur est affecte d’un statut (paralyse, empoisonne ou brule), il gagne +50% de degats en Attaque. De plus, en cas de brulure, il ignore la baisse d’Attaque normalement causee par la brulure.
Pokémon exemples : Betochef, Mackogneur, Ursaking de Hisui (enormement de succès depuis les Worlds 2023)
Synergie avec Orbe Flamme : On combine généralement Cran avec l’Orbe Flamme (plutot que Orbe Toxique) car la brulure fait moins de degats par tour que l’empoisonnement.
Synergie avec Facade : L’attaque Facade double sa puissance quand le Pokémon est statut, ce qui se cumule avec Cran. Ursaking + Facade + Orbe Flamme + Cran = degats extremement eleves.
A6 – TALENTS DEFENSIFS
39. LEVITATION (Levitate)
Effet : Donne une immunité aux attaques de type Sol + le Pokémon ne touche plus le sol.
Pokémon exemples : Motisma (toutes ses formes), Trioxydre, Cresselia, Latios, Latias
Consequence importante : Ne pas toucher le sol signifie que le Pokémon ne profite PAS des effets des Champs (un Trioxydre ne profite pas du Champ Psychique pour se protéger du flinch, par exemple).
Interaction avec Brise-Moule : Lévitation est un talent, donc il peut être ignore par Brise-Moule.
40. BRISE-MOULE (Mold Breaker)
Effet : Ignore le talent de la cible quand on l’attaque.
Pokémon exemple : Minotaupe
Stratégie : Permet de toucher un Pokémon Lévitation avec une attaque Sol, d’ignorer Corps Sain, etc.
41. TORCHE (Flash Fire)
Effet : Donne une immunité aux attaques Feu + quand on subit une attaque Feu, on active un boost de 50% sur ses propres attaques Feu.
Pokémon exemples : Carmadura, Lamperroie
Important : Torche NE REDIRIGE PAS les attaques Feu vers le porteur (contrairement a Lavabo/Paratonnerre). Si l’allie se prend Lance-Flamme, le Pokémon Torche n’en profite pas.
Difference avec Lavabo/Paratonnerre : Le boost de Torche est un multiplicateur (x1.5 sur les attaques Feu), PAS un boost en stat. C’est pour cela qu’Inconscient n’ignore PAS le boost de Torche, mais ignore celui de Paratonnerre/Lavabo.
42. LAVABO (Storm Drain) – Redirection de type
Effet : Redirige les attaques Eau monocibles vers le porteur + immunité totale + gagne +1 en Attaque Spéciale.
Pokémon exemple : Tritosor
Mécanique precise : Seules les attaques monocibles sont redirigees. Mais l’immunite fonctionne même sur les attaques de zone et non offensives.
Exemple : L’adversaire fait Surf (zone) -> touche son allie, touche votre allie, mais PAS votre Tritosor (immunise, pas de redirection mais immunite). L’adversaire fait Ebullition (monocible) sur votre allie a côté -> Ebullition est redirigee vers Tritosor, qui prend le boost d’Attaque Spéciale.
43. PARATONNERRE (Lightning Rod) – Redirection de type
Effet : Redirige les attaques Electriques monocibles + immunité + gagne +1 en Attaque Spéciale.
Pokémon exemple : Raichu
Mécanique : Identique a Lavabo mais pour le type Électrique. Coup de Jus (zone) -> Raichu prend le boost d’Attaque Speciale et pas les degats. Tonnerre (monocible) -> redirige automatiquement vers Raichu.
Interaction avec Inconscient : Inconscient IGNORE le boost d’Attaque Spéciale de Paratonnerre (c’est un changement de stat/stack).
44. PARE-BALLES (Bulletproof)
Effet : Immunise aux attaques balistiques (Bombe-Beurk, Ball’Ombre, Boulet Roc, etc.).
Pokémon exemples : Blindépique (+ sa Méga Evolution), Ekaiser
Stratégie : Peut complètement shutdown un Ectoplasma dont les deux attaques principales offensives sont Ball’Ombre et Bombe-Beurk.
Attaques balistiques : C’est généralement dans le nom (bombe, ball, boulet…). Les plus importantes sont Bombe-Beurk et Ball’Ombre.
45. FERMETE (Sturdy)
Effet double :
- Immunité aux attaques OHKO (Glaciation, Abime, Guillotine)
- Effet Ceinture Force (depuis la 5G) : si le Pokémon a tous ses PV et subit une attaque qui devrait le KO, il survit avec 1 PV.
Pokémon exemples : Pondralugon (representant principal pour Champions), Galking, Grolem
Avantage sur Ceinture Force (objet) : L’objet se consomme après une utilisation. Le talent Fermete peut se reactiver si le Pokemon recupere tous ses PV (mais c’est très difficile en pratique).
46. ENDURANCE (Stamina)
Effet : A chaque fois que le Pokémon subit des degats, il gagne +1 en Défense.
Pokémon exemples : Pondralugon, Bourrinos
Activation precise : S’active a chaque iteration de degats. Cage Éclair (pas de degats) = pas d’activation. Vent Glace (fait des degats même si faibles) = activation. Grimace (pas de degats) = pas d’activation.
COMBO avec Baston : Famignol utilise l’attaque Baston (multihit, très peu de degats) SUR SON PROPRE ALLIE Pondralugon. Baston touche ~4 fois -> Endurance s’active 4 fois -> Pondralugon monte a +4 en Défense et devient extremement tanky sur le physique.
COMBO avec Big Splash : Pondralugon a l’attaque Big Splash (qui utilise la Defense comme stat offensive). Donc chaque boost en Défense augmente aussi ses degats. Triple synergie : plus resistant + tape plus fort + peut se soigner.
47. GARDE-AMI (Friend Guard)
Effet : Réduit de 25% les degats subis par l’allie (pas par le porteur, mais par le Pokemon a côté).
Pokémon exemples : Melofe (le representant ultime), Famignol, Rondoudou (a Garde-Ami mais n’a pas l’attaque Par Ici)
Pourquoi Melofe > Mélodelfe : Melofe a Garde-Ami + Par Ici (redirection). Mélodelfe n’a PAS Garde-Ami. L’Evoluroc permet a Melofe d’avoir des stats defensives comparables a Mélodelfe. Sans Garde-Ami, on jouerait directement Mélodelfe.
Synergies : Famignol + Courrousinge (Garde-Ami protege Courrousinge, Famignol peut aussi utiliser Baston sur Pondralugon pour Endurance). Même sur le Special : si Pondralugon se booste en Défense physique via Endurance mais prend une attaque speciale, Garde-Ami reduit quand même les degats de 25%.
“C’est l’un des tout meilleurs talents du jeu” selon HARI.
48. REGE-FORCE (Regenerator)
Effet : Quand le Pokémon sort du terrain (switch), il récupère 1/3 de ses PV max.
Pokémon exemples : Gaulet (un des tout meilleurs Pokemon du jeu grace a ce talent), Symbios
Stratégie : Un Gaulet qui tank bien et qui se prend des degats peut switcher, recuperer 33% de ses PV, puis revenir plus tard en bien meilleur etat. Ca permet de faire des switches offensifs sans “gacher” un tour puisque le Pokémon se soigne en partant.
Exemple concret : Gaulet se prend des coups et tombe a 50% PV -> il sort du terrain -> quand il revient, il a 83% PV. “Il n’est plus en danger autant qu’avant de sortir.”
49. AIRLOCK (Air Lock)
Effet : Identique a Ciel Gris – neutralise les effets de la meteo en cours.
Pokémon exemple : Rayquaza
Tableau recapitulatif des interactions cles (Talents standard)
| Situation | Ce qui se passe |
|---|---|
| Intimidation vs Corps Sain | Corps Sain bloque la baisse d’Attaque |
| Intimidation vs Acharne | -1 Att puis +2 = resultat net +1 Attaque |
| Intimidation vs Battant | -1 Att (osef si Special) puis +2 Att. Spe |
| Intimidation vs Benet | Benet bloque Intimidation (depuis 8G) |
| Intimidation vs Attention | Attention bloque Intimidation (depuis 8G) |
| Intimidation vs Querelleur | Querelleur bloque Intimidation (depuis 8G) |
| Dernier Mot vs Acharne | 2 drops -> Acharne x2 = +4 Att., net = +3 |
| Dernier Mot vs Battant | 2 drops -> Battant x2 = +4 Att. Spe., net = +3 |
| Farceur vs type Ténèbres | Les attaques Farceur ne marchent PAS |
| Farceur vs Anti-Priorité | Les attaques ciblées sont bloquees, mais Vent Arrière passe |
| Provoque vs Miroir Magique | Provoque est renvoyee au lanceur |
| Sans Limite + Orbe Vie | +30% degats + pas de recul Orbe Vie |
| Cran + Orbe Flamme | +50% Attaque + ignore baisse brulure + Facade x2 |
| Inconscient vs boosts stats | Ignore les boosts de stats (stacks) |
| Inconscient vs Torche | N’ignore PAS le boost 50% Feu |
| Inconscient vs Delestage | N’ignore PAS le doublement de Vitesse |
| Lavabo/Paratonnerre mono | Redirige l’attaque vers le porteur |
| Lavabo/Paratonnerre zone | Pas de redirection, mais immunité |
| Lévitation + Champs | Ne profite pas des Champs (ne touche pas le sol) |
| Brise-Moule vs Lévitation | Ignore Lévitation, peut toucher avec Sol |
| Endurance + Baston (allie) | 4 hits = +4 Défense |
| Delestage + Graine | Graine consommee -> boost Défense + x2 Vitesse |
| Fermete vs OHKO | Survit a 1 PV (reactiable si full PV) |
PARTIE B : TALENTS UNIQUES (22+)
Les talents ci-dessous sont des talents exclusifs ou quasi-exclusifs a un seul ou très peu de Pokémon. Ils ont des mécaniques tellement particulieres qu’ils changent fondamentalement le fonctionnement du combat quand ces Pokémon sont presents.
50. MARQUE OMBRE (Shadow Tag)
Pokémon concernes : Méga-Ectoplasma, Siderella (Gothitelle) et sa pre-évolution.
Mécanique complète : Empêche TOUS les Pokémon adverses de fuir ou de se retirer du combat. Tant que le Pokémon avec Marque Ombre est sur le terrain, l’adversaire ne peut pas utiliser la commande “switch” pour rappeler son Pokémon. C’est un piège.
Exceptions et interactions importantes :
- Les Pokémon de type Spectre sont immuns a Marque Ombre. Ils peuvent se retirer librement.
- Un Pokémon qui possède lui-même Marque Ombre est egalement immune.
- Les attaques de pivotement (Demi-Tour, Dernier Mot, Change Eclair) permettent quand même de se retirer, car c’est l’attaque qui provoque le changement, pas la commande switch.
- Le Bouton Fuite (Eject Button) fonctionne aussi malgre Marque Ombre.
Timing de la Méga-Évolution : La decision de changer de Pokémon est calculee AVANT la Méga-Évolution. Si vous decidez de retirer votre Pokémon au même tour ou Ectoplasma méga-evolue, le retrait se fait quand même car Marque Ombre n’etait pas encore actif au moment du choix.
51. AMOUR FILIAL (Parental Bond)
Pokémon concerne : Méga-Kangourex
Mécanique complète : Permet a Méga-Kangourex de frapper DEUX FOIS en un seul tour avec chaque attaque. Le premier coup fait des degats normaux, puis un second coup automatique suit immediatement.
Le nerf important : A l’origine (6G), le deuxieme coup faisait 50% des degats du premier (totalement brise). En 7G, reduit a 25% des degats du premier. Reste très fort.
Avantages strategiques :
- Casse automatiquement les Ceintures Force et le talent Fermete : le premier coup active la protection, le deuxieme acheve.
- Deux coups = deux chances d’activer des effets secondaires.
Inconvenients :
- Deux coups = deux activations de Peau Dure (Rough Skin) ou Casque Brut (Rocky Helmet). Beaucoup de degats de recul.
52. MULTIECAILLE (Multiscale)
Pokémon concernes : Dracolosse, Lugia
Mécanique complète : Quand le Pokémon est a PV pleins (100%), TOUS les degats qu’il recoit sont divises par deux. Que ce soit une attaque super efficace ou neutre.
Contres :
- Brise-Moule et talents similaires ignorent complètement Multiecaille.
- Les degats residuels (Picots, brulure, poison, meteo) annulent Multiecaille en reduisant les PV avant l’attaque.
- Un simple passage sur les Picots (Stealth Rocks) suffit a desactiver le talent.
53. IMPOSTEUR (Imposter)
Pokémon concerne : Metamorph (Ditto)
Mécanique complète : Des que Metamorph entre sur le terrain, il se transforme AUTOMATIQUEMENT en le Pokémon adverse qui lui fait face. Il copie :
- Toutes les statistiques SAUF les PV (Metamorph garde ses propres PV faibles)
- Toutes les attaques (mais avec seulement 5 PP par attaque)
- Le talent du Pokémon copie
- Tous les changements de statistiques (boosts et baisses). Si l’adversaire a fait +2 en Attaque, Metamorph copie ce +2.
Ce qu’il ne copie PAS : Les PV et l’objet tenu (Metamorph garde son propre objet – souvent Echarpe Choix pour être plus rapide que l’original).
Importance : Metamorph est un “revenge killer” parfait. Si l’adversaire a passe plusieurs tours a se booster, Metamorph copie TOUS ces boosts instantanement.
54. DECLIC TACTIQUE (Stance Change)
Pokémon concerne : Exagide (Aegislash)
Mécanique complète : Exagide possède DEUX formes distinctes :
- Forme Bouclier : Défense et Défense Spéciale enormes, Attaque faible. Forme par defaut.
- Forme Lame : Attaque et Attaque Spéciale enormes, Défense faible.
Fonctionnement :
- Attaque offensive -> passe en Forme Lame
- Bouclier Royal (King’s Shield) -> repasse en Forme Bouclier
Bouclier Royal est une variante de Protection qui baisse l’Attaque de 2 crans de tout Pokémon qui le touche avec une attaque de contact.
55. REPLI TACTIQUE (Emergency Exit)
Pokémon concerne : Sarmurai (Golisopod)
Mécanique complète : Si les PV tombent en dessous de 50%, il est automatiquement retire du combat et renvoye dans son equipe. Retrait force et non controlable.
Synergie : Combinable avec Premier Assaut (First Impression) – attaque prioritaire très puissante mais uniquement au premier tour. Grace a Repli Tactique, Sarmurai peut revenir et reutiliser Premier Assaut.
56. FANTOMASQUE (Disguise)
Pokémon concerne : Mimiqui (Mimikyu)
Mécanique complète : Donne un bouclier gratuit qui absorbe le premier coup offensif recu. Le premier coup ne fait AUCUN degat. Quand le deguisement se brise, Mimiqui perd quand même 1/8 de ses PV max en degats residuels (depuis la 8G).
Importance : Un tour gratuit garanti. Mimiqui peut faire une Danse Lames en securite, puis sweeper.
57. OSMOSE (Power of Alchemy)
Pokémon concerne : Grotadmorv d’Alola
Mécanique complète : Quand un Pokémon allie tombe KO sur le terrain, Grotadmorv copie le talent de cet allie. Fonctionne uniquement en Double.
58. GAZ INHIBITEUR (Neutralizing Gas)
Pokémon concerne : Smogogo de Galar
Mécanique complète : Tant que Smogogo est sur le terrain, TOUS les talents de TOUS les Pokémon presents sont desactives. Effet global : adversaires ET allies perdent leurs talents.
Combos devastateurs :
- Avec Monaflemit : son talent Absenteisme est desactive -> il peut attaquer CHAQUE tour avec ses stats monstrueuses.
- Avec Regigigas : Debut Calme est annule -> Regigigas a immediatement acces a toutes ses stats.
Inconvenient : Desactive aussi les talents benefiques de VOS allies. Quand Smogogo quitte le terrain, tous les talents se reactivent instantanement.
59. ABSENTEISME (Truant)
Pokémon concerne : Monaflemit (Slaking)
Mécanique : Ne peut attaquer qu’un tour sur deux. Handicap enorme qui compense ses stats de legendaire. Necessite Gaz Inhibiteur pour briller.
60. DEBUT CALME (Slow Start)
Pokémon concerne : Regigigas
Mécanique : Pendant les 5 premiers tours, Attaque et Vitesse divisees par deux. Après 5 tours, retrouve ses pleines capacités. Combo essentiel avec Gaz Inhibiteur.
61. ILLUSION (Illusion)
Pokémon concernes : Zoroark, Zoroark de Hisui
Mécanique complète : Prend l’apparence du dernier Pokémon de votre equipe (6eme slot). L’adversaire voit un Pokémon complètement different : sprite, nom, type affiche. Zoroark garde son vrai type, ses vraies stats et ses vraies attaques.
Ce qui brise l’Illusion : Tout degat direct subi. Les degats indirects (meteo, brulure, poison) NE cassent PAS l’Illusion.
Stratégie : Placez un Pokémon de type favorable en 6eme slot pour induire l’adversaire en erreur sur les immunités et faiblesses.
62. SUPERMUTATION (Zero to Hero)
Pokémon concerne : Palafin (Super-Dauphin)
Mécanique complète : Deux formes :
- Forme Zéro : stats très mediocres.
- Forme Hero : stats parmi les plus elevees du jeu (surtout Attaque).
Pour passer en Forme Hero, Palafin doit quitter le terrain puis revenir. Des qu’il revient après un retrait, il est en Forme Hero.
Attaque signature : Jet Poing (Jet Punch) – attaque prioritaire de type Eau. En Forme Hero, c’est devastateur.
63. DEPOT TOXIQUE (Toxic Debris)
Pokémon concerne : Amonistar (Glimmora)
Mécanique : Quand touche par une attaque physique, pose automatiquement une couche de Pics Toxik du côté adverse. 1 couche = poison normal, 2 couches = poison grave. Un Pokémon Poison qui entre côté adverse retire les Pics.
64. COMMANDANT (Commander)
Pokémon concernes : Nigirigon (Tatsugiri) + Oyakata (Dondozo) – fonctionne EN DUO
Mécanique complète (Double uniquement) :
- Nigirigon entre dans la bouche d’Oyakata (disparait visuellement).
- Oyakata recoit un boost de +2 dans TOUTES ses statistiques.
- Nigirigon ne peut plus agir ni être cible.
- Si Oyakata est KO, Nigirigon est libere et revient sur le terrain.
Contre-jeu : Utiliser Hurlement (Roar) ou Queue de Dragon (Dragon Tail) pour forcer le retrait d’Oyakata, ce qui annule le combo.
65. HOSPITALITE (Hospitality)
Pokémon concerne : Ogerpon
Mécanique : Quand Ogerpon entre sur le terrain, il soigne son allie de 25% de ses PV max. Automatique et instantane a chaque entree.
66. OEIL REVELATEUR (Mind’s Eye)
Pokémon concerne : Ursaking Lune de Sang
Mécanique – TROIS effets combines :
- Les attaques Normal et Combat peuvent toucher les Pokémon Spectre (normalement immuns).
- La précision ne peut pas être baissee.
- Ignore les boosts d’Esquive de l’adversaire.
Importance : Aucun “safe switch” du côté adverse. Normalement, on envoie un Pokémon Spectre pour bloquer Normal/Combat, mais ca ne marche plus.
67. CORPS EN OR (Good as Gold)
Pokémon concerne : Gromago (Gholdengo)
Mécanique : Complètement immune a TOUTES les attaques de statut. Aucune attaque de statut ne l’affecte : pas de Cage Éclair, pas de Toxik, pas de Spore, pas de Regard Noir, RIEN. Seules les attaques qui font des degats peuvent le toucher.
68. POING INVISIBLE (Unseen Fist)
Pokémon concerne : Shifours (Urshifu) – les deux formes
Mécanique : Toutes les attaques de contact de Shifours ignorent complètement les effets de Protection (Protect), Detection, Bouclier Royal. L’adversaire a beau utiliser Protection, les coups passent quand même.
Précision : Seules les attaques de CONTACT sont concernees. Les attaques a distance ne beneficient pas de cet effet.
69. TRANSISTOR (Transistor)
Pokémon concerne : Regieleki
Mécanique : Augmente la puissance des attaques Electrik de 30% (originalement 50% en 8G, nerfe a 30% en 9G).
Regieleki est le Pokémon le plus rapide du jeu. Avec Transistor, ses degats deviennent enormes.
70. DENT DE DRAGON (Dragon’s Maw)
Pokémon concerne : Regidrago
Mécanique : Augmente la puissance des attaques Dragon de 50%.
71. GARDE MYSTIK (Wonder Guard)
Pokémon concerne : Munja (Shedinja)
Mécanique : Le talent le plus extreme du jeu. Munja ne peut être touche QUE par des attaques super efficaces. Toute attaque non super efficace fait ZERO degat.
Types super efficaces contre Munja (Insecte/Spectre) : Vol, Roche, Feu, Tenebres, Spectre (5 types seulement).
Le piège : Munja n’a qu’1 PV. Un seul. La moindre attaque super efficace le met KO instantanement.
Autres sources de degats qui IGNORENT Garde Mystik :
- Degats de meteo (tempete de sable)
- Brulure, poison
- Picots (Stealth Rocks), Pics
- Recul d’attaques
Anecdote de HARI : Il a utilise Munja pour gagner un tournoi majeur en 2022. Contre certaines compositions, Munja est litteralement invincible car aucun Pokémon adverse n’a d’attaque super efficace. Mais contre une equipe preparee, il tombe en un coup.
Tableau recapitulatif : Talents uniques
| # | Talent (FR) | Talent (EN) | Pokémon principal | Effet cle |
|---|---|---|---|---|
| 50 | Marque Ombre | Shadow Tag | Méga-Ectoplasma | Empêche l’adversaire de fuir |
| 51 | Amour Filial | Parental Bond | Méga-Kangourex | Frappe deux fois par tour |
| 52 | Multiecaille | Multiscale | Dracolosse | Degats /2 a PV pleins |
| 53 | Imposteur | Imposter | Metamorph | Se transforme en l’adversaire |
| 54 | Declic Tactique | Stance Change | Exagide | Change forme offense/défense |
| 55 | Repli Tactique | Emergency Exit | Sarmurai | Retrait auto sous 50% PV |
| 56 | Fantomasque | Disguise | Mimiqui | Absorbe le premier coup |
| 57 | Osmose | Power of Alchemy | Grotadmorv d’Alola | Copie le talent d’un allie KO |
| 58 | Gaz Inhibiteur | Neutralizing Gas | Smogogo de Galar | Desactive tous les talents |
| 59 | Absenteisme | Truant | Monaflemit | Agit un tour sur deux |
| 60 | Debut Calme | Slow Start | Regigigas | Att/Vit /2 pendant 5 tours |
| 61 | Illusion | Illusion | Zoroark | Apparence du 6e Pokémon |
| 62 | Supermutation | Zéro to Hero | Palafin | Forme Hero après pivot |
| 63 | Depot Toxique | Toxic Debris | Amonistar | Pics Toxik si frappe physique |
| 64 | Commandant | Commander | Nigirigon + Oyakata | +2 toutes stats en Double |
| 65 | Hospitalite | Hospitality | Ogerpon | Soigne l’allie de 25% PV |
| 66 | Oeil Revelateur | Mind’s Eye | Ursaking Lune de Sang | Normal/Combat touchent Spectre |
| 67 | Corps en Or | Good as Gold | Gromago | Immune aux attaques statut |
| 68 | Poing Invisible | Unseen Fist | Shifours | Ignore Protection |
| 69 | Transistor | Transistor | Regieleki | Booste attaques Electrik |
| 70 | Dent de Dragon | Dragon’s Maw | Regidrago | Booste attaques Dragon |
| 71 | Garde Mystik | Wonder Guard | Munja | Seules att. super efficaces |
SECTION 12 : LES OBJETS TENUS
Introduction et Règles Fondamentales
Avant de detailler chaque objet, voici les trois règles absolues du PvP competitif :
- Un seul objet par Pokémon. On ne peut pas en tenir plus d’un.
- Pas de doublons dans l’equipe. On ne peut pas avoir deux fois le même objet sur deux Pokémon differents de la même equipe. C’est une règle cruciale car certains objets sont tellement bons que plusieurs Pokémon se les “disputent”.
- Il est rarissime de ne pas jouer d’objet. Ne pas donner d’objet a un Pokémon en competitif est quasiment du jamais vu.
Méga-Gemmes et Cristaux Z ne sont pas couverts ici car ils fonctionnent differemment (objets de forme reserves a certaines especes, relevant de mécaniques a part).
Notion cle : Consommable vs. Non-consommable
- Consommable : l’objet s’active une seule fois et disparait. Même si le Pokémon récupère ses PV, l’objet ne revient pas. Exemples : Ceinture Force, Baie Citrus, Herbe Mentale, Spray Gorge, Graines, Herbe Pouvoir.
- Non-consommable (passif) : l’objet reste actif tant que le Pokémon le tient. Il fonctionne en continu, tour après tour. Exemples : Veste de Combat, objets Choix, Orbe Vie, Restes, Casque Brut, De Pipe, Evoluroc.
1. CEINTURE FORCE (Focus Sash)
| Propriete | Valeur |
|---|---|
| Type d’objet | Consommable |
| Activation | Quand le Pokémon devrait être KO alors qu’il est a 100% PV |
Effet : Permet a un Pokémon de survivre a une attaque qui l’aurait mis KO, en le laissant a 1 PV. Condition absolue : le Pokémon doit être a 100% de ses PV au moment de l’impact.
Mécanique detaillee :
- Si le Pokémon a perdu ne serait-ce qu’1 seul PV (degats de recul, meteo, etc.), la Ceinture Force ne peut PAS s’activer.
- Une fois activee, elle disparait pour le reste du match. Même si le Pokémon est soigne et revient a 100% PV, elle ne se reactivera jamais.
Cas particulier – Munja (Shedinja) : Munja n’a qu'1 PV. Donc soit il est en vie (1 PV = full life), et la Ceinture Force s’active automatiquement, soit il passe a 0 PV et il est KO. C’est un des Pokémon emblematiques de cet objet.
Usage competitif : On le donne a des Pokémon fragiles mais offensivement puissants, pour leur garantir au moins un tour d’action.
Interaction avec le Casque Brut : Si l’adversaire porte un Casque Brut et que votre Pokémon attaque au contact, il perd des PV a cause du Casque Brut. Si votre Pokémon avait la Ceinture Force “en reserve”, cette perte de PV la rend inutilisable au tour suivant. HARI donne l’exemple de Baogian qui porte quasi toujours la Ceinture Force : s’il utilise Cri au Pirouette (attaque de contact) contre un Pokémon avec Casque Brut, il perd des PV et la Ceinture Force est “desactivee” de facto.
2. VESTE DE COMBAT (Assault Vest)
| Propriete | Valeur |
|---|---|
| Type d’objet | Non-consommable (passif) |
| Bonus | +50% Défense Spéciale |
| Contrainte | Aucune attaque non-offensive |
Effet : Multiplie par 1,5 (soit +50%) la Defense Speciale du porteur. En contrepartie, le Pokemon ne peut utiliser aucune attaque non-offensive (aucune attaque de statut, aucun support).
Précision importante : On PEUT utiliser des attaques offensives qui servent de support. HARI donne les exemples de Vent Glace (attaque offensive qui baisse la vitesse adverse) et Bluff (attaque offensive qui fait flinch). C’est même frequent de voir un Pokemon Veste de Combat jouer Bluff + Vent Glace. L’interdiction concerne uniquement les attaques de statut pures (Abri, Distorsion, Danse Lames, etc.).
Usage competitif : L’un des objets les plus joues du jeu. +50% de Défense Spéciale de maniere passive, juste en tenant un objet, c’est “vraiment très très fort” selon HARI. Ideal pour des Pokémon physiques offensifs qui n’ont pas besoin de moves de statut.
3. MOUCHOIR CHOIX (Choice Scarf)
| Propriete | Valeur |
|---|---|
| Type d’objet | Non-consommable (passif) |
| Bonus | +50% Vitesse |
| Contrainte | Bloque sur une seule attaque |
Effet : Multiplie par 1,5 (soit +50%) la Vitesse du porteur. En contrepartie, une fois qu’on a selectionne une attaque, on est bloque sur cette attaque jusqu’a ce qu’on retire le Pokémon du terrain ou qu’il perde son objet.
Pourquoi c’est si important : HARI insiste : le Mouchoir Choix est le seul objet du jeu qui augmente la Vitesse sans conditions annexes. Augmenter la vitesse “n’est pas gratuit normalement” a Pokémon. C’est le seul objet qui permet d’augmenter la vitesse de n’importe quel Pokémon. A retenir absolument.
Interaction avec Tour de Magie : On peut utiliser l’attaque Tour de Magie (Trick) pour echanger les objets avec l’adversaire. Un Pokémon avec un Mouchoir Choix peut utiliser Tour de Magie pour bloquer un adversaire sur une seule attaque. Exemple historique : Gromago avec Lunettes Choix ou Mouchoir Choix jouant Tour de Magie.
4. BANDEAU CHOIX (Choice Band)
| Propriete | Valeur |
|---|---|
| Type d’objet | Non-consommable (passif) |
| Bonus | +50% Attaque physique |
| Contrainte | Bloque sur une seule attaque |
Effet : Multiplie par 1,5 l’Attaque physique du porteur. Même contrainte de choix que le Mouchoir. HARI souligne qu’aucun autre objet n’augmente autant l’Attaque que le Bandeau Choix.
5. LUNETTES CHOIX (Choice Specs)
| Propriete | Valeur |
|---|---|
| Type d’objet | Non-consommable (passif) |
| Bonus | +50% Attaque Spéciale |
| Contrainte | Bloque sur une seule attaque |
Effet : Multiplie par 1,5 l’Attaque Spéciale du porteur. Même mecanisme de verrouillage que les deux autres objets Choix.
Resume des objets Choix
| Objet | Stat boostee | Contrainte |
|---|---|---|
| Mouchoir Choix | Vitesse +50% | Bloque sur une attaque |
| Bandeau Choix | Attaque +50% | Bloque sur une attaque |
| Lunettes Choix | Att. Spéciale +50% | Bloque sur une attaque |
Le seul moyen de “debloquer” le choix est de switch (retirer le Pokemon) ou de perdre l’objet (via Sabotage, Tour de Magie, etc.).
6. ORBE VIE (Life Orb)
| Propriete | Valeur |
|---|---|
| Type d’objet | Non-consommable (passif) |
| Bonus | +30% degats offensifs |
| Cout | -10% PV max a chaque attaque qui fait des degats |
Effet : Booste de 30% les degats de toutes les attaques offensives. En contrepartie, le Pokémon perd 10% de ses PV max a chaque fois qu’il inflige des degats.
Précision : Le recul de 10% ne s’applique QUE si l’attaque fait au moins 1 point de degat. Si on tape dans un Abri (0 degats) ou si on rate l’attaque, pas de recul.
Comparaison avec les objets Choix : L’Orbe Vie donne moins de boost (+30% vs +50%), MAIS :
- On n’est pas bloque sur une seule attaque (souplesse totale).
- On peut booster des attaques physiques ET speciales sur le même Pokémon.
Interaction cruciale avec le talent SANS LIMITE (Sheer Force) : Quand un Pokemon a le talent Sans Limite ET tient l’Orbe Vie, les degats de recul de l’Orbe Vie sont annules. On cumule le boost de Sans Limite (+30%) + le boost de l’Orbe Vie (+30%), sans aucun inconvenient. C’est pourquoi Demeteros Forme Avatar avec Orbe Vie ne prend jamais de degats de recul.
7. OBJETS DE BOOST DE TYPE (+20%)
Il existe deux catégories d’objets qui boostent les degats d’un type specifique de +20% :
A. Les Plaques d’Arceus
Exemples : Plaque Pixi (type Fee), Plaque Hydro (type Eau), etc. Une plaque par type.
B. Les objets “classiques” de boost de type
| Objet | Type booste |
|---|---|
| Eau Mystique | Eau |
| Charbon | Feu |
| Graines Miracle | Plante |
| Aimant | Électrique |
| Plume Féerique | Fee |
| Mouchoir Soie | Normal |
| (et d’autres pour chaque type) |
Point cle – Deux objets par type : Chaque type a DEUX objets differents qui donnent le même +20%. Comme ce sont des objets techniquement differents, on peut les avoir TOUS LES DEUX dans la même equipe. HARI cite l’exemple de l’equipe de King Cambell au Championnat du Monde 2025 : Kyogre avec Plaque Hydro ET Shifours avec Eau Mystique – deux boost +20% Eau sur la même equipe.
Exception – Type Normal : Il n’existe pas de Plaque pour le type Normal. Le seul objet de boost +20% Normal est le Mouchoir Soie.
Note : La Plume Féerique est un objet assez recent (ajoute avec Ecarlate/Violet), en plus de la Plaque Pixi. Incertitude pour Pokémon Champions : les Plaques d’Arceus seront-elles presentes ?
8. LUNETTES FILTRE (Safety Goggles)
| Propriete | Valeur |
|---|---|
| Type d’objet | Non-consommable (passif) |
Effet : Protège le porteur de :
- Tous les effets des poudres (Poudre Dodo, Spore, Poudre Fureur)
- Les degats de la Tempête de Sable en fin de tour
Usage competitif principal – Anti-Poudres : L’interet principal est l’immunite aux poudres. HARI insiste surtout sur Gaulet (Amoonguss) : c’est l’un des meilleurs Pokemon du jeu, et il brille grace a ses attaques de poudre (Spore, Poudre Fureur). Avec les Lunettes Filtre, on peut complètement l’ignorer.
Exemple concret : Même quand Gaulet n’est pas très present dans la méta, ne pas le respecter est “complique”. Certaines equipes mettent les Lunettes Filtre sur un Pokémon comme Felin Ferno juste pour contrer Gaulet.
9. TALISMAN SAIN (Clear Amulet)
| Propriete | Valeur |
|---|---|
| Type d’objet | Non-consommable (passif) |
Effet : Empêche les baisses de statistiques infligees par les Pokémon adverses (ou plus precisement, par les autres Pokemon).
Distinction cruciale :
- Fonctionne exactement comme le talent Corps Sain de Metaloss.
- Bloque : Intimidation, Dernier Mot, l’effet secondaire de Vent Glace, etc.
- NE bloque PAS les baisses que le Pokémon s’inflige a lui-même (ex : Close Combat baisse ses propres Defense et Defense Speciale).
Usage competitif : Nerf indirect du talent Intimidation. On le donne a un Pokémon qui veut taper sur le physique sans se faire intimider. Existe depuis la 9G.
10. CAPE OBSCURE (Covert Cloak)
| Propriete | Valeur |
|---|---|
| Type d’objet | Non-consommable (passif) |
Effet : Protège le porteur des effets secondaires des attaques.
Distinction cruciale – Effet secondaire vs. Propriete :
Effets secondaires (BLOQUES par Cape Obscure) :
- Vent Glace : baisse de vitesse -> bloquee
- Bout de Feu (Flamethrower) : brulure -> bloquee
- Laser Glace : gel -> bloque
- Bluff (Fake Out) : flinch -> bloque
- Grif’Funeste (Dire Claw) de Farfurex : empoisonnement/paralysie/sommeil -> tous bloques
- Eboulement : flinch -> bloque
Proprietes (NON BLOQUEES par Cape Obscure) :
- Attaque drainante (Giga Drain, Vampi-Poing) : vol de PV -> pas bloque (c’est une propriete, pas un effet secondaire)
Usage competitif : Un des meilleurs objets du jeu (9G). Particulierement utile contre les Pokemon qui spamment des attaques a effets secondaires. Protege aussi d’Aboiement (baisse d’Att. Spe = effet secondaire).
11. RESTES (Leftovers)
| Propriete | Valeur |
|---|---|
| Type d’objet | Non-consommable (passif) |
| Soin | 1/16e des PV max par tour |
Effet : Rend au porteur 1/16e de ses PV max a la fin de chaque tour. Pas de limite : la recuperation se fait tous les tours, indefiniment.
Usage competitif : On joue les Restes sur des Pokémon qui vont se booster defensivement et qui veulent rester longtemps sur le terrain. La petite recuperation a chaque tour s’accumule et fait une vraie difference sur la duree.
Comparaison avec la Baie Citrus : Restes = meilleurs sur la duree. Baie Citrus = meilleure en burst (un seul gros soin).
12. BAIE CITRUS (Sitrus Berry)
| Propriete | Valeur |
|---|---|
| Type d’objet | Consommable |
| Soin | 25% PV max quand on passe a 50% PV ou moins |
Effet : Rend au porteur 25% de ses PV max lorsqu’il passe a 50% ou moins de ses PV. Activation automatique.
Usage competitif : Historiquement joue sur enormement de Pokémon, surtout les Pokémon resistants. C’est comme si le Pokémon avait effectivement 125% de ses PV : le +25% est enorme.
Nuance : La Baie Citrus n’empeche pas le KO en un coup. Si l’adversaire fait 100% des PV en un seul coup, la baie ne se declenche pas.
Mention de la Baie Prine (Lum Berry) : Soigne un probleme de statut. Historiquement moins jouee que la Baie Citrus.
13. CASQUE BRUT (Rocky Helmet)
| Propriete | Valeur |
|---|---|
| Type d’objet | Non-consommable (passif) |
| Degats infliges | 1/6e des PV max de l’attaquant |
Effet : Inflige 1/6e des PV max du Pokémon attaquant a chaque fois qu’il touche le porteur avec une attaque de contact.
HARI insiste : C’est 1/6e (et non 1/16e), c’est vraiment beaucoup.
Interaction avec les attaques multi-coups : Si un Pokémon fait Torrent de Coups (Surging Strikes, 3 hits), il prendra le Casque Brut trois fois (1/6 x 3 = il perd la moitie de ses PV). La punition est très severe.
Interaction avec la Ceinture Force : Le Casque Brut est un counter direct de la Ceinture Force. Si le Pokémon adverse a la Ceinture Force et attaque au contact, le recul du Casque Brut lui fait perdre des PV -> il n’est plus full life -> la Ceinture Force ne peut plus s’activer au tour suivant.
Usage competitif : On joue le Casque Brut surtout sur les Pokémon redirecteurs (Par Ici / Poudre Fureur) comme Gaulet ou Famignol. L’adversaire est force d’attaquer le redirecteur, et il prend des degats en retour.
14. HERBE MENTALE (Mental Herb)
| Propriete | Valeur |
|---|---|
| Type d’objet | Consommable |
| Soigne | Provoque, Encore, Entrave |
Effet : Soigne le porteur de certains effets restrictifs : Provoque (Taunt), Encore, Entrave (Disable), et quelques autres.
Usage competitif : On le donne aux Pokémon de support qui doivent absolument poser leurs moves de statut. Exemple principal : un Pokémon qui doit assurer la pose d’une Distorsion. Si l’adversaire utilise Provoque pour l’empecher, l’Herbe Mentale s’active et annule la Provoque.
Egalement utile pour les Pokémon qui n’ont aucune attaque offensive (100% support) et qui seraient complètement paralyses par Provoque/Encore.
15. SPRAY GORGE (Throat Spray)
| Propriete | Valeur |
|---|---|
| Type d’objet | Consommable |
| Activation | Après une attaque sonore |
| Bonus | +1 Attaque Spéciale |
Effet : S’active quand le porteur utilise une attaque sonore. Donne un boost de +1 en Attaque Spéciale (soit +50% de degats speciaux).
Fonctionnement concret : On fait Megaphone une premiere fois -> le Spray Gorge s’active -> on gagne +1 en Attaque Spéciale -> tous les Megaphone suivants (et autres attaques speciales) beneficient du boost de +50%.
Exemples :
- Nymphali : avec Megaphone + Peau Féerique + Spray Gorge, il devient une menace immense.
- Fari-Girafe : après un Megaphone + activation du Spray Gorge, ses degats deviennent beaucoup plus corrects, ce qui le rend moins passif.
16. GRAINES DE TERRAIN (Terrain Seeds)
Il existe quatre graines, une par terrain :
| Graine | Terrain associe | Boost |
|---|---|---|
| Graine Herbe | Champ Herbu | +1 Défense Physique |
| Graine Psychique | Champ Psychique | +1 Défense Spéciale |
| Graine Brumeuse | Champ Brumeux | +1 Défense Spéciale |
| Graine Électrique | Champ Electrifie | +1 Défense Physique |
Mécanique detaillee :
- Ce sont des consommables : une seule activation par match.
- S’activent automatiquement des que le terrain correspondant est pose.
- Le Pokémon qui porte la graine n’a PAS besoin de toucher le sol. Exemple historique (2017) : un Pokémon de type Vol portait la Graine Psychique et profitait quand même du boost.
Combinaison majeure avec DELESTAGE : Le talent Delestage double la vitesse d’un Pokémon qui a consomme un objet. Comme les graines sont des consommables, elles activent Delestage. Double benefice : boost defensif + vitesse doublee.
Exemple emblematique : Farfurex en reglement H : Graine Herbe a côté de Gorithmique (Crea Herbe) -> graine consommee -> +1 Défense + Delestage -> Vitesse doublee. Devastateur.
Autre exemple : Pirax (Volcarona) : sa faiblesse est la Defense Physique. Avec une Graine Herbe + Papillodanse (qui booste la Defense Speciale), il se booste des deux côtés et devient très resistant.
17. ORBE FLAMME (Flame Orb)
| Propriete | Valeur |
|---|---|
| Type d’objet | Non-consommable (passif) |
| Activation | Brule le porteur a la fin du 1er tour |
Effet : Brule le porteur a la fin du premier tour ou il reste sur le terrain.
Pourquoi vouloir se bruler ? Le talent CRAN (Guts) booste l’Attaque physique de 50% quand le Pokémon a un probleme de statut. On combine avec l’attaque Facade dont la puissance double quand le Pokémon est brule/empoisonne/paralyse. On préféré l’Orbe Flamme a l’Orbe Toxique car la brulure inflige moins de degats que l’empoisonnement.
Exemple emblematique : Ursaking avec Cran + Facade + Orbe Flamme.
18. ORBE TOXIQUE (Toxic Orb)
| Propriete | Valeur |
|---|---|
| Type d’objet | Non-consommable (passif) |
| Activation | Empoisonne le porteur a la fin du 1er tour |
Effet : Empoisonne le porteur (empoisonnement standard, pas grave) a la fin du premier tour.
Usage : Theoriquement utilisable avec le talent Soin Poison (Poison Heal) qui regagne des PV au lieu d’en perdre quand empoisonne. Mais historiquement, il n’y a eu “a peu pres aucun Pokémon vraiment bon avec Soin Poison en competition”.
19. LUMARGILE (Light Clay)
| Propriete | Valeur |
|---|---|
| Type d’objet | Non-consommable (passif) |
| Bonus | Ecrans de 5 tours -> 8 tours |
Effet : Etend la duree des murs (Protection / Mur Lumiere) de 5 tours a 8 tours. Fonctionne aussi avec Voile Aurore (Aurora Veil).
Précision : L’extension est prise en compte au moment ou le mur est pose. Si Angoliath pose Protection au tour 1 en tenant la Lumargile -> Protection dure 8 tours. Même si Angoliath meurt ensuite, c’est pose, c’est pose.
MAIS : Si le Pokémon pose un premier mur avec Lumargile, puis perd l’objet (via Sabotage) entre les deux poses, le deuxieme mur ne durera que 5 tours normaux (pas de Lumargile au moment de la pose).
Pokémon emblematique : Feunard d’Alola avec Voile Aurore + Lumargile (Voile Aurore = Protection + Mur Lumiere en un seul move, sous la Neige).
Impact stratégique : Les parties durent en général 8 a 12 tours. Des murs de 8 tours couvrent potentiellement toute la partie, ce qui les rend enormement plus rentables que des murs de 5 tours.
20. HERBE POUVOIR (Power Herb)
| Propriete | Valeur |
|---|---|
| Type d’objet | Consommable |
| Effet | Saute le tour de chargement d’une attaque a 2 tours |
Effet : Permet de sauter le tour de chargement d’une attaque a deux tours. Une seule utilisation.
Attaques jouees en competitif avec l’Herbe Pouvoir :
- Laser Meteor (Meteor Beam) : attaque Roche speciale. Le tour de chargement donne un boost en Attaque Spéciale, puis l’attaque part. Avec l’Herbe Pouvoir, on prend le boost ET on envoie l’attaque dans le même tour.
- Fulgurayon de Pondralugon : même principe.
- Geo Controle (Geomancy) de Xerneas : attaque a deux tours qui donne d’enormes boosts. L’Herbe Pouvoir permet de l’activer en un seul tour.
21. DE PIPE (Loaded Dice)
| Propriete | Valeur |
|---|---|
| Type d’objet | Non-consommable (passif) |
| Effet | Les attaques multi-coups touchent au minimum 4 fois |
Effet : Garantit que les attaques multi-coups touchent au minimum 4 fois (au lieu de 2-5 avec des probabilites variables).
Précision : Il ne garantit PAS de reussir le premier coup. L’attaque doit d’abord toucher (check de precision), et ensuite le De Pipe garantit 4-5 coups.
Exemple : Rafale Caille (Rock Blast) a 90% de précision. Si le premier coup touche, les 3 suivants sont garantis. Mais si le premier coup rate, pas de coups du tout.
Historique : N’existe que depuis la 9G. Combinaison principale historiquement avec Rafale Caille sur Dracolosse et d’autres.
22. EVOLUROC (Eviolite)
| Propriete | Valeur |
|---|---|
| Type d’objet | Non-consommable (passif) |
| Bonus | +50% Défense ET +50% Défense Spéciale |
| Contrainte | Uniquement pour les Pokémon qui peuvent encore evoluer |
Effet : Octroie un boost de +50% en Défense ET en Défense Spéciale aux Pokémon qui peuvent encore evoluer (les prevolutions).
Comparaison avec les autres objets +50% :
- Objets Choix : +50% mais bloque sur une attaque.
- Veste de Combat : +50% Def. Spe. seulement, pas d’attaques de statut.
- Evoluroc : +50% Défense ET Défense Spéciale, SANS AUCUNE CONTRAINTE sur les attaques. La seule contrainte est qu’il faut utiliser un Pokémon non-evolue.
Pokémon emblematiques avec Evoluroc :
- Melofe (Clefairy) : Garde-Ami + Par Ici + Evoluroc = le support ultime.
- Cornebre (Murkrow) : Farceur + Evoluroc = un support solide.
- Teraclope (Dusclops) : poseur de Distorsion avec une défense enorme grace a Evoluroc.
- Porygon2 : bulk enorme + Distorsion.
23. OBJETS EXCLUSIFS
Balle Lumiere (Light Ball) – Pikachu exclusif
Effet : Double l’Attaque ET l’Attaque Spéciale de Pikachu. Ca donne un “vrai potentiel offensif” a Pikachu, mais “ca reste une chips” – il se fait KO sur la moindre attaque.
Os Sacre (Thick Club) – Osature exclusif
Effet : Double l’Attaque physique d’Osature (Marowak). “Il se met a taper très très très fort.”
Masques de Ogerpon – Objets de forme
Les masques changent la forme et le type d’Ogerpon. Ce sont des objets de forme avec des règles speciales :
- Ne peut PAS être sabote (Knock Off)
- Ne peut PAS être echange via Tour de Magie
- Ne peut PAS être supprime ou neutralise
Méga-Gemmes – Objets de forme
Techniquement des objets de forme aussi. Ne peuvent pas être sabotees non plus.
24. BOOSTER ENERGIE (Booster Energy)
Pokémon concernes : Pokémon Paradoxe exclusivement
Effet : Active automatiquement les talents Protosynthese ou Propulsion Quantique des Pokémon Paradoxe. HARI choisit de ne pas le detailler en profondeur car les Pokémon Paradoxe ne seront pas presents au debut de Pokémon Champions.
25. LA LOUPE (Wide Lens)
| Propriete | Valeur |
|---|---|
| Type d’objet | Non-consommable (passif) |
| Bonus | +10% précision |
Effet : Donne +10% de précision a toutes les attaques. HARI mentionne que c’est mathematiquement meilleur que le De Pipe pour l’attaque Proliferation (Population Bomb). Peu joue en général.
Recapitulatif des synergies et interactions cles (Objets)
| Synergie/Interaction | Effet |
|---|---|
| Ceinture Force vs Casque Brut | Le Casque Brut desactive indirectement la Ceinture Force en infligeant des degats de recul |
| Orbe Vie + Sans Limite | Le recul de l’Orbe Vie est annule par Sans Limite, cumul des boosts sans inconvenient |
| Orbe Flamme + Cran + Facade | Triple synergie offensive devastatrice (+50% Att + puissance x2 + ignore brulure) |
| Graines + Delestage | Boost defensif + vitesse doublee |
| Herbe Pouvoir + Attaques a 2 tours | Laser Meteor, Geo Controle en un seul tour |
| Lumargile + Murs | Prolongation de 5 a 8 tours, couvrant quasi toute la partie |
| Tour de Magie + Objets Choix | Bloquer un adversaire sur une seule attaque |
| Spray Gorge + Megaphone | Boost Att. Spe automatique après une attaque sonore |
| De Pipe + Multi-coups | Garantir 4-5 coups au lieu de 2-5 |
| Evoluroc + Prevolutions | Bulk monstrueux sans contrainte offensive |
| Amour Filial + Casque Brut | Double recul = punition severe pour Méga-Kangourex |
| Talisman Sain vs Intimidation | Bloque la baisse d’Attaque comme Corps Sain |
| Cape Obscure vs Bluff | Bloque le flinch = Bluff ne fait que 40 degats sans effet |
Part 7 — Mega-Evolution & Teracrystallization (HARI)
SECTION 13 : LA MEGA-EVOLUTION – ENCYCLOPEDIE COMPLETE
13.1 Comprendre la mécanique de Méga-Évolution
La Méga-Évolution est l’une des deux mécaniques de combat centrales de Pokémon Champions, aux côtés de la Teracristallisation. Elle transforme temporairement un Pokémon en une forme plus puissante pendant un combat. Voici tout ce qu’il faut savoir.
13.1.1 Conditions de declenchement
Pour Méga-Evoluer un Pokémon, trois conditions doivent être remplies simultanement :
- Le Pokémon doit porter sa Méga-Gemme (ou “Pierre [Nom]ite”) – un objet specifique a chaque espece. Par exemple, Kangourex doit porter la Kangourexite, Dracaufeu la Dracaufite X ou Y, etc.
- Vous ne devez pas avoir déjà Méga-Evolue un autre Pokémon ce combat – la Méga-Évolution est limitee a une seule fois par combat, pas par tour.
- Le Pokémon doit être en vie sur le terrain – la Méga-Évolution se declenche au moment de choisir une attaque, avant l’execution du tour.
13.1.2 Deroulement mécanique
- La Méga-Évolution se produit au debut du tour, avant toute attaque.
- Le Pokémon conserve ses PV actuels – les PV de base ne changent jamais lors d’une Méga-Évolution.
- Le Pokémon gagne +100 points de statistiques de base (BST) repartis sur l’Attaque, la Défense, l’Attaque Spéciale, la Défense Spéciale et la Vitesse. La repartition varie selon l’espece.
- Le Pokémon peut changer de type(s) et de talent en Méga-Evoluant.
- La transformation dure jusqu’a la fin du combat – il n’y a pas de duree limitee.
- Si le Pokémon Méga-Evolue tombe KO, la Méga-Évolution est consommee pour le reste du combat.
13.1.3 Implications strategiques fondamentales
Le sacrifice de l’objet : Un Pokémon qui porte une Méga-Gemme ne peut porter aucun autre objet. Cela signifie pas de Baie Prine, pas de Ceinture Force, pas de Veste d’Assaut, pas de Lunettes Choix. C’est un cout d’opportunite enorme – votre Méga-Évolution doit justifier ce sacrifice par sa puissance brute.
Le talent de transition : Avant de Méga-Evoluer, le Pokémon utilise son talent de base. Ce talent pre-Mega est souvent crucial. Par exemple, Drattak (Salamence) entre sur le terrain avec Intimidation (baisse l’Attaque adverse de 1 cran), puis Méga-Evolue pour obtenir Peau Celeste. Ce “double benefice” (talent pre-Mega + talent Mega) est un avantage unique de la mécanique.
Le slot Mega : Puisqu’une seule Méga-Évolution est autorisee par combat, le choix de votre Mega est l’une des decisions de teambuilding les plus importantes. Vous construisez souvent toute votre equipe autour de votre Mega.
L’interaction avec la Teracristallisation : Règle cruciale – un Pokémon Méga-Evolue ne peut pas Teracristalliser, et un Pokémon Teracristallise ne peut pas Méga-Evoluer. Les deux mécaniques ne se cumulent pas sur le même Pokémon. Cela signifie que votre Mega et votre candidat a la Teracristallisation doivent être deux Pokémon differents.
13.1.4 Obtention des Méga-Gemmes
Pour obtenir les Méga-Gemmes dans Pokémon Champions :
- Les Méga-Gemmes des Pokémon de Legendes Pokémon Z-A sont obtenues en transferant le Pokémon concerne depuis Legendes Z-A vers Pokémon HOME, puis de HOME vers Champions. Vous recevez la Méga-Gemme en cadeau.
- Attention a la fenetre evenementielle – si vous ratez la periode de transfert, l’obtention des Méga-Gemmes pourrait necessiter des VP ou un autre mecanisme.
- Les Pokémon de Pokémon GO ne fonctionnent PAS pour ce transfert.
- Conseil pratique : Trouvez un ami qui possède Legendes Z-A pour faire les echanges via Pokémon HOME si vous ne l’avez pas.
13.2 Le “Big Three” : Les Trois Megas Historiquement Dominantes
Ces trois Méga-Évolutions sont les equivalents de Nadal, Federer et Djokovic du Pokémon competitif. A eux trois, ils ont remporte les Championnats du Monde 2015, 2016, 2018 et 2019. Les comprendre est absolument essentiel.
13.2.1 MEGA-KANGOUREX (Mega Kangaskhan)
Type : Normal Talent Mega : Amour Filial (Parental Bond) Talent pre-Mega : Querelleur (Scrappy) / Attention (Inner Focus)
Statistiques
| Stat | Base | Mega | Delta |
|---|---|---|---|
| PV | 105 | 105 | +0 |
| Attaque | 95 | 125 | +30 |
| Défense | 80 | ~100 | +20 |
| Atq. Spe. | 40 | ~40 | +0 |
| Def. Spe. | 80 | ~100 | +20 |
| Vitesse | 90 | ~120 | +30 |
Le talent Amour Filial – Ce qui rend Kangourex unique
Chaque attaque offensive mono-cible frappe deux fois. Le deuxieme coup inflige un pourcentage reduit des degats :
- En 6G (2014-2016) : le deuxieme coup fait 50% des degats du premier.
- A partir de la 7G (2017+) : le deuxieme coup ne fait plus que 25% des degats du premier (nerf majeur).
Effets secondaires et coups critiques s’appliquent sur CHAQUE coup, y compris le deuxieme. C’est ce qui rend Poing Boost (Power-Up Punch) uniquement viable sur Kangourex : chaque utilisation donne +2 en Attaque au lieu de +1, car les deux impacts declenchent le boost d’Attaque separement.
Limitation importante : Amour Filial ne fonctionne PAS sur les attaques de zone comme Séisme ou Eboulement.
Le talent pre-Mega : Querelleur (Scrappy)
Querelleur permet de toucher les Pokémon de type Spectre avec des attaques Normal et Combat. L’interet principal en competitif : pouvoir utiliser Bluff (Fake Out) sur un Méga-Ectoplasma avant qu’il ne Méga-Evolue et piège votre equipe avec Marque Ombre. C’est une interaction essentielle a connaitre.
L’alternative Attention (Inner Focus) protège du flinch, utile dans les miroirs Kangourex ou contre des Bluffeurs plus rapides, mais elle etait largement moins populaire que Querelleur.
Moveset historique
| Attaque | Puissance | Type | Rôle |
|---|---|---|---|
| Retour (Return) | 102 | Normal | STAB principal fiable, sans recul |
| Damocles (Double-Edge) | 120 | Normal | STAB plus puissant mais avec recul |
| Poing Boost (Power-Up Punch) | 40 | Combat | Setup : +2 Atk par utilisation grace a Amour Filial |
| Bluff (Fake Out) | 40 | Normal | Flinch garanti + degats STAB significatifs |
| Coup Bas (Sucker Punch) | 70 | Ténèbres | Priorité, touche les Spectres avec Querelleur pre-Mega |
| Abri (Protect) | – | Normal | Rarement joue mais viable (Eduardo Cunha, Top 4 Worlds 2016) |
Palmaras en tournoi
| Saison | Resultat | Joueur | Notes |
|---|---|---|---|
| 2014 | Domine la saison | – | Ennemi public n.1 toute la saison, mais ZERO Méga-Kangourex en Top 8 aux Worlds (tout le meta le ciblait) |
| 2015 | Champion du Monde | Shoma Honami (Japon) | Equipe CHALK : Cresselia + Heatran + Amoonguss + Landorus-T + Kangaskhan |
| 2015 | Special de Tours | Alexo | Une des rares victoires francaises en tournoi majeur |
| 2016 | Top 4 Worlds | Eduardo Cunha | Variante avec Abri + Provoque sur Kangourex |
| 2019 | Toujours present | – | Moins dominant, jouait Morsure (Crunch) pour cibler Lunala |
L’equipe CHALK (Worlds 2015)
L’archétype CHALK est l’une des equipes les plus iconiques de l’histoire du VGC :
- C = Cresselia (support, Distorsion, Laser Glace)
- H = Heatran (attaquant special Feu/Acier, couverture)
- A = Amoonguss (redirecteur via Poudre de Colère, Spore)
- L = Landorus-Therian (Intimidation, Seisme, couverture Sol/Vol)
- K = Kangaskhan (Mega, piece maitresse offensive)
Les nerfs subis au fil des generations
- Nerf d’Amour Filial (7G) : Deuxieme coup passe de 50% a 25% des degats
- Perte de Poing Boost : Plus disponible en CT a partir de la 7G
- Nerf de Coup Bas : Puissance reduite
- Perte de Retour/Frustration (8G) : Supprime du jeu. C’est potentiellement le plus gros probleme pour Champions – Plaquage (Body Slam) ne fait que 85 de puissance contre 102 pour Retour.
Contres et faiblesses
- Intimidation : Kangourex n’a aucune protection contre la baisse d’Attaque
- Feu Follet (Will-O-Wisp) : Brulure divise l’Attaque par 2
- Pokémon Spectre : Immunité au STAB Normal (d’ou Querelleur et Coup Bas)
- Pokémon Combat : Terrakium, Bastiodon très presents historiquement
- Target intensif : Quand tout le méta construit pour battre Kangourex, il disparait du Top 8
Perspectives dans Pokémon Champions
- Probleme majeur : La perte de Retour/Frustration force a jouer Damocles (recul) ou Plaquage (puissance insuffisante)
- Espoir : Si Poing Boost revient, le setup +2 Atk redevient possible
- Querelleur reste precieux pour toucher les Spectres, surtout Méga-Ectoplasma
- Verdict : Toujours redoutable si le movepool est etoffe, mais plus fragile qu’avant
13.2.2 MEGA-DRATTAK (Mega Salamence)
Type : Dragon / Vol Talent Mega : Peau Celeste (Aerilate) Talent pre-Mega : Intimidation
Statistiques
Méga-Drattak possède des stats enormes dans tous les domaines. Son bulk physique est si important qu’on pouvait jouer nature -Défense ou -Défense Spéciale sans probleme. Son Attaque Spéciale de base atteint 120 même sans investissement, suffisant pour des Draco Meteore devastateurs.
Le talent Peau Celeste – La machine a degats aeriens
Peau Celeste transforme toutes les attaques de type Normal en type Vol et accorde un bonus de puissance :
- En 6G : +30% de puissance
- A partir de la 7G : +20% de puissance (nerf)
Concretement, Damocles (Double-Edge, 120 puissance Normal) devient une attaque Vol a 120 x 1.2 (ou 1.3) + STAB Vol = des degats absolument monstrueux. C’est l’equivalent d’un STAB Vol surpuissant, fiable et sans restriction.
Fait crucial : Même après le nerf en 7G, Méga-Drattak a remporte les Championnats du Monde DEUX FOIS (2018 et 2019). C’est la seule Méga-Évolution a avoir gagne les Worlds deux annees consecutives.
Le talent pre-Mega : Intimidation
Intimidation est potentiellement LE meilleur talent du jeu. Il baisse l’Attaque adverse d’un cran en entrant sur le terrain. Cela signifie que Drattak est utile même avant de Méga-Evoluer – il debuff l’adversaire rien qu’en arrivant.
A l’epoque, il existait beaucoup moins de contres a Intimidation : pas de Talisman Sain, pas de talents immunises en 8G, moins de bons Pokémon avec Acharne/Battant. Intimidation etait excellente contre Kangourex, les miroirs Drattak, Primo-Groudon, Méga-Rayquaza et les Ultra-Chimeres.
Movesets principaux
Build Physique Standard (2014-2015) :
| Attaque | Type (après Peau Celeste) | Puissance | Rôle |
|---|---|---|---|
| Damocles | Vol | 120 (+20-30%) | Nuke aerien principal |
| Draco Meteore | Dragon | 130 | Tue les Dragons adverses, pas affecte par Intimidation (special) |
| Vent Arrière (Tailwind) | Vol | – | Support de vitesse pour toute l’equipe |
| Abri (Protect) | Normal | – | Protection standard |
Build Special (variante) :
| Attaque | Type | Puissance | Rôle |
|---|---|---|---|
| Megaphone (Hyper Voice) | Vol (via Peau Celeste) | 90 (+20-30%) | Attaque speciale DE ZONE Vol |
| Damocles | Vol | 120 (+20-30%) | Frappe physique même sans investissement |
| Vent Arrière | Vol | – | Support de vitesse |
| Abri | Normal | – | Protection |
Build Danse Draco (celui qui a gagne les Worlds 2018) :
| Attaque | Type | Puissance | Rôle |
|---|---|---|---|
| Danse Draco | Dragon | – | +1 Atk +1 Vitesse, compense Intimidation, depasse Ectoplasma |
| Damocles | Vol | 120 (+20%) | A +1 avec Peau Celeste, “explose tout le Pokédex” |
| Séisme ou Draco-Griffe | Sol/Dragon | Variable | Coverage |
| Abri | Normal | – | Protection |
Palmaras en tournoi
| Saison | Resultat | Joueur | Build |
|---|---|---|---|
| 2015 | Très fort | – | Physique standard |
| 2016 | Excellent en restreints | – | Megaphone contre Primo-Groudon (Vol super efficace sur Sol) |
| 2018 | Champion du Monde | Paul Ruiz (Equateur) | Danse Draco, POST-nerf de Peau Celeste |
| 2019 | Champion du Monde | Naoto Mizobuchi (Japon) | Deuxieme victoire consecutive, POST-nerf |
Contres et faiblesses
- Double faiblesse Glace : MAIS peu exploitable historiquement – Puissance Cachée Glace de Fulguris/Electhor etait faible; Cresselia avec Laser Glace necessitait beaucoup d’investissement offensif.
- Faiblesse Fee : Exploitee principalement par Xerneas
- Intimidation adverse : Compensable par Danse Draco
- Tricherie (Foul Play) d’Yveltal : Exploite l’Attaque elevee de Drattak, mais compensee par l’excellente Défense
Pourquoi Drattak etait si dominant
- Stats enormes dans tous les domaines
- Typing exceptionnel avec immunité Sol et plein de resistances
- Intimidation pre-Mega = utile même sans Méga-Evoluer
- Peau Celeste transforme Damocles en nuke aerien
- Polyvalent : physique, special, support Vent Arrière, ou setup Danse Draco
- Comme le dit HARI : “Il n’a pas besoin d’avoir tous les moves du jeu pour faire son travail”
Perspectives dans Pokémon Champions
Probablement le mieux positionne des trois legendes. Stats enormes, Intimidation, polyvalence intacte. Il n’a pas souffert des memes nerfs de movepool que Kangourex.
13.2.3 MEGA-ECTOPLASMA (Mega Gengar)
Type : Poison / Spectre Talent Mega : Marque Ombre (Shadow Tag) Talent pre-Mega : Lévitation (6G) / Corps Maudit (Cursed Body, 7G+)
Statistiques
| Stat | Valeur |
|---|---|
| PV | 60 |
| Attaque | – |
| Défense | 80 |
| Atq. Spe. | 170 |
| Def. Spe. | 80 |
| Vitesse | Excellente (supérieure a Kangourex et Drattak) |
170 d’Attaque Spéciale est un chiffre gigantesque. Même sans talent boostant les degats, Ectoplasma tape naturellement extremement fort. Mais son veritable pouvoir ne vient pas de ses degats.
Le talent Marque Ombre – Le piège ultime
Marque Ombre empêche les adversaires de switcher tant qu’Ectoplasma est sur le terrain. C’est CE talent qui rend Ectoplasma unique et redoutable, bien plus que ses degats purs.
Exception cruciale : Les Pokémon de type Spectre sont immunises au piège et peuvent switcher librement.
Ce talent permet la stratégie la plus terrifiante du jeu : le Perish Trap.
La stratégie Perish Trap en detail
C’est la combinaison la plus frustante a affronter et la plus elegante a executer :
- Tour 1 : Méga-Ectoplasma utilise Requiem (Perish Song) – tous les Pokémon sur le terrain ont 3 tours avant de tomber KO automatiquement.
- Tours 2-3 : Grace a Marque Ombre, les adversaires ne peuvent pas switcher pour echapper au compteur Requiem (sauf les Spectres).
- Tour 3 : Ectoplasma se protège avec Abri ou switch out – il n’est plus affecte par Requiem. Un deuxieme porteur de Marque Ombre entre (par exemple Siderella ou Bronzong/Tarpo avec le talent Farceur).
- Tour 4 : Les Pokémon adverses tombent KO automatiquement, pieges par le second porteur de Marque Ombre.
Cette stratégie etait absolument devastatrice en 2019 avec les Primos et leurs meteos permanentes qui rendaient le trapping encore plus punitif.
Movesets – La diversite qui fait peur
| Attaque | Type | Puissance | Rôle |
|---|---|---|---|
| Bombe Beurk (Sludge Bomb) | Poison | 90 | STAB, touche les Fee (Xerneas) |
| Ball’Ombre (Shadow Ball) | Spectre | 80 | STAB, essentiel pour toucher les Spectres immunises a Marque Ombre |
| Requiem (Perish Song) | Normal | – | Coeur du Perish Trap |
| Abri (Protect) | Normal | – | Temporise les tours de Requiem |
| Feu Follet (Will-O-Wisp) | Feu | – | Neutralise les attaquants physiques; n’est PAS une attaque offensive, donc n’active pas Coup Bas |
| Provoque (Taunt) | Ténèbres | – | Empêche Cresselia de poser Distorsion, Amoonguss de supporter |
| Vent Glace (Icy Wind) | Glace | 55 | De zone, enormes degats en x4 sur Drattak, controle de vitesse |
| Entrave (Disable) | Normal | – | Bloque le meilleur move adverse en combo avec Farfaduvet + Encore |
| Clonage (Substitute) | Normal | – | Protège des statuts, temporise Requiem sans switcher |
| Puissance Cachée Sol (HP Ground) | Sol | 60 | Couverture contre Primo-Groudon (2016/2019) |
La versatilite du moveset est ce qui rend Ectoplasma cauchemardesque, surtout en Open Team List : l’adversaire voit qu’il y a un Ectoplasma mais ne sait JAMAIS quel set il joue. Entrave ? Requiem ? Clonage ? Feu Follet ? Chaque set change complètement la maniere de le contrer.
Palmaras en tournoi
| Saison | Resultat | Joueur | Notes |
|---|---|---|---|
| 2016 | Champion du Monde | Wolfe Glick (USA) | Premiere victoire d’un type Spectre aux Worlds – le dernier type a ne jamais avoir gagne |
| 2025 | Champion d’Europe | Wolfe Glick | Stratégie Perish Trap (sans Mega, avec Siderella) |
HARI note que le type Fee avait gagne des sa premiere occasion aux Worlds (2014, Gardevoir de Se Jun Park), tandis que le type Spectre a du attendre 2016.
Contres et faiblesses
- Extremement fragile physiquement : 60 PV / 80 Def
- Pokémon Spectre : Immunises a Marque Ombre, switch librement
- Investissement defensif obligatoire : Même avec 170 Atq. Spe., on investissait massivement en survie
- Open Team List : HARI pense qu’Ectoplasma souffrira le PLUS de l’open team list parmi les trois, car ses sets sont très variables
Perspectives dans Pokémon Champions
Le plus effrayant au debut de Champions selon HARI. Le Perish Trap est “extremement frustrant quand tu perds contre”. Sans Flotte-Meche (Flutter Mane) / Bogian / Miraidon / Koraidon au debut du format, sa vitesse redevient excellente.
Attention : Dans Champions, Ectoplasma perd Encore (retire de son movepool). Cela affaiblit certains combos mais le Perish Trap reste intact.
13.2.4 Tableau recapitulatif du Big Three
| Saison | Format | Mega dominante | Champion |
|---|---|---|---|
| 2014 | 6G standard | Kangourex (saison) | Se Jun Park (Méga-Leviator) |
| 2015 | 6G standard | Kangourex (Worlds) | Shoma Honami (CHALK) |
| 2016 | Restreints | Ectoplasma | Wolfe Glick |
| 2018 | 7G post-nerf | Drattak (Danse Draco) | Paul Ruiz |
| 2019 | Restreints 7G | Drattak | Naoto Mizobuchi |
13.3 Les Megas Charizard : Deux Chemins, Deux Philosophies
Dracaufeu est le seul Pokémon a posseder deux Méga-Évolutions distinctes, chacune avec un type, un talent et un rôle complètement differents. Le choix entre X et Y est une declaration d’intention stratégique.
13.3.1 MEGA-DRACAUFEU Y (Mega Charizard Y)
Type : Feu / Vol (inchange) Talent Mega : Sécheresse (Drought)
Rôle principal : Poseur de Soleil offensif. Des que Dracaufeu Y Méga-Evolue, il pose automatiquement le Soleil, ce qui :
- Booste les attaques Feu de 50%
- Réduit les degats des attaques Eau de 50%
- Permet Lance-Soleil (Solar Beam) sans tour de chargement
- Active Ball’Meteo en type Feu (100 puissance)
Pourquoi c’est si fort : Méga-Dracaufeu Y est un setter de meteo qui frappe comme un canon. Il n’a pas besoin d’un tour de setup – le Soleil arrive instantanement avec la Méga-Évolution. C’est le coeur des equipes Soleil (Sun teams) depuis sa creation.
Presence dans le méta précoce de Champions : Les simulations pre-lancement montrent Méga-Dracaufeu Y parmi les Pokémon les plus utilisés, aux côtés de Méga-Scarabrute et Méga-Kangourex. Les equipes Soleil sont un archétype tier 1 attendu.
13.3.2 MEGA-DRACAUFEU X (Mega Charizard X)
Type : Feu / Dragon (changement de type) Talent Mega : Griffe Dure (Tough Claws)
Rôle principal : Sweeper physique. Le changement de type en Dragon lui retire la double faiblesse Roche et lui donne un profil d’attaquant physique pur avec Griffe Dure (+30% sur les attaques de contact).
Differences strategiques avec Y :
- Pas de meteo – Méga-X ne pose pas le Soleil
- Profil physique contre profil special pour Y
- Moins de support d’equipe, plus d’autonomie offensive
- Nitrocharge (Flame Charge) pour auto-booster sa vitesse est une option
13.4 Méga-Metallosse (Mega Metagross)
Type : Acier / Psy Talent Mega : Griffe Dure (Tough Claws) Talent pre-Mega : Corps Sain (Clear Body) – immunise contre les baisses de stats
Profil competitif
Méga-Metallosse est un attaquant physique puissant avec un excellent typing defensif. Acier/Psy donne d’excellentes resistances et un profil offensif solide.
- Griffe Dure : +30% de puissance sur toutes les attaques de contact
- Corps Sain pre-Mega : immunise a Intimidation avant la Méga-Évolution, ce qui est un avantage unique parmi les Megas physiques
- Stats : bulk correct, attaque physique elevee, vitesse honnete
HARI l’utilise comme reference de comparaison pour les Megas moins bonnes (Méga-Airmure est explicitement jugee inferieure a Méga-Metallosse sur quasiment tous les plans).
13.5 Les Megas des Starters de Gen 2
13.5.1 MEGA-MEGANIUM
Type : Plante / Fee (ajout du type Fee en Mega) Talent Mega : Sécheresse (Drought) – pose le Soleil automatiquement
Pourquoi c’est interessant
Méganium n’a jamais ete joue en competitif dans toute l’histoire de Pokémon. C’est potentiellement le pire starter en competition. Le fait que sa Méga-Évolution puisse “exister” en competitif est déjà un exploit de design.
Mega Sol (le surnom) : Le Méga-Dex de Z-A indique que Méganium peut tirer un Lance-Soleil “surpuissant”, d’ou le surnom de “Canon Mega Soleil”. Le talent Sécheresse pose le Soleil instantanement a la Méga-Évolution, comme Méga-Dracaufeu Y.
Statistiques et profil
- Statistiques defensives solides – profil de pivot bulk (pas un sweeper)
- Manque de presence offensive brute – c’est son principal defaut
- Le double type Plante/Fee donne de bonnes resistances (Combat, Eau, Plante, Sol, Tenebres, Électrique) mais des faiblesses genantes (Poison, Acier, Feu, Glace, Vol)
Moveset envisage
| Attaque | Type | Rôle |
|---|---|---|
| Lance-Soleil (Solar Beam) | Plante | STAB sans charge sous Soleil |
| Ball’Meteo (Weather Ball) | Feu (sous Soleil) | Coverage Feu a 150 puissance |
| Éclat Magique (Dazzling Gleam) | Fee | STAB Fee |
| Giga-Sangsue (Giga Drain) | Plante | Recovery + STAB |
| Abri (Protect) | Normal | Standard competitif |
Avis de HARI
“C’est un Pokémon qu’on n’a jamais joue… potentiellement le pire pire pire starter en competition… mais ils en ont fait un poke qui peut exister déjà grace a sa Méga, c’etait pas evident.”
Verdict : Niche unique comme setter Soleil bulk avec un typing defensif interessant (Plante/Fee). Viable dans les equipes Soleil mais pas un pick universel. Son manque de puissance offensive et sa faiblesse Feu (paradoxale pour un poseur de Soleil) sont des freins reels. Neanmoins, Ball’Meteo sous Soleil lui donne une couverture Feu appreciable.
13.5.2 MEGA-ALIGATUEUR (Mega Feraligatr)
Type : Eau / Dragon (changement de type) Talent Mega : Draconifier (Dragonize) – talent signature exclusif
Le talent Draconifier
Draconifier fonctionne exactement comme les talents de la famille “-ate” (Peau Celeste/Pixelisee/Refrigeree) :
- Convertit toutes les attaques Normal en type Dragon
- Accorde un bonus de puissance de +20% aux attaques converties
- Ces attaques converties beneficient ensuite du STAB Dragon (x1.5)
Calcul concret : Damocles (120 puissance) x 1.2 (Draconifier) x 1.5 (STAB Dragon) = 216 de puissance effective. C’est un STAB Dragon fiable, controlable, sans lock-in comme Colère (Outrage) et sans baisse de stats comme Draco Meteore.
Statistiques
| Stat | Base | Mega | Delta |
|---|---|---|---|
| PV | 85 | 85 | +0 |
| Attaque | 105 | 160 | +55 |
| Défense | 100 | 125 | +25 |
| Atq. Spe. | 79 | 89 | +10 |
| Def. Spe. | 83 | 93 | +10 |
| Vitesse | 78 | 78 | +0 |
| BST | 530 | 630 | +100 |
160 en Attaque : a egalite avec Palafin (forme Hero) pour la plus haute Attaque de tous les Pokémon Eau. 78 en Vitesse : le point faible evident – Méga-Aligatueur est LENT. Le controle de vitesse est absolument indispensable.
Movesets
Set principal : Dragon Dance Sweeper
| Attaque | Rôle |
|---|---|
| Danse Draco (Dragon Dance) | +1 Atk, +1 Vit – resout le probleme de vitesse |
| Damocles (Double-Edge) | Converti en Dragon par Draconifier, 216 puissance effective |
| Liquidation | STAB Eau physique |
| Aqua Jet | Attaque prioritaire Eau, indispensable vu la lenteur |
Après un Dragon Dance avec nature Jovial (Jolly), Méga-Aligatueur atteint ~270 en Vitesse, depassant la majorite du méta non-Echarpe.
Typing Eau/Dragon
Resistances : Eau, Feu, Acier (x0.5 chacun) Faiblesses : Fee (x2), Dragon (x2) Offensivement : Eau + Dragon est une combinaison offensive excellente – seuls les types Fee resistent aux deux.
Synergies d’equipe
- Felinferno (Incineroar) : Intimidation + Demi-Tour pour le momentum + couverture Feu/Ténèbres
- Amoonguss : Redirection via Poudre de Colère + Spore + couverture Plante
- Tartard (Politoed) : Crachin pose la Pluie, booste les attaques Eau de 50% – Liquidation sous Pluie est devastateur
Avis de HARI
Le meilleur des trois Méga-starters de Gen 2, et de loin. Draconifier + Danse Draco + bon bulk physique en font un sweeper physique redoutable. Potentiellement OU (OverUsed) voire Ubers selon le meta final. Ses limitations : vulnerabilite a Intimidation (pas de Talisman Sain sur une Méga), vitesse de base mediocre, et la prevalence des types Fee.
13.5.3 MEGA-ROITIFLAM (Mega Typhlosion)
Type : Feu / Combat Talent Mega speculatif : Général Suprême (Supreme Overlord)
AVERTISSEMENT : Talent non confirme
HARI precise que l’analyse est speculative. Le talent Général Suprême est une prediction basee sur la description du Méga-Dex (“quand ses camarades sont en difficulte, il accourt en brandissant une lance serpentine”). Showdown a cree un format speculatif qui l’utilise, mais ce n’est pas officiel.
HARI rappelle egalement que dans la video precedente sur les Gen 2 starters, le talent alors suppose etait Brise-Moule (Mold Breaker), qu’il avait juge catastrophique (“c’est super nul, c’est une catastrophe”). Si le talent final est Brise-Moule, le verdict reste : Méga-Roitiflam est inutilisable.
Général Suprême – Comment ca marche
- +10% de degats pour chaque allie KO precedemment dans le combat
- Maximum +30% en situation de 1 vs 4 (3 allies KO)
- Talent actuellement signature de Scalpeur/Kingambit
Statistiques
| Stat | Base | Mega | Delta |
|---|---|---|---|
| PV | 110 | 110 | +0 |
| Attaque | ~123 | 148 | +25 |
| Défense | Faible | 75 | Leger gain |
| Atq. Spe. | Trop elevee | Leger gain | Points “gaches” |
| Def. Spe. | Faible | Gain significatif | “Force mentale du chef de guerre” |
| Vitesse | 65 | 75 | +10, insuffisant |
La distribution de stats est le probleme fondamental : trop d’Attaque Spéciale inutile sur un profil physique, vitesse “ingrate” (ni rapide ni assez lent pour Trick Room optimal), bulk physique insuffisant.
Movesets envisages
| Attaque | Type | Puissance | Notes |
|---|---|---|---|
| Tacle Feu (Heat Crash) | Feu | Variable (80-120) | Pas de recul, puissance selon ecart de poids |
| Marteau-Point (Hammer Arm) | Combat | 100 | Baisse la vitesse (avantage sous Trick Room!) |
| Éclair Fou (Wild Charge) | Électrique | 90 | Coverage électrique physique – RARE en Trick Room |
| Bout de Feu (Flare Blitz) | Feu | 120 | Alternative a Tacle Feu, puissance constante mais recul |
| Coup Bas (Sucker Punch) | Ténèbres | 70 | Priorité pour hors Trick Room |
L’archétype Trick Room
L’equipe type construite par HARI autour de Méga-Roitiflam :
- Courousinge (Annihilape) : Se sacrifie via Tout ou Rien pour infliger des degats enormes = premiere stack de Général Suprême. Acharne contre Intimidation.
- Sortilence (Hatterene) : Poseur de Trick Room + Vaste Pouvoir de zone sous Champ Psychique
- Wimessir-F (Indeedee-F) : Pose le Champ Psychique + Par Ici (redirection sacrificielle) = deuxieme stack
- Chartor (Torkoal) : Le Soleil booste les attaques Feu ET affaiblit les attaques Eau defensivement
- 6e Pokémon flexible : Fragilinou (Mimikyu) avec Ceinture Force ou un Pokémon en “mode rapide”
Verdict de HARI
Méga-Roitiflam ne s’assoit “pas a la table” des Megas de premier plan (Kangourex, Drattak, Ectoplasma, Dracaufeu Y, Metallosse). Niche viable uniquement en equipe Trick Room avec Soleil et Général Suprême. Roitiflam n’a JAMAIS eu le moindre resultat en competitif dans toute son histoire. La Méga le rend potentiellement jouable, mais c’est un Pokémon de niche qui ne rivalisera probablement jamais avec les Megas dominantes.
Classement des Megas Gen 2
| Rang | Pokémon | Verdict |
|---|---|---|
| 1 | Méga-Aligatueur | Fort. Draconifier + Danse Draco = vrai potentiel competitif |
| 2 | Méga-Méganium | Niche interessante. Setter Soleil viable, déjà enorme pour ce Pokémon |
| 3 | Méga-Roitiflam | Decevant. Niche Trick Room uniquement, stats et typing problematiques |
13.6 Les Megas des Starters de Gen 6
13.6.1 MEGA-BLINDEPIQUE (Mega Chesnaught)
Type : Plante / Combat (inchange) Talent Mega : Par Balles (Bulletproof) – identique au talent caché de la forme de base
Statistiques
- 172 de Défense de base – qualifie de “gigantesque” par HARI
- PV corrects
- Défense Spéciale “vraiment bonne”
- Le probleme : le typing Plante/Combat donne des resistances surtout utiles sur le physique (Sol, Plante), alors que les faiblesses (Glace, Fee, Psy, Vol) frappent surtout sur le special
Utilité de Par Balles
Le talent confere une immunité aux attaques balistiques :
- Immunité a Bombe Oeuf : normalement super efficace contre lui. Les Golemastoc et leurs Bombe Oeuf ne le touchent plus.
- Immunité a Ball’Ombre : force Méga-Ectoplasma a jouer Cradovague (qui touche aussi le partenaire, donc genant pour l’adversaire).
- Immunité a Balle Graine : sans interet (“on s’en fout” – HARI)
Limite : Le nombre de cas ou Par Balles fait vraiment la difference reste restreint.
Movesets envisages
| Attaque | Type | Rôle |
|---|---|---|
| Big Splash (Coaching) | Combat | Boost Atk/Def de l’allie – synergie de support |
| Mur de Fer | Acier | Augmente la Défense |
| Pic Défense (Spiky Shield) | Plante | Protection + degats de contact |
| Attaque Plante (Gliss’Herbe / Marteau Bois) | Plante | STAB offensif |
Verdict de HARI
“C’est très dommage. Vraiment très très dommage pour Mega Blindépique.”
Pas mauvais mais pas excitant. Dependant de la méta. Pourrait être une reponse a la méta mais pas un pick de depart. Neanmoins, HARI dit que c’est celui des trois starters 6G en lequel il croit le plus.
13.6.2 MEGA-GOUPELIN (Mega Delphox)
Type : Feu / Psy (inchange) Talent Mega : Lévitation
Pourquoi c’est catastrophique
HARI qualifie ce talent de “cataclysmique” et “catastrophique”. Voici pourquoi :
Le probleme central : l’anti-synergie avec Champ Psychique
L’unique usage competitif historique de Goupelin etait en reglement H avec cette stratégie :
- Un partenaire (Wimessir-F) pose le Champ Psychique via le talent Crea Psy
- Goupelin utilise Vaste Pouvoir (Expanding Force) qui devient une attaque de zone ET gagne en puissance sous Champ Psychique
- Le boost du Champ Psychique s’applique aux Pokémon qui touchent le sol
Or, avec Lévitation, Méga-Goupelin ne touche plus le sol. Consequences :
- Il ne beneficie PAS du boost d’attaque Psy du Champ Psychique
- Vaste Pouvoir est immensement plus faible chez Méga-Goupelin que chez Goupelin Orbe Vie
- Un Goupelin Orbe Vie fait plus de degats que sa propre Méga-Évolution – c’est absurde
Deuxieme probleme : Le Champ Psychique protège les Pokémon au sol des attaques prioritaires (dont Coup Bas). Avec Levitation, Méga-Goupelin ne beneficie pas de cette protection – dramatique pour un Pokemon aussi fragile (74 PV, 72 Defense).
Verdict de HARI
“Je suis decu parce que c’est un design que j’adore, Méga-Goupelin. J’aurais voulu potentiellement le jouer.”
Le pire des trois starters 6G. Le talent Lévitation detruit activement la stratégie qui rendait Goupelin viable. Un Goupelin Orbe Vie est tout simplement supérieur a sa propre Méga-Évolution. C’est un echec de design competitif.
13.6.3 MEGA-AMPHINOBI (Mega Greninja)
Type : Eau / Ténèbres (inchange) Talent Mega : Protean – identique au talent caché de la forme de base
Analyse
Protean permet de changer de type a chaque attaque utilisée. C’est un bon talent en soi, mais le probleme :
- Aucun resultat en competition n’a jamais ete obtenu par un Amphinobi Orbe Vie
- Si la version Orbe Vie n’a jamais marche, la Méga (qui fait essentiellement la même chose en mieux) n’inspire pas confiance
- On est sur un Glass Cannon – très fragile, tape fort mais meurt vite
Ce que HARI aurait préféré
Un talent qui doublait sa vitesse avec le Champ Psychique, a la maniere de Raichu d’Alola qui double sa vitesse avec le Champ Electrifie. Cela aurait donne une niche unique.
Verdict de HARI
“Encore une fois, on est sur un Glass Cannon qui pourrait faire son travail avec une Orbe Vie.”
Decevant. Protean ne donne aucun avantage nouveau par rapport a la forme de base. Un Glass Cannon reste un Glass Cannon, Mega ou pas.
Classement des Megas Gen 6
| Rang | Pokémon | Talent | Verdict |
|---|---|---|---|
| 1 | Méga-Blindépique | Par Balles | Le plus prometteur – bon bulk, talent utile |
| 2 | Méga-Amphinobi | Protean | Decevant – Glass Cannon sans avantage nouveau |
| 3 | Méga-Goupelin | Lévitation | Catastrophique – inferieur a sa propre forme Orbe Vie |
13.7 Les Méga-Mewtwo X et Y – Legendaires qui meritent un rework
Contexte : le probleme des “restreints a Mega”
Méga-Mewtwo X et Y sont des Pokémon restreints (legendaires) qui consomment aussi le slot Mega. Ce double cout (slot restreint + slot Mega) exige une puissance exceptionnelle pour se justifier. En comparaison, Méga-Rayquaza dominait sans même tenir de Méga-Gemme.
Situation actuelle : Mewtwo est un “restreint nul” selon HARI. Il est surclasse par Lunala, Sylveroy Spectre, Koraidon, Miraidon, Sylveroy Cavalier du Froid. En VGC 2019, il etait largement depasse par Ultra-Necrozma.
13.7.1 MEGA-MEWTWO Y
Type : Psy Talent actuel : Insomnia (inutile sauf vs Spore d’Amoonguss)
| Stat | Base Mewtwo | Mega Y actuel | Rework HARI |
|---|---|---|---|
| PV | 106 | 106 | 106 |
| Attaque | 110 | 150 (+40 gaches) | 110 |
| Défense | 90 | 70 (-20, fragile!) | 90 |
| Atq. Spe. | 154 | 194 | 194 |
| Def. Spe. | 90 | 120 | 120 |
| Vitesse | 130 | 140 | 160 |
Proposition de HARI :
- Nouveau talent : Neuroforce (+25% degats sur attaques super efficaces, actuellement signature d’Ultra-Necrozma)
- Vitesse 160 : depasse Sylveroy Spectre (150), Zacian (148), Eternatus (145)
- Défense 90 : resist aux priorités physiques (Coup Bas de Baojian)
- Rôle : Premier sweeper special ultra-rapide du format
13.7.2 MEGA-MEWTWO X
Type : Psy / Combat Talent actuel : Impassible (Steadfast) – augmente la Vitesse d'1 cran après apeurement, quasi inutile
| Stat | Base Mewtwo | Mega X actuel | Rework HARI |
|---|---|---|---|
| PV | 106 | 106 | 106 |
| Attaque | 110 | 190 | 190 |
| Défense | 90 | 100 | 110 |
| Atq. Spe. | 154 | 154 (gaches) | 134 |
| Def. Spe. | 90 | 100 | 100 |
| Vitesse | 130 | 130 (aucun gain!) | 140 |
Proposition de HARI :
- Nouveau talent : Attention (Inner Focus) – immunise contre l’apeurement ET l’Intimidation. Buff colossal pour un attaquant physique.
- Nouveau move : Close Combat – indispensable, STAB Combat 120 puissance (actuellement le meilleur STAB Combat est Vampi-Poing a 75 puissance)
- Vitesse 140 : depasse le palier des 135 (Koraidon, Miraidon, Flotte-Meche, Baojian)
- Rôle : Bulky physical sweeper immunise a Intimidation
13.8 Méga-Zygarde – Pourquoi il sera nul quand même
Type : Dragon / Sol Mecanisme unique : Double transformation (Forme Parfaite puis Méga-Evolution)
Le probleme fondamental : la double condition
Méga-Zygarde exige deux etapes sequentielles impossibles a executer rapidement :
- Passer a 50% HP pour declencher la Forme Parfaite (se fait en fin de tour, pas instantanement)
- Méga-Evoluer au tour suivant
Pourquoi c’est un cauchemar :
- La Méga-Gemme bloque l’objet : pas de Baie Citrus, pas de Restes, pas de Graine Brumeuse pour faciliter la transition
- Clonage (Substitute) est la seule solution viable : deux Clonages = 50% HP = Forme Parfaite
- Pendant tout ce setup, vous jouez passivement : l’adversaire gagne du tempo
Stats de Méga-Zygarde
- 216 Attaque Spéciale – “complètement absurde, au-dessus même de Kartana”
- 70 Attaque physique – miserable, Vitesse Extreme devient inutile
- Perd 30 Def, 10 Def Spe, 30 Atk physique pour financer l’Atk Spe
- Attaque signature Lux Nilum : 200 puissance, type Dragon, ignore l’immunite Dragon des types Fee
Menaces qui le detruisent
- Sylveroy Glace (Calyrex-Ice) : Menace numéro 1. Glacial Lance x4 = KO garanti même avec bulk enorme. “C’est termine pour lui, vraiment.”
- Sylveroy Spectre : Machination pendant que Zygarde setup = explosion totale
- Kyogre : Puissance brute suffisante
- Miraidon : Bien plus dangereux que Koraidon pour Zygarde
Le cout d’opportunite insoutenable
Comme Méga-Mewtwo, Méga-Zygarde est un restreint qui Méga-Evolue – il consomme DEUX budgets d’equipe. Contrairement a Méga-Rayquaza qui frappe immediatement avec Draco Ascension, Zygarde demande 2-3 tours de setup avant d’être fonctionnel.
Verdict de HARI
“J’arrive a trouver un milliard d’arguments pour dire que Méga-Zygarde ca va pas marcher, et je n’arrive pas a en trouver pour lui.”
A eviter. Le Pokémon demande trop dans un format a un seul restreint. L’environnement apportera plus de menaces que d’allies.
13.9 Méga-Airmure (Mega Skarmory)
Type : Acier / Vol (inchange) Talent Mega predit : Griffe Dure (Tough Claws) – +30% sur les attaques de contact
Pourquoi c’est decevant
- Trop passif : le reproche principal de HARI. Méga-Airmure “ne propose rien sur le terrain”, pas assez de pression offensive.
- Stats globales inferieures a Méga-Metallosse sur quasiment tous les plans
- Movepool limite et previsible en combat competitif
- Faiblesses genantes : Feu et Électrique, deux types extremement presents en méta
- Défense physique phenomenale mais PV faibles et Défense Spéciale faible
Synergies explorees
- Courousinge (Annihilape) : Coaching pour booster Atk/Def
- Tarpaud (Politoed) : Pluie qui attenue la faiblesse Feu
- Gorythmic (Rillaboom) : Champ Herbu restaure des PV
- Tritosor (Gastrodon) : Immunité Électrique via talent
Verdict
Pas inutilisable, mais nettement en dessous des attentes pour une Méga-Évolution. Niche très etroit necessitant une equipe construite entierement autour de ses besoins.
13.10 Méga-Momartik (Mega Froslass)
Type : Glace / Spectre Talent Mega : Alarme Neige (Snow Warning) – pose la Neige automatiquement
Statistiques Mega
| Stat | Base | Mega |
|---|---|---|
| PV | 70 | 70 |
| Attaque | 80 | – |
| Atq. Spe. | 80 | 140 |
| Défense | 70 | 140 |
| Def. Spe. | 70 | 120 |
| Vitesse | 110 | 120 |
Les défenses montent enormement, MAIS les 70 PV limitent severement la bulk effective.
La synergie Neige
Alarme Neige est ce qui justifie l’existence de Méga-Momartik :
- Voile Aurore (Aurora Veil) : Réduit les degats physiques ET speciaux de 50% pendant 5 tours – utilisable UNIQUEMENT sous Neige. C’est LE move qui justifie le slot Mega.
- Blizzard : Passe de 70% a 100% de précision sous Neige (nuke fiable de 110 puissance)
- Les allies Glace beneficient de +50% Défense Spéciale sous Neige
Movesets
| Attaque | Type | Rôle |
|---|---|---|
| Blizzard | Glace | Nuke STAB principal, 100% précision sous Neige |
| Ball’Ombre (Shadow Ball) | Spectre | STAB secondaire |
| Feu Follet (Will-O-Wisp) | Feu | -50% Attaque physique adverse |
| Voile Aurore (Aurora Veil) | Glace | Protection d’equipe pendant 5 tours |
| Chatiment (Hex) | Spectre | 130 puissance si cible avec statut (synergie Feu Follet) |
Verdict de HARI
Note : 0/20. Le typing Glace/Spectre est trop fragile defensivement (5 faiblesses). Les 70 PV sont un handicap permanent. Le niche Neige + Voile Aurore est trop etroit pour justifier le slot Mega face a Méga-Ectoplasma ou Méga-Dracaufeu Y.
13.11 Méga-Hyporoi (Mega Kingdra) – Le poseur de Pluie Mega manquant
Type : Eau / Dragon Talent Mega speculatif : Crachin (Drizzle) – pose la Pluie automatiquement
Pourquoi c’est important
Il n’existe actuellement aucune Méga-Évolution avec Crachin pour poser la Pluie. Toutes les autres meteos ont leur Mega :
- Soleil : Méga-Dracaufeu Y (Secheresse)
- Tempête de Sable : Méga-Tyranocif (Sable Volant)
- Neige : Méga-Blizzaroi / Méga-Momartik (Alarme Neige)
- Pluie : AUCUNE MEGA (vide unique)
Méga-Hyporoi comblerait ce vide stratégique. La description du Méga-Dex mentionne sa capacité a manipuler l’atmosphere pour invoquer des tempetes.
Stats et profil
- Attaque Spéciale de base : 135 (déjà elevee avant Mega)
- Talent actuel : Berserk – augmente l’Atq. Spe. quand les PV tombent a 50%
- Typing Eau/Dragon : excellentes resistances
Moveset
| Attaque | Type | Rôle |
|---|---|---|
| Megaphone (Hyper Voice) | Dragon | STAB Dragon special de zone |
| Draco Meteore | Dragon | STAB Dragon puissant |
| Ball’Meteo | Eau (sous Pluie) | 100 puissance Eau |
| Canicule | Feu | Coverage (anti-synergie avec Pluie) |
Probleme identifie : Movepool Eau limite – paradoxal pour un poseur de Pluie. L’equipe doit compenser avec des attaquants Eau dedies.
Synergies
- Gouroutan (Oranguru) : Sommation (Instruct) double les degats
- Tarenbulle (Araquanid) : Double puissance Eau sous Pluie (Aquabulle)
Verdict
Potentiel enorme si Crachin se confirme – comblement d’un vide stratégique unique dans le méta. Fort typing Eau/Dragon + forte Atq. Spe. en font un poseur de Pluie offensif credible.
13.12 Méga-Staross (Mega Starmie)
Type : Eau / Psy Talent Mega speculatif : Force Pure (Pure Power) / Coloforce (Huge Power)
Mecanisme de compensation Force Pure
Pour certaines Megas (Méga-Charmina, Méga-Mysdibule), Game Freak ajoute +40 en Attaque pour compenser l’absence du talent Force Pure dans Legends. L’Attaque est ensuite doublee par le talent, donnant une Attaque effective.
Statistiques speculees
| Stat | Base | Mega | Atk effective |
|---|---|---|---|
| PV | 60 | 60 | – |
| Attaque | 75 | 100 | 200 (x2 via Force Pure) |
| Défense | 85 | 105 | – |
| Atq. Spe. | 100 | 130 (gachee) | – |
| Def. Spe. | 85 | 105 | – |
| Vitesse | 115 | 120 | – |
Movesets
| Attaque | Type | Rôle |
|---|---|---|
| Liquidation | Eau | STAB physique (85 puissance, 20% baisse Def) |
| Psykoud’Boul | Psy | STAB physique (80 puissance, 20% apeurement – très bon avec 120 Vitesse) |
| Gonflette (Bulk Up) | Combat | +1 Atk / +1 Def, compense Intimidation |
| Aqua-Jet | Eau | Priorité pour finir les cibles affaiblies |
Verdict de HARI
Sweeper physique rapide avec une Attaque effective massive (200), mais les 60 PV sont un handicap permanent. Méga-Évolution faible, au mieux au niveau de Méga-Charmina. Rôle de niche, inferieur aux Megas dominantes.
13.13 Méga-Minotaupe (Mega Excadrill) et Méga-Scovilain
13.13.1 MEGA-MINOTAUPE
Type : Sol / Acier Talent Mega : Foreuse Perçante (Piercing Drill)
Mécanique
Lorsque Méga-Minotaupe utilise une attaque de contact, celle-ci peut toucher un adversaire même s’il utilise Abri/Detection, mais ne fait que 1/4 des degats normaux a travers la protection. Les effets secondaires de la protection (comme Bouclier Royal) s’appliquent toujours.
Pourquoi c’est nul
Comparaison directe avec Shifours (Urshifu) : Poing Invisible de Shifours traverse les protections a 100% des degats. Foreuse Perçante ne fait que 25%. C’est objectivement inferieur.
Cout d’opportunite : Méga-evoluer Minotaupe = perdre Sand Rush (double vitesse en Tempete de Sable), qui est son talent phare historique. Minotaupe classique avec Sand Rush + Bandeau Choix est déjà un sweeper redoutable en OU. La Méga ne justifie pas ce sacrifice.
Verdict de HARI
Nul. Perte de Sand Rush pour un effet de traversee a 25%, largement inferieur a ce que Shifours fait déjà sans Méga-Évolution.
13.13.2 MEGA-SCOVILAIN
Type : Plante / Feu Talent Mega : Spray Piquant (Spicy Spray)
Mécanique
Lorsque Méga-Scovilain recoit des degats d’une attaque, l’attaquant est automatiquement brule. Se declenche sur chaque coup recu, physique ou special, contact ou non.
Statistiques
| Stat | Valeur |
|---|---|
| PV | 85 |
| Attaque | 138 |
| Défense | 85 |
| Atq. Spe. | 138 |
| Def. Spe. | 85 |
| Vitesse | 75 |
Pourquoi c’est decevant
Bon talent, mauvais porteur. La brulure automatique est forte en théorie – excellent anti-attaquants physiques. Mais le Pokémon a :
- Un bulk de 85/85/85 – insuffisant pour survivre aux coups necessaires au declenchement du talent
- Des stats offensives identiques (138/138) – profile mixte dilue, ni specialise physique ni special
- Une vitesse de 75 – trop lent sans être assez lent pour Trick Room
Verdict de HARI
“Bon talent sur un mauvais Pokémon.” Les stats ne permettent pas d’exploiter le concept. Le cout d’opportunite du slot Mega n’est pas justifie.
13.14 Les Pires Megas et Propositions de Rework
HARI a identifie quatre Méga-Évolutions comme les pires du jeu et propose des reworks complets pour chacune. Ces analyses illustrent ce qui fait une bonne vs une mauvaise Méga-Évolution.
13.14.1 MEGA-PHARAMP (Mega Ampharos)
Probleme : Type Électrique/Dragon. Talent Brise-Moule (offensif) sur un Pokémon a 45 de Vitesse – totale incoherence. Un talent offensif sur un des Pokémon les plus lents du jeu.
Rework propose :
- Talent : Battant (Competitive) – +2 Atq. Spe. si stats baisees par l’adversaire. Transforme chaque Intimidation en boost massif.
- Capacité : Coup de Foudre (Thunderclap) – priorité Électrique
- Stats : Atq. Spe. 185 (depuis 165), Défense et Def. Spe. augmentees, Attaque physique reduite a 20
13.14.2 MEGA-ONIGLALI (Mega Glalie)
Probleme : Stats complètement “plates” (80/120/80/120/80/100). Mediocre partout, bon nulle part. Type Glace pur = pire type defensif du jeu.
Rework propose :
- Type : Glace / Combat (ajout Combat pour coverage STAB)
- Talent : Corps Gel (Ice Body) – soin sous Neige + boost Def. Spe. des types Glace sous Neige
- Stats : Défense 145 (!), Def. Spe. 125, Attaque reduite a 80
- Capacité : Force-Poigne (Body Press) – utilise la Defense (145!) pour calculer les degats au lieu de l’Attaque
13.14.3 MEGA-SHARPEDO (Mega Sharpedo)
Probleme : 70/70/65 en défenses = papier. Se fait one-shot par tout. Talent Prognathe (Strong Jaw) mais pas d’attaque Croc type Eau pour profiter du STAB.
Rework propose :
- Talent : Prognathe (conserve – le talent est bon, c’est le Pokemon qui pose probleme)
- Capacité signature : Croc Trempette – 85 puissance Eau, puissance double (170!) si la cible n’a pas encore attaque ce tour. Avec Prognathe (+50%) = 255 puissance effective en frappant premier.
- Stats : Vitesse 125 (pour frapper premier et activer le doublement), bulk ameliore a 90/85
13.14.4 MEGA-NANMEOUIE (Mega Audino)
Probleme : Talent Coeur Soin (Healer, 30% de chance de soigner le statut d’un allie adjacent). En solo/singles, ce talent ne fait strictement rien. 80 Atq. Spe. et 60 Attaque = aucune menace offensive.
Rework propose :
- Talent : Benet (Oblivious) – immunite a Provoque (Taunt) et Attraction. Parfait pour un mur/support qui depend de ses moves de statut.
- Stats : PV 178 (!), Défense 161, Def. Spe. 147 – mur absolu et inarretable
- Capacités cles : Suivez-moi (Follow Me) + Voeu Soin + Pouvoir Lunaire (STAB Fee pour minimum de pression)
Tableau recapitulatif des reworks
| Mega | Probleme | Nouveau talent | Stat cle |
|---|---|---|---|
| Pharamp | Talent offensif sur Pokémon lent | Battant | Atq. Spe. 185 |
| Oniglali | Stats plates, mono-Glace | Corps Gel + type Combat | Def 145 |
| Sharpedo | Trop fragile, pas de Croc Eau | Prognathe + Croc Trempette | Vit 125 |
| Nanmeouie | Talent vide en solo | Benet (anti-Provoque) | PV 178 |
Philosophie de design de HARI
Ces reworks illustrent cinq principes fondamentaux :
- Coherence talent-profil : Un talent offensif sur un Pokémon lent est un gaspillage
- Redistribution des stats : Retirer les points inutiles (Attaque sur un special) et reinvestir
- Capacités signatures : Comblent les trous de movepool
- Equilibre : Les reworks visent la viabilite, pas la domination
- Le type Glace reste structurellement faible : Même avec un rework, les faiblesses omni-presentes persistent
13.15 Megas DLC et Candidates (Hawlucha, Weavile)
Au moment de la redaction de ce guide, les informations sur les Méga-Évolutions DLC (Hawlucha/Brutalibré, Weavile/Dimoret) ne sont pas encore confirmees. Surveillez les mises a jour de HOME et les annonces officielles pour les donnees definitives.
13.16 Tier List synthetique des Megas pour Pokémon Champions
Tier S – Les incontournables
- Méga-Drattak : Stats enormes, Intimidation pre-Mega, Peau Celeste, polyvalence totale
- Méga-Ectoplasma : Marque Ombre + Perish Trap, le plus effrayant au debut du méta
- Méga-Kangourex : Amour Filial reste redoutable malgre les nerfs de movepool
- Méga-Dracaufeu Y : Setter Soleil offensif tier 1, coeur des equipes Sun
Tier A – Très viables
- Méga-Metallosse : Griffe Dure + Corps Sain pre-Mega, solide et fiable
- Méga-Dracaufeu X : Sweeper physique Feu/Dragon avec Griffe Dure
- Méga-Aligatueur : Draconifier + Danse Draco, monstre offensif en devenir
Tier B – Viables dans la bonne equipe
- Méga-Méganium : Setter Soleil Plante/Fee bulk, niche unique
- Méga-Hyporoi (si Crachin confirme) : Comblement du vide Pluie Mega
Tier C – Niche etroit
- Méga-Roitiflam : Trick Room + Général Suprême, stats insuffisantes
- Méga-Blindépique : Reponse a la méta, dependant du contexte
- Méga-Staross : Glass cannon physique, 60 PV handicapant
Tier D – A eviter
- Méga-Goupelin : Inferieur a sa propre forme Orbe Vie
- Méga-Amphinobi : Glass Cannon sans avantage nouveau
- Méga-Momartik : 0/20, trop fragile malgre la synergie Neige
- Méga-Airmure : Trop passif, inferieur a Méga-Metallosse
- Méga-Minotaupe : Perte de Sand Rush pour 25% a travers Abri
- Méga-Scovilain : Bon talent, mauvais porteur
- Méga-Zygarde : Double condition de transformation impossible a executer
Tier F – Necessitent un rework pour exister
- Méga-Pharamp : Talent incoherent avec la vitesse
- Méga-Oniglali : Stats plates, mono-Glace
- Méga-Sharpedo : Papier, pas de Croc Eau
- Méga-Nanmeouie : Talent vide en solo
SECTION 14 : LA TERACRISTALLISATION
14.1 Comprendre la mécanique
La Teracristallisation (ou “Téra”) est la seconde mécanique de combat de Pokémon Champions, heritee de Pokémon Ecarlate/Violet. Elle permet de changer temporairement le type d’un Pokémon.
14.1.1 Fonctionnement de base
- Chaque Pokémon possède un Téra-Type visible dans son resume. Ce Téra-Type peut être n’importe lequel des 18 types.
- Une fois par combat, vous pouvez Teracristalliser un Pokémon. Il adopte alors son Téra-Type en remplacement de ses types actuels.
- La transformation dure jusqu’a la fin du combat.
- Le Pokémon peut Teracristalliser au moment de choisir son attaque, au debut du tour (comme la Méga-Evolution).
14.1.2 Règles de changement de type
Quand un Pokémon Teracristallise :
Son type defensif change complètement : il perd ses types originaux et adopte UNIQUEMENT le Téra-Type pour les calculs de resistances/faiblesses.
- Exemple : Un Dracaufeu (Feu/Vol) qui Téra-Plante perd ses faiblesses Roche, Eau, Électrique et gagne les resistances Plante (Eau, Sol, Électrique, Plante) mais aussi les faiblesses Plante (Feu, Glace, Poison, Vol, Insecte).
Le STAB s’adapte :
- Si le Téra-Type correspond a l’un des types originaux du Pokémon : les attaques de ce type recoivent un STAB booste (x2 au lieu de x1.5 dans certaines conditions).
- Si le Téra-Type est different des types originaux : le Pokémon gagne le STAB du nouveau type mais conserve aussi le STAB de ses types originaux a puissance normale.
Le Pokémon gagne une “couronne” cristalline visible qui indique son Téra-Type.
14.1.3 Utilisations strategiques
Offensif – Gagner un nouveau STAB :
- Un Pokémon peut Teracristalliser pour obtenir le STAB d’un type qu’il n’a pas naturellement, transformant une attaque de couverture en STAB surpuissant.
- Exemple classique : Un Pokémon qui connait une attaque Spectre Teracristal Spectre gagne le STAB x1.5 sur cette attaque.
Defensif – Changer ses faiblesses :
- Teracristalliser pour retirer une faiblesse critique.
- Exemple : Un Pokémon Sol/Roche faible x4 Eau qui Téra-Plante annule complètement cette faiblesse et gagne même une resistance Eau.
Surprise – L’élément d’imprevu :
- En Open Team List, l’adversaire ne connait PAS le Téra-Type de vos Pokémon. C’est l’un des rares éléments de surprise dans un format ou les equipes sont visibles.
- Un bon Téra-Type inattendu peut retourner complètement un combat.
14.1.4 Consideration stratégique majeure
Le Téra est votre deuxieme ressource unique (avec la Méga-Evolution). Contrairement a la Méga qui est decidee au teambuilding (quel Pokemon porte la Méga-Gemme), le Téra est une decision en combat – vous choisissez quel Pokémon Teracristalliser et a quel moment.
Les meilleurs joueurs gardent souvent le Téra en reserve comme un “atout caché” pour retourner une situation, plutot que de l’utiliser prematurement.
14.2 Règle critique : Mega et Téra ne se cumulent pas
C’est l’une des règles les plus importantes a comprendre pour le teambuilding :
Un Pokémon qui a Méga-Evolue ne peut PAS Teracristalliser. Un Pokémon qui a Teracristallise ne peut PAS Méga-Evoluer.
Les deux mécaniques sont mutuellement exclusives sur le même Pokémon. Cependant, vous pouvez parfaitement Méga-Evoluer un Pokémon ET Teracristalliser un AUTRE Pokémon dans le même combat – les deux mécaniques sont independantes tant qu’elles ciblent des Pokémon differents.
14.2.1 Implications pour le teambuilding
Cela signifie que dans votre equipe de 6, vous devez identifier :
- Votre candidat Mega : le Pokémon qui porte la Méga-Gemme et qui Méga-Evoluera
- Votre/vos candidat(s) Téra : un ou plusieurs Pokémon avec un Téra-Type stratégique que vous pourrez utiliser en combat
- Ces deux roles sont toujours differents – votre Mega ne sera jamais votre Téra
14.2.2 Consequences sur la profondeur stratégique
Cette separation force des choix plus complexes :
- Votre Mega est “fixe” dans son rôle (pas de Téra defensif de secours)
- Votre candidat Téra ne beneficie pas du +100 BST de la Méga
- En combat, vous devez gerer deux ressources one-shot independantes (Mega tour 1 souvent, Téra au moment optimal)
14.3 Les Téra-Types les plus pertinents pour le debut de Champions
Bien que le méta n’ait pas encore cristallise (sans jeu de mots), certains Téra-Types sont universellement reconnus comme superieurs :
Tier S des Téra-Types
Téra-Spectre :
- Donne l’immunite Normal et Combat – retire deux types offensifs majeurs
- Le type Spectre n’a que deux faiblesses (Tenebres, Spectre)
Téra-Eau :
- Une seule faiblesse (Électrique, Plante)
- Resistance Feu, Eau, Glace, Acier
- Excellent defensivement
Téra-Fee :
- Immunité Dragon (retire un des types offensifs les plus puissants)
- Faible a Poison et Acier seulement
Téra-Acier :
- 10 resistances et 1 immunité (Poison)
- Le meilleur type defensif du jeu
Principes de selection du Téra-Type
- Couvrir la faiblesse principale : Si votre Pokémon meurt toujours a une attaque specifique, le Téra peut le sauver
- Booster le STAB : Si votre Pokémon frappe déjà fort avec un type, le Téra identique donne le STAB booste
- Surprise factor : Un Téra inattendu peut casser les predictions adverses
- Ne pas gaspiller le Téra : Si vous n’en avez pas besoin, gardez-le. L’option est souvent plus precieuse que l’utilisation.
14.4 Resume des deux mécaniques
| Aspect | Méga-Évolution | Teracristallisation |
|---|---|---|
| Quand | Au teambuilding (choix du Pokemon + Méga-Gemme) | En combat (choix du Pokemon + moment) |
| Cout | Objet tenu (Méga-Gemme) | Aucun cout d’objet |
| Effet stats | +100 BST permanent | Aucun changement de stats |
| Effet type | Peut changer de type selon la Méga | Change TOUJOURS de type |
| Effet talent | Change de talent | Pas de changement de talent |
| Nombre par combat | 1 Méga-Évolution | 1 Teracristallisation |
| Duree | Jusqu’a la fin du combat | Jusqu’a la fin du combat |
| Cumul | NE SE CUMULE PAS avec Téra sur le même Pokémon | NE SE CUMULE PAS avec Mega sur le même Pokémon |
| Élément de surprise | Aucun (Méga-Gemme visible en preview) | Fort (Téra-Type cache) |
Ce guide est base sur les analyses pre-lancement de HARI (@HariPKMN) et les donnees de simulation. Le meta de Pokemon Champions evoluera rapidement après le lancement le 8 avril 2026. Les equilibrages (balance patches) pourront modifier les talents, stats et movesets documentes ici. Restez informes via les sources communautaires et les annonces officielles.
Part 8 — Teambuilding Principles (VGCGuide)
Teambuilding Introduction
What is teambuilding and why should you care?
Written by Aaron Traylor When competitive Pokémon players talk about teambuilding, rather than talking about breeding or catching Pokémon, they’re talking about the thought process behind the question: “which Pokémon do I want to use in a Pokémon battle”? If you’ve played Pokémon before, you’ve built a team, whether it was to catch a Pokémon, take on a gym, or challenge a friend. In competitive Pokémon, you won’t have to worry about healing your Pokémon (they’re healed in between battles) or whether the other player can use items like Potions and Revive (they can’t), but you’ll need to have a team of six Pokémon to battle other players.
Well, what Pokémon do you want on your team? That’s the million-dollar question, and the answer is not only complex but really up to your personal opinion. Teambuilding is an art, not a science– it’s very challenging to say that one goal or reason is better than others. However, unlike art, we have a real way of evaluating how good the teams that we make are, which is by playing battles. A competitive teambuilder designs their team with the intent of getting closer to their goal: winning a Pokémon battle. This guide in general is designed for teambuilders whose end goal in building teams is to win battles; if this isn’t the case for you, that’s totally cool, you just need to take this guide with a grain of salt.
However, being a teambuilder doesn’t just mean putting the Pokémon with the highest stats on a team together. Here are some of the things that teambuilders have to consider:
- Synergy: How well do the Pokémon on a team work together? One example is having types that deal complementary damage, but synergy can take many forms.
- Consistency: How often can a player rely on a team’s options no matter what? How often do the Pokémon on this team accomplish their goals?
- Pacing: How long are games with this team going to be?
- Breadth: How flexible is the team? Does it have backup options if its main goals aren’t possible?
- Depth: If an opponent was to play against a team several times, would that team have several options to explore?
- Dynamicness: Remember, in double battles, a person controls two Pokémon at a time, and they need to work together. Does each Pokémon on the team work well with each other Pokémon?
- Relevance: No Pokémon team exists in a vacuum. How does a Pokémon team stack up against the common Pokémon and teams that it’s likely to play against?
Over the course of this guide, we’ll lay out the principles behind how we understand teambuilding.
If teambuilding is daunting: you don’t actually have to do it at all, if you don’t want to. It’s easier than ever to use teams that other people have made!
If teambuilding is exciting to you: Hopefully reading about our principles can help you get started on the right foot.
We’ll dive more into teambuilding specifics later, and give a general guide to making your first team. If you’re interested in any of the above skills specifically, feel free to click on them and travel to a new page, or to click here to continue reading our introduction guide.
“Because of the nature of Pokémon, it’s not always clear which teambuilding elements work or don’t work. It’s not uncommon for players (such as myself) to fluctuate in their results, winning one tournament and underperforming the next, or to have one extremely successful season followed by a struggle when the rules change - and a lot of what determines a player’s success at a tournament is their team.”
— Wolfe
Intent
The first step of the teambuilding process– every team begins with an idea.
Written by Aaron Traylor When you start a new team, add a Pokémon to a team, or make the tiniest change to an EV spread or moveset, you have some reason for doing so. Intent– or the reasoning behind your decisions and choices– is the backbone of all things teambuilding. Intentions can be straightforward (I’m adding Incineroar to my team because it’s so good!) or highly complex (I’m going to give my Cresselia a 8 Speed IV so it hits 84 Speed stat because I want it to move before minimum Speed Groudon and Kyogre in Trick Room).
It’s not the case that every aspect of every Pokémon on your team has to be overly thought out and extensively planned; that might be overdoing it. Your job is simply to try to understand and accept every piece of reasoning behind the decisions that you made to build your team.
When you start a new team, here are some possible reasons you might have for doing so:
You want to work with a Pokémon or mechanic that interests or excites you
- I want to build a Groudon team, and partner it with Gravity so its Precipice Blades always hits!
You think a team is especially strong and want to use it yourself
- I really like where Xerneas is at in this metagame, so I’m going to build around it
You want to be strong against popular teams
- Grimmsnarl and Togekiss are everywhere, so I’m going to make a Durant team to beat them.
Here are some examples of possible intentions for adding a Pokémon to a team:
Because you like it or have had success with it in the past
- I’m going to add Lucario because it’s my favorite Pokémon!
Because you think it’s especially strong
- Incineroar is one of the best Pokémon in the metagame right now, so I’m going to add it to my team.
Because it has good synergy with the rest of your team
- I have Tapu Fini and Kartana on my team, so I’m going to add Arcanine, which covers both of their weaknesses defensively.
Because you are weak to another Pokémon or type
- I’m really weak to Dragon-types! I’m going to add Togekiss.
Because it specifically enables one, or multiple Pokémon, on your team
- I want to sweep with Weakness Policy Yveltal, so I’ll add Comfey to easily activate its Weakness Policy
Evaluate your choices
Keeping track of intent is important because, once you get to battling, it’s a large part of how you evaluate how your team is performing. Double battles are dynamic and complex, and it can be challenging to figure out whether you made a mistake in your play during a battle or whether your team is underperforming. Understanding the intent behind each Pokémon lets you frame each battle in much simpler terms. Did this Pokémon do what you wanted it to do? Why or why not? If a Pokémon isn’t performing how you wanted it to or intended it to, you might want to revisit why it’s on your team, or approach battling from another direction.
I don’t know what my intent is
When you add to a team by quickly following your gut instinct, you’re “slapping on”. There’s nothing ultimately wrong with slapping on, because inherently, you have some reason for making that choice– it’s just implicit rather than fully articulated.
When the intention of a team, move, Pokémon, or EV choice isn’t clear, it can be a sign that it might require some more thought. This may be part of why it’s so hard to use teams made by other players without a guide, or to take EVs from another player– you don’t know why these choices were made!
If you’re stuck on why you added a Pokémon, try brainstorming a few reasons why you think it belongs, or what you might want from other Pokémon.
Working with others
When someone asks me to take a look at their team, my questions will usually be in the form of– why did you do this? Why did you make this decision? Then I can give them subjective feedback based on whether I agree with their goals and decisions, and hopefully we come to a consensus about which aspects of the team are good and which need to be changed.
If you don’t know why someone did something, ask– there are no stupid questions in Pokémon. You’re not only learning more about that other person’s thought process, which is helpful for you, but you’re asking them to put their thoughts into words– which is a useful and important exercise for them.
Conclusion
Pokémon is not a game where choices can be made passively– you must be an active participant. Understanding intention is the first step to doing so. Over time, you’ll be able to come up with more complex intentions as you practice and grow with the game.
Brainstorming Ideas to Start Teams
Starting points when you want to begin building a team.
Written by Wolfe Glick If you don’t know how you’d like to begin building your team, I’ve got a few suggestions to get you started. Feel free to experiment to find starting points that work for you!
Something Strong
Being able to identify themes, Pokémon, and strategies that are powerful in the current state of the game is an extremely valuable skill. In Pokémon it can sometimes be easy to try (and fail!) to reinvent the wheel, but being able to separate the great ideas from the latest fad can give you a solid starting point. What Pokémon do you think are good? How could you start a team to highlight their strengths?
“I always take note of Pokémon that are especially difficult for me to play against while playing. Then when I’m thinking about Pokémon I want to use, I consider those same Pokémon I had a hard time dealing with.”
— Wolfe
The Metagame
Some players prefer to play whatever is currently standard and try to capitalize on the strength of Pokémon that have established success rather than use riskier strategies that haven’t proven themselves yet. Players that prefer this approach tend to use teams that have established results and modify them slightly to fit their preferences. What do you think is strong in the metagame right now? Do you like how popular teams are composed right now, or do you think putting your own spin on one of them would make it stronger?
Content Creators
For someone new and looking to start VGC, content creators are a great way to get a handle on what is currently being used. By watching someone else play you can learn which Pokémon are popular, and you can also pay attention to any strategies or Pokémon that interest you in particular without having to build a full team on your own. Additionally, many content creators provide rental codes so you can use a team for yourself to get a feel for it.
Someone Else’s Idea
Many people ideate with the help of their peers. Although it’s human nature to be attached to your own ideas, an equally useful skill is being able to help flesh out an idea someone else comes to you with. Being able to identify good or bad ideas before extensive testing is a very valuable skill in a teambuilding partner. Although this method is less individualistic, when it works well it tends to produce very powerful teams.
Past Metagames
Each generation of Pokémon games (and to a certain extent each format of VGC) shifts the Pokémon that are strong. For example, Thundurus’ dominance in Generation 5 completely disappeared in Generation 7. Many Pokémon have their time in the spotlight and then vanish once a new generation comes around. One place you can look when trying to start building is at Pokémon that at one point were more popular than they are in the current format.
Inspiration Strikes!
This one is probably my go-to method, but it’s also the one that’s the hardest to force– I think about Pokémon idly when I’m awake, and brainstorm different ideas that excite me. Maybe you’re in the shower or walking around or staring at Serebii and an idea comes to you. Congratulations! You have a potential starting point. This will happen more naturally the more time you spend thinking about the game, the format, and the metagame.
I can do it better
Maybe you saw something that you thought had potential, and you think you can improve upon it. This can be something like changing a Pokémon, adjusting an EV spread, or using a different item than is considered standard. This can also work on ideas you had that weren’t fully fleshed out– maybe you want to iterate on that idea and take another look.
You Don’t Need to Teambuild to Play Pokémon

You Don’t Need to Teambuild to Play Pokémon
How to play Pokémon if you don’t want to worry about making the teams yourself.
Written by Wolfe Glick Many players instead use teams that others have built. These may be teams that have done well in previous tournaments in the format, teams that someone they believe to be good at teambuilding have given them, teams they found or saw online and recreated, et cetera. Even though teambuilding is a fundamental part of the game, you don’t have to do it yourself. Building a good team is a way of giving yourself the best tools possible to win, but battling and making use of those tools is what determines victory. In other words: you can’t play competitive Pokémon without battling, but you can play without building.
There’s no right or wrong way to play Pokémon, and if what you love is the battling itself, that’s completely valid.
If you have a team that you want to use, but you’re not sure how to operate it, click here.
“One point I normally make to newer players is to not force your own team too hard. I think a lot of newer players start out and feel the need to innovate and build their own team (and there’s nothing wrong with that at all). However, it’s tougher to build a “structurally” sound team as a newer player as that’s something that comes with experience. Thus, for players who are more focused on winning battles and improving, I normally recommend for them to try out more established teams. That way, when you lose, it’s a bit easier to identify what went wrong.”
— Aaron Zheng
How to Use Someone Else’s Team
How to Use Someone Else’s Team
Learn how to approach using a team you didn’t build yourself.
Written by Aaron Traylor Finding teams made by other people is easier than ever; you can watch a YouTube video and get a paste, or you can rent teams using the rental codes feature in Pokémon Sword and Shield. However, sometimes it’s hard to know how to battle with a team once you have it, and you might feel lost. We’ll talk about our strategies for finding success when battling with another person’s team.
Prelude: every team is built for a reason
It’s important to recognize why it might be hard to win games with a team that you didn’t make– that’s because you don’t have direct access to the teambuilder’s intent. When the teambuilder made the team, they chose specific Pokémon based on their goals, practiced with that team and refined it based on their testing, and ultimately found success because they could play the team in a way that felt comfortable to them. When you use someone else’s team– even if they tell you how to use it– you’re recreating their thought process and playing their team in your way.
First, pick a team
You’ll want a team that was designed to be used in the current format. We recommend choosing teams that have some explanatory information from the author, because that will give you more of a jumping off point– but it’s not a requirement.
You’re going to find more success with teams that are published more recently, because teams built for an earlier version of the metagame might not have been created with current threats in mind. Take teams more than a few weeks old with a grain of salt.
Finally, not all rental teams are equally strong. Keep track of a couple teams that you’re interested in, and don’t be afraid to switch it up after giving one a shot
Reverse Engineering
Your job is to figure out why the author of your chosen team made each decision that they did, which can guide your own understanding of the team.
Before you begin reverse engineering, come up with a threatlist– what Pokémon and archetypes do you think you’re likely to face when you use this team?
From there, you have two major goals when reverse engineering a team:
- Understand team preview (which Pokémon should I bring to a battle?)
- Know how to make a game plan (how do I reach victory with the Pokémon I choose?)
By focusing on these skills, you’ll understand the rationale behind the decisions you make, and piloting the team will feel more natural.
First, try to figure out why each Pokémon was chosen.
- Do they synergize or work together in particular ways? If so, you might want to consider bringing them to the same games.
- Do they cover for each other’s weaknesses? If so, you might want to think about how they could switch in for one another– or if they are intended to be brought to separate games entirely.
- Does any one Pokémon stick out (e.g. a Choice Scarf Pokémon on a Trick Room team)? What is that Pokémon adding specifically that the other Pokémon don’t? Can it be used in contexts that the other Pokémon struggle in?
Second, look at the moves, abilities, and items of each Pokémon on your team.
- Which moves do you think you’ll be using the most with each Pokémon?
- Are any choices unique, or not what you were expecting (e.g. weird item, weird ability, weird move)? Can you figure out the purpose for those choices (beyond surprise factor?)
- Does anything combo with other Pokémon on the team (e.g. Helping Hand, Rage Powder, Weakness Policy)?
- In particular, are any of the moves coverage moves (i.e. deal attacking damage, but are not the same type as the Pokémon)? Try to identify which Pokémon or archetypes from your threatlist might struggle to deal with those moves. Use the damage calculator to confirm your hypotheses. If you think you’ve found an answer, you’ve gained insight into what specific threats concerned the author, and you might know more about how they intended for the team to be played.
If you have access to the EVs– can you figure out what they’re designed to do, or if they change how the Pokémon plays? (Running a lot of damage calcs can be challenging and time-consuming, so don’t spend too long here). Does any stat investment stick out as odd to you (e.g. a bunch of Speed EVs in something that’s typically slow, or a Pokémon with more bulk than usual?)
Next, try to figure out the “modes” of the team– which Pokémon were intended to be brought together, either in the front or the back? Do you have more than one choice in most battles? Come up with lead combinations, and write down situations in which you’d want each one. Then think about which Pokémon you can bring in the back for each lead combination.
Your final step is to take another look at the threatlist that you made, but now from a position of better understanding your team.
- For each threat that you identified– how would your team deal with them? Are there any threats that you have to pay particular attention to? (e.g. a Pokémon that threatens a lot of knockouts on your team, a Pokémon with setup moves you can’t stop?) How would you approach them in battle?
- If you have specific archetypes or full teams on your threat list, come up with a team preview strategy against them– both front and back Pokémon– and think about what your win conditions would be in that scenario. It’s unlikely that you’ll play a team that’s exactly what you expect, and whatever plan you make isn’t the only way you can approach the battle, but when you consider your options ahead of time, you’ll be more ready in the moment.
- Consider if there are any archetypes or full teams that negate the strengths of any of your Pokémon in particular - knowing which Pokémon you want to leave behind in certain matchups in advance will make team preview easier.
Optionally, if you’re using a team that comes with videos of someone playing it, watch a few battles. Stop the video frequently, at team preview and before they select a move, and think about how you would approach that point in the battle. Then, see what that player does. How do their instincts differ from your own? Can you find the rationale for their plays? With the work that you’ve done to understand their team, you’ll be better able to contextualize their decisions, even if your thought process diverges from the author’s or player’s.
Why is Reverse Engineering Important?
Reverse engineering a team when you don’t know much about how it was created is hard– I struggle with it myself. I think there are a lot of benefits to reverse engineering, though, and you can learn a lot about how the game works:
- You get access to other players’ perspectives, and you have to invest cognitive effort to understand where they’re coming from.
- If there are teambuilding/battling elements that excite you, then look for them in other teams– and see how those authors’ takes differ from your own.
- You can learn to play the team in a way that the original author might not have thought of.
- With different perspectives, you can identify weaknesses in other teams much more easily. When playing with X team, I struggled against opponents that did Y. Now that I’m facing X team: how do I beat it?
Wrapping Up
It’s a tall order to take someone else’s team and use it to win in a battle. Be proud of yourself for every time you make a decision and it feels right, and for every time you feel like you know what’s going on in battle. Don’t be discouraged if it takes a couple teams before one really clicks– by even trying, you’re learning and growing as a player, and you’re making your own path to success.
Typing
The type chart is fundamental to Pokémon, and each Pokémon has a typing– but which types are most important, and how should they fit into your team?
Written by Aaron Traylor A Pokémon’s typing greatly impacts how that Pokémon can be used in battle, from resisting damage to getting more damage out of attacks. However, not all types are created equal. The type chart is important, but how your team approaches covering it depends on the metagame and the threatening Pokémon that exist.
Typing usually refers to a Pokémon’s types in a defensive sense, when it’s taking damage from attacks. When we talk about a Pokémon’s offensive capabilities, we talk about STAB attacks or coverage.
What does it mean for a Pokemon to have “good” typing?
Typing is useful in the context of the Pokémon that are popular in the metagame. If an offensive Pokémon appears on 60% of teams, and you have a Pokémon that resists its powerful attacks AND can do something useful in return, that Pokémon is likely going to be a good member of your team because of its typing.
Pokémon with good typing often have few weaknesses, and might not have 4x weaknesses to common types. Another sign is that the moves that do hit them for super effective damage are hard to come by on good Pokémon in the format; for example, in most formats, Bug- and Poison-type moves are generally challenging to fit on teams, so you wouldn’t need to worry about those weaknesses as much.
A Pokémon’s typing is also good when it synergizes with the other Pokémon on your team. If a Pokémon has typing that lets it resist attacks that would deal significant damage to other Pokémon on your team, that’s going to allow you to switch more often. This means a Pokémon can have good typing in general, good typing for your specific team, or a combination of both.
A Pokémon can only make use of its typing defensively if it has the stats to back it up. For example, if you were looking to make use of Fighting/Bug typing defensively, you’d look at Buzzwole before you looked at Pheromosa.
With Pokémon that have good typing, you can:
Switch in on powerful attacks that threaten your Pokémon on the field
- You can even switch Pokémon multiple times in the same game!
Once on the field, survive attacks and take control of the battle
Put pressure on your opponent by making use of both defensive typing and offensive coverage
Note*: Steel-types are frequently useful defensively due to the amount of attacks they resist. Pokémon like Metagross, Bronzong, and Dialga are classic examples of Steel-types that have the defense to back up their stats. However, Pokémon like Kartana and Bisharp, while they are certainly Steel-type, have holes in their defensive stats (as well as important 4x weaknesses) that make them much more challenging to use defensively. This is why some players choose to give Kartana the item Assault Vest, which shores up its Special Defense stat and lets it switch in on most non-Fire-type attacks. When Bisharp is used, it typically carries a Focus Sash or Life Orb, and is used for its offensive coverage and strong ability rather than for its Steel typing.*
EXAMPLE
Worlds 2019 Top 4 James Baek VS Naoto Mizobuchi: In this match, we can see the value of a strong Steel-type Pokemon. James’ team features Xerneas, an incredibly powerful restricted Pokemon. However, Xerneas is inherently weak against Steel-type Pokemon. In game 1, James pays Stakataka enormous respect and uses Incineroar and Amoonguss to position around it, and finally uses Xerneas to deal enough damage to win.
In game 2, Naoto turns a lead that looks bad on paper into an early advantage by using Wide Guard and Gyro Ball with his Stakataka to pick up an early KO on James’ Tornadus. As the game progresses, we see that the threat of Stakataka caused James to not even bring his Xerneas. Due to Stakataka’s defensive typing and the support from Tapu Fini and Groudon, James is unable to get any damage onto it despite his adaptation, and Stakataka continues whittling away at James’ team until Naoto is ready to close out the game.
The third game opens with a third set of unique leads from each player. Realizing Stakataka’s influence (and seeing how the Tornadus/Kyogre lead from the previous game had been ineffective versus it), Naoto chooses to bring Stakataka in the back and focuses on eliminating one of its biggest checks in James’ Amoonguss, which he takes down turn 1 with an aggressive double target. With Amoonguss out of the way, Naoto is free to set up Trick Room and use the strong offensive combination of Groudon and Stakataka to secure victory.
In my opinion, Staktaka was the most crucial Pokemon in this set, in large part due to its Steel typing. Combining Stakataka’s good bulk with great defensive typing, we see that so many of James’ options to damage it were removed by the support Naoto had. Kyogre’s Water Spout was blocked by Wide Guard and Desolate Land, Amoonguss couldn’t use Spore thanks to Tapu Fini’s Misty Terrain, and Kartana was awkward to bring in general thanks to the rest of Naoto’s team. Every single move James had available to use against the Stakataka in games 2 and 3 was mediocre at best- Naoto always had an answer when James could use moves that would really threaten Stakataka.
What does it mean for a Pokemon to have “bad” typing?
Pokémon can be hindered by their defensive typing. If a Pokémon has many weaknesses and few resistances, or has 4x weaknesses to common attacks with no other defensive merit, you won’t be able to rely on it to take attacks or to switch in. If you need that Pokémon for offensive purposes, a bad typing may not be the end of the world– but you’ll notice in your games that you’ll be constrained on when you can switch that Pokémon in, which can be exploitable by your opponents.
Thinking about the type chart when teambuilding
A common misconception is that your Pokémon team needs to cover all types offensively (need to be able to hit every type for super effective) or defensively (need to be able to resist every attack). In fact, typing is slightly more contextual than that. As mentioned previously, the Pokémon that you’ll face more frequently determines which typing is important. You’re going to want to get a sense of which Pokémon will be attacking you most frequently; your own experience or usage stats can be a great source of information.
You will want some balance on your team’s types, however– you don’t want a common Pokémon to be able to plow through your team! Make sure that you have Pokémon that can switch in on common attacks for each other. Some of my friends use the Marilland Teambuilder to plug in their team and make sure they have a good balance of defensive coverage. From there, they cross-reference the output with what they understand of the format, and go back to the teambuilder from there. You might be okay with having three Pokémon that are weak to Bug-type on your team; but if you’re thinking about including three Fairy-type weak Pokémon on your team, you might want to take a step back.
When I pick Pokémon for my teams, ideally, I’m not picking Pokémon just for their typing– but the Pokémon does something offensively or defensively that I’m interested in, and its typing means that it will synergize nicely with the rest of my team. When I notice I’m focusing on finding the perfect typing that solves all my problems, I end up looking at Pokémon that I don’t think are very good. This is a sign to me that the rest of my team needs rethinking. Especially beware of Pokémon that have low damage output in these scenarios– it’s easy to justify choosing them based on their supportive moves, but typing alone won’t save you from threats that have high damage output.
**Note:**Players familiar with Single Battles are often surprised that Skarmory, who is very useful in single battles, doesn’t get more use. Skarmory has phenomenal defensive stats and good defensive typing. However, due to the increased pace of VGC matches and the lack of usefulness of entry hazards, Skarmory isn’t able to contribute to VGC matches in a meaningful way most of the time. If you want to read more about this concept, check out our article on Island Pokémon.
EXAMPLE
In Single Battles, Skarmory is able to use it’s naturally high base defense stat to great effect, such as in this battle here. Skarmory is used as a counter to the opponents Urshifu-Rapid-Strike.
Let’s look at the same teams, but in a Double Battle. In this battle, Skarmory is no longer safe to switch in, nor does it beat Urshifu, because Urshifu’s partner is able to threaten it with super effective special damage. In Double Battles, Skarmory is not able to perform the role it is so well known for in Single Battles.
Does typing always matter?
In restricted metagames or GS cup metagames, there are a few Pokémon that hit much harder than other Pokémon— culprits include Xerneas, Primal Groudon, Primal Kyogre, and Calyrex-Shadow, among others. When the metagame revolves around supporting these Pokémon, it’s important that your Pokémon are focused on resisting their attacks– and you can kind of forget about some of the rest of the type chart, because other Pokémon will appear less frequently, and won’t be hitting you with the same strength.
Wrapping Up
The type chart is one of the first things that we learn about Pokémon, and it’s easy to think that we need to cover all of it at once. However, it’s much less necessary to have every Pokémon be a different type, or to make sure to cover for every type defensively, than it is to understand how your Pokémon operate defensively and how typing plays into that puzzle.
Utility Moves
Moves that aren’t used for damage are a huge part of competitive Pokémon. Here’s why.
Written by Wolfe Glick When I played through Pokémon for the first time, I had a rule for myself: all of my Pokémon only used moves that did damage. Now, while triple Fire Attack Charizard was enough to beat the Elite 4, in competitive Pokémon the norm is a bit different.
Nearly all Pokémon in a competitive match will have between 1 and 3 utility moves - moves that primarily offer support instead of damage. This is defined as a “Status” category move in the game’s description (the three categories are Physical, Special, and Status), but there are some discrepancies so I prefer to define it this way. Some examples of utility moves that do damage are Breaking Swipe which is a weak move that lowers both opponents Attack stats, and Dragon Tail which forces an opponent to switch (often used as a counter to Trick Room).
Some moves are classified as utility depending on their user. Surf is a move that Kyogre could use to deal heavy Rain-boosted damage, but on a weak Special Attacker intended to activate a partner’s Weakness Policy such as Dragapult or Weavile, Surf would be considered a utility move. When determining whether a move counts as utility, ask yourself– “Is the purpose of this move to do damage, or does it have another primary goal?"
How many utility moves a Pokémon should have varies based on the team and Pokémon. Most Pokémon will have at least one: the standard for this is Protect, but some Pokémon will choose to use a setup move (Dragon Dance/Nasty Plot etc.) or a recovery move (Roost, Recover, etc.) instead.
As an overly general outline, most Pokemon movesets will look something like:
-Protect
-STAB 1
-STAB 2/Coverage
-Utility/Coverage
A Pokémon’s role will determine what moves it carries– a fast and frail sweeper (think Urshifu) typically will prefer to have several attacks, whereas a super bulky support Pokémon (such as Cresselia) will normally run 3 utility moves and 1 damaging move.
Now that you have some idea of what a utility move is and how you can fit them on your Pokémon, let’s talk about which specific utility moves are good and why.
Moves that I want on every team if I can fit them
Protect
Protect allows you to protect your Pokémon while changing other things about the game state, making it one of the most important and iconic moves in VGC. Unlike many other moves, there are almost no viable alternatives to Protect. Nearly all Pokémon (except those holding a Choice Item or Assault Vest) can make good use of Protect. For a more in-depth explanation on Protect click here.
Moves that Influence Speed (Speed Control)
Speed control, or manipulating the order in which Pokémon on the field move, is one of the most important aspects of a team in VGC. Moves such as Trick Room and Tailwind offer enormous returns if used properly. Some utility moves both control Speed and double as damage-dealing moves, like Icy Wind and Electroweb, which can pick off low HP targets, hit targets for super effective damage, and grind down your opponent if left unchecked. For a full description of what Speed control is and how to use it, check out this article.
Redirection
If you polled VGC players and asked them what the best type of support in the game is, I expect many would say redirection. Redirection refers to the moves Follow Me and Rage Powder, which redirect opponents’ attacks and force them to target the user for that turn. Rage Powder and Follow Me differ only in that Rage Powder doesn’t work against Pokémon immune to Powder moves (Grass Types, Safety Goggles, Overcoat).
Redirection allows a Pokémon to completely protect its partner (barring spread moves), thus disrupting your opponent’s gameplan. Redirection users with Protect can be especially difficult to play against - target the partner with a move that would be not very effective against the Follow Me user and you’re in trouble, but targeting the Follow Me user with a super effective attack can leave you in bad shape if the user just Protects.
Pokémon that are best at redirection have high defensive stats, as their goal is to take as many hits as possible to shield their partners. Most Pokémon that utilize redirection well also make use of disruptive moves that allows them to still exert pressure when they aren’t redirecting attacks (e.g. Amoonguss’ Spore).
Fake Out
Fake Out is a weak priority move that flinches the target with 100% certainty, but only works the first turn a Pokemon hits the field. Fake Out is extremely flexible - it can be used offensively or defensively, and at any stage of the game. It’s used to trade one of your Pokemon’s attacks for one of your opponent’s, so make sure to only use it when it benefits you.
The Pokémon that make the best use of Fake Out are typically bulky and ideally have some way of switching out (U-Turn, Parting Shot, Eject Button, Volt Switch), which allows Fake Out to be used multiple times per game. Alternatively, sometimes fast and frail Pokémon holding a Focus Sash can use Fake Out well.
Taunt
Taunt is my personal favorite utility move because it limits the opponent’s options and makes your own planning so much easier. Taunt is often used to stop Pokémon that rely on their support moves, such as: Trick Room setters, Follow Me users, Pokémon that want to put you to sleep, Pokémon that want to recover lost health, et cetera. Taunt also prevents your opponent from using Protect. As I mentioned earlier, most Pokémon will run at least one utility move, and Taunt stops those that don’t deal damage.
Moves that are more situational
Status Moves
Status conditions can be devastating when utilized properly. A status condition is one of: Sleep, Burn, Freeze, Paralysis, and Poison (Confusion is not considered a status condition as it is cured by switching out your Pokémon, unlike the others). Status conditions offer some sort of negative effect on the Pokémon they’re inflicted on. The status conditions are not all equal, though, and not all are worth dedicated moveslots. Ranked, I would say they’re roughly freeze > sleep > burn » paralysis »> poison.
- Freeze is by far the best– however, because it only triggers as a low percentage secondary effect, you can’t trigger it consistently.
- Sleep is one of the most common status conditions in VGC, as sleep incapacitates a Pokémon for 1-3 turns. Players use Spore, Sleep Powder, and Hypnosis to inflict sleep– the low accuracy is sometimes worth it because sleeping Pokémon are much weaker.
- Burn is a consistently great status condition as it significantly weakens opposing physical attackers by cutting their Attack in half. Players inflict it with Will-o-Wisp.
- Paralysis used to be one of the best status conditions. However, Thunder Wave (the best move that solely applies paralysis) has fallen off as Electric-types gained an immunity to paralysis in Generation 7, the Speed drop was changed from 75% to 50%, and its accuracy was decreased from 100% to 90%, so it’s harder to inflict paralysis on purpose.
- I strongly suggest you don’t mess around with moves that only inflict poison, as VGC games don’t typically last long enough to make the passive damage worth it on its own (even Toxic).
Screens
“Screens” refers to the moves Reflect, Light Screen, and Aurora Veil. These are powerful support moves that decrease incoming damage to ⅔ their original value in double battles for 5 or 8 turns (NOTE! This is different than singles which is a ½ reduction!). While the effect of these moves is phenomenal, it’s worth noting that some of the Pokémon that use these moves have setting up the screens as their primary purpose, and often faint after getting one or both up. In short, you’re playing 3 VS 4 a lot of the time, with your 3 Pokémon gaining damage reduction, so this strategy’s strength depends on whether the remaining Pokémon can pick up the slack. In the Dynamax formats that have happened so far, screens were able to shine due to the extra power Dynamax offers and how much harder it is to knock out a Dynamax Pokémon behind screens.
The distribution of Reflect and Light Screen is pretty large, so you might wonder why these moves are so committal on a Pokémon. It seems easy enough to just add one on in theory and have it not be a major commitment. The reason is because of the item Light Clay, which turns the 5 turn base of the screens to 8 turns instead. This allows you to get maximum value out of the screens, but also makes it harder for the Pokémon using them to fill different roles as the item and 1-2 of the moves are already accounted for.
It’s worth noting that strategies that rely on screens are typically weaker to getting critical hit. Because a critical hit ignores the reduction that screens provide, they are correspondingly more devastating.
Stat Dropping Moves
Lowering your opponent’s Pokémon’s stats is one way of disrupting their gameplan. These moves take many different forms - the most common of them lower the opponents speed, which we touched on earlier. Other moves that have seen play include Fake Tears, which lowers the opponent’s Special Defense two stages and sets up for easy KOs, Eerie Impulse, which lowers the opponent’s Special Attack two stages, and Breaking Swipe, which lowers both opposing Pokémon’s Attack stats by one stage.
Setup Moves
Setting up is very difficult in VGC due to the fact that you’re always facing down two opponents who can target you while you’re vulnerable. That being said, once a Pokémon has acquired some boosts it is often much more dangerous. Throughout VGC’s history we’ve seen many Pokémon do well by setting themselves up. While most moves boost either your offenses or defenses, the most successful Pokémon typically raise their offensive stats - it’s rare to see an “unkillable” Pokémon succeed.
The best setup moves typically fall into one of two categories. Some moves raise one stat multiple stages such as Swords Dance, Belly Drum and Nasty Plot, and are best on Pokémon that either have priority or are naturally fast. Others raise several different stats (often including Speed) such as Quiver Dance, Dragon Dance, or (vomit) Geomancy. The typical set for a Pokémon that wants to set up is Protect/STAB 1/STAB 2(or coverage)/Setup Move.
Setting up a Pokémon is a high risk, high reward activity. For that reason, these Pokémon are often paired with supporting Pokémon that can protect them while they’re vulnerable. Moves like Fake Out and Follow Me/Rage Powder have had the most success thus far for protecting their partners.
Recovery Moves
Recovery moves typically do best on Pokémon that are naturally very bulky and want to gradually chip away at their opponents. A Pokémon can make good use of a recovery move if you expect most neutral attacks to do a maximum of 40% damage. Porygon2, Dusclops, and Milotic are good examples of Pokémon that utilize recovery moves well.
Anti-Setup (Haze/Roar)
In some formats, Pokémon that have the ability to set up are extremely dangerous, and extra measures are needed to stop them. The main culprits are stat boosts (e.g. Dynamax Pokémon, Xerneas) and Trick Room.
Haze is an easy way to stop Pokémon that accumulate many boosts quickly.
- Because Haze removes stat changes from both sides of the field, you can also use it as a way to remove your own debuffs in addition to your opponent’s boosts.
- Haze is best used on extremely bulky Pokémon that can survive attacks from Pokémon with boosts and reset them after, such as Tapu Fini and Dusclops.
Roar, Whirlwind, Dragon Tail and Circle Throw are moves that force your opponent to switch, but nearly always move last.
- When a Pokémon switches, any stat changes are reset, so you can use them to stop setup quickly.
- However, these moves always fail on Dynamax Pokémon.
- Trick Room has the lowest priority out of any move, and always moves last, so you can use these moves to force an opponent to switch before they make their move.
- Be careful: most dedicated Trick Room teams will have some counterplay to Roar in the form of redirection or Fake Out.
Weather
Although the most consistent way of setting weather is to use a Pokémon with an ability that sets up the weather, there are times where having one of the weather setting moves can be helpful (referred to as “manual weather”). Typically, only Sunny Day and Rain Dance are used. Since Sun and Rain are opposite weathers, having a way to get the weather up AFTER your opponent has switched in their weather setter can be valuable. Manual weather is most powerful on dedicated weather teams.
Ally Switch
One of the most controversial moves of all time, Ally Switch switches the position of your two Pokémon, meaning any moves aimed at Pokémon 1 will instead land on Pokémon 2 and vice versa. It’s a move that is best when your opponent doesn’t know you have it, and thereafter forces difficult decisions from both players. I don’t personally like Ally Switch as it’s a move that has virtually no effect if your opponent guesses correctly, but that’s more of a personal preference.
Ally Switch can be beaten by using spread moves, targeting smartly, or hard reading your opponent (which can be inconsistent). It isn’t always possible to completely cover for the move in all scenarios, so trying to deal with the user before it can force difficult end games is ideal.
Speed Control
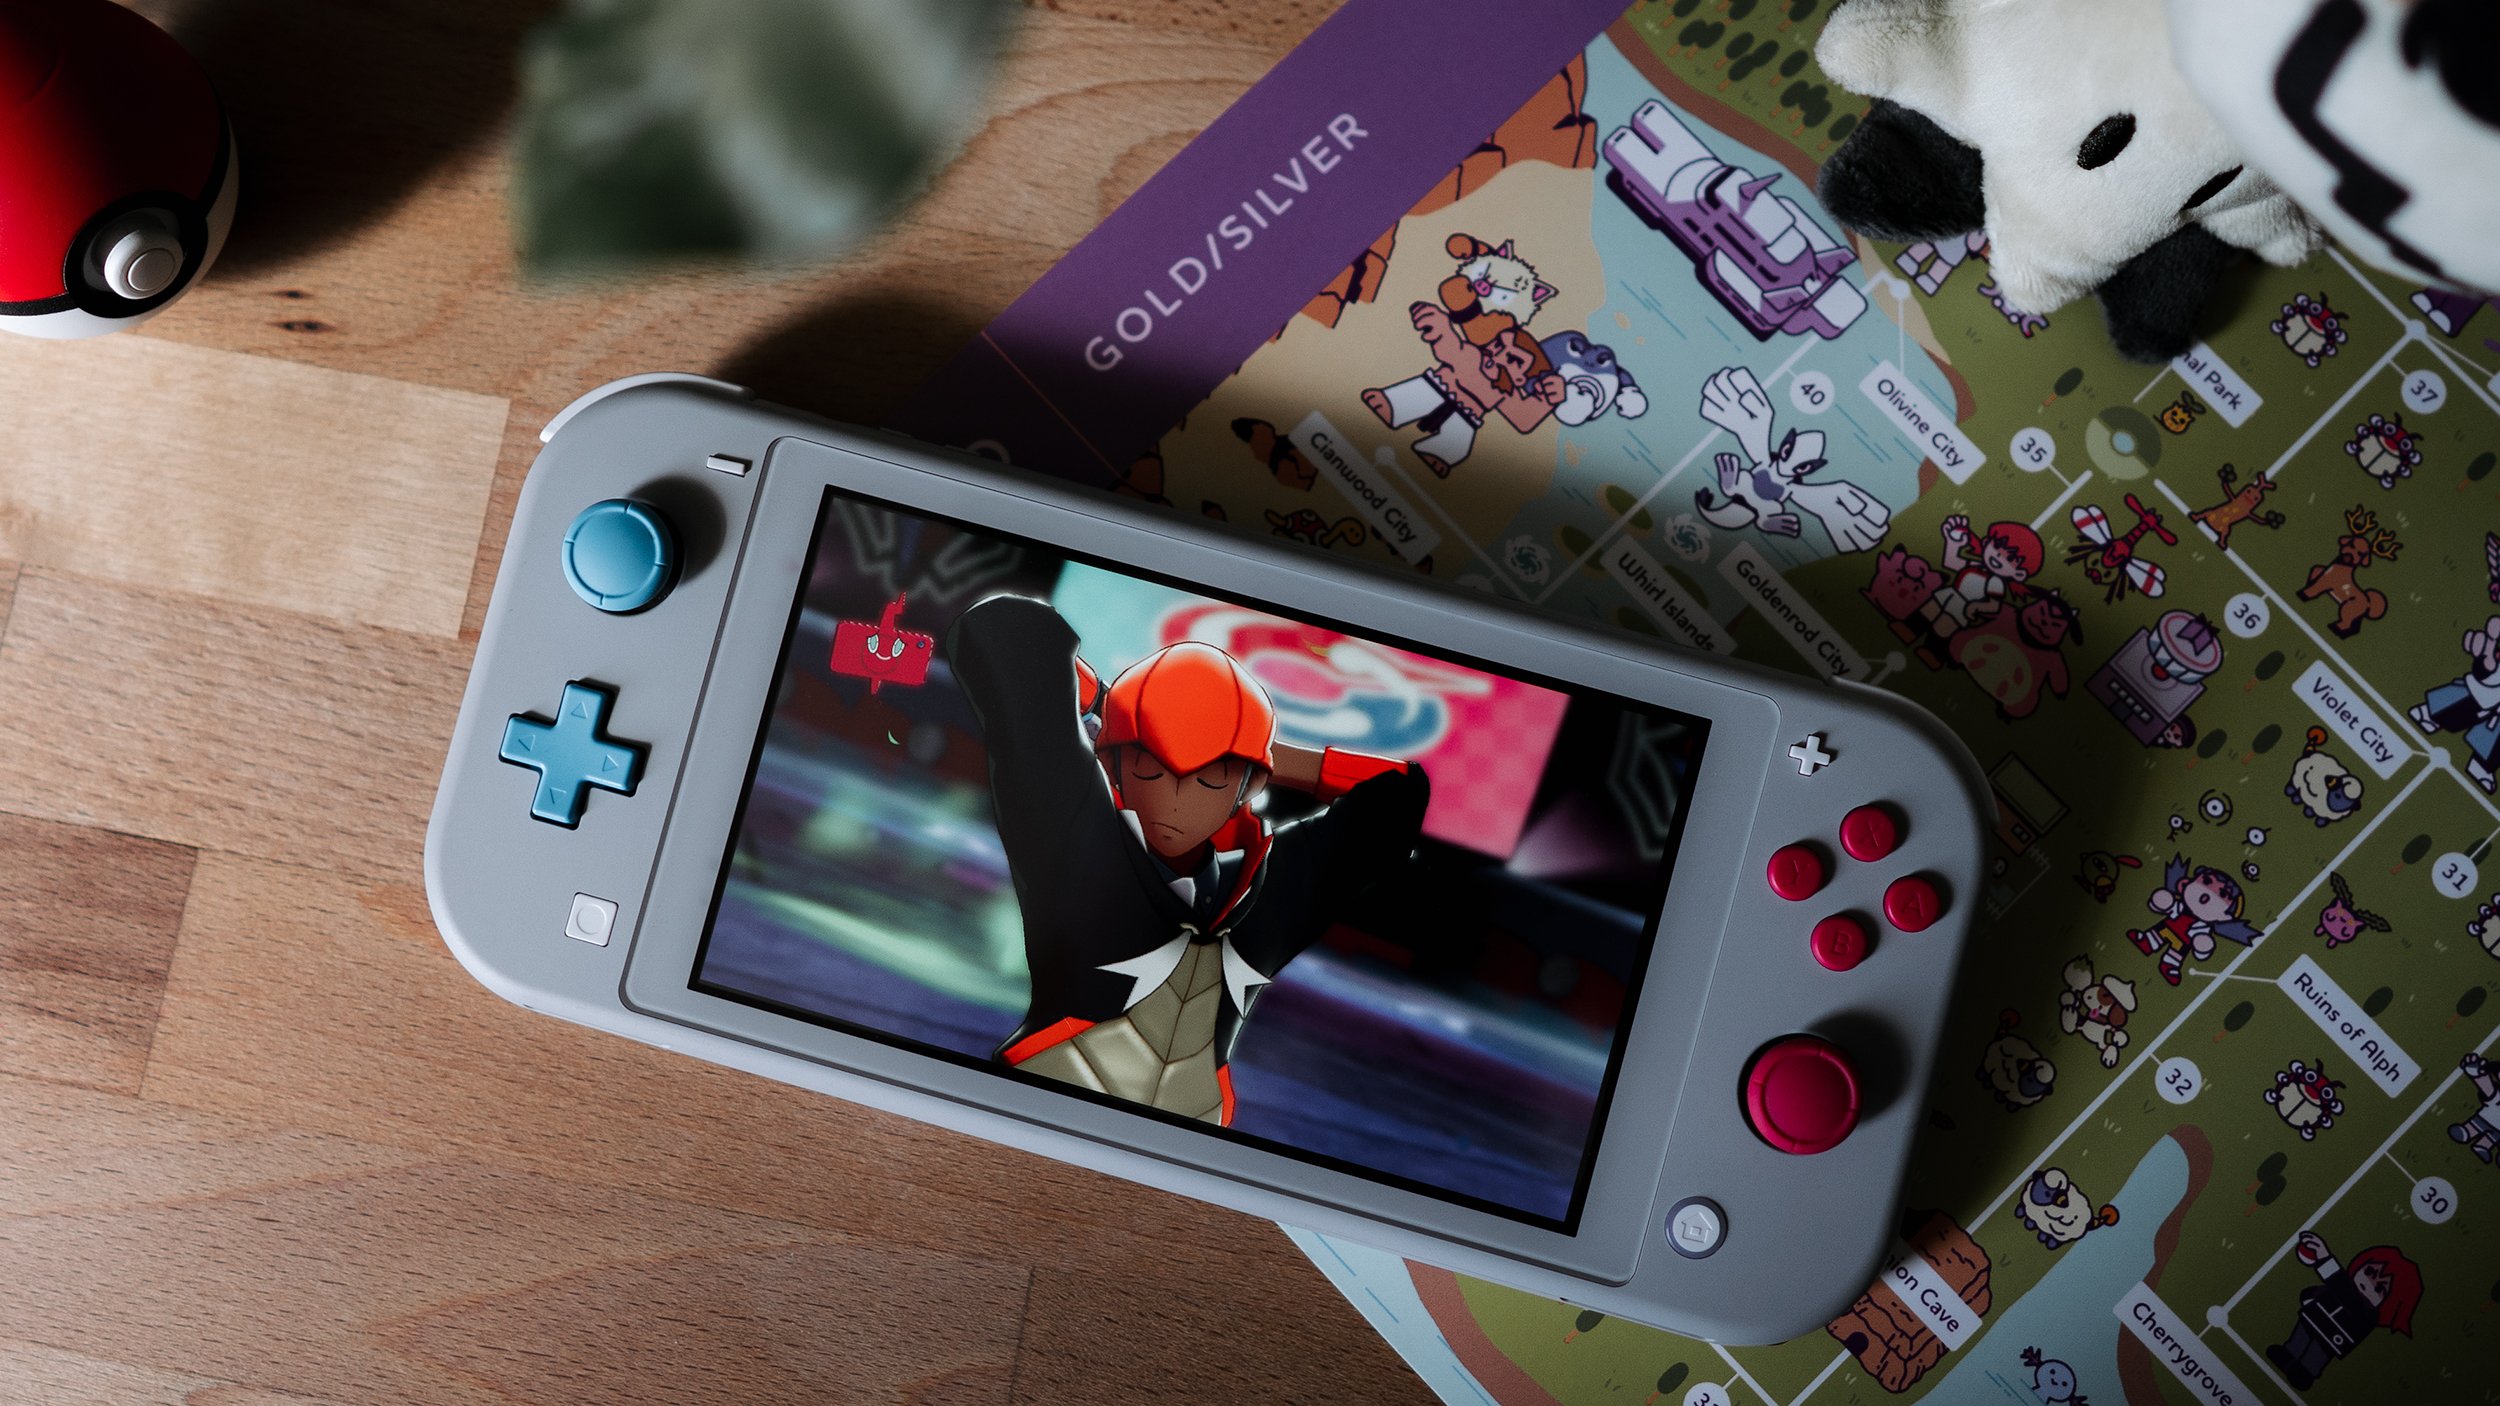 Learn why moving before your opponent is crucial and what tools you can use to do it.
Written by Wolfe Glick Although both players input their moves at the same time during a battle, Pokémon move in an order determined by their Speed stat. This makes the Speed stat one of the most fundamental elements of a Pokémon battle. Moves that alter Speed stats or otherwise change the order in which the Pokémon move in during a turn are referred to as “Speed control”. In this article, we’ll break down the most common elements of Speed control so that you can make informed choices for your own team.
EXAMPLE
Lets say you have Ludicolo and Raichu on your side of the field, against your opponents Togekiss and Scizor. Raichu is faster than Togekiss who is faster than Ludicolo who is faster than Scizor - if nothing changes the speeds of the Pokemon, this is the order they will move in. However, if Raichu uses Volt Switch to switch into Politoed and set the rain, Ludicolos Swift Swim will activate and allow it to move next. If the Togekiss is holding a Choice Scarf, it will instead move before the Raichu can attack.
Why is controlling the Speed stat important?
Attacking before your opponent gives you an enormous advantage. If you’re able to knock out your opponent’s Pokémon before they attack, their move for the turn never goes through. In other words, one of the best defensive moves you can make is knocking out one of your opponent’s Pokémon - the best defense is a strong offense (hope this metaphor translates– I don’t watch sportsball).
Furthermore, in Generation 8, Speed mechanics were changed. In generations 1-7, Speed order is calculated at the beginning of the turn– however, in Pokémon Sword and Shield, Speed changes are calculated immediately during a turn, which players call dynamic Speed. Speed control is now even more important than in previous generations– your Pokémon can work together to deliver an attack before your opponents can even respond.
EXAMPLE
Before Generation 8, our above example would play out a little differently. Turn order was set at the beginning of the turn, meaning whatever the speed order was when the turn started is how things will play out. If, in our above example, Raichu uses Volt Switch to go into Politoed and set the rain up, Togekiss will still move next despite Ludicolos Swift Swim technically being active.
NOTE: THIS IS NOT HOW SPEED WORKS IN ANY CURRENT COMPETITIVE GAMES
There’s another benefit to attacking first, and that has to do with passive effects. Many moves in Pokémon have a secondary effect that may activate when an attack lands. By attacking first, some secondary effects won’t activate, such as Rock Slide flinching, and even ones that do activate such as paralysis, burn, and freeze are less devastating since your Pokémon has already launched its attack for the turn.
When I was a wee VGC player, I had a friend named EnFuego, who told me “You can’t get unlucky if your opponent never gets to make any moves”. This is an oversimplification of course, but there’s a lot of truth in the statement. A Pokémon that has been knocked out can’t freeze you, paralyze you, crit you, etc.
At first glance, competitive Pokémon appears to have a lot of luck involved. However, the way you play and the way you build your team will significantly influence how lucky or unlucky you get. And one of the best ways to build a “lucky” team is to ensure you’re always attacking first. This is where Speed control comes in. There’s a number of methods of Speed control, but nearly every successful team makes use of some form of it. As a personal rule, I like to have at least two types of Speed control on all of my teams.
Types of Speed Control
Tailwind
Tailwind’s effect is simple: after setting Tailwind up, your team’s side of the field has their Speed doubled for four turns (the first turn is the turn you set it up, so 3 effective turns for the setter). Tailwind is a relatively straightforward form of Speed control - set Tailwind up, Pokémon go vroom. Tailwind is typically best used by Pokémon that are very fast or can use the move with some form of priority, such as Whimsicott and Talonflame. Tailwind setters normally are fast and frail, with decent offense or good supporting moves. Teams that function primarily around Tailwind use offensive Pokémon that exert a lot of pressure to make the most of their turns. Tailwind teams by nature struggle pretty heavily against Trick Room teams.
It’s important to note that Prankster (or otherwise very fast) Tailwind became even better after Generation 8 was released– if a Pokémon uses Tailwind first in the turn, it instantly doubles its partner’s speed for that turn, which means it will usually move immediately after the Tailwind happens. First-turn Tailwind combos can be devastating for opponents to deal with.
Trick Room
Trick Room is probably the most iconic and successful form of Speed control across VGC history. It’s also probably the strongest form of Speed control when used properly. Trick Rooms effect is simple: reverse the Speed order of the Pokémon for 5 turns. The slowest Pokémon will move first, the fastest Pokémon will move last. Trick Room is a form of Speed control that you can commit to at various levels - you can build a full Trick Room team or just have it as a mode or option on your team. Typically, Trick Room teams need a bit of setup to get the move out– this most often takes the form of Fake Out or Follow Me/Rage Powder. Trick Room teams of all shapes and sizes will normally run a super bulky Trick Room setter and an offensive Trick Room sweeper. Because Trick Room reverses the Speed order, it’s almost always a good counter to your opponent’s Speed control. You can learn more about Trick Room in this article.
Trick Room always moves last in the turn due to its -7 priority, so you won’t be able to pull off any first-turn Speed shenanigans with Trick Room in Generation 8, unlike with Tailwind.
Speed Drops
A less committal way of controlling opposing Pokémon’s Speed is to make use of moves that drop their Speed stat. This most often takes the form of support moves such as Icy Wind, Electroweb, and occasionally Bulldoze. These moves are less committal of a strategy in the sense that they can easily be added to many Pokémon, but their effect is also less strong as well– all stat drops reset upon switching. Furthermore, the drops can also be nullified by your opponent raising their Speed. That being said, this type of Speed control can be invaluable. Speed-dropping moves are especially powerful when your opponent is incapable or unwilling to switch their Pokémon out, normally in the late game. Speed-dropping moves are relatively low commitment to add onto a team (just one moveslot), so the reward vs investment is often very high. They’re typically used in Generation 8 by a very fast Pokémon to offer immediate benefit to the partner, such as Regieleki, or by extremely bulky Pokémon that are difficult to remove and can stick around continuously lowering Speed if they choose, such as Milotic or Cresselia.
Speed Boosts
On the opposite end of the spectrum are Pokémon that can boost their Speed. Boosting Speed is typically considered more useful than dropping your opponent’s Speed stat, because if you knock out a Pokémon with its Speed dropped, your opponent switches in a Pokémon without a drop, but if you take a KO with your own Speed-boosted Pokémon, you still have your boost. This is a similar reason to why Tailwind is strong. The main weakness of Speed boosts is they are often hard to come by. In a Dynamax format, Max Airstream offers great Speed control, but apart from that, the moves that raise Speed typically have a limited distribution. If you can find a good Pokémon that can consistently raise its Speed (often with a setup move such as Dragon Dance or Quiver Dance), there’s a good chance it can do quite well.
There are other ways to increase your Speed that don’t rely on setup moves, although they typically come with strings attached. One of the most common ways is to use the Choice Scarf item, which allows you to increase your Speed by 1.5x at the cost of not being able to switch moves after you enter the field. Another method of raising your Speed involves the Weather abilities such as Swift Swim, Sand Rush, Chlorophyll, and Slush Rush. These abilities are quite powerful, but they require their respective weather to be up and thus are susceptible to counterplay.
Priority Moves
One way you can bypass the different conditions that affect Speed is by using moves with increased priority. Priority moves are special in that they bypass other forms of Speed control, including everything we’ve talked about thus far. Priority moves typically trade boosted priority for lower base power, meaning they overall deal less damage. However, some Pokémon can muster up powerful priority attacks, and even weak priority moves can be invaluable in picking off opposing low HP Pokémon or comboing with a partner’s stronger attack. Priority moves often won’t be a primary form of Speed control, but can be extremely strong as a supplementary form of Speed control.
EXAMPLE
Rillaboom is one of the premier support Pokemon in many formats - it has good defensive bulk, decent typing, several good support moves such as Fake Out, U-Turn, and Knock Off, and the powerful combination of Grassy Glide and Grassy Surge. This pairing allows Rillaboom to not only overwrite opposing Terrains, but also access to a strong Grass type move that often has priority. Rillaboom is able to damage Pokemon weak to Grass types before they attack and finish off low HP opponents as well as combo with a faster teammate.
Natural Speed
Pokémon that are naturally fast are invaluable when considering Speed control. While they don’t technically affect the conditions on the field that allow you to manipulate Speed, what they do is give you the advantage when there is NO Speed control present, such as on the first turn. Field effects such as Tailwind and Trick Room have a turn limit, and there’s a lot of value in being the fastest Pokémon on the field when those effects run out. Additionally, having naturally faster Pokémon than your opponent forces your opponent to invest resources into setting up their Speed control, which takes time and has counterplay. A team with all middling/slow Pokémon is going to have a much harder time and get far less “lucky” than a team with a better spread of Speeds. It’s worth noting that teams composed of only super speedy Pokémon typically struggle due to their poor natural bulk, so this method of Speed control isn’t something you can rely on solely.
Other Methods of Speed Control
Other methods of Speed control are significantly less common than those mentioned previously:
- The move Thunder Wave applies the Paralysis status, which cuts the opponent’s Speed stat by half. It’s only 90% accurate, however, and won’t work on Electric or Ground types.
- The move Quash is a move that forces the target to move last within its priority bracket. Quash isn’t a bad move at all, but its distribution is limited - it’s only viable on a Pokémon that is attacking first, such as Sableye with its Prankster ability.
- Using the move Trick while holding the Lagging Tail item gives your opponent a bad item that forces them to always move last in their priority bracket, like a permanent Quash, and steals their item. Prankster Pokémon such as Whimsicott, Grimmsnarl, and Sableye will still move first using Trick when holding a Lagging Tail. This combination is considered a bit gimmicky and doesn’t see much play in non-Dynamax formats.
- The move Speed Swap is a fun move that swaps the Speed of the target and the user, but hasn’t seen nearly any success in VGC.
These moves can be good situationally but aren’t consistent enough that I’d recommend them in a general case.
Wrapping up
Which form of Speed control should you want on your team? Well, it depends on your team and your preferences. Furthermore, different types of Speed control are stronger in different formats. In formats with many fast and frail Pokémon, Trick Room is even stronger than normal. In a format with many bulky Pokémon with good defensive tools, Tailwind-centric teams may struggle more. Ensuring you have good Speed control on your team will go a long way in giving you more tools to win and to handle negative variance. As you play more and get more experience, you may learn that you prefer certain types of Speed control over others. Don’t forget these strategies aren’t mutually exclusive! You can always mix and match to build the strongest team.
Items
Pokémon can play in a completely different way depending on the item that they’re holding– learn about the most popular and impactful items.
Written by Wolfe Glick In this article, we’ll talk about what items we consider when we’re building a team, and help you find an item if you’re stuck. If you haven’t played competitively before, check out the “Basics of Items in Competitive Play” section. If you have, skip that section and continue to the “What Items Should I Use?” section.
Basics of Items in Competitive Play
When I tell people unfamiliar with VGC that I play Pokémon competitively, a question that quickly arises is: “So, do you just spam revives/potions”? While I always make sure to tell the asker that this is quite a good idea and I will try it next tournament, a trainer cannot use itemsduring a competitive battle.
However, Pokémon can hold items, and use “held items” themselves. A held item is a subclass of general item - you “equip” them to a Pokémon, and they take effect during the battle. Items such as Potions, Revives, X-Accuracy, and many others are not held items and therefore cannot be used. For a full list of held items, click here.
VGC has several clauses, rules that affect the team you can legally bring to a tournament. One of these clauses is known as “item clause”, which states each item used on your team must be unique. Each Pokémon can hold one item, meaning competitive VGC teams will have a total of 6 different held items.
What items should I use?
Choosing an item can feel overwhelming. After all, there’s quite a few possible held items, and you have to choose 6 distinct ones. Is this a fool’s errand? Are you destined to stew in itemless purgatory indefinitely, suffering choice paralysis akin to selecting the best 6 ice cream flavors in a store with hundreds of options? Well, even though in theory there are hundreds of possible items, many of these should be immediately discounted when considering itemization. Many items are inferior versions of existing ones, such as Oran Berry VS Sitrus Berry. When considering whether an item is “good”, there are few things to consider.
First, consider how often your item is likely to activate. Some items are always active such as Choice Specs, Leftovers, Etc. whereas some need conditions to be met such as Sitrus Berry or Weakness Policy. Some items, such as Battery, Snowball, and Utility Umbrella aren’t going to come into play the majority of games.
Next, consider the benefit your item provides. The +1 boost you get from Absorb Bulb isn’t as impactful as the +2 boost from Weakness Policy, and is only marginally better than the boost Life Orb provides. Some items activate often, such as Big Root, but provide very little value. Furthermore, how good an item is depends largely on the Pokémon holding it. Focus Sash Shedinja is likely its best item, but Focus Sash Snorlax is going to be useless most of the time, because so few Pokémon threaten to take all of its HP in one turn.
Finally, consider the opportunity cost of your item. Is there a better item you could be using? One prime example of this is the Air Balloon item, which makes a Pokémon immune to ground moves until it is hit by an attack. This item is inconsistent - you may not be able to count on it to always be active when you need it - and smart players can maneuver around the effect. In this case, most Pokémon that want to hold an Air Balloon would fare better with Focus Sash or Shuca Berry.
There are no hard and fast rules when it comes to items, but these questions should give you some guidance when considering your items. In most formats, there are probably 10-15 held items that are common in most formats, with the rest being situationally strong. How good a specific item is depends largely on the Pokémon holding it and the rest of the metagame, but most items fall into 4 general categories– recovery, damage output, damage mitigation, and support.
Recovery
It’s not rocket science - your Pokémon can’t battle when they run out of health, so people use items that recover HP. These include Sitrus Berry, Leftovers, and the berries that restore 33% of your health, which are the Figy, Mago, Aguav, Wiki, and Iapapa berries. Sitrus Berry is typically best on Pokémon with middling bulk to significant bulk - Pokémon that on average will take 2-4 hits to knock out. Leftovers is strongest when a Pokémon intends to stick on the field for multiple turns (at least 4 to offset the Sitrus Berry alternative), such as gradual setup sweepers like Calm Mind Tapu Fini that increase their bulk as well as their offense. Leftovers are also useful on Pokémon that have other forms of passive recovery such as Leech Seed or Grassy Terrain, as you get additional recovery from Protecting. Berries that restore 33% of your health are a good alternative to Sitrus Berry on Pokémon with significant bulk, as they’ll likely reach the activation threshold consistently. They can also be useful on Pokémon with a recoil move, as it is easier to activate these berries yourself in a pinch.
Damage Output
Don’t you want your Pokémon to do MORE DAMAGE!?!?! Well, thanks to these items, they can! Some examples of damage output items include Life Orb, Choice Specs/Band, Weakness Policy, and type-boosting moves such as Miracle Seed or Mystic Water. Where these items belong depend largely on the format, but in general it’s important to consider the power vs drawback balance. The strongest of these items (Choice items and Life Orb) have somewhat sizable drawbacks that the weaker alternatives lack, but in exchange offer more power. When deciding on which item you want, consider how the drawbacks affect the Pokémon you’re itemizing. A Pokémon that clearly has a best move whose primary goal is to do damage and doesn’t need defensive options like Protect may be better off with a Choice item. A Pokémon that runs multiple moves of the same type and also values a defensive option or the ability to switch moves may prefer a type boosting item.
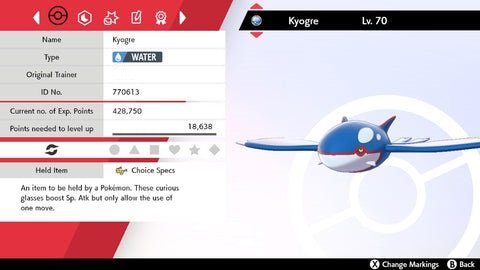
EXAMPLE
In the VGC2021 Series 10 format, Kyogre would sometimes run the Choice Specs item. This is a good item for Kyogre as Water Spout is a very powerful move, and when paired with the Rain, STAB, and Choice Specs boost the damage output is significant.
In this same format, some people started to run Mystic Water Urshifu-Rapid-Strike. This Urshifu would choose to invest in its defenses, and would take advantage of its natural defensive typing to consistently output damage with Surging Strikes. Mystic Water allowed Urshifu to finish low HP Pokemon off with Aqua Jet, as well as allowing it to Protect when feeling threatened. The additional power a Choice Band would provide was not worth the lack of defensive utility provided by allowing Urshifu to switch moves.
Damage Mitigation/Survivability
Survivability items don’t restore health, but they do allow your Pokémon to stick on the field longer by reducing incoming damage. These items include Assault Vest, type resist berries such as Shuca Berry and Coba Berry, and other items such as Focus Sash and Eviolite. These items are good on Pokemon that need help staying on the field for whatever reason, and attempt to reduce a specific weakness to provide longevity. Survivability items can be used either to increase a somewhat bulky Pokémon’s staying power, or to allow a frailer Pokémon another turn on the field.
Support
Support items that typically bolster something about a Pokémon that doesn’t fit into one of the other 3 categories. Some of the better examples include Safety Goggles, Lum Berry, and Light Clay. These are items that have a specific purpose– help with powder moves, help with sleep, or increase the duration of Light Screen/Reflect. As such, the types of Pokémon they excel on depend largely on the niche being filled.
How do I choose an item for my Pokémon?
Nearly every good item choice on a Pokémon will do one of two things for a Pokémon: bolster a strength or mitigate a weakness. Let’s look into these a little deeper.
Bolster a strength
- Does your Pokémon naturally threaten high amounts of damage? Consider adding a Choice Band, Choice Specs, or Life Orb to become even more threatening
- Is your Pokémon threatening because it outputs big damage and also has good staying power? Consider a type boosting item like Magnet or a Sitrus Berry
- Is your Pokémon a defensive wall who whittles away at opponents over time, such as Ferrothorn or Celesteela? Consider increasing its staying power with Leftovers.
- Is your Pokémon most threatening when moving first? Consider the Choice Scarf item.
These are just a few examples of things you might consider when augmenting something your Pokemon does well. Experiment with different items so you can learn which Pokemon they are strongest on.
Mitigate a Weakness
- Is your Pokémon weak to a common type in the Metagame? Consider a type-resist berry such as Shuca Berry
- Does your Pokémon need help staying on the field longer and could benefit from more Special Defense? Consider an Assault Vest
- Is your Pokémon fast and frail and finds itself getting knocked out in one hit? Consider a Focus Sash
- Is your Pokémon getting KO’d in two hits often? Consider adding a Sitrus Berry
- Does your Pokémon keep getting put to sleep by Spore or Sleep Powder? Consider adding Safety Goggles.
It’s worth noting that these questions are about the Pokémon we’re using, not the items themselves - you can add the same item (such as Sitrus Berry) to either bolster a strength or mitigate a weakness. As you get more experience with Items it will become easier to identify what each of your Pokémon needs!
Wrapping Up
If you’re just getting started in VGC, I recommend seeing which items are popular and staying mostly inside that box. As your game knowledge progresses, you can start thinking about items more conceptually and identifying the situations where a less conventional item may be appropriate. I hope this guide gives you the tools to think about itemization and the specific job your items are doing.
Protect
Protect is the most popular move in Double Battles, and for good reason.
Written by Wolfe Glick
What is Protect?
If there were one move that defined VGC in its entirety, it would have to be Protect. Newer players are often surprised to see the prevalence of Protect in VGC - after all, it’s a move that doesn’t actually do anything offensively, and it can’t be used consecutively without high risk of failure.
Let’s use a very basic example - I have a Pikachu and I don’t want to deal with my opponents Onix because there are no sprinklers around and Onix is immune to all my Electric Attacks and threatens to knock out my Pikachu with Ground-type Moves. If this were a Single Battle, Protect wouldn’t do anything for me - I can Protect to stall a turn, but my problems still remain next turn. The Onix is still around and there still are no sprinklers to be seen. But what if this is a Double Battle?
See it in Showdown here.
Well, if this is a Double Battle, things change a bit. Say I have a Bulbasaur next to my Pikachu which can KO the Onix. Onix is still threatening to KO my Pikachu, but now the dynamic is totally different. If Onix wants to attack my Pikachu, it risks being KO’d in return by my Bulbasaur. Now, the Onix player could choose to trade their Onix for my Pikachu if they decide that’s in their favor, but if I choose to Protect my Pikachu, they lose Onix and gain nothing. This creates a mind game centered entirely around Protect and which of the players will choose to use it.
See it in Showdown here.
Why is Protect Important?
As seen in the above example, Protect allows you to control the pace of the game. If a Pokémon of yours is being threatened, you can always Protect it while its partner Pokémon attacks, potentially removing the threat. This makes it so that your opponent isn’t always safe to attack you, and adds uncertainty when they go to make their move.
Protect is a defensive tool that is often used for positioning. If you have two Pokémon that you want on the field together but only one of them is currently out, you can Protect it and switch in the other. This lets you navigate to board states that are favorable for you.
Protect also pairs well with supportive Pokémon, many of which are bulky. Protect allows you to shield an offensive damage dealer while you bring in the proper support for it (Fake Out, Intimidate, Follow Me/Rage Powder, Tailwind, etc.)– being able to keep your high damage output Pokémon safe is a really valuable asset. The longer they survive, the more damage they can deal.
Protect allows you to waste turns where your opponent would otherwise have an advantage. There are many effects used in competitive Pokémon that have a set number of turns (Trick Room, Tailwind, Weather, Terrain, Dynamax, etc). If an opponent sets Tailwind turn 1, they would normally have 4 total turns to make use of its effect. But, if both Pokémon on your side of the field have Protect, you can completely nullify two of those turns by Protecting both of your Pokémon.
EXAMPLE
In this replay, we can see that despite the opponent technically having Tailwind up for four turns, there was only one turn where they were actually able to use its effects. Without Protect, it would be much harder to slow the momentum down to stall out the Tailwind.
See it in Showdown here.
In short, Protect is a positional tool that allows you to keep your options open. More than that, it makes decisions harder for your opponent - attacking into a Pokémon using Protect will most often be a “wasted” move. However, you never know if a Pokémon is actually going to Protect until it does– so your opponent can’t safely ignore your Pokémon.
Which Pokémon Need Protect?
Most Pokémon in VGC will carry Protect. It’s worth noting that not every Pokémon needs to run Protect, and some Pokémon make much better use of it than others. Pokémon that are extremely bulky (such as dedicated Trick Room setters) often opt not to run Protect, as do most Pokémon holding a Choice item. Occasionally, an extremely offensive Pokémon will opt not to run Protect in favor of more coverage moves, but this is pretty risky. In a Dynamax format, some offensive Pokémon opt to use a different status move in their 4th slot as all status moves turn into Max Guard when Dynamaxed. How good and how necessary Protect is depends on the format– as a very general rule I typically aim to have four of my six Pokémon with a Protecting move, but this is very loose and not something that should be set in stone.
Pokémon that are supportive in some regard also sometimes opt not to run Protect. This often includes Pokémon with moves such as Fake Out or Pokémon with both Light Screen and Reflect. These moves often serve as a sort of pseudo-protect: Fake Out allows you to nullify an opponent the first turn your Pokémon is in battle, and Dual Screens (Reflect + Light Screen) provide significant damage reduction. Additionally, by running Pokémon with the aforementioned moves, you only have two or three moves remaining– and adding another defensive move (Protect) can sometimes result in a Pokémon that can simply be ignored and not have any presence. Therefore, on a support Pokémon that is already defensively inclined, Protect is sometimes dropped.
EXAMPLE
In the 2012 format, Cresselia almost never ran Protect. This is in part due to how useful Cresselia’s movepool was (it could almost always be doing something to support the team), and also in part due to how incredibly bulky it was. The main way of removing Cresselia from play was to hit it with multiple strong attacks over time - if a Cresselia went down after three attacks, that would be considered way faster than average. Because of this, Cresselia was often better off supporting its teammates than mitigating the damage it took.
In more recent formats, Dusclops and Porygon2 often don’t run protect. They each have not only exceptional bulk and not many weaknesses, but also recovery moves in Pain Split and Recover respectively. Dusclops has the additional benefit of being immune to Fake Out. These Pokemon are also able to forego Protect thanks to their staying power and supportive options.
Certain teams make better use of Protect than others. If a team plays more aggressively and aims to overwhelm the opponent with offense, additional offensive moves may be better suited for that team instead of Protect. However, a team that is more defensively oriented and requires lots of switching and positioning can get more use out of Protect.
When deciding whether or not to run Protect on one of your Pokémon, there’s a few things to consider:
Think about how much damage your Pokémon will be taking on average - if it’s 50% or more from a chunk of the metagame, that’s a very good reason to run Protect. This also explains why extremely bulky Pokémon such as Cresselia, Dusclops, and Porygon2 can justify not using Protect.
You should also weigh what the next best alternative is for dropping Protect from your moveset. If you’re weighing Protect versus another offensive coverage move, consider how long you’ll be able to survive without Protect. Extra coverage isn’t especially useful if your Pokémon has already fainted.
Bulky Pokémon can opt to run recovery moves instead of Protect. If you’re taking less than 50% from most attacks, this may be a good alternative.
Wrapping Up
Protect is one of the most fundamental parts of VGC battling. There’s no hard and fast rules when it comes to using Protect, but it’s one of the best moves in the game and in my opinion you need a really good reason to not use it on a Pokémon. If you’re unsure whether a Pokémon on your team needs Protect, play some games without it and see how much you miss it. As you get more experience with VGC you’ll start to develop your own sense of which Pokémon need Protect and which can afford to drop it. Don’t be afraid to experiment to get a feel for what you like!
Trick Room
 Trick Room can turn a battle on its head (ha!) by flipping the order in which Pokémon move.
Written by Wolfe Glick
What is Trick Room?
Trick Room is a move that reverses the order in which the Pokémon move for 5 turns. Under the effect of Trick Room, the Pokémon with the lowest Speed stat moves first, then the second lowest, then the second highest, then the highest. Trick Room does not affect move priority. Trick Room itself has a -7 priority, which is the lowest priority an attack can be, meaning it is (almost) always the last move used (unless there’s some trickery with other moves that affects the move order). Even though technically Trick Room lasts for five turns, because it always is set up last, it’s effect is only relevant for four turns.
Why is Trick Room strong?
Trick Room has multiple strengths:
- Some strong Pokémon have low Speed stats as a counterbalance to their high offensive and defensive stats. Trick Room turns a large negative into a huge positive.
- Furthermore, most non-Trick Room Pokémon will want to invest in their Speed stat in order to move before other Pokémon. Trick Room Pokémon very often don’t invest at all into their Speed stat, giving them extra EVs (stat points) compared to a Pokémon that has invested in speed while still being able to move first.
- Trick Room is much stronger in VGC than it is in Singles– you have twice the amount of Pokémon to take advantage of each Trick Room turn compared to Singles.
- It lasts for a long time (5 turns).
Additionally, Trick Room has been not only a good option but a dominant one in every VGC format historically. It has won seven of the twelve World Championships, which is highly consistent.
Trick Room Teams
The classic Trick Room Team includes:
- Two Pokémon that set Trick Room (setters)
- One to two Pokémon to help Trick Room get set up (helpers)
- and one to two Pokémon to deal the bulk of the damage in Trick Room (sweepers)
This style of team (called a hard Trick Room team) is typically strong if Trick Room goes up, and much less strong otherwise. To circumvent this, some dedicated Trick Room teams make use of an alternative mode in case they can’t get Trick Room up. Players will run fast Pokémon even on the most dedicated Trick Room teams. There’s no real hard and fast rules when it comes to building Trick Room teams.
Some teams that utilize Trick Room can have as little as two Pokémon that make use of it, but still maintain the strategy as an option. It’s even possible for a mid-speed team to make good use of Trick Room with only one slow Pokémon.
EXAMPLE
The team I won the 2016 World Championships only has two Pokemon that could really make use of Trick Room. Despite that, it was one of the most important aspects of the team. The pairing of Kyogre and Bronzong could completely decimate faster teams, especially ones that relied on Primal Groudon. Not every Pokemon on your team needs to benefit from Trick Room in order for it to be an effective strategy.
There are certain consistent roles that Pokémon on Trick Room teams tend to fall into. These are general classifications that appear across generations and formats. There are three major categories: Trick Room Setters, Trick Room Helpers, and Trick Room Sweepers. Note that not every Trick Room team needs all three categories.
Roles: Trick Room Setters
Every Trick Room team needs a Pokémon that knows the move Trick Room– a “setter”. The only requirement of a Trick Room setter is that it knows the move Trick Room. They typically fall into one of two categories: bulky setters, or offensive setters. A bulky Trick Room setter trades offense for survivability - it’s a Pokémon whose primary goal is to get Trick Room up, and then offers some support once it goes up. Pokémon like Cresselia, Dusclops, and Porygon2 fall into this category. Then there are offensive Trick Room setters - these Pokémon often need some support in order to get Trick Room up, but once set up they are able to function as a strong offensive threat, allowing immediate offense without need for repositioning. Hatterene and Reuniclus are some of the best examples of Offensive Trick Room setters. Some Trick Room setters are exceptions to this bulky/offensive split. For example, fast, frail Pokémon such as Nihilego, Whimsicott, and Gengar are normally selected for surprise factor or as anti-Trick Room tech.
EXAMPLE
In VGC2010, Huy Ha used a rather unusual team featuring an unorthodox Mewtwo build. Most people would assume that since Mewtwo has such high base speed, it would ordinarily be used as a fast sweeper, but Huy decided to give his Trick Room and Self-Destruct. Opponents expecting Mewtwo to attack turn 1 might make a defensive play like using Protect or switching, and would be totally caught off guard by Mewtwos Trick Room. You can take a look at the Report and Battle.
Roles: Trick Room Helpers
Trick Room helpers are Pokémon whose primary goal is to protect your Trick Room setter to allow them to get Trick Room up. They normally are selected due to a low Speed stat in addition to their access to strong support moves. The two most common ways of supporting a Trick Room setter are Fake Out and redirection.
Fake Out is a great way to stop one of your opponent’s moves, meaning your setter only needs to withstand one attack in order to get Trick Room up. In Dynamax formats, Fake Out is less useful due to Dynamax’s immunity to flinch, but Fake Out can still prevent disruption moves like Taunt from stopping Trick Room. Many good Fake Out users such as Incineroar and Scrafty provide additional support with Intimidate.
Redirection refers to the moves Follow Me and Rage Powder, which draw attacks away from your Trick Room setter. These Pokémon tend to be defensively oriented, but offer low offensive pressure, especially if paired with a defensive Trick Room setter. Perhaps counterintuitively, one of the best outcomes of Turn 1 in a battle is that a redirector is knocked out, which allows a free switch under Trick Room to a more offensive Pokémon. Each redirector still can be disruptive in their own way, however. Amoonguss uses Rage Powder and, if not KO’d, can follow up with Spore. Indeedee-Female uses Follow Me and can follow up with Psychic Terrain-boosted Expanding Force. Defensive redirection Pokémon tend to perform better when paired with an offensive Trick Room setter, though they can work in many situations.
Roles: Trick Room Sweepers
Trick Room sweepers are Pokémon intended to be heavy hitters under Trick Room. They tend to be bulky and hard hitting, and very slow. The goal of a Trick Room sweeper is to do as much damage as possible before Trick Room expires, so having good coverage and being difficult to switch into are huge pluses. However, once these Pokémon are caught outside of Trick Room, they will always move last, which is a significant disadvantage. Trick Room sweepers tend to carry offensive items like Life Orb and Weakness Policy. Rhyperior, Torkoal, and Glastrier are good examples of Trick Room Sweepers.
Trick Room Counters
There are specific Pokémon, moves, and items that you can add to your team to make it more difficult to get Trick Room up, but there’s also general ways of playing the game that are effective at stopping Trick Room, which we talk about here.
Here are things you can put on your team to help you versus Trick Room:
- The move Taunt stops all status moves as long as the target Pokémon isn’t holding the Mental Herb.
- Moves that force switches such as Roar and Dragon Tail move before Trick Room and force the setter out before Trick Room goes up.
- Using Trick Room when Trick Room is up cancels the effects of Trick Room.
- A Pokémon knowing both Imprison and Trick Room and then using Imprison makes it so your opponent can’t use Trick Room until your Imprison user is KO’d or switches out.
- You can also make use of your own slow Pokémon that benefit from your opponents Trick Room.
EXAMPLE
Arash Omatti won the 2013 World Championships using multiple slow Pokemon that benefitted from Trick Room without a Trick Room setter on his team. Arash’s team consisted of three fast Pokemon in Scarf Mamoswine, Tornadus, and Latios, and three slow Pokemon in Conkeldurr, Heatran, and Amoonguss. Because Trick Room was so prevalent at the time, Arash ensured that he had the faster Pokemon outside of Trick Room as well as slower Pokemon if his opponent set it up, allowing him to react flexibly and ensure he was consistently moving first.
However, be careful: Trick Room teams often have counterplay in the early game for all of the above strategies, mostly in the form of their support Pokémon, though obviously some methods are easier to deal with than others. These are still good strategies to consider though, especially adding the move Taunt which is highly flexible, and putting slow Pokémon on your team, which are useful in many situations.
In summary, Trick Room is one of the best and most consistent strategies of all time. There’s a whole spectrum of ways you can integrate it into teams, and various types of Pokémon can benefit from the twisted dimensions. Playing against Trick Room requires smart positioning and planning, in addition to having the tools to handle it in the first place. It’s also very fun to use and rather straightforward to grasp the basics of– if you haven’t tried it before, I personally recommend it.
What Makes a Pokemon “Good”?
What Makes a Pokémon “Good”?
Learn how to evaluate the strength of individual Pokémon.
Written by Aaron Traylor Wolfe released this video, where he talks about one of the first things we think about in teambuilding: the Use Good Pokémon rule, or more concretely, the Pokémon on your team should be good under your teambuilding philosophy. This isn’t to say, though, that you should only use the highest used Pokémon with the best stats– in this article, we’ll help you think about what this rule means in your own terms.
What Makes a Pokémon “Good”?
Being able to identify a “good Pokémon” is a more important and foundational skill, in my opinion, than being able to make a “good team”. What does it mean for a Pokémon to be “good”? It does NOT mean that the Pokémon has a high usage rate. Good Pokémon often have high usage rates, but many good Pokémon do not.
Maybe cheekily, the definition of a “good” Pokémon is a definition that you have to come to yourself. What do you value in a Pokémon battle? What do you think are the best ways to win? These are principles that YOU hold dear based on your experience as someone learning to play this game. This is, of course, extremely subjective– all of Pokémon is. I have things in my head about what I think makes a Pokémon “good”, but that’s different from what you might be thinking of. The path to victory in a Pokémon battle is so complex that all we’re able to do is come up with our own principles and philosophies on battling and teambuilding and refine them endlessly.
If you’re new to this game, it’s okay to not have principles. It’s okay to have principles that you think might be wrong or based on little experience. You’ll pick things up as you go along. What’s important for you is that you identify things that make you feel like you’re having fun and learning. Pokemon is a game about endless learning, so you might as well start now.
When you pick Pokémon for your teams– are you picking Pokémon that meet your criteria or help further your goals? Or are you adding band-aid fixes to support what you think are holes? If you have to include a Pokémon that doesn’t meet your criteria– if you don’t think it’s good, but you’re putting it on your team anyway– you need to take a step back and think about your team from a different angle.
If your team isn’t working out, revisit your principles of why each Pokémon is on your team. At one point, you thought that each of these Pokémon was good, and was a good fit for your team. Why did you think that? Is that decision working out how you wanted it to?
Considering Other People’s Opinions
Much as how you have some idea of what Pokémon are good, other players are going to have their own perspective. Taking in the opinions of other players (whether through conversation or watching videos) is a great way to learn and to refine your own philosophy.
Beware of being told that a Pokémon is “good” and not being told why. If you’re hearing it from a better player, they might assume you know the context behind why they would think that a Pokémon is good. You might not! It’s okay to not know what makes a Pokémon good under their definition. They defined that for themselves and then didn’t tell you directly. Ask them to put it in their own words why a Pokémon is good, or hypothesize and put it into words yourself.
At worst, that person “slapped” the Pokémon onto their team without considering why– they just thought it was “good” in general. In this guide, we caution you to fully think through why every Pokémon makes it onto your team. You define what makes a Pokémon good under your own principles: take the time to understand why you want to put it on your team, and whether reality will play out as you envision it. Your team will be better for it.
Different people might have different opinions on what makes a good Pokémon based on their own principles and experiences. I want to urge you to think through what a “good” Pokémon is for yourself and to not rely on other players to decide that for you. Remember that you’re in charge of your own Pokémon.
EXAMPLE
Written by Aaron Traylor
I, personally, think Salazzle is not a great Pokemon. Not even within the current VGC metagame or format, I think in general its stats are such that it will never be useful to me to play the game of Pokemon that I want. It has low defenses and its offenses and utility aren’t special to the point where I want it on my team.
You could take that at face value. Or you could look at a player like Jamie Boyt, who went 7-0 on the second day of the World Championships with Salazzle. Clearly, Jamie values what tools Salazzle has in battle. Clearly, it worked out for him and clearly my principles of what Pokemon are good aren’t the full picture of our game. Was I wrong about my assessment of Salazzle? I think yes and no– Salazzle might not lend itself to the way of playing Pokemon that I’m comfortable with, but Jamie was able to use it effectively. Does the clash of Jamie’s result and my opinion support or challenge your own philosophy?
What are our criteria?
Maybe it would be helpful to hear from us what we consider markers of good Pokémon, but please take our opinions as just that– opinions.
Aaron T.
Good Pokémon fundamentally challenge your opponent. The best Pokémon are the ones that do so much, the other Pokémon allowed in the format simply don’t have enough tools to deal with them. This is heavily linked to the concept of consistency of strategy: a Pokémon should be strong enough or have enough tools to give your opponent problems, even if your opponent is prepared for them.
I think the best Pokémon of all time is Xerneas in the VGC 2016/2019 metagames. Xerneas commanded so much power and was so flexible in how it could set up that players were forced to run multiple checks and counters to begin to deal with it, and even then, it still ran away with games thanks to a flexible supporting cast. That isn’t to say that strength is the only aspect that makes a Pokémon good. Pokémon that accomplish many goals, such as Incineroar, can sometimes similarly rise above the capabilities of your opponent.
Being “good”, like everything in Pokémon, is always in context. For example, Amoonguss’ useful defensive typing, stats, and moves are a variety of reasons why I would consider it for my teams. Is Amoonguss good in the context of whatever format it’s being played in? Well, then I’d have to consider– how popular are anti-Sleep options such as Taunt, Safety Goggles, or Misty Terrain? How useful is its defensive typing going to be if Fire- or Flying-type Pokémon are everywhere? Furthermore, do all of those factors occur naturally because those Pokémon are good too– or are they in response to Amoonguss itself? In the former case, Amoonguss might not actually be a good Pokémon, because it is disadvantaged from the start. However, in the latter case, the format has evolved to respect Amoonguss and its tools– that is strength. If Amoonguss can be feared enough that people will willingly shift their teams around it, and despite that respect I can still find useful situations for it– that is the mark of a good Pokémon.
Wolfe
Good Pokémon need to meet certain criteria of mine. The most important thing a Pokémon needs in order to be good is field presence– the ability to impact the game by being on the field. This can be via damage output like Kyogre or with support like Incineroar. Without the ability to consistently impact the game, a Pokémon risks being able to be ignored which is extremely bad in VGC.
Consistency is another extremely important factor to consider - both in strategy and in gameplay. I value Pokémon that don’t lose significant value once the opponent knows their moveset and item. I also value Pokémon that reduce the negative variance I am susceptible to (like Tapu Fini), and dislike Pokémon that force me to gamble (like Venusaur).
I value the base stats of Pokémon highly. For a Pokémon to be good, it needs to be able to do something well, and for nearly every Pokémon what they are capable of comes down to their base stats. Not every stat needs to be especially great - Raichu is an example of a Pokémon I think is good despite only having one “good” stat (Speed), but Pokémon do need the base stats to be able to accomplish their goal. This is a big reason why I don’t love Rotom. Although Rotom-Wash and Rotom-Heat have great typing and good movepools, their stats make them really difficult to use. Most of Rotom’s stats are slightly above average, which makes it difficult to use in a specialist role.
Lastly, Pokémon that are good enable the rest of their team in some way. This is most clear in support Pokémon like Incineroar or Dusclops, which allow their teammates extra breathing room, but it’s true even of offensive Pokémon like Azumarill. Each battle is not 4 one-on-one battles, it’s a 4 against 4. Forcing your opponent to focus down your offensive powerhouse while your support Pokémon disrupts, using a high damage Pokémon to eliminate the threat to your defensive win condition, using a Pokémon that is disruptive to put your opponent out of position before going into a Pokémon with high damage output– these are all ways that good Pokémon can bring out the best in their teammates.
Aaron Z.
Before diving into my personal definition, I want to quickly go over my personal philosophy regarding “good” Pokémon. I strongly believe that you can make any Pokémon work competitively. HOWEVER, you have to work a LOT harder to make certain Pokémon work, which can make the game more challenging for you.
My general principles for good Pokémon are as follows:
- The Pokémon generally matches up well vs. most of the common Pokémon in the format (e.g. you can hit most Pokémon for neutral damage, you don’t get OHKOed by the most common threats)
- The Pokémon commands pressure while it’s out on the field, ideally with no setup required (e.g. Zacian-C can hit almost every Pokémon for at least neutral damage and doesn’t need speed control or an attack-boosting move to deal large amounts of damage)
Looking at it from the opposite side, here are some problems that I generally tend to see in Pokémon that I don’t consider good.
- The Pokémon needs to use a setup move or item in order to deal substantial damage
- The Pokémon needs a certain field state (e.g. weather, Trick Room/Tailwind) to succeed
- The Pokémon does not match-up well vs. a significant number of common Pokémon
- I generally don’t feel like I have “safe” or “consistent” plays to make with the Pokémon & feel like I constantly need to make hard predictions to gain an advantage with it
- The Pokémon lacks good move coverage, resulting in it relying on too many attacks of the same type
However, I think one thing that’s really tough about Pokémon is that it’s hard to distinguish where your exact weaknesses are. It can be in team-building, in team preview, making good predictions, etc. I generally find that when you use “good” Pokémon, it’s a bit easier to see where the holes in your game are. (As a converse - when you use Pokémon that are not as “good,” those Pokémon often directly contribute to making the game more difficult at every stage)
I also think that there is a common misconception that “good” Pokémon are all common. That’s often not the case. Sejun Park won the 2014 World Championships with Pachirisu, which saw very little play throughout the season. I’d argue that Pachirisu fits under my definition of good – it just flew under the radar for most people that season since it saw so little usage. Thus, don’t make the mistake of thinking that any uncommon Pokémon is bad - there are plenty of other Pokémon/sets like Pachirisu waiting to be discovered.
Wrapping Up
There is no one truth to what makes a Pokémon good or worth using. We improve at this game by learning endlessly, especially from each other. Chances are that your principles are different from the person you’re talking to. Having a discussion about your opinions with people who are at a similar place in their Pokémon journey is, in my mind, the best way to improve at this game, and the best way to find the success that you seek.
Synergy
A look into how Pokémon sometimes work well together and sometimes don’t.
Written by Wolfe Glick Synergy is a broad term used in teambuilding to talk about how well your Pokémon work together. Specifically, how well do they cover for each other’s weaknesses and enable each other’s strengths? Because VGC battles are complex and dynamic, these symbiotic relationships can play out in many different ways. Here are a few quick examples of synergy:
- Weather Setter and Weather Sweeper (e.g. Politoed + Kingdra): Politoed’s Drizzle Ability sets up the rain for Kingdra’s Swift Swim ability and Water-type attacks, and can further boost Kingdra’s attacks with Helping Hand
- Fake Out and Trick Room (e.g. Incineroar + Dusclops): Using Fake Out causes one of your opponent’s Pokémon to flinch, meaning an ally Pokémon can use Trick Room more easily
- Trick Room setters and slow attackers (sweepers) (e.g. Cofagrigus + Conkeldurr):Using Trick Room allows other slow attackers to move first
- Intimidate and frail partners (e.g. Landorus-T + Raichu): A Pokemon with Intimidate drops opponent’s Attack, meaning that ally Pokémon with lower physical Defense stats have more breathing room
- Pokémon that slow the pace of the game down and Pokémon that like to set up (e.g. Grimmsnarl + Tapu Fini): One Pokémon slows your opponents momentum by reducing their damage output, while the partner becomes gradually stronger.
These Pokémon combinations play out in different ways, which demonstrates the scope of synergy’s effect on a battle. Furthermore, as you can see above, the synergy between the Pokémon depends on what each contributing Pokémon is capable of– typing, stats, moves, and abilities all affect how your team will work together. The synergy between two or more Pokémon is roughly broken down into two main categories: offensive synergy and defensive synergy.
- Offensive synergy: How do these Pokémon complement each other offensively? (Taking knockouts, dealing complementary damage, giving each other more opportunities to attack)
- Defensive synergy: How do these Pokémon complement each other defensively? (Switching in for each other, shoring up each other’s weaknesses)
These synergies are not binary: different Pokémon combinations will have different amounts of offensive and defensive synergy. To return to our examples above:
- Politoed and Kingdra: This pair has offensive synergy with its strong and fast Rain-boosted attacks. However, Politoed and Kingdra don’t really have defensive synergy: they are weak to similar attacks, and can’t protect each other from Pokémon that threaten super effective damage.
- Fake Out and Trick Room: We wouldn’t really classify Fake Out with Trick Room as a defensive synergy, although it allows the attack to go off, so this combination is synergistic to some extent.
- Trick Room setters and slow attackers (sweepers): This is a purely offensive synergy; when Trick Room gets up, the slow attackers move first.
- Intimidate and frail partners: This is a defensive synergy: Intimidate allows the defensively weak partner to attack in situations where it may otherwise be threatened.
- Setup and Slowdown Pokémon: These Pokémon are often naturally defensive, and by working together, they can increase their defensive position while gradually threatening offense.
Offensive and defensive synergy are ultimately defined by how the Pokémon work together towards your goal of winning the battle. Do these Pokémon work together by taking knockouts at a brisk pace or by firing off strong attacks that opponents can’t withstand? Or do they work together by tactically covering each other’s bases, positioning and grinding out the opponent until you reach certain victory?
In the rest of this article, we’ll talk more in detail about offensive and defensive synergy, and discuss pitfalls and other contextual factors of synergy in teambuilding.
Offensive Synergy
Offense in Pokémon is all about moving before your opponent, dealing huge amounts of damage, and taking knockouts. Offensive synergy, then, is all about how your Pokémon work together to accomplish those goals. Here are a few ways that Pokémon can do that together:
- Complementary damage. Pokémon synergize offensively if they each threaten different subsets of the pool of available Pokémon with their damage output. If they can work together to take key knockouts or to make switching difficult for your opponent, you’ll have a great offensive position.
- Cover a weakness. If you like the pace that one Pokémon deals damage at, add a Pokémon which can knock out one of its central weaknesses to sit next to it.
- Overwhelming damage. The prior strategies focus on attacking different areas of the type chart. On the other hand, it’s possible to achieve such a high level of damage that the defending Pokemon’s types almost don’t matter– you’ll knock them out regardless. Stacking modifiers such as boosts and Helping Hand are key to this sort of strategy.
Offensive synergy is not only about the attacking power of the Pokémon you’re using– they should use strong attacks that hit large swaths of the available Pokémon for significant damage– but the pace at which these Pokémon attack. Remember, to knock a Pokémon out, you’re going to have to either withstand an attack or move first. Speed and priority are important factors for offensive synergy as well.
Offensive synergy is not the same as setup, which is a different strategy. For example, Dragapult’s Surf does not have offensive synergy with Coalossal: it sets Coalossal up, but has no other effect in battle (outside of weak spread damage). All of the damage is being dealt by Coalossal in this case. Dragapult’s Dragon Darts may in fact synergize offensively with Coalossal; it can finish off Pokemon that Coalossal might have barely missed knocking out, and it deals boosted damage to Dragon-type Pokémon that might resist some of Coalossal’s attacks. Offensive synergy is about how the Pokémon work together to knock out threats.
EXAMPLE
One of the best examples of offensive synergy is Primal Groudon + Xerneas: Xerneas’ Fairy attacks are resisted by Poison, Steel, and Fire - all 3 of which Primal Groudon hits for super effective damage.
Normally Groudon and Xerneas synergized well by eliminating the others’ threats - Groudon could KO pesky Steel-type pokemon like Bronzong and Stakataka, or other threats like Amoonguss, while Xerneas was able to deal enormous damage to Pokemon like Kyogre and Rayquaza. The key to these two Pokemon working together was that they were nearly impossible to stop without losing key resources - resources that very often were neaded to stop the other part of the duo.
While Groudon and Xerneas normally worked best when paired with support Pokemon, clearing the way for the other to sweep, they also exerted enormous offensive pressure when on the field together. In this match, Gabriel Agati uses their Choice Scarf Ditto to copy their opponents Groudon and pairs it with their own Xerneas. This combination allows Gabriel to deal enough damage to clean up the game once the Xerneas is knocked out.
EXAMPLE
Pokemon have poor offensive synergy if having them on the field together doesn’t threaten many additional Pokemon in the format as having only one of them on the field. One example of this is Xerneas and Ferrothorn. Once boosted, Xerneas can deal with nearly any Pokemon that doesn’t resist its attacks, and unfortunately Ferrothorn offers nothing to help with the Fire and Steel types that are often used in response to Xerneas.
Defensive Synergy
Conversely, defensive synergy is all about achieving defensive goals that move you closer to victory. It’s tricky to play defensively in Pokémon (especially VGC) – it’s harder to take damage and win than to deal damage and win. Defensive play is about switching your Pokémon smartly, taking attacks, and navigating to positions where your opponent can’t break your defenses.
An important aspect of defensive play is “switchability”, or the ability of one Pokémon to switch in for another. Switchability is a factor of many attributes, but most importantly typing and base stats. Two Pokémon are defensively synergistic if they can switch in on attacks that would threaten each other without taking much damage.
EXAMPLE
A set of Pokemon that share defensive synergy can be the basis for constructing a team and form a core. A synergetic core is a predetermined set of synergies in typing that work together - some most famous examples are the Fire/Water/Grass core (featuring Fire-, Water-, and Grass-type Pokemon) and the “Fantasy”core (Fairy-, Dragon-, and Steel-type Pokemon). These are a blueprint of typings that naturally cover each other well, and many players use them to give direction in teambuilding.
For example, Primarina and Ferrothorn have good defensive synergy - Primarina can switch into the Fire- and Fighting-type super effective attacks aimed at Ferrothorn, and Ferrothorn can switch into the Electric-, Grass-, and Poison-type super effective attacks aimed at Primarina. Both Pokemon also have excellent defensive stats. An example of poor defensive synergy is a team of all Fire-type Pokemon– if an opponent has a threatening Ground-, Water-, or Rock-type, you won’t have the ability to play defensively and conserve your Pokemon.
EXAMPLE
Switchability isn’t limited to typing. Even though Pokemon like Dusclops and Porygon2 don’t resist too many types, they can still be used effectively defensively due to their natural bulk and recovery. Conversely, Pheromosa with its atrocious bulk never has good defensive synergy with anything else, because its defensive stats are too low.
In Double Battles, where you have two Pokémon on the field at a time, it’s not enough to have great defensive stats or to resist a Pokemon’s attack– an opponent may just end up targeting your partner Pokémon! Some of your Pokémon may have abilities that boost your whole team’s defenses or drop all of your opponent’s offensive capabilities. Examples include the moves Light Screen and Reflect, and the ability Intimidate. Smart use of these tools can prevent your opponents from breaking through both of your Pokémon on the field— not just the user.
Although Follow Me and Rage Powder are great defensive tools, we wouldn’t call them defensive synergy. Amoonguss’ Rage Powder does not have defensive synergy with Xerneas, but rather allows Xerneas to set up. Instead, Amoonguss has great defensive synergy with many Pokemon because of its Grass and Poison typing– it can make use of that typing to switch in and threaten opponents with Spore.
Anti-Synergy
Anti-synergy is the term for when your Pokémon get in the way of one another, and it’s surprisingly common. Pokémon like Tapu Fini have anti-synergy with Amoonguss - Amoonguss wants to use Spore to put foes to sleep, but Tapu Fini’s Misty Surge prevents status conditions. Having multiple weather setters or terrain setters can also be an example of anti synergy. Prankster Pokémon or Pokémon that employ strong priority moves have anti-synergy with Psychic Terrain setters Indeedee and Tapu Lele. Some anti-synergy is generally acceptable on a team (though not ideal), such as teams that use both Tapu Fini and Amoonguss.
Metagame
The types of synergies you need, especially in reference to typing, vary depending on the metagame. There are certain formats where playing without a Steel-type Pokémon can make your life very difficult, and there are other formats where Steel-types are totally optional. There are some formats where you want to make sure you’re using as many different typings as possible, and other formats where traditional rules and assumptions about typing go out the window. There’s no blueprint for the types you need when building, even if some types go together better than others.
If you aren’t sure which synergies to start with, take a look at teams that are performing well in the current format. Pay attention to how many teams share common types– for example, do most teams have a Steel-type Pokémon? Are there common pairings beyond just the individual usage stats, or does anything else jump out at you (is Intimidate on every team? Does every team have Taunt?) As you become more comfortable with the game you’ll be able to form your own inferences about what is needed in a format.
Wrapping Up
This may seem like a lot of information, but the short version is: you want to make sure the Pokémon on your team work well together, and at the very least don’t get in the way of one another.
Cores and Modes
Learn about how we look at some of the relationships between Pokémon within a team.
Written by Wolfe Glick A core is a group of Pokémon that synergize so well that their synergy is a defining factor of how your team plays. The Pokémon in a core often aid each other both offensively (hitting different parts of the type chart for super effective, working together to take KOs, etc.) and defensively (switching in on super effective/threatening attacks for each other).
Really, a core is simply a natural extension of the synergy that you’ll build into your team at the beginning of the teambuilding process. Defining a core is practically useful to think about during teambuilding because once you have established a core, it can provide direction for your team, and you can base your remaining Pokémon slots on supporting its strengths and covering its weaknesses
EXAMPLE
I started my 2012 Worlds Team with the core of Heatran and Cresselia. This core worked exceptionally well together defensively, with Cresselia using Skill Swap to remove Heatran’s Ground-type weakness, Sunny Day to remove Heatran’s Water-type weakness, and Psychic typing to help with Fighting-type Pokemon. Heatran also (at the time) resisted all of Cresselia’s Bug-, Dark- and Ghost-type weaknesses.
This pairing worked well offensively too - Cresselia threatened the Fighting-type Pokemon that Heatran feared, could use Sunny Day to increase Heatrans firepower, and utilized Icy Wind which had the dual purpose of slowing down opponents and hitting popular Ground-type Pokemon for super effective damage.
How do I make a core?
If you already have an idea for the start of your team, the core of your team is going to be the Pokémon that support it and bring it closer to being battle-ready. We have a guide to making cores in Step 2 of our teambuilding guide.
Classic Cores
Many cores are specifically useful within the format they are created in, and may be less useful in other formats because they are taken out of context. However, a few cores have classically cropped up across many formats, and they are worth paying attention to.
Fire/Water/Grass Core (FWG)
Although you may first think of the Route 1 choice between the starter Pokémon, Fire-type, Water-type, and Grass-type Pokémon all resist attacks that would otherwise hit each other for super effective damage. These cores usually lend themselves well to bulky offense, because each Pokémon has to be able to switch in and take an attack to make full use of the natural defensive synergy. There are usually standout Fire-, Water-, and Grass-type Pokémon in any given format, and it’s easy to pair them together on a team that’s focused on switching and positioning Pokémon carefully.
EXAMPLE
The Fire-Water-Grass core has been prolific in many VGC formats, but one where it was the most influential was VGC17. In 2017, the most common version of this core was Arcanine, Tapu Fini, and Kartana, often referred to as AFK. These three not only had incredible defensive synergy, but they also offered useful utility for the rest of the team. Arcanine was arguably the best Intimidate user, and Tapu Fini’s Misty Surge ability was incredibly valuable in a format with lots of status and opposing terrains.
These Pokemon worked well together both defensively and offensively - one example of this is the fact that Tapu Fini and Kartana perfectly resist each other’s weaknesses. On top of having synergistic typings and abilities, these three Pokemon also had complementary base stats. Kartana’s paper thin Special Defense stat could be protected with Tapu Fini’s naturally high Special Defense, and Tapu Fini’s comparably lower physical Defense was protected by both Kartana’s rock-solid base Defense stat as well as Arcanine’s intimidate. This core also made use of one physical attacker (Kartana), one special attacker (Tapu Fini), and one Pokemon that could go either way (Arcanine). Lastly, the Speed stats of this core were able to cover a wide swath of the format - Tapu Fini was typically middling Speed, Arcanine often ran max Speed allowing it to outpace much of the middle of the format, and Kartana was one of the fastest legal Pokemon.
This core was not strong ONLY because of the typing of the Pokemon. There were many factors involved in allowing this specific combination of Pokemon to be as oppressive as it was. That being said, the typing of the Pokemon involved absolutely was a contributing factor to how prevalent this core was in VGC17.
To see this core in action, check out this match between myself and Tobias Koscitzki from the 2017 Pokemon World Championships.
Dragon/Fairy/Steel Core
Dragon-type, Fairy-type, and Steel-type Pokémon all have useful defensive and offensive typing– and it turns out that their defensive synergy pairs quite nicely. Furthermore, Pokémon of these types tend to have high base stat totals, so they tend to synergize well together.
EXAMPLE
While not quite as famous as the Fire-Water-Grass core, the Fairy-Dragon-Steel (or fantasy) core is quite powerful in its own right. One format where this core was especially popular was VGC14. One of the best Pokemon in the 2014 format was Aegislash (who has since received a nerf), and many players looked for partners that paired well with it. Hydreigon and Aegislash have perfect defensive synergy - Hydreigon resists the Ground-, Fire-, Ghost-, and Dark-type weaknesses of Aegislash, and Aegislash resists the Fighting-, Dragon-, Fairy-, and Ice-type weaknesses of Hydreigon. Add to this potent defensive synergy a strong Mega-Evolution in the form of Mega Mawile and you have a core with a strong offensive and defensive backbone.
What I personally really like about this core is that to me it feels more flexible than the Fire-Water-Grass core. Fairy, Dragon, and Steel all have good defensive synergy with each other, but picking two out of the three types will still offer a lot of value in most formats.
While most teams in the 2014 format that utilized these typings well had two of Aegislash, Mawile, and Hydreigon, Markus Liu brought the Fairy Dragon Steel core to Worlds 2014 (and finished in the top 4) with Azumarill, Mawile, and Hydreigon. You can see how they use the pieces flexibly in their top 8 match, bringing Mawile and Azumarill in the first two games and Hydreigon and Azumarill in the third
Modes
A mode can either refer to a mode at teambuilding or during battling.
Teambuilding modes
A teambuilding mode can refer to two (sometimes three) Pokémon that work together in a way that the rest of your team doesn’t.
- Two Pokémon that are often led together (e.g. Politoed and Kingdra are a team’s rain mode)
- Two Pokémon that work well together, but are kind of disjoint from the rest of the team (Indeedee-Female and Hatterene can be a faster team’s Trick Room mode)
Modes operate differently on your team than cores will: when a few Pokémon are your team’s core, your team works around them and highlights their strength. Pokémon in a mode stick out– often, they work together explicitly, and might not work as harmoniously with the rest of your team. This doesn’t make them bad choices - often modes are quite powerful, but sometimes they might work together awkwardly with the rest of your team, and you might be constricted on which Pokémon you can lead, which you can bring in the back, and which you can take to battle together.
EXAMPLE
In 2018, Sweden’s Nils Dunlop finished in the Top 4 at the World Championships with a team that featured Mimikyu and Snorlax. This team was overall quite fast - Tapu Koko, Choice Scarf Landorus-Therian, Jolly Mega Metagross and Jolly Mimikyu were all heavily invested in their Speed stats. However, Nils added Trick Room on his Mimikyu and paired the support that Mimikyu offered with Trick Room and Z-Destiny Bond (Which redirected all opponents attacks to the user for one turn) with his Belly Drum Snorlax, creating an extremely threatening Trick Room Snorlax mode on his otherwise fast team.
When should I add a mode to my team?
If you have a core of three or four Pokémon that work well together, a mode might add some depth and variability to your team, because then you can do one of four things:
- Play your core the way you originally intended it
- Lead with your mode, and finish off with core Pokémon in the back
- Lead with core Pokémon, and bring your mode Pokémon in back for a momentum shift on switches
- Flexibly integrate your mode into your core’s play (mix core and mode Pokémon in front and back)
However, be careful with modes:
- Modes can restrict your options during team preview. For instance, if you have a Trick Room mode on your team (e.g. Porygon2 and Escavalier), and if you have a Pokémon that only works in Trick Room (Escavalier), you’re always going to have to bring it with your Trick Room setter, or hope your opponent sets up Trick Room for you. This can make your team feel like it doesn’t mesh together very well.
- Sometimes modes can give you fewer options for picking lead and back Pokémon. For instance, if two Pokémon need to come next to each other, you’ll only be able to lead them or bring them in the back next to each other. This also reduces flexibility.
- When your team only has a few lead options, at best, your opponent will respect your mode and make a game plan for it, or at worst you might telegraph all of your viable leads to your opponent from team preview.
Battling modes
A battling mode is a set of Pokémon on your team that form a game plan that you can reuse in a lot of different battling scenarios. Coming up with these modes can save you time during the team preview stage of the game. Similarly to cores, battling modes are all about how your Pokémon synergize together: the difference here is practical. Core refers to the Pokemon’s synergy in the abstract based on your work during the theorymonstage, and battling modes are about what you actually intend to bring to games, and how does that game plan actually work out?
EXAMPLE
For instance, if your team is Urshifu-Rapid-Strike / Landorus-Incarnate / Incineroar / Amoonguss / Xerneas / Rillaboom, you might call leading Xerneas / Rillaboom with Incineroar / Amoonguss in the back your Xerneas setup mode. If you instead wanted to focus on dealing damage early with less of a focus on setting up, you might instead go with something like Urshifu / Landorus in the front with Xerneas / Rillaboom in the back. You might call something like this your late-game Xerneas mode.
How do I find battling modes on my team?
Unlike a teambuilding mode which is an intentional choice in teambuilding, battling modes are often (not always) found in practice. Some of the questions you can ask yourself to figure out what the modes are on your team include:
- Do I find myself always feeling like I need to always have the same four Pokémon in certain matchups?
- Are there Pokémon on my team that I’ve found work especially well alongside each other in battle?
- Are there Pokémon on my team that feel like they need another team member or they can’t be used well?
- After picking my leads, do I find that I often know which two Pokémon would work best in the back?
Wrapping Up
Distinctions like cores, teambuilding modes, and battling modes are useful conceptual tools to think about how the Pokémon on your team synergize. You don’t need any one of them, and if you don’t end up thinking about the game this way, that’s totally okay. These terms broadly capture the different relationships that Pokémon on your team have with each other, and they can be useful when you’re diagnosing an issue on your team– is your core solid? Do you have a mode (or even two or three!), and does it mesh well with the rest of your team? Thinking in these ways can lead to a deeper and more fluid understanding of your team.
Archetypes
Learn about the broad strokes with which we classify teams.
Written by Aaron Traylor Sometimes, a strong core will become popular, and people will iterate on it and optimize for partners that minimize its weaknesses. At this point, many players will have similar teams built around the same Pokémon and goals, and those teams will likely succeed at a variety of events and tournaments, although they are rarely exactly alike. At this point, we refer to this core as an archetype.
Typically, archetype refers to a core with defined strengths and weaknesses that really defines a team and isn’t just a “backbone” or “glue Pokémon”. This is because all of the teams within an archetype will have similar goals and typically play in similar ways.
EXAMPLE
Fire/Water/Grass cores, while popular, usually appear on many different archetypes rather than being an archetype themselves. In Series 10, Incineroar, Urshifu-Rapid-Strike, and Rillaboom formed a powerful Fire/Water/Grass core. However, these Pokemon aren’t really an archetype together; but Zacian alongside those Pokemon formed a popular archetype, colloquially referred to as “Standard Zacian”. This is an example of what a “Standard Zacian” team might look like.
Pay attention to archetypes– as the metagame for a format develops, many archetypes will become too popular to ignore, and you’ll see them frequently in both ladder and tournament battles. At the beginning of a format, not many archetypes will be established, as players are experimenting and iterating on their best ideas, but as time goes on, a metagame will form around these archetypes. If the metagame is decentralized, the archetypes will be more varied. If the metagame is centralized, there will be fewer archetypes; but they will be very well-optimized and challenging to defeat.
That being said, not every team will lie within a known archetype, and while it’s good to have a rough idea of how the archetypes work, they aren’t a complete snapshot of a format. Don’t feel like you have to start with an archetype when you’re building your own team!
How do I identify popular archetypes?
The best place to look is tournament results, for two reasons– first, the teams there have proven success (because they placed highly in the tournament). Second, players tend to take tournaments seriously, so you can learn about what other players think is their best shot of winning by looking at what they bring to events. Check out Victory Road for recent tournament results.
How should I think about archetypes when teambuilding?
During teambuilding, you’ll want to consider the popular archetypes (maybe by making a threat list) and how your team handles them. This will provide constraint, because it will quickly become apparent (either in theory or in practice) which archetypes your team struggles against, and then you might have to edit your team. Many archetypes that gain popularity are quite strong. Good answers to popular archetypes may be rather hard to find, and usually aren’t as easy as finding one perfect Pokémon that matches up perfectly. Working to find teambuilding solutions to popular cores is perhaps the most challenging and rewarding part of VGC.
If a particular archetype interests you when building your own team, the strengths will be well-known, which will give you ideas and maybe even a starting point for your team. However, the weaknesses of that archetype will also be well-known– and it’s fun to try to solve those problems yourself. If this path interests you, we recommend working through the archetype as if you were building it from scratch yourself, and not slapping on any Pokémon or taking anything for granted. Why is each Pokémon added? What’s necessary, and what could be optimized? This will not only give you a better understanding of how your team plays out, but maybe you will find a cool new direction for the team that others may have overlooked.
Wrapping Up
As players learn and grow in a format, they’ll begin to understand what Pokémon work extremely well together, and make teams based around that combination’s fundamental goals. These archetypes often define the metagame, and they will wax and wane in popularity as time in a format goes on. You don’t have to use a core from an archetype, or treat the current archetypes as some sort of unwavering standard; but understanding what each archetype is meant to do lets you put the current metagame in concrete terms. From there, even though teambuilding itself might not be any easier, it will be well-defined– and you’ll understand your team and its performance much better.
Consistency
Lose less often to bad luck.
Written by Wolfe Glick
What is consistency?
Pokémon is a game that in every way contains variation– your opponents’ knowledge and tendencies vary. The Pokémon on your opponent’s teams vary. If given the same situation two different times, an opponent might make two different choices. Your luck will vary from day to day.
Consistency, then, is about finding victory no matter what variation stands in your way. Consistency can be searched for in any aspect of Pokémon:
- Consistency in teambuilding. Reduce reliance on random chance in battle from the teambuilding stage.
- Consistency in strategy. Find strategies that are so powerful that you can execute them reliably, even versus opponents who know they are coming or who have prepared counters.
- Consistency in play. Choose actions that give your opponent no opportunity to counter them, regardless of the choices they make. Furthermore, make your odds to win the battle as high as possible, and leave little to chance.
Consistency is very challenging to achieve, and is more of an ideal than a reality in most cases. However, consistency is a very useful goal to be in search of, and chasing it will help you to form good habits in both teambuilding and battling. We’ll define what consistency means to us and how we approach it ourselves.
Consistency in Teambuilding
You will win more games by reducing variance in general, and you can reduce the amount of variance in your battles at the teambuilding step: we expand on this idea more generally in this article.
If you can use a move on your team to stop opponents’ setup, gimmicks, or hijinks in general, we’d say that that move is consistent– no matter what your opponent is trying to do, you have tools to stop it cold in its tracks. These moves reduce your opponents’ options. We’re talking about moves like Fake Out, Taunt, Haze, and Safeguard. Not every utility move works consistently, though– Lucky Chant only helps you in a small margin of games. Roar always moves last, and is reactive– if your opponent uses a damaging move, you might end up taking damage and giving them a free switch.
Consistency in Strategy
A strategy is consistent if it can be executed no matter who your opponent is, what knowledge they have about the game, or how thoroughly familiar they are with your team– maybe they’ve even played against it a few minutes ago! There are, of course, many strong opponents out there, but there are also plenty of strong Pokémon, and even the toughest opponents will have to tread lightly against them or risk defeat.
A consistent strategy is in direct opposition to a gimmick, which is a strategy that cheekily attempts to take advantage of an opponent’s lack of knowledge or preparation. Gimmicks are fun to use, but they may not be optimal for best of three play or a long tournament versus strong opponents, and we aren’t well-versed in their use. A strategy stops being a gimmick when it works regardless of your opponent’s knowledge.
When I review other people’s teams, one of the first things that I do is attempt to get a handle on how consistent their strategy is. Here are some questions so that you can guide yourself through this process. Remember again that consistency isn’t a binary, and it is often an ideal rather than an achievable goal, so don’t be too hard on yourself if you can’t answer all of these questions positively.
Consistency Checklist
Theorymonning:
- Does the thought process behind this decision make sense to me?
- (optional) Does the thought process behind this decision make sense to my friends?
Ladder play:
- Can I consistently beat people on the ladder with my team? More so or less so than other teams I have built?
- How common are the Pokémon that my teambuilding choices shine against? How common will they be at the tournament I compete in?
- Are there particular combinations of enemy Pokémon that I have no hope of defeating? How common are they on the ladder / at the tournament I will compete in?
- If I run into the same opponent twice, how does the second game go? If I feel my opponent knows what I want to do, does that affect whether or not I can use my strategy?
Best of 3 practice:
- Can I consistently do well against people who don’t know anything about the decisions I’ve made in teambuilding or about my strategy?
- Can I consistently do well against people who know what the decisions I have made are, but haven’t prepared for them in teambuilding?
- Can I consistently do well against people who know what the decisions I have made are, and who have prepared to beat them either with a detailed game plan or modifications to their team?
Consistency in Play
Consistency in play is about reducing variance during a battle on your path to a win.
- In team preview, can you find a lead that works against your opponent’s strategy no matter what they lead?
- In battle, can you avoid relying on luck? (for example, if you need to hit a Sleep Powder or lose the game– can you find another path through the battle?)
- During any given turn, can you find a move that works no matter what your opponent does?
- If you’re close to closing out a game, can you find a path to a win 100% of the time (or as close as possible?)
EXAMPLE
One Pokemon that is inherently inconsistent is Venusaur, in large part because of its reliance on the move Sleep Powder. Sleep Powder is only 75% accurate, meaning using it is a big gamble. One way to make yourself less susceptible to bad variance is to only click Sleep Powder in certain conditions - when missing it isn’t costly, for example, or when you need to hit it in order to not lose the game. By minimizing the times you click Sleep Powder unnecessarily, you also reduce your odds of losing to Sleep Powder missing.
Wrapping Up
At times, it can feel like Pokémon comes down to random chance, and losing in those scenarios can be discouraging. Luck is a part of Pokémon that we can’t ignore. However, by giving luck its due, and focusing on reducing variance at every stage of the game, you’re minimizing the impact that luck will have on your performance.
That’s not to say that consistency is at all easy to achieve. In fact, searching for consistency is probably one of the toughest perspectives with which to approach the game. Many people can win a game in its final turns 90% of the time, but it takes a great deal of knowledge and foresight to navigate to endgames where you win 99% or 100% of the time. We’ve spent a good deal of our lives in pursuit of this kind of excellence. When you’re analyzing your performance, no matter how the battle went, you’ll nearly always find a better way that you could have approached it from a viewpoint of consistency. In a way, hunting for consistency is a method of imposing control on the uncontrollable. That’s part of what we love about competitive Pokémon.
Your Team Determines Your Luck
Never lucky? The choices you make when teambuilding affect your luck in battle.
Written by Wolfe Glick How “lucky” or “unlucky” you are in Pokémon is determined by a lot more than your karma or random variance. There’s a lot that goes into whether a player is “lucky” or not, much of which is within a player’s control. While this concept might be easy to understand in theory, it is difficult to internalize, even for the most advanced players. This article will cover the teambuilding part of improving your luck.
Take Control of the Odds
There’s a lot of potential variance in Pokémon - critical hits, secondary effects, damage rolls, and accuracy are just some of the ways that make predicting the outcome of a turn difficult. However, there are certain things you can do as a teambuilder to nudge the game to favor you more or to punish you less. For example, you can select more accurate moves instead of less accurate moves.
EXAMPLE
Many Pokemon rely on high power moves that have accuracy lower than 100%. One option players have to avoid losing games due to missing a move is to run both the stronger, less accurate move and the weaker, more accurate move on the same Pokemon. Mega Charizard-Y would normally run a combination of Protect/Flamethrower/Solarbeam/Overheat(or Heat Wave/Fire Blast) in the 2015 and 2018 formats, for example. This is also seen occasionally on Pokemon with choice items and Pokemon with the Assault Vest, such as Draco Meteor and Dragon Pulse on Choice Scarf Salamence in 2014.
To be more direct, a player who prioritizes accurate moves in the teambuilding process is far less likely to lose games due to missing a move than a player who does not. This isn’t to say accuracy is the end-all, be-all of teambuilding - sometimes you need to run an inaccurate move to bring out the maximum value in a Pokemon. That being said, whenever you choose to use a move that is not a guaranteed hit you should be thinking about whether you are likely to have alternatives (such as Dragon Pulse and Draco Meteor on the same Pokemon) as well as the scenarios where you will be forced to rely on the move.
Act First
Moving consistently after your opponent (having a team with poor Speed control) is implicitly risky. By moving after your opponent you’re risking critical hits and secondary effects (Scald burns, Thunderbolt paralysis, Muddy Water accuracy drops, etc) that might be prevented by attacking first. One of the best ways to ensure you avoid negative RNG is to knock out your opponent’s Pokemon before it can attack - after all, a fainted Pokemon can’t crit or flinch you. To set up opportunities for your Pokemon to move first, focus on speed control with fast Pokemon, the item Choice Scarf, or moves such as Tailwind, Icy Wind, and Trick Room.
EXAMPLE
One of the most classically terrifying Pokemon to face in VGC is a Landorus-Therian holding the item Choice Scarf and knowing the move Rock Slide. Although Choice Scarf Landorus-Therian had a variety of other uses in VGC 2015 and VGC 2018, no matter how close its trainer was to a loss, this Pokemon could nearly always wedge a small leg in the door of defeat by moving first and threatening flinches with small percentage chances. Choice Scarf Landorus-Therian shows the power of the odds granted to a player when their Pokemon move first, and the respect that Speed commands.
With the release of Brilliant Diamond and Shining Pearl, a grassroots metagame sprang up featuring only Pokemon released in gen 4 and before. In this match in top 16 of the tournament, you can see me make a 2-4 comeback thanks to some extremely fortunate RNG as my Garchomp and Tyranitar outsped all of my opponents Pokemon.
Pay Attention to Team Composition
Certain playstyles can also be more susceptible to poor luck. If a team is very fast and frail, a single bit of bad luck can cause a domino effect that can cost the whole game. However, a team that is too defensive can lose too much offensive presence by a surprise knockout or status effect. Additionally, a team that is stretched too thin and relies too heavily on any one Pokémon for a specific matchup is susceptible to losing games due to a single bit of bad luck.
EXAMPLE
Tapu Fini’s Misty Surge effect is sought-after among players looking to reduce their odds of random Burns, Paralysis, Freeze, or Sleep effects harming their Pokemon. Tapu Fini controls the odds in your favor: if you can’t get Frozen, there’s no way an end-of-game Ice Beam can ruin an otherwise ideal endgame.
However, certain Tapu Fini movesets can leave you at the mercy of luck, too. Tapu Fini doesn’t have a very high Special Attack stat, but it does have high defensive stats, and its offensive and defensive typing is very nice. Many players will choose to take advantage of these attributes by running sets focused on Calm Mind. The issue with Special Defense boosts is that they can leave you with a feeling of security– but while you’re setting up your often taking attacks, and the longer you take to KO your opponents the more chances they have to land a critical hit that can spell defeat. Tapu Fini can be strong after just one Calm Mind, but in some situations, it’ll stick around on the field long enough to be immensely threatening to your opponent– even after all of your other Pokemon have fainted. In an endgame situation where it’s facing down 2, 3, or even 4 opponents all by itself, the battle can become a race for your opponents to crit through your defenses.
Does this mean that you shouldn’t run Calm Mind on Tapu Fini? That’s absolutely not what we’re saying. Many players have accepted the long-run odds and found success with Calm Mind Tapu Fini. Ultimately, it’s up to you– the most important thing is to keep inherently accepted risk in mind when building your team.
Please enjoy this replay illustrating this concept (don’t ask about my team please I don’t know either)
See it in showdown here.
Wrapping up
Accuracy, Speed, and Playstyle are just three examples of many that influence whether luck will favor you on any given day. It is a mistake to think that just because we are all playing the same game we therefore should all have more or less the same luck. Certain players really are luckier or unluckier than others - not because they were born with something, but because of the decisions they made. The good news is if you consider yourself to be “unlucky” when it comes to Pokémon, it’s likely because you are making decisions that make you vulnerable to luck. As a student of the game you should be constantly assessing which of your decisions gives you the opportunity for good “luck” and which makes you vulnerable to bad “luck”. By paying attention and learning to identify decisions that improve your odds, you can change your luck for the better.
Accuracy vs Power
When do you want a more accurate move, and when do you want a higer power move? Lean about the tradeoff.
Written by Wolfe Glick When you’re building a team, one of the decisions you have to make is which moves you’re going to give your Pokémon. Each Pokémon gets 4 moves for a total of 24 across the team, and these moves are quite important as they will be your primary way of actually playing the game. So how do you know which moves are the best to use?
Two of the factors influencing which moves you choose are move power and move accuracy. These aren’t mutually exclusive - a move can be both powerful and accurate, however most moves with high base power (in general above 95) have drawbacks, and many of those drawbacks come in the form of decreased accuracy. Some common examples include:
- Thunderbolt (90 base power 100% accuracy) VS Thunder (110 base power 70% accuracy out of rain)
- Flamethrower (90 base power 100% accuracy) VS Fire Blast (110 base power 85% accuracy)
- Scald (80 base power 100% accuracy) VS Hydro Pump (110 base power 85% accuracy)
These moves are grouped together because they share a similar distribution, meaning most Pokémon that can learn the higher accuracy, safer move can also learn the less accurate and thus riskier version. So, how do you know which moves to choose for each Pokémon?
There are a couple philosophies when it comes to answering that question. Some players would tell you it depends on the damage calculations around the moves- if Fire Blast or Hydro Pump are necessary to pick up a knock out, then they are the right choice. Other players might argue that the higher base power move is better in general, or the higher accuracy move is better in general. There isn’t one right or wrong answer and if there were it would heavily depend on context, but for now I’ll tell you what I do.
EXAMPLE
Dragon-type special attackers, such as Duraludon and Hydreigon, often have a choice between Dragon Pulse, which has 100% accuracy, and Draco Meteor, which is stronger but only 90% accuracy. Most players prefer to run Draco Meteor alongside Protect and two coverage moves. However, when Draco Meteor is necessary, that move will miss 10% of the time. 10% might not sound like a lot, but you can easily play upwards of 30 games in any given tournament, and if you’re banking on hitting Draco Meteor to win you the game, that’s an expected value of 3 games lost if you only use the move once per game.
In this Game 3 match in the Top 8 of Worlds 2012, Ray Rizzo faces off against Jumpei Yamamoto. The winner of the match will advance on to the Top 4 of the World Championships, while the loser will be eliminated. Ray is in a really bad position, and is very likely to lose the game, when Jumpei’s Salamence misses Draco Meteor, allowing Ray to win the set and subsequently the World Championships.
I personally recommend setting an accuracy threshold - a minimum accuracy you aren’t willing to go below. Some players are comfortable using low accuracy moves. I personally have a soft threshold at 90% accuracy - I don’t even like using moves that are 90% accurate, but I’ll use them begrudgingly, and I try never to go below that. Obviously with any rule there are exceptions - I will often use Will-O-Wisp despite it’s accuracy being only 85%. These personal rules are things you should experiment with and they may grow or change over time - they should be a loose set of guidelines that serve as a baseline when making a decision about a team.
Some common reasons to dip below your accuracy threshold include:
- When a Pokémon has a more accurate version of a move already, such as Draco Meteor AND Dragon Pulse on the same Pokemon
- If there is no real substitute for a move (or the substitute is significantly worse), such as Groudon’s Precipice Blades or the move Rock Slide in general
- If you have a way of making a move more accurate such as Gravity + Hypnosis (or Z-Trick Room + Hypnosis in Generation 7), or Dynamax with inaccurate moves in Generation 8.
- If you’re a high risk high reward player who is comfortable losing games due to missing moves with the trade off of more power when you hit (I don’t personally recommend this)
- When your move isn’t often a move you rely on to win AND it can offer a big advantage when it lands such as Sleep Powder or to a lesser extent Will-O-Wisp
EXAMPLE
As we mentioned, sometimes a Pokemon has no real substitutes to an inaccurate move. As an offensive ground type move, most Groudon will run the move Precipice Blades. This move has a whopping 110 base power and hits both opposing Pokemon, but is only 85% accurate. You can shore up this shaky accuracy by being mindful when you choose to use Precipice Blades in battle, opting for your more accurate other moves (normally a fire move) when necessary, or by sacrificing a moveslot to run a weaker more accurate move like Stomping Tantrum. At the end of the day though, a Pokemon like Groudon will always be inherently susceptible to missing moves because there will be times you need to rely on Precipice Blades connecting. If the idea of losing a tournament because your moves missed is unbearable to you, I would recommend building around a Pokemon that is intrinsically more consistent.
Another example of this is often found on Venusaur. Venusaur is a powerful Pokemon in Sun thanks to its good offensive coverage, but its main selling point is its access to an extremely fast Sleep Powder. Sleep is one of the most debilitating status’ in the game, and it can easily swing matches when inflicted. The issue is that Sleep Powder (Venusaur’s most accurate sleep inducing move) is only 75% accurate. Because sleep is such a big selling point of running Venusaur, nearly all players opt to use this inaccurate move because of how influential it can be despite the risk.
One reason why I try to only use very accurate moves is because of how inaccuracy plays out across a tournament. In a tournament you could play upwards of 30 games, and when you make a conservative estimate that you’re using your 90% move once per game, if hitting that move is make-or-break you can easily lose 3 games or more over the course of a tournament due to your inaccuracy. Of course, the more inaccurate moves you run, the higher the odds are of losing in a tournament due to one missing, and as you’re never sure when your moves will miss in preparation, it’s best in my opinion to minimize the risk in advance.
Despite my tirade against inaccuracy, there are some circumstances when a Pokémon has no other choice but to use a move that is inaccurate, primarily due to there being no good substitutes for the move on a certain Pokémon.
EXAMPLE
While Groudon technically had some substitutes for its inaccurate Precipice Blades, there are some Pokemon where they simply were not given any alternatives. One of the best examples here are the Rotom forms. Rotom-Wash only has access to one Water type move: Hydro Pump. Moreover, one of the primary reasons to use Rotom-Wash is the water typing, defensively and offensively. Rotom-Wash is a Pokemon that will always inherently have risk built into using it because it is not a Pokemon that will often see success without using Hydro Pump, and there are no perfect solutions to the 85% accurate move.
Ideally I’d personally prefer to avoid these Pokémon, but sometimes they are the best fit for a team. In using these Pokémon you should understand that you are accepting some additional inherent risk, and should try and bake in some stability when possible such as not clicking the inaccurate move unless completely necessary or adding an alternative option when possible. In general I would recommend trying to use Pokémon that don’t rely on inaccurate moves, as they are more consistent in the long run.
The tradeoff between move power and move accuracy is just one of many things to consider when building a team, though the choices you make will resonate throughout your games. Don’t be afraid to experiment with different moves to learn what you personally are comfortable with!
Surprise Factor
When and how to make teambuilding choices that catch your opponents off guard.
Written by Wolfe Glick
Hidden Information in Pokemon
Information– how much you know about your opponents team– can play a major part of a Pokémon battle. In other multiplayer games like fighting games and chess, you know what options your opponent has at all times– these games are perfect information games. In contrast, Pokémon is an imperfect information game, in which you don’t know every option available to your opponent. In Pokémon, you can only know for sure what tools your opponent has access to after they have already revealed them.
Each Pokémon has multiple traits that can be altered depending on the player’s decisions - the moves, item, nature, and EV spreads are all customizable facets of the game. Importantly, these elements are not visible from team preview– you won’t know what your opponent chose until you find out during the game. Making a plan to defeat your opponent is dependent on knowing or assuming what decisions your opponent has made. Even decisions that may appear minor (e.g an unorthodox move or item, an unusual Speed stat) can have large implications in the way a match is played. This is one of the reasons why Game 2 or 3 in a best of 3 set will often play out very differently than Game 1 - the players have gotten additional information on their opponents team (and also on how their teams interact) and will often adjust midway through a set.
What this leads to in competitive Pokémon is an interesting tradeoff between:
- Consistency, as described in previous articles. In this context, does your strategy remain powerful even when your opponent knows the choices you made?
and
- Surprise factor: How influential are your choices when they are revealed to your opponent?
Surprise Factor
Surprise factor is a blanket term to talk about unorthodox options in Pokémon– as players figure out what is strong within a format, standardization occurs, and by deviating from that, you can catch people off guard. This can be as simple as switching around the way a Pokémon is trained - for example, going faster on a support Pokémon than expected. Other options include running an unusual move or item on one of your Pokémon or even running a Pokémon that isn’t popular in order to catch opponents off guard. You can also use Pokémon in tandem in surprising ways - two priority moves or a surprise boost to your partner to pick up a surprise KO are some examples of combinations that can quickly swing a match.
When considering how heavily you weight surprise factor, you should consider the type of tournament you are playing in. Typically, unorthodox options perform better when fewer games are going to be played. Some players consider Best of 1, where the set is over after a single game, to be “gimmicky”, as players are rewarded for winning games with options that are difficult to predict. Conversely, teams that don’t rely on surprise factor will often perform well in a 2- or 3-day best of 3 tournament.
Here are some direct examples of what we’ve described above:
- Switching around the way a Pokémon is trained: Ray Rizzo’s 2011 Thundurus. In 2011, almost all players ran Thundurus offensively (e.g. max Special Attack/Speed investment, no bulk, Electric Gem). For Worlds, Ray turned it into a defensive/supportive role, allowing it to spread Thunder Waves & survive on the field for much longer than expected.
- Running an unusual move/item: Wolfe Glick’s 2012 Cresselia. In 2012, Cresselia was often seen in a support role, designed to set up Trick Room. Wolfe won US Nationals using an offensive Cresselia with Hidden Power Fire & Expert Belt - this allowed it to deal much more damage than expected & even pick up surprise one hit knockouts.
- Running an unexpected Pokémon: Sejun Park’s 2014 Pachirisu. In 2014, Sejun Park won Worlds with Pachirisu, a Pokémon that was barely seen up until that point. As a result, few people knew their damage calcs well when going up against it. Sejun’s Pachirisu also enabled for some other surprise strategies on his team, such as Mega Gyarados, making it even harder to fight.
- Best of 1 oriented strategies: In VGC2020, there was a wifi tournament where a rather unusual Porygon2 set did very well. A Max Attack and Max Special Attack Porygon2 with 4 attacking moves won this competitive tournament by Dynamaxing the Porygon2 and catching opponents off guard with the sheer damage output. This is what a more standard Porygon2 looks like. To learn more about best of 1 oriented strategies, check out our full article here.
You might be wondering what surprise factor actually looks like in a tournament. Let’s take a look at two examples.
EXAMPLE
Wolfe Glick VS James Baek: It’s the 14th and last round of Swiss at NAIC 2019, and the winner will make Top Cut while the loser will likely be eliminated. Cut to the middle of the game and I’m in a tricky spot - I have no safe switch in for an incoming Spore from James’ Amoonguss. Knowing this, James goes for Spore into my Tapu Koko who switches to Incineroar, but the Spore fails to activate thanks to the Safety Goggles item. Both Aaron Traylor and I had Safety Goggles on our Incineroar, but despite playing over 40 games combined, this was the only time Safety Goggles activated the entire tournament. Because this was the first (and only) time the item activated all tournament, James likely didn’t cover for the item on Incineroar.
Full match and the Turn in question
EXAMPLE
Wolfe Glick VS Brandon Meckley: It’s the last round of Day 2 Swiss at Worlds 2019 and the winner will make Top Cut while the loser will be eliminated. I’m down a game and in a decent position to have a chance to win game 2, when Brandon reveals that his Groudon has the move Dragon Claw. Groudon deals enough damage to my Rayquaza to seal my defeat. Brandon concealed that he had this move until the most pivotal point and used the advantage to make Top Cut.
Full Match and the Turn in question.
What’s the Balance?
It’s worth noting that consistency and surprise factor aren’t mutually exclusive - in my opinion, some of the strongest options in Pokémon are tools that are extremely difficult to prepare for if you’re caught unaware, and are still strong after they’ve been revealed. There is a difference between making a choice in teambuilding that is unorthodox but you expect to be strong, rather than picking an option BECAUSE it is surprising and unorthodox.
For players who are new to the game, I wouldn’t spend much time worrying about this concept - you need to first learn what is standard before you can deviate from it. For players who have a good grasp of what is popular and who are considering making choices in order to catch their opponents off guard, here are just a few things to consider:
- Is the tournament best of 1 or best of 3? Best of 1 favors surprise factor
- How useful is my choice once my opponent knows about it? This can be a range from completely unusable to not affected at all
- What is my goal for this tournament? If you’re trying to win a tournament you’ll probably need more consistency, but if your goal is to top cut (advance past the first stage) surprises can go a long way
- What is the opportunity cost of choosing to deviate from the norm? This mostly applies to moves and items, but you should be asking yourself what you’re giving up in order to use something that isn’t standard, and you should be considering the benefits each one gives you
- How long is the tournament? The longer the tournament the more likely you are to run into somebody who already knows about your strategy
Common Pitfalls
There are several pitfalls to focusing on surprise factor as a main strategy. First and foremost, many players know what each Pokémon is capable of. Players commonly scour Pokémon’s information pages, trying to find a hidden edge or tactic that makes that Pokémon better– even if those same players roll up to a tournament using a completely standard team. Try not to rely on your opponent’s lack of Pokémon universe knowledge.
Second, in a best of 3 setting, your opponent will be able to adapt once the initial shock has worn off. You may need to rely on other aspects of your team, or to have multiple surprises in store for your opponent.
Lastly, your opponent may actually be able to infer some of your surprises. For example, if during team preview they threaten a Trick Room setup and sweep, and you lead seemingly unassuming Pokémon into their Trick Room setter lead, they may hedge that you have some move or hidden tactic that will disrupt their strategy.
On Open Team Sheets
Naturally, any tournament with open team sheets will have drastically fewer opportunities for surprises. Open team sheets typically include everything about a Pokémon except for their IVs, EVs, and Natures, which end up being the only opportunities for surprises.
Wrapping Up
Adding options focused on surprise factor is a stylistic choice that differs from teambuilder to teambuilder. Catching opponents off guard is definitely something to consider when building a team, but surprise shouldn’t be the primary driving force when starting. When I build teams, I focus on picking strong Pokémon that I believe in– and if those Pokémon happen to do something out of the ordinary, all the better.
Metagame
What does metagame mean to us, and why should you care about it while you’re building a team?
Written by Wolfe Glick One of the most common terms heard when talking about competitive Pokémon is “the Metagame”. Technically speaking, metagame simply means “game within a game”, which I know wasn’t especially helpful for me when I first started playing. So, functionally, what is the metagame and why do we care?
What is a metagame?
The rules dictate which Pokémon can or cannot be used, and these rules change at least once a year. This is called a format or a ruleset. The amount of Pokémon that are legal vary widely: some years barely over 100 species of Pokémon are legal, and some years it’s closer to 1000. However, regardless of thenumber of Pokémon legal, the distribution of their use isn’t going to be even. There’s no ruleset where you’re going to see Metapod with high usage. Not all Pokémon are created equally, and as such not all Pokémon are used equally.
Metagame is the term used to describe which Pokémon are popular and which aren’t. If you’re new to VGC, you might have balked at the idea of learning nearly 1000 Pokémon in order to play competitively. However, functionally speaking, you could probably win tournaments while only knowing the top 50 or so, or in some cases even less.
The metagame is specific to whatever context you will be battling in. If you’re playing on the ladder, the metagame’s context is going to be very general, and you’re going to see a lot of popular Pokémon. If you’re going to your weekly local tournament, or playing versus one of your close friends, there’s still a metagame: the metagame is whatever Pokémon are popular there! When we talk about metagames, we’re discussing the concept broadly, which roughly describes “what Pokémon people in general are using right now”, but it’s important to think about whether there’s a more specific contextual metagame that the team you’re making will battle in.
It’s worth noting that the metagame is a concept and not something concrete. A metagame is practically useful to you because it describes which Pokémon you are likely to play against. A metagame is more than just raw usage statistics or popular teams– rather, it loosely encapsulates which Pokémon, Pokémon combinations, or teams people currently view as favorable. There’s never one “right answer” about what the metagame is at any moment in time. In this article, we’ll define what metagame means to us– and how we keep track of how a metagame grows over time.
EXAMPLE
The metagame is the reason why some Pokemon may struggle at one point in a format but shine at another point despite the format not changing. 2013 was a format where Landorus-Therian (Ground/Flying-type) and Thundurus-Incarnate (Electric/Flying-type) both shone, and as the format progressed their usage climbed higher and higher. Then at the World Championships, Mamoswine (who had a particularly good matchup against both Pokemon) ended up winning the whole thing.
Why should I care about the metagame?
The metagame is incredibly relevant to consider when building a team, no matter who you are. You cannot give yourself the tools to beat your opponents without first considering what your opponents are going to be using. Each Pokémon and each team has weaknesses, and deciding which weaknesses you are unlikely to play against and which ones need to absolutely be accounted for is a skill in teambuilding that can take you very far.
Importantly, metagames merely describe what your opponents are likely to bring. Some people treat a metagame as a user manual for building their own team, but that is entirely the teambuilder’s decision. It is not necessary to build your own team out of the elements that you recognize in the known metagame, but if you want to succeed in games, you must understand and respect the threats that you identify as part of it.
EXAMPLE
In 2012 I placed second at the World Championships with Exeggutor. Exeggutor was a great defensive Pokemon because of it’s good natural bulk, number of resistances to common types, and access to the ability Harvest. In every format since then, I have tried to make Exeggutor work whenever it has been legal - however I have never been able to come close to how strong Exeggutor was in 2012. That’s because the metagame of 2012 at the World Championships was at a specific point that allowed Exeggutor to shine. Exeggutor has a number of weaknesses to common types, and in later formats those weaknesses were common enough that it made Exeggutor nearly impossible to use well.
Understanding the Metagame
The metagame influences how we think about the game– when building a team, it’s important to consider matchups. If a Pokémon matches up well against the metagame, it does well against popular Pokémon or teams. As a simple example, if Water-types are extremely popular, I might say that a Grass-type Pokémon like Rillaboom has a good matchup versus the metagame. If the top Pokémon are all physical attackers, I might prioritize means of reducing Attack, such as the ability Intimidate and moves like Will-o-Wisp or Reflect. That being said, the Pokémon at the top of the metagame are often useful in many scenarios, and countering them might not be as simple as taking advantage of the type chart.
The metagame may also shift. This refers to a rebalancing of popularity of Pokémon, teams, or archetypes. For example, if I see that rain teams are picking up in usage, I’d say that rain teams are a more important part of the metagame. Then I’d have to think more carefully about them when I go to make my own team. If you’ve ever used a team that a streamer used, or a team that won a tournament, and found less success than the original user had, it may be because of shifts in the metagame. The metagame can shift over time, or because of the success or popularity of a specific team– maybe even the one you’re using!
What does a metagame shift actually look like? All it means for a metagame to shift is that the common perception of which Pokémon are strong has changed. This often happens after big tournament performances, but it can also happen under other circumstances as well. When a metagame shifts, Pokémon rise and fall in popularity. Dramatic changes mean that players will find themselves in new contexts; strategies that were useful before may not have great tools for managing the new landscape.
EXAMPLE
In late 2020, I won the Players Cup 2 with Coalossal. After this tournament performance, Coalossal went from being relatively unseen to much higher usage. The metagame had shifted, and the specific shift was a rise in Coalossal usage. Due to this shift, Pokemon and strategies that matched up well into Coalossal rose in popularity (such as Dynamax Landorus-T with the right support), and Pokemon that matched up poorly into Coalossal fell in usage. It became much more challenging to win with Coalossal.
How do you learn more about the current metagame?
In my opinion, it’s best to be aware of but not bound to the metagame. It provides direction in teambuilding and threats to prepare for, but if you only use what’s popular you might miss some hidden gems, and as mentioned it can be misleading at times. That being said, there are some things you can do to have a sense of where the metagame is at.
- Play games and take note of what you’re playing against often! Are there Pokémon that are more popular than you expected? Are there Pokémon you expected to see that are not present or less common?
- Check usage statistics! You can use websites like pikalytics to see what is currently popular. Keep in mind usage statistics are an approximation and often don’t tell the full story.
- Watch other people play! Streamers and YouTubers can be great to watch to learn the game, as well as to see what is popular at their rating.
- Check recent tournaments! Tournaments are often the biggest contributor to which Pokémon are popular at the current moment.
- Collaborate with other people! Compare your notes and learn from each other to better understand the metagame.
Don’t feel like you need to be up to date 100% with the metagame at all times, even if you’re trying to take the game very seriously: keeping up with the metagame can be like drinking from a firehose, and there’s a lot to learn. If you have a rough and general idea of how the metagame functions, that’s going to be good enough for teambuilding.
Wrapping Up
The metagame is important because the only real way to evaluate whether a team is going to be strong or weak is to know which Pokémon it’s going to be up against in battle; whether you play versus a friend, on the ladder, or in a tournament. A metagame does not have to be a blueprint for which Pokémon must be used to find success, although it is certainly possible to build with that perspective. Metagames, practically, are a descriptive tool that let us make educated guesses as to what the goals of our team need to be when we fight against other trainers. Without knowledge of a metagame, a teambuilder pays no respect to the context that they’ll battle in; and in Pokémon, context is everything.
Team Playstyle and Pace
Learn why the time a team takes to finish games is important.
Written by Wolfe Glick We describe a team’s playstyle in terms of how the Pokémon on the team affect the rate at which battles progress. Battles can have different paces: a fast-paced battle features lots of KOs and is over in a few turns, and a slow-paced battle is a grindfest where both players spend a lot of effort positioning and less time dealing damage. Certain Pokémon lend themselves well to either a fast or slow pace.
Generally, a team falls into one of three categories of team playstyle based on its pace. These terms should be used to help you think about how a team achieves its goals. Think of these terms not as a roadmap for where your team should go next; but a toolkit to analyze how your team will function in battle.
Hyper Offense: These teams tend to use fast but frail Pokémon to overwhelm the opponent. They typically value speed control and damage output over defensive switches and defensive typing. Hyper offense teams want to do a lot of damage fast- for a game to go beyond 8 turns would be unusual. Because of this, they are often prone to big momentum swings. They typically excel when they are in the driver’s seat, and will collapse quickly if they end up out of position.
Hyper offense teams tend to be more useful in best of 1 settings, where your opponent has little time to react to how your team applies pressure. They also tend to perform better early in a format before an established metagame has formed; teams at the beginning of the format tend to be more volatile, and dealing powerful damage quickly can be a solid strategy when other players are still figuring the format out.
Bulky Offense: This style of team focuses on balance - they want Pokémon with good defensive typing and good stats to allow them to maneuver their Pokémon around safely, but not at the expense of their damage output. Bulky offense teams value both offensive capabilities and making use of synergistic defensive typing. They’ll often have multiple ways of influencing the board state with speed control and other disruptive moves. It would be typical for a game with bulky offense teams to last between 8 and 12 turns.
These teams tend to be consistent, and often use Pokémon that have been established as good Pokémon in a format. This is the playstyle that is most present in the teams that perform highly at tournaments, especially at the World Championships. This is most likely because of the control that balancing offense and defense provides.
Defense/Full Defense/Hyper Defense: Some players (such as myself between 2013 and 2016) prefer to play a more defensive style. These teams tend to focus significantly on the defensive capabilities of their Pokémon, and may employ tactics such as recovery and setup (especially defense enhancing setup moves such as Calm Mind) to outlast their opponents. Lowering the opponent’s offensive capabilities with moves such as Snarl, Will-O-Wisp, and Light Screen allow defensive teams to control the pace of the game and disrupt their opponents’ offensive capabilities. Typically these teams tend to take 10-15 turns to win a game.
They don’t often perform as well as other archetypes at tournaments, though they have been known to do well on occasion. Defensive teams are often passive, and it is challenging to fully halt your opponent’s offense, especially since they will have two Pokémon on the field most of the game. Furthermore, the in game timer at events means that defensive teams are more likely than the other styles to run out of time before winning the game. Going to time in a tournament is not advisable, as you’re not always guaranteed to be up on tiebreakers, and even if you win, long battles are draining and you’ll have less rest between rounds than your competitors.
How do I identify the playstyle of my team?
Here are a few questions to ask yourself:
- How many turns does my team take to win on average? If your games are often over quickly or are drawn-out, that’s the easiest way to tell your team’s pace. Can you figure out what factors are contributing to why games are ending quickly or dragging on?
- How many attacking moves do I have, and how hard do they hit? If you don’t have many attacking moves, your games are going to take a long time. If you struggle to take knockouts decisively, your team may have a slower pace.
- Are your Pokémon frail? What are their HP, Defense, and Special Defense stats like? Can they survive attacks? Is switching in your Pokémon generally easy and low-risk?
- How many defensive options does your team have? A team with very few defensive tools (Intimidate, Burn, Reflect/Light Screen, healing moves, other utility moves) is likely to be more offensive.
What do these categories mean to me, the teambuilder?
You’ve identified that your team falls into one of the three categories– either because of your experience in battles, or because of advice you received from another player. The question that you have to answer at this point is: are you comfortable with the pace that your team plays at? If so, great: being in your comfort zone is a good thing. If not, what needs to change on your team?
For example, I usually prefer for my teams to be bulky offense teams. I value both being able to switch and being able to deal damage at appropriate times. If I were to realize my team played in a more hyper offensive style, I would maybe want to take a step back and think about whether I like how the team plays and whether its goals align with what I think are good practices.
What Playstyle Should I Use?
How do you like to play VGC? If you have an answer, great: these terms can be helpful to diagnose whether you agree with the goals of the team. If you don’t have an answer: try some teams out, and keep track of how the pace of each team feels to you.
As mentioned before, we generally prefer bulky offense teams as we feel that they are the most consistent and give us the most control over how the battle goes while being the least affected by odds and chance. However, players have found success with all types of teams; our way of battling is certainly not the only way. We encourage you to try different styles of teams and find what works best for you. And don’t forget that these decisions aren’t set in stone! You can always be flexible and step outside your comfort zone when it comes to your teams.
Wrapping Up
As teambuilders, we spend a lot of time thinking about how our team will function before we even battle with it. Thinking about your team in terms of its playstyle, as defined in this article– hyper offense, bulky offense, or full defense– can help you identify how your Pokémon will work together, what your team’s goals will be, and whether battles will play out in a way that is comfortable and natural to you.
How to Pull it all Together
A complete guide to building a team from start to finish.
Written by Aaron Traylor and Wolfe Glick So far, we’ve told you some pretty general elements of teambuilding. We’ve talked about some of the qualities of the Pokémon we look for when we’re building a team, how they might work together, and the moves and strategies that we prioritize. However, at this point you might be wondering: how do I build a team myself? In this portion of the guide, we’ll show you the process that we follow when we build a team from start to finish. We hope that these steps can guide you to assemble your own team.
Here, we’ll explain our fundamental goals in a rough template that can be applied to any format. Know that the teambuilding process is pretty abstract and you and I might not take the same path from an idea to a completed team, and furthermore, there’s no one right or wrong way to build a team.
Generally, Pokémon are numbered in the order that they are put onto a team. For example, if I focus my team around Pikachu, Pikachu will be added first– it’s my first slot. You should loosely keep this ordering in mind– it’s not important in the long run, but if you talk about your team with other players, hearing about the ordering can help them follow your thought process when building.
Step One: The Main Idea
Every team begins with an idea. Maybe the idea that you have is to use a particular Pokémon or combination of Pokémon; maybe it’s to use a particular move or tactic in a certain way.
- If you’re starting from a certain Pokémon or combination of Pokémon: put that Pokémon/those Pokémon on your team in the teambuilder. You don’t have to do anything else; maybe sketch out some rough EVs for them, or think about what moves or items you’d like to use.
- If you’re starting from a particular tactic, such as a move: What Pokémon are going to carry out this tactic on your team? Start there: pick the most pivotal Pokémon (or combination of Pokémon) and put it/them on your team.
What we’re beginning to do in this step is forming the core; the key idea or goal of your team. We haven’t added anything to that core yet other than its foundation.
EXAMPLE
Lets say we want our core to be centered around Torkoal and Venusaur, in the VGC21 series 9 ruleset. Torkoal and Venusaur are a common pairing - Torkoals Drought sets up the Sun for Venusaurs Chloryphyll, and Venusaur is able to threaten the Water-, Rock-, and Ground-type Pokemon that would otherwise be problematic for Torkoal. At this point, you might have some ideas about what your Pokemon will do - your Venusaur is going to want a Grass move (probably leaf storm or frenzy plant) and Sleep Powder, and your Torkoal will probably want a fire move. Other than that, we can fill the rest of the details in later.
Step Two: Adding to the Core
We’ve got the main idea, but it isn’t complete yet. Remember, you’ll be bringing four of your six Pokémon to every battle– if you started with just one Pokémon in Step One, you’ve got a ways to go before you can even test your team.
At this point, our mission is to add Pokémon to aid the main goal of the team. When adding Pokémon in this step, you should loosely outline how they will fit on your team– there’s no need to fill out a complex EV spread or settle on move/item just yet.
Generally, you’ll add Pokémon in this step for one of these reasons:
Complementary offense: this Pokémon synergizes with the offensive capabilities of your core with its own offensive power. Note that complementary offense isn’t limited to the type chart: Speed, priority attacks, or spread moves are also great offensive reasons to pick a Pokémon.
One pitfall at this step is to only add Pokémon that are purely offensive in nature– this can lead you towards a “hyper offense” team. Unless you’re explicitly trying to play this aggressive style, try to pick Pokémon that have a range of offensive and defensive capabilities.
EXAMPLE
We want some more offense to add to our Torkoal and Venusaur core, and we might want a physical attacker as both Torkoal and Venusaur are typically special attackers. One Pokemon we might consider is Urshifu single strike - it’s a powerful Pokemon that is able to threaten Psychic- and Rock-types, and also has nice synergy with Venusaurs sleep powder allowing it to get off multiple high powered attacks.
- Complementary defense: If you value switching your Pokémon around often, you might want to add a Pokémon with synergistic defensive typing to your core. Just like offensive synergies, defensive synergy isn’t limited to the type chart. Abilities such as Intimidate or good defensive base stats can allow Pokémon to switch in often, even without a resistance. As a word of caution, defensive capability isn’t everything in VGC– make sure you know what these Pokémon are adding to your team.
EXAMPLE
At this point we might consider adding Landorus-T to our team - Intimidate offers us some extra support and defensive utility, and Landorus can easily switch into the Ground type attacks that threaten Torkoal. Landorus also benefits from Torkoals drought, reducing its weakness to Water-type attacks. Landorus typically struggles with Ice-type offensive moves, which Torkoal will often be able to switch into as well. Although Landorus is a more offensive Pokemon, we consider it here because of how its attributes allow it to serve our team defensively.
Support: Does your Pokémon from Step One benefit from Tailwind, Trick Room, Fake Out, or Follow Me (or any other supportive tactic? These types of moves may enable your main Pokémon to accomplish their goals in battle.
Be careful with purely supportive Pokémon, as they can skew the offensive capabilities of your team. Make sure the Pokémon you’re adding still exert pressure on your opponent.
“ Every Pokémon on my teams has to deal damage with at least one move– that way, if it’s ever my last Pokémon standing, it has a chance to win the game for me.”
— Aaron Traylor
EXAMPLE
Our team is severely lacking in Speed Control, so to remedy this let’s add Porygon-2. Porygon-2 is able to set up Trick Room for Torkoal, allowing it to use its low speed stat into an advantage. Porygon-2 can support the team with Trick Room, but can also be used as a switch in to many attacks thanks to its high natural bulk and access to Recover.
As a rule, in this step, I try to add Pokémon to further my team’s main strength rather than to counter any one strategy in particular. It’s too early to add Pokémon specifically to counter other strategies; we’re still forming the main goal of our team. It’s okay to add Pokémon that are good against other strategies; but that should be a side benefit to the main reasons why that Pokémon belongs. I’m making this distinction because it’s an easy trap to be nervous about the strong teams that you’ll face; but if you keep picking Pokémon to counter different strategies, your team will lack cohesion and focus. We’ll make this consideration in the next step.
“Typically I try to have a starting point that I think will be strong against other teams that are popular naturally. By ensuring your main mode has the ground it needs, you will hopefully already have given yourself tools for certain matchups.”
— Wolfe
Repeat this process a few times– you’ll want to have three to five Pokémon on your team before ending this step. The goal at this point is to “finish” the main goal and idea of your team.
Step Two, part B: How do you know when your main idea is finished?
When we follow this part of the process, we want to feel like our team is near the point where we COULD battle with it (if we filled out all of the details). We want to feel good about what we’ve done and feel like it’s an appropriate time to take what we’ve made and go test our main idea. We don’t expect what we have to be perfect at this point, but we want to know if the ideas we build the team on are actually going to hold up when we finish and start using the team.
There’s no right or wrong way to decide when the core of your team is done– everyone has their own sense of when a core feels complete. For our process, here’s how we can describe it best:
- You don’t feel like anything is “missing” from your team’s core.
- You feel like you’ve covered your major weaknesses
- You can sort of imagine how battles will go
- You feel like the idea that you started with is fleshed out enough that you can use it
Once you have your core Pokémon in your builder, imagine some different teams or Pokémon you expect to face. Try to think about which Pokemon on your team you’d WANT to bring vs those teams, and which you’d likely leave behind. If you don’t like the situations that you imagine, you may have to go back to the drawing board on some of your Pokémon. When you do this, you’re using your theorymon skills.
EXAMPLE
Lets say you’re building a team for the series 10 format, where you are allowed one Restricted Pokemon but no access to dynamax. Imagine you added Gastrodon to your team to help with your matchup against Kyogre teams, as Gastrodons Storm Drain makes it immune to Kyogres powerful Water-type attacks. In practice, you might find that Gastrodon is not effective at actually stopping Kyogre - Water Spout and Origin Pulse will still hit Gastrodons partner, and nearly every Kyogre team has at least one bulky Grass-type Pokemon. Moreover, Gastrodon is not able to remove Kyogre from play quickly despite being able to ignore its powerful Water-type moves. In this situation, we might take a step back and try to add a more effective answer for opposing Kyogre teams.
Step Three: Round Out the Team
By this step, you’ll have finished your core. Congratulations! You’re done with the main part of your team. At this point, you probably won’t (and shouldn’t!) have six Pokémon on your team.
Now is the time to consider other teams and Pokémon. Every core has weaknesses, and yours is not an exception. It’s good to be up front with yourself about what the weak spots of your team are so that you can adjust for them during battle. Are there popular Pokémon or moves that tear holes in your strategy? Is there a popular team or core with a good matchup against your main strategy? Are there any big weaknesses in your team?
You may not have answers to these questions until after you test– that’s okay. Regardless, at this step, you will have three options:
- What Pokémon or teams did you identify to be difficult matchups for yourself? Add strong Pokémon to your team that are particularly useful against what you’ve identified to be an issue. Ideally, the strengths of Pokémon that you add at this stage won’t overlap with what your core is already good at. You can think of this as adding breadth to your team - widening the scope of what your team can handle.
- Add Pokémon that interact with the Pokémon in your core in new and interesting ways. This might give you more than onemodein your core– you’ll be able to choose how your Pokémon are going to interact with each other depending on the game and opponent. This is a great place to add Pokémon with useful utility moves. This gives your team depth.
- Add Pokémon that take your team in a whole new direction. For example, if your team is faster paced, your last two Pokémon could set and work well in Trick Room; or if you have a team focused on Trick Room, your last two Pokémon could work well outside of its effects. This process is called adding a mode. The Pokémon you add should complement each other and you should have some reason that they’ll work alongside the rest of your team. You’ll probably need at least two Pokémon slots to add a mode.
Follow the above guidelines until you have six Pokémon in your builder or box. If you hit a wall, don’t be afraid to unwind some of your work and return to an earlier step with different Pokémon.
Step Four: Finish the Details
At this point, you should know all of the six Pokémon that are going to be on your team, and you should have imagined some ways that you’d like to battle using them. Now is the time to fill in every aspect you skimmed over in the earlier steps– EVs, moves, items, et cetera.
Once you’re done with Step Four, the first draft of your team is complete. Congratulations! Building a team from scratch is not easy.
Step Five: Start Testing
The first draft of your team is unlikely to be the final draft of your team. Throughout this template, you’ve imagined different scenarios you’ll find yourself in when you use this team during battle. The only way to know how right you are is to practice, and to evaluate your guesses. We have a guide on that here.
You may find yourself returning to the drawing board on some or all of the team. There are no hard and fast rules when you iterate on a team– if you thought a Pokémon that you added early was essential, but it isn’t working out for you, don’t be afraid to move on!
You might find yourself struggling with one slot in particular on your team. Maybe you love your core Pokémon, but you can’t find one last Pokémon to make it work. This is a common issue that we call “Sixth Pokémon Syndrome”, and you can read about it here.
At the end of the day, if you love your team, great– if you try a few things and they don’t work out, and you don’t like what you came up with, it’s okay to scrap the team and try again. Teambuilding is a muscle, and the more you work on it, the easier it will get, and the more you’ll like the teams that you build.
How to Win (Sometimes) With Your Favorites
A guide to building a team around your favorite Pokémon.
Written by Wolfe Glick A common theme so far is that there’s no right or wrong way to play Pokémon competitively. Even at the highest level, competitors are motivated by a variety of different factors. There are players present throughout all levels of competitive Pokémon (to varying degrees) that are motivated by something else - instead of using commonly used Pokémon, they prefer winning in a way that feels “right” to them. Sometimes, these players are even willing to use Pokémon perceived as “weaker” in pursuit of this goal. Most often, this takes the form of “winning with your favorites”, which is a term used in conjunction with a player who builds their team around a Pokémon not necessarily because of what it offers competitively but instead due to some kind of personal attachment.
In this article, I’ll share some of my tools that help me identify the strengths of any Pokémon and how I build a team around them. I should be upfront, first: starting a team by simply choosing a Pokémon you like, especially a Pokémon that doesn’t have established strength, is more difficult than other starting points, and does not always (or even often!) yield results. When I build teams competitively, I always start with goals for my team, and then find Pokémon to accomplish them. When you start with a Pokémon because you like it, you’re searching for a problem to solve, which is putting the cart before the horse.
That being said, it’s a lot of fun to battle with Pokémon that feel unique and not every team you build has to be intended for top tournament play.
Figure out your Pokemon’s Strengths
In most cases, players who are most interested in winning with their favorites will have a Pokémon in mind which they’d like to build around. The first thing to do when building around (or “forcing”) a specific Pokémon is to look at what it does well, which can give you some idea of strategies you can employ. Ideally, your Pokémon will have some strength or goal that sets it apart from other Pokémon– the less tools your Pokémon has access to, the more challenging your task will be. If you decide to build around Chimecho, for example, you may struggle a bit, but if your favorite Pokémon is Incineroar I have good news for you.
When you choose to build around a specific Pokémon, you have the advantage of having a starting point based on that Pokémon’s intrinsic strengths and weaknesses. If you’ve already identified HOW you want to use your Pokémon, that will provide even more guidance, but even without a central strategy or moveset selected you can still begin building. Oftentimes I’ll choose Pokémon for my team without deciding on the moves or items, and once I have an outline I’ll go back and begin filling in the structure of the team.
How do you identify your Pokémon’s strengths? There’s a couple places to look.
- Which of your Pokémon’s base stats are the highest?
- Does the Pokémon have any unique moves?
- Is there something this Pokémon does better than any other Pokémon can?
- Does the Pokémon have any tools to manipulate Speed?
- Can the Pokémon support its partners in a unique or meaningful way?
These starting points should get you thinking about what your Pokémon can do well, which leads us into our next step.
Identify your Pokémon’s Place in the Format
Now that you’ve identified a Pokémon that you want to build around and some things it can do well, it’s time to look broader. You have a square peg, and now you need to go find a square hole. Start looking at which Pokémon (individually as well as combinations) are popular, and consider if your Pokémon can be used against any of them. If you aren’t sure what is popular, you can watch videos of other people playing or check out usage statistics.
Some things to consider when thinking about if your Pokémon is strong against other popular Pokémon include:
- Does your Pokémon have a type advantage?
- Will your Pokémon move first?
- Does your Pokémon make your opponent’s strategy more difficult to execute?
- Does your Pokémon allow potential partners to be more annoying for your opponent?
- Will your Pokémon be difficult to remove while meaningfully contributing to the battle?
- Does your Pokémon disrupt your opponents strategies in a meaningful way?
Write these answers down so you have them for later. Once you have an idea of which popular Pokémon your pick will match up well against, it’s time to think about the Pokémon you’re weak against.
Identify your Pokémon ’s Weaknesses
You have some things your Pokémon does well now - great! However, every Pokémon has weaknesses and it’s time to think about yours. When you were considering which Pokémon you had an advantage against earlier, did you notice any where your matchup was unfavorable? Are there any Pokémon you really don’t want to use your favorite against, or that you need to remove in order to win with your favorite?
This is a two-step process - first, identify what the weaknesses are of the Pokémon you chose. Then, start to consider how to deal with them. “Countering” Pokémon is actually really difficult in VGC, so it’s important to have a number of answers for threats. Some helpful tools to include are:
- Add Pokémon that can switch in when you want your favorite to leave the field (good defensive type synergy)
- Add Pokémon that offensively pressure the Pokémon your favorite is weak against
- Add Pokémon that enable your favorite to have a more positive matchup against its checks
- Add Pokémon you can use to handle your favorite’s threats while keeping it safe off the field.
Again, write what you brainstorm down. One thing that helps me personally during this step is to look for broad weaknesses of my chosen Pokémon, such as being generally weak to Steel types or to Pokémon that are faster than base 110 Speed. With our weaknesses outlined, we’re ready for the last step of our process.
Add Support and Finish Your Team
Once you have a starting point, you’re going to need to build the rest of the team. That process will be extremely similar to the process that we describe in this article; you’ll fill out the rest of a core that works with your favorite Pokémon, you’ll think about what your core is strong and weak against, and then you’ll finish off your team. The only difference here is that we’re totally focused on making this Pokémon the star of the team, and we’ll be orienting most of our other choices with its strengths and weaknesses– as we identified in the above sections– in mind.
It is tempting at this point to focus on the usage statistics of potential partner Pokémon and overcompensate in either direction: you might say “I’m using a very uncommon Pokémon, so I’ll have to add some of the top usage Pokémon to make up for it”, or say “I want to go totally off the deep end and use a bunch of Pokémon no one’s heard of”. There’s nothing wrong with either thought process, but instead try to focus on your team’s goals and what you’ll need from the Pokémon that you’re adding later in the process.
Once your team is done, give it a shot on the ladder. It may take a couple of iterations of your team before you’re comfortable with how it plays and how its strengths and weaknesses play out in battle.
Wrapping Up
Pokémon is interesting, in large part, because of the creative choices that a player can make during the teambuilding stage. Some people enjoy teambuilding around their favorite Pokémon or around Pokémon that receive less attention from other players, perhaps because it allows them to express their creativity openly from the minute the battle begins, or because building such teams is a unique challenge. Teambuilding with these goals in mind is not all that different from teambuilding in the general case around any strategy or idea. However, it does require a certain honesty in your thought process: what are the strengths and limitations of your centerpiece Pokémon or strategy? For some players, the joy of winning with their favorites more than makes up for the difficulty of teambuilding in this style.
EVing #1: How to Make Simple EV Spreads
EVing#1: How to Make Simple EV Spreads
A basic guide to EV spreads.
Written by Aaron Traylor
The First Step for Making EV Spreads
EV spreads offer the most customization out of any element of VGC (outside of selecting Pokémon for your team), and, at first glance, they can be daunting. Although EV spreads have a significant impact on the game, the skill of making spreads is not taught (or even mentioned!) in the mainline Pokémon games, there’s no-one-size-fits-all answer for each Pokémon, and ultimately, it’s challenging to know without experience whether your spreads are helpful or detrimental. All of these factors combined make crafting EV spreads an opaque and seemingly complex process.
We’re going to start you off with the absolute basics of constructing EV spreads, and give you a strategy that will be straightforward and effective. You’ll be able to build from this foundation in later articles.
What do EVs Do, Practically?
EVs are going to change your Pokémon’s stats. What that means practically differs based on the stat that gets EVs. For Speed, EVs change when your Pokémon moves in the turn. For all other stats, EVs change how your Pokémon’s attacks and defenses will interact with the damage formula, which guides how much damage an attack deals. The damage formula is complex, and we don’t expect you to know it off the top of your head - we certainly don’t!
Here is a screenshot from the Pikalytics Damage Calculator that shows a damage calculation. This Excadrill has 252 EVs in Attack. The Sylveon has 252 EVs in HP, and 4 in Defense. We can see that Excadrill will do between 98% and 115.8% of Sylveon’s maximum health. If Excadrill had less Attack EVs, this attack would do less damage; and if Sylveon had less HP EVs, this attack would do more damage, and maybe even guarantee the knockout.
Know your Pokémon
The most important part of battling is to know what the Pokémon on your team are capable of. The EV spread simply changes your Pokémon’s capabilities in battle.
Each of the Pokémon on your team was added to your team for a reason– and the EVs are, for the most part, going to help it carry out that purpose. Before making an EV spread, think to yourself– why did you put that Pokémon on your team? Then set out to make that EV spread with that goal in mind.
Starting your Spreads
A simple EV spread focuses on the Pokémon’s strengths, and might be intended to be general-purpose. The most simple EV spread of all is maxing out two of the Pokémon’s stats and putting the last stat point in a third. This is called a 252/252/4 spread, or a “max max” spread, because 252 is the maximum amount of EVs that a Pokémon can have in a stat.
Kartana @ Focus Sash
Ability: Beast Boost
EVs: 252 Atk / 4 SpD / 252 Spe
Jolly Nature
- Detect
- Leaf Blade
- Sacred Sword
- Smart Strike
For example, I might have added Kartana to my team because I wanted to take advantage of its fast physical Grass- and Fighting- type moves. If I’ve chosen to have it hold the Focus Sash for survivability, I’m going to max out its Attack stat (so it does as much damage as possible) and its Speed stat (so it is as fast as possible). I’m also going to give it a Jolly nature, which boosts Speed and drops Special Attack, so it can outspeed all Pokémon below 109 base Speed.
I’m adding Sylveon to my team for its strong Hyper Voice while being a fairly bulky but slow Special Attacker. Sylveon isn’t naturally a very fast Pokémon, so I’m not going to try to take advantage of its Speed. I’m going to max out its Special Attack so that it deals as much damage as possible, and then put the rest of the points in HP so that it has more health to survive attacks. With my last 4 EVs, I’m going to put them in Defense, its lower defensive stat.
Sylveon @ Pixie Plate
Ability: Pixilate
EVs: 252 HP / 4 Def / 252 SpA
Modest Nature
IVs: 0 Atk
Protect
Hyper Voice
Moonblast
Helping Hand
Speed is the Most Important Stat
This is something we’ll drill into your head again and again when you’re making your EV spreads: be mindful of the Speed stat that your Pokémon ends up with. If a Pokémon’s speed is higher by one point, it will move first– and that one point can be the difference between winning or losing a game. If you’re going to give serious thought into any aspect of your EV spread, make it the Speed stat– you can do that by checking out speed tiers and usage stats.
“When I’m making an EV spread the very first thing I do is decide on my speed stat! That will let me know how many EVs I have left to accomplish my goals for that Pokémon after.”
— Wolfe
Increase Strength or Shore Up Weaknesses
When deciding what you want your EVs to do, there are two general approaches: you can lean into the strength of a Pokémon, or you can try and decrease that Pokémon’s weaknesses. One important general rule is that you get the most value for a stat point the lower a stat is - this means that a point of special defense on Kartana (base 31 special defense) will have a larger impact in the damage formula than a point of special defense on Blissey (base 135 special defense). This isn’t to say you should always be investing in your Pokémon’s lowest stats, but you should be aware that there are diminishing marginal returns.
As a side note, you should always invest in 3 or 5 stats on your Pokémon, never 2, 4, or 6. The short explanation is that if you invest in 2, 4, or 6 stats, you end up wasting EVs that could go elsewhere to be not wasted– we’ll explain more in depth later.
Natures
When making a simple EV spread, it’s best to use a nature that improves the most important stat for that Pokémon. If moving first is essential for this Pokémon, you may want to give it a Speed-boosting nature such as Timid or Jolly. If it isn’t, you may want to boost an attacking stat with Adamant or Modest, and if your Pokémon is defensively oriented you may want to boost its Defense or Special Defense.
Whatever nature you use will also drop a stat at the same time. Your strategy here is for the most part to minimize the attacking stat that you use the least.
- If your Pokémon is using physical attacks, drop the Special Attack stat, and vice versa for Special. Utility moves that do slight damage (e.g. Fake Out) shouldn’t factor into your calculation here
- If your Pokémon is operating in Trick Room, consider choosing a nature that drops its Speed so it’ll move even slower.
- In extremely rare cases, you might not want to drop either attack stat, and you might not want to drop Speed. As a last resort, you can drop a defensive stat, but we don’t recommend this as your defenses are extremely important.
In VGC, here are the most common natures you’ll see:
- Offensive: Jolly/Timid, Adamant/Modest, Brave/Quiet
- Defensive: Bold/Relaxed/Impish, Calm/Careful/Sassy
A Simple Method for Making a Simple EV Spread
Here’s how we advise making a simple EV spread for each of your Pokémon:
- Is your Pokémon holding Focus Sash, or is otherwise fast and frail (base speed around 96+, base HP and defenses around 60–70 or less)?
You probably want to maximize its Speed and either Attack or Special Attack, whichever is relevant. Consider a nature that boosts Speed and drops the irrelevant attacking stat.
- Is your Pokémon midspeed (base 60–95)?
Midspeed Pokémon are the most challenging to make EV spreads for. This is a great time to check out the speed tiers and usage statistics. Take a guess with Speed — it will be obvious over the course of some games whether it’s at a good number, and you can always adjust later. As a good rule of thumb, if there’s a popular species of Pokémon around your Pokémon’s Speed that can KO it, and your Pokémon can KO back, you probably want to outspeed it when possible. If you can’t decide, either 252 Speed or 252 HP is probably a good call. With your leftover EVs, think about your Pokémon’s role on the team. If its job is to take out specific Pokémon with a super effective hit (for example, Arcanine attacking Ferrothorn), feel free to put the points in defensive stats however you see fit. If you want to be dealing more damage in general, put points in its attacking stat.
- Is your Pokémon going to be dealing damage in Trick Room?
You probably want to max its HP and its attacking stat. If HP is much higher than a defensive stat (e.g. Snorlax or Rhyperior), put the points in that defensive stat. Keep Speed as low as possible, and think about what Pokémon you’re outspeeding and underspeeding.
- Is your Pokémon defensively oriented (e.g. its only job is to set Tailwind or Trick Room or to set Light Screen)?
Go straight to HP and the defenses. Pick a defensive stat to put EVs in based on that Pokémon’s stats, and put EVs into Defense or Special Defense accordingly. Split evenly or evenly-ish if you can’t decide. Be careful with these Pokémon — if you have too many, you may not have enough offensive power to win games.
- Is your Pokémon holding Eviolite?
Maximize its HP to get the most out of the defensive boost. Then split evenly between the defenses, make a metagame judgment, or dump EVs into the lower stat (which is more effective in the damage formula).
Conclusion
I hope that this guide helped you understand some of the intuition behind EV spreads and how to apply them to your team. This is the first of a series of EV spread articles, and is intended to be more of an introduction– put some EVs on your team and try them out on the ladder. In the next article, we’ll talk about how to make EV spreads more complex, but this is not a necessary step for battling.
Standard EV Notation
People will write out their EVs differently: let’s imagine that we have a Lucario with 252 EVs in Attack and Speed:
Notation Explained: HP/Attack/Defense/Special Attack/Special Defense/Speed
Expanded: 4 HP / 252 Atk / 252 Spe
Shorthand: 4/252/0/0/0/252
Japanese: 4H-252A-252S
EVing #2: The Next Step - Why would you want a more complex EV spread?
EVing #2: The Next Step
Why would you want to make more complex EV spreads?
Written by Aaron Traylor
Taking the next step with your EVs– why go beyond a simple spread?
EVs are a complex part of Pokémon, and we just outlined a straightforward strategy for applying them to your team. However, a trainer has complete control over their team, and EVs can be as complicated as you need (or want!). We’re going to outline some key reasons why a trainer would want to do something more specialized with their EV spreads, or why they might not.
“Simple” EVs versus “Complex” EVs
A simple EV spread, as discussed in our earlier article, focuses on the Pokémon’s strengths, and might be intended to be general-purpose. These EV spreads often focus on maxing a few important stats.
A complex EV spread has a specific purpose and focuses on carrying out that goal precisely and optimally. It may be related to a particular enemy Pokémon that your Pokémon might be facing against, or a particular situation that you might find your Pokémon in. These EV spreads often invest in many or all of a Pokémon’s stats.
Let’s take our Sylveon example from the previous article. Previously, we showed that Excadrill would knock out our Sylveon 81.3% of the time.
252 Atk Excadrill Iron Head vs. 252 HP / 4 Def Sylveon: 198-234 (98 - 115.8%) – 81.3% chance to OHKO
We’d like for our Sylveon to survive this attack. Here is a complex EV spread that does just that:
Sylveon @ Wiki Berry
EVs: 36 HP / 244 Def / 228 SpA
Modest Nature
Protect
Hyper Voice
Moonblast
Helping Hand
252 Atk Excadrill Iron Head vs. 36 HP / 244 Def Sylveon: 146-174 (83.4 - 99.4%) – guaranteed 2HKO
This Sylveon achieves a specific goal– it survives Jolly Excadrill’s Iron Head with the least total EVs possible, and then puts the rest in Special Attack.
When do I want a complex EV spread?
As with all things in Pokémon, this usually comes down to the context in which you’re asking your question. Here are some potential reasons to use an EV spread that is more specialized than general:
- You want your Pokémon to reach a certain Speed point that outspeeds another Pokémon or combos with your team well.
- You want your Pokémon to knock a specific Pokémon out with a specific attack and be bulky otherwise.
- You want your Pokémon to survive a specific attack from a specific Pokémon and be offensive otherwise.
Pitfalls of complex EV spreads
However, it’s important to note that some things can go wrong when you add a complex EV spread that might make it not much better than a simple EV spread. What are some things that might go wrong?
- Your Pokémon might never be in the situation that you EV for. For example, in our Sylveon versus Excadrill example, the Excadrill had a neutral nature and didn’t have a held item. If you go to a tournament with that Sylveon and never face an Excadrill, or face an Excadrill with an Attack-boosting nature or holding a Life Orb, your Pokémon might get knocked out when you don’t expect it. An engineered EV spread is best when it is relevant.
- EV spreads and damage calculations are best when you can remember them in battle. You don’t want to be surprised by being knocked out (or sometimes by surviving an attack!)
- If you survive an attack with a sliver of health, know that many factors (Sand, Fake Out, switching in, weak spread moves) mess those damage calcs up quickly. Being able to flexibly switch your Pokémon in to cover for each others’ weaknesses is usually more useful than surviving one specific attack from full health.
- Your Pokémon may no longer be able to do what you originally intended for it to do when you added it to the team. Taking significant points from a Pokémon’s Attack and Speed stats may change how it functions entirely, and you may need to switch up how you battle with that Pokémon. If you don’t find it effective, go back to the board on your EV spread.
- Taking EVs out of a Pokémon’s speed stat to allow it to reach defensive benchmarks may give you an inherent disadvantage against other Pokémon of the same species. For example, if two Terrakion threaten to knock each other out with Close Combat, the one that moves first wins– a Terrakion that takes EVs from Speed will never have the chance to win that fight unless they’ve decided to become extremely bulky.
When in Doubt, Start Simple
“When I’m starting a new team, I almost always start with simple EV spreads. The main reason for this is that I don’t want to spend time making a complex EV spread for an idea that I might move on from after one battle. I find it helpful to start with a basic spread and gradually make my spreads more complex as I test my team, aiming to tailor the Pokémon on my team for the scenarios I run into while I am testing.”
— Wolfe
Conclusion
A spread being complex doesn’t mean that it’s necessarily better than a simple EV spread– at the end of the day, what matters is knowing what your Pokémon is capable of in battle. Many players start off their teams with extremely simple EV spreads, and some keep them that way– if it isn’t broken, don’t fix it! Most players only make complex EV spreads for their Pokémon once they’ve done some practice battles or theorymonning and are aware of the battle scenarios that their Pokémon are going to be in. In the next article, we’re going to talk about just that– how to make your own complex EV spreads based on your practice and your Pokémon’s intent.
EVing #3: How to Make a Complex EV Spread
A guide to advanced EV spreads.
Written by Wolfe Glick So you’ve decided you do want a complex EV spread, and you want to know how to get started. The following is my personal process - I’m sure most people who make complex EV spreads do it in their own way, so if this doesn’t work for you, feel free to experiment to find a better fit.
When I begin working on a team, I almost always give all of my Pokémon either a simple EV spread or a recycled EV spread from a previous team. I don’t begin with a complex spread, because EV spreads are strongest within the context of your team, so it’s important when you use a complex spread that it is tailored to your specific team. Until you know what your team needs, it’s better to use a simple spread or a spread you’re comfortable with from the past. I suggest gradually adjusting a complex spread over time based on how your practice games are going. When you do want a complex spread, the process below can help guide you.
Step 1: No Compromises
The very first step in deciding on a complex EV spread is to consider the aspects of your Pokémon that you are absolutely not willing to compromise on. For an offensive Pokémon, this is probably their Speed and offensive Stat - for example, let’s say you want your Assault Vest Kartana to always outspeed Nihilego, so you aren’t willing to go below 212 Speed EVS (Jolly), and to always 2HKO opposing Focus Sash Kartana after Intimidate which requires 132 EVs. Great! That means you have 164 EVs leftover to make the rest of your EV spread.
For a defensive Pokémon, this is typically what attacks you always want to survive no matter what. You’re going to want to know how to use a damage calculator. Say you want your Dusclops to always survive Black Glasses Jolly Urshifu-Single-Strike Wicked Blow. There’s a few ways to do this, but it will typically involve max HP and a Defense-boosting nature.
This step probably seems simple, but it’s the one that trips people up the most. With EVs, it’s very easy to get caught up in what you CAN do - it’s much harder to know what you SHOULD do with your Pokémon instead.
Learning to identify what a Pokémon needs to succeed is one of the most important skills to develop. This step becomes much easier when you have a good understanding of the metagame. Try to think about which popular Pokémon you are realistically going to go up against, and which of them are important to knock out or survive attacks from.
Step 2: Pick a Speed
Once you’ve identified what you want your Pokémon to do, your next step is to decide on the Pokémon’s Speed stat. Speed is one of the most important parts of a Pokémon battle, and being naturally faster than your opponent can give you a big advantage. There isn’t one right way to know what Speed your Pokémon should be, but there are a few things you can consider.
- Are there Pokémon that you want your Pokémon to outspeed for sure?
- Do you want to be faster than other Pokémon of the same species or Speed tier?
- How many EVs do you need to invest in order to achieve the above two goals?
Just as in the above example, this is mostly dependent on the rest of the metagame. Think about how much of an impact it will make if you are faster than popular Pokémon. It might not matter if you outspeed an opponent’s Pokémon if you can’t do anything to it, or if you just want to switch your Pokémon out a majority of the time. If you aren’t sure what Pokémon you want to outspeed, start with a simple EV spread and pay attention to which Pokémon you find yourself going up against often in your games.
Step 3: Round out your Spread
If you’ve followed this process, you should have a Speed stat and a few benchmarks for your EV spread. Now it’s time to figure out what you want to do with the rest of your spread. Just like the previous step, consider what scenarios your Pokémon is likely to be in, and if there are things you can do with your spread that can help it shine. Don’t get too lost in the weeds here - pay attention to what actually happens when you use your Pokémon in battle.
To me, this step normally happens when I’m in a practice match and something unexpected happens. It’ll normally follow me getting KOed by something I expected to survive, or failing to KO something I thought was in range. I’ll open up my damage calculator and see how much investment it would take to reverse the scenario that surprised me.
EVs in Pokémon have an opportunity cost. Every point you put into one stat is a point you could have put somewhere else. Sometimes you might find that you could survive an attack or pick up a KO or outspeed a threat, but it would take significant investment. Consider if the scenario you’re EVing for is worth losing the value those stat points could do somewhere else.
The Big Picture
When making an EV spread, make sure you consider what matchups you’re actually bringing your Pokémon to! Making a specific spread to counter an opposing Pokémon is great, but not useful if you can’t bring your Pokémon to the battle.
General Notes on EV Spreads
- You get the most value (stat wise) out of your nature when it raises your highest stat after EVs. If your nature isn’t helping you do anything specific, have it raise your highest stat.
- There are diminishing marginal returns to stat points. Investing 20 points into your Kartana’s Attack stat will change your damage calcs a lot less than investing 20 points into its Special Defense. The reason for this is because you’re changing the proportion less. If Kartana uses 68 EVs in Attack, its stat goes from 201 to 210, which is about a 1% increase. Those same 68 EVs in Special Defense take it from 51 to 60, which is about a 17% increase. Even though in both cases our stat went up by 9 points, those points had a bigger impact in Special Defense because it was a larger change relative to the starting point.
- Some things in Pokémon use a percent of your HP stat, like Life Orb (10% recoil), Grassy Terrain (1/16 recovery per turn) and Sandstorm (1/16 damage per turn). If you utilize these effects, you can optimize your HP values by minimizing recoil damage or maximizing healing. Life Orb prefers the last digit of your HP stat to be high (169 HP takes 16 damage from Life Orb, 170 takes 17), and Grassy Terrain likes your HP to be above a multiple of 16 when close while Sandstorm you want to be lower (160 HP takes 10 damage from sandstorm, while 159 takes 9).
- To my knowledge, a neutral nature (a nature that raises no stats while lowering no stats) should never be mathematically optimal.
- You always want to invest in an odd number of stats with your EVs. All EVs should be multiples of 4 + 8x (4, 12, 20, …, 244, 252). If you invest in an even number of stats or do not use the above multiples, you will be wasting stat points at level 50.
- Not every stat change will change a damage calculation - if you’re EV’ing to survive something specific, make sure that lowering the relevant stats make a difference in the damage calculator.
- The first 4 EVs in any given stat give you a stat point, and after that you need 8 EVs to get a point. For this reason, many players prefer to use spreads that are 252/244/4/4/4 instead of 252/252/4, as your Pokémon will have one additional stat point in the former case (you should almost never run 244 speed, don’t take your 8 EVs from that stat).
“Be careful of overengineering EV spreads that can be thrown off by a tiny bit of damage. For example, if you survive an attack with 94-99% of your health remaining, some damage from Sandstorm or Fake Out will mean that you no longer survive that attack. That can still be okay– you just have to keep that in mind when you’re battling.”
— Aaron Traylor
Example: 2016 Worlds Raichu
For Worlds 2016, I knew I needed a complex EV spread for my Raichu. This is the Raichu in question, without EVs. Let’s go through our process using this Raichu as an example.

Step 1: Example
I needed to decide what the benchmarks were of my Raichu that I was not willing to compromise on. To start, the easiest thing was to pick a Speed stat. Raichu (as a species) can only be between 130 Speed (31 IVs, 0 EVs and a neutral nature) and 178 Speed(252 EVs and a Speed boosting nature). I knew that the absolute slowest I could afford to go was 168 stat, which is exactly one above Pokémon with a Base Speed stat of 100. The reason I chose to outspeed this specific number was due to the prevalence of Mega Kangaskhan, a Pokémon with 100 Base Speed. I have narrowed down that I want my Raichu to be between 168 and 178 Speed Stat. My Raichu’s moveset was Fake Out, Nuzzle, Volt Switch, and Endeavor. This was a very supportive moveset, but it could still be threatening if Raichu was able to use Endeavor after surviving a big hit to bring the target’s HP very low. I hoped to allow Raichu to survive Kyogre Origin Pulse and Kangaskhan Double Edge after Intimidate, with stretch goals of Xerneas Boosted Moonblast and Groudon Precipice Blades after Intimidate if possible.
Step 2: Example
This step is simple here - I’d narrowed down that I wanted to be between 168 and 178 Speed. After looking at the additional Pokémon I would outspeed by investing more points, I realized that the list was relatively short - Raichu already has priority due to Fake Out, and the few Pokémon I missed out on by not investing 252 points in Speed were not especially relevant for the metagame. I decided to start with 168 Speed, and adjust it if I ran into problems during testing.
Step 3: Example
So far, our Raichu looks like this:

We have 328 EVs left to play with, and no nature. Additionally, we have some benchmarks in mind. Let’s start with Kangaskhan. First, how much does Kangaskhan do with our current spread?
- 252 Atk Parental Bond Kangaskhan-Mega Double-Edge vs. 0 HP / 0 Def Raichu: 239-283 (177 - 209.6%) – guaranteed OHKO
Okay, so we definitely can’t survive that attack. What if Mega Kangaskhan has been Intimidated?
- -1 252 Atk Parental Bond Kangaskhan-Mega Double-Edge vs. 0 HP / 0 Def Raichu: 160-190 (118.5 - 140.7%) – guaranteed OHKO
Still not great. Next, let’s see what happens if we maximize our Defense.
- -1 252 Atk Parental Bond Kangaskhan-Mega Double-Edge vs. 0 HP / 252 Def Raichu: 113-135 (83.7 - 100%) – 0.4% chance to OHKO
This shows us that it is possible, but it’s going to take a lot of Defense investment and some HP as well. We’re going to stick a pin in this to take a look at some special attacks we’ll be taking, to help us figure out how much investment we have left over.
Kyogre’s Origin Pulse is a very important move for this Raichu to survive, given the context of this team. Let’s see how Raichu currently stacks up against it.
- 252+ SpA Kyogre-Primal Origin Pulse vs. 0 HP / 0 SpD Assault Vest Raichu in Rain: 118-141 (87.4 - 104.4%) – 31.3% chance to OHKO
Excellent - clearly we’re pretty close to being able to survive Kyogre Origin Pulse, and can do it with just a little Special Defense and HP. The shape of our spread is starting to take place - we can infer that our Raichu will likely have a lot of investment in Defense, and a little in Special Defense and HP. Let’s see how Raichu handles Xerneas next.
- +2 252 SpA Fairy Aura Xerneas Moonblast vs. 0 HP / 0 SpD Assault Vest Raichu: 174-205 (128.8 - 151.8%) – guaranteed OHKO
- +2 252 SpA Fairy Aura Xerneas Dazzling Gleam vs. 0 HP / 0 SpD Assault Vest Raichu: 109-129 (80.7 - 95.5%) – guaranteed 2HKO
With this, we can see we’re already surviving Dazzling Gleam and never surviving Moonblast without significant investment. Raichu wasn’t even supposed to come to most Xerneas matchups, so we’re not going to consider EV’ing for Xerneas having seen these calcs.
Right before the World Championships, Timid Special Groudon picked up in popularity. Let’s see how strong it is compared to Origin Pulse.
- 252 SpA Groudon-Primal Eruption (150 BP) vs. 0 HP / 0 SpD Assault Vest Raichu in Harsh Sunshine: 127-150 (94 - 111.1%) – 68.8% chance to OHKO
- 252 SpA Groudon-Primal Earth Power vs. 0 HP / 0 SpD Assault Vest Raichu: 138-164 (102.2 - 121.4%) – guaranteed OHKO
So, Eruption is a bit stronger than Kyogre’s Origin Pulse, but still within range where we can probably survive it without too much investment.
Now we’re ready to actually start filling in some numbers. Let’s try and see what it would take to survive Kangaskhan’s Double Edge after Intimidate.
- -1 252 Atk Parental Bond Kangaskhan-Mega Double-Edge vs. 4 HP / 252 Def Raichu: 113-135 (83 - 99.2%) – approx. 2HKO
Great! We survive! But did we survive in a way that is efficient? Doing it this way takes 256 EV’s - what if we can do it with less? The less EV’s we use here, the more EV’s we have to use elsewhere. And even if this is the least amount of EVs possible, we might be able to redistribute them to get a bit more HP which could aid in our special calculations. In this case, we can see immediately that what we were doing was not optimal:
- -1 252 Atk Parental Bond Kangaskhan-Mega Double-Edge vs. 12 HP / 228 Def Raichu: 113-136 (82.4 - 99.2%) – approx. 2HKO
This also always survives Kangaskhan Double Edge, but only uses 240 EVs - meaning we now have 16 EVs to use elsewhere! If you’re wondering how I knew to use these numbers, I simply lowered my Defense stat one point at a time and raised my HP stat a corresponding amount. Remember, not every point you put into a stat will change the damage calcs - in this case, 244 Defense and 252 Defense give the same damage roll, as do 228 and 236 Defense EVs.
Let’s continue this process, lowering Defense and raising HP to still survive:
- -1 252 Atk Parental Bond Kangaskhan-Mega Double-Edge vs. 12 HP / 220 Def Raichu: 117-139 (85.4 - 101.4%) – 2% chance to OHKO (232 EVs used)
- -1 252 Atk Parental Bond Kangaskhan-Mega Double-Edge vs. 12 HP / 204 Def Raichu: 118-140 (86.1 - 102.1%) – 5.1% chance to OHKO
- -1 252 Atk Parental Bond Kangaskhan-Mega Double-Edge vs. 36 HP / 204 Def Raichu: 118-140 (84.2 - 100%) – 0.4% chance to OHKO (240 EVs used)
- -1 252 Atk Parental Bond Kangaskhan-Mega Double-Edge vs. 36 HP / 188 Def Raichu: 121-144 (86.4 - 102.8%) – 5.1% chance to OHKO
- -1 252 Atk Parental Bond Kangaskhan-Mega Double-Edge vs. 60 HP / 188 Def Raichu: 121-144 (84.6 - 100.6%) – 0.4% chance to OHKO (248 EVs used)
We want to minimize our odds of getting KO’d, so we’re only considering options 1, 3, and 5 above. Although the first option uses the least amount of EV’s, we’re going to use option 3 because it allows us 3 more HP points than the first at the cost of only 8 additional EVs, and it is cheaper than the 5th EV spread. This Raichu is a special case in that we want to keep its HP as low as possible beyond surviving calcs, because Endeavor is stronger the lower the user’s HP.
Our Raichu now looks like this:

With 88 EVs left to play with, let’s revisit our Groudon and Kyogre damage calculations again.
- 252+ SpA Kyogre-Primal Origin Pulse vs. 36 HP / 0 SpD Assault Vest Raichu in Heavy Rain: 118-141 (84.2 - 100.7%) – 6.3% chance to OHKO
- 252 SpA Groudon-Primal Eruption (150 BP) vs. 36 HP / 0 SpD Assault Vest Raichu in Harsh Sunshine: 127-150 (90.7 - 107.1%) – 43.8% chance to OHKO
Now that we have an HP stat in mind, we can easily find out how much Special Defense we need.
- 252 SpA Groudon-Primal Eruption (150 BP) vs. 36 HP / 20 SpD Assault Vest Raichu in Harsh Sunshine: 126-148 (90 - 105.7%) – 37.5% chance to OHKO
- 252 SpA Groudon-Primal Eruption (150 BP) vs. 36 HP / 28 SpD Assault Vest Raichu in Harsh Sunshine: 123-145 (87.8 - 103.5%) – 25% chance to OHKO
- 252 SpA Groudon-Primal Eruption (150 BP) vs. 36 HP / 36 SpD Assault Vest Raichu in Harsh Sunshine: 121-144 (86.4 - 102.8%) – 18.8% chance to OHKO
- 252 SpA Groudon-Primal Eruption (150 BP) vs. 36 HP / 60 SpD Assault Vest Raichu in Harsh Sunshine: 118-141 (84.2 - 100.7%) – 6.3% chance to OHKO
- 252 SpA Groudon-Primal Eruption (150 BP) vs. 36 HP / 68 SpD Assault Vest Raichu in Harsh Sunshine: 118-139 (84.2 - 99.2%) – guaranteed 2HKO
Either of the last two options would be acceptable - I personally chose to go with the last one for extra security. And just to be complete, here’s how Raichu stacks up against Kyogre:
- 252+ SpA Kyogre-Primal Origin Pulse vs. 36 HP / 68 SpD Assault Vest Raichu in Heavy Rain: 109-130 (77.8 - 92.8%) – guaranteed 2HKO
Note: Although in this example we go from one calculation to another without backtracking, in practice you’re very often trying to find the balance between HP, Defense, and Special Defense fluidly depending on what you’re trying to survive. For the purpose of this example, I thought it was clearer to do them consecutively - in reality, making and tweaking a spread nearly always requires lots of adjusting and backtracking.
Here’s what our Raichu looks like now:

Remember, we always invest in an odd number of stats, so our Raichu ACTUALLY looks like this:
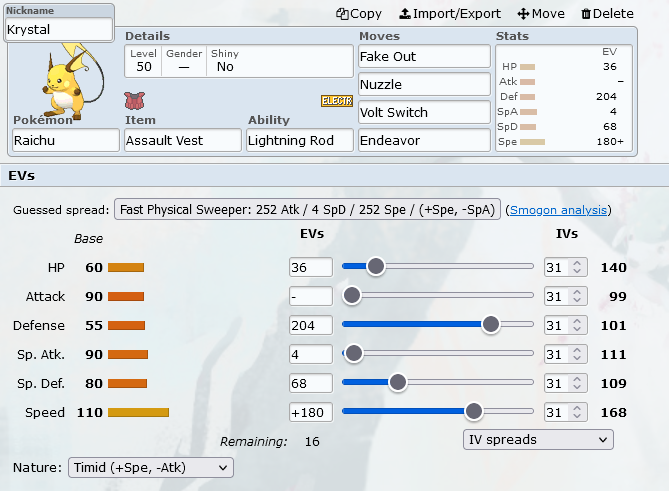
We only have 16 EVs left to play with. At this point, we’ve accomplished what we set out to do with our spread, and these 16 EVs are most likely not going to make a huge impact. You can do a few things with them, however:
- Invest in Speed, to outspeed other Pokémon that had the same goal with their speed stat as yours
- Increase the odds on a more specific calc or work towards a stretch goal
- Put into HP for general bulk
- Invest in offense for specific calcs
I personally opted to go with option 4, as it gave me higher odds of breaking Mega Gengar’s Substitute which could be very problematic for my team. Here’s my final spread:
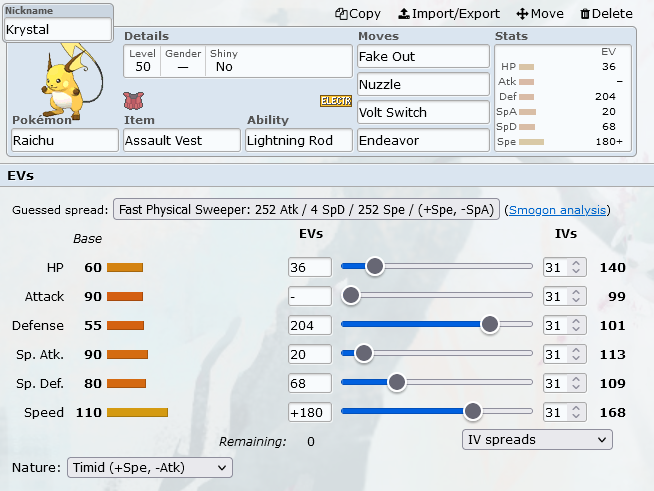
However, the following spreads would also all be just as good and have specific strengths:


For the full list of what I calc’ed going into Worlds 2016, check out this document I made and memorized before the event.
Wrapping Up
At the end of the day, the specific spread you settle on should reflect what you expect to play against and what you want to cover for. EV’ing, just like many other aspects of Pokémon, is a skill - you need to do it in order to get better. When I first started out, I was awful at making EV spreads and always needed friends to help me. Keep practicing, don’t get discouraged, and don’t forget the fundamentals - the more experience you get with it, the easier it becomes.
Sixth Pokémon Syndrome
Sixth Pokémon Sydrome
For readers who feel like they are “so close” to finishing a team.
Written by Wolfe Glick
What is Sixth Pokemon Syndrome?
Sixth Pokémon Syndrome is a term my friends and I coined to describe the situation where the final Pokémon you want to add to a team has too many roles it needs to fulfill. If you’ve ever found yourself in a situation where you really like the core five Pokémon on a team and feel like if you can just figure out the perfect last pick you’ll have a great team, you’re likely struggling from Sixth Pokémon Syndrome.
As you narrow down what your last Pokémon needs to be able to do through testing and refining your team, you may find yourself looking for some miraculous Pokémon that fixes all of your team’s problems. When your core team has too many weaknesses and the 6th Pokémon cannot fix all of them, it’s typically an issue with the first 5 Pokémon on your team. Sixth Pokémon Syndrome isn’t actually about the Sixth Pokémon, it’s about the first five.
If I think my team has Sixth Pokémon Syndrome, what should I do?
Try other Pokémon in the last slots.
Have you actually exhausted your options? If you like a core, and it almost works, keep trying with different combinations– Sixth Pokémon Syndrome happens only after you’ve tried a bunch of options and none feel right. Pay attention to how far down in the usage stats the Pokémon are that you’re trying out– while we don’t think the usage statistics are law, looking at Pokémon with extremely low usage rates can be an easy sign that you’re reaching.
Accept the flaws of your team and press on.
Every team is going to have weaknesses, and yours is not an exception. No team will be able to cover all of its flaws– and as time winds down closer to an event, you might have to make compromises or accept the flaws of your team. Furthermore, not every weakness is worth totally changing your team for– being weak to the most common team might be worth fixing a weakness, but for a random loss on the ladder, you might not have to change anything.
No matter what, it’s up to you whether you like where your team is at. If you can accept the weak points of your team, and you like your team, don’t feel like the sixth Pokémon is too much of a burden– you probably shouldn’t change much at this point.
Rework a larger part of your team or move on.
The most heartbreaking end to a team with Sixth Pokémon Syndrome is needing to take a big step back and change major aspects of your team. This step can be a challenging one to take– it’s a lot of work to build a team, and teams are kind of like art in that they feel extremely personal and it’s easy to get attached. Sometimes, you’ve got to rip the band-aid off.
In this scenario, you can:
- Revert to a much more scaled-back version of your core. What are the most important elements / your favorite elements of the team? Could you have built around them from a different angle or new perspective? Try to scale down to two or three Pokémon that you think you absolutely need, and work from there.
- Ditch your team entirely. This can hurt a lot to think about– and if a tournament is approaching quickly, it can even induce anxiety– but in some cases, it’s the best way out. It’s definitely worth your time to have built a team, even if you have to move on from it. For one, you gained experience and learned a lot about the Pokémon that you used on your team. Maybe you found subtler elements of your team that aren’t quite a “core” that you like enough to put onto another team, however you build it.
Wrapping Up
It can be painful to lose battles, and even more painful when you realize that despite your best efforts, your team isn’t going to work out. Critically evaluating how the final Pokémon (or the “sixth” Pokémon) addresses the main problems of your team can help you realize whether your team will sink or swim in the current metagame and competitive environment. If you’re working on a team and you find yourself changing its last Pokémon repeatedly, and never feeling satisfied, it may be a problem with the larger structure of the team as a whole– and you might want to take a step back.
How to Beat a Pokémon
Is one particular Pokémon bothering you? Learn how to change your team to beat it more frequently.
Written by Aaron Traylor After a bit of time playing a format, you might be rather fed up with some of its Pokémon. “I’m sick and tired of losing to Incineroar! (or insert popular Pokémon/team/strategy here)”, you might think. “Screw this! I’m going to build a team that beats it every time!” If this sounds similar to something you’ve said during teambuilding, you’re not alone– different Pokémon frustrate us all the time. What you’re looking for is a good matchup– you want to be favored to win when you play against that Pokémon or strategy. It’s natural to want to build in a better matchup against certain opposing Pokémon, especially the strong ones with high usage rates.
In extreme circumstances, you might consider a counter to that Pokémon. A Pokémon counters another Pokémon if it invalidates it in a variety of circumstances. The word “counter” tends to strongly imply that it nearly always beats the target Pokémon: a softer concept is a check, which generally means it is favored against the opposing Pokémon, though not all the time. Counter and check are words borrowed from Singles: look here for more information.
Given the complexity of Double Battles, finding a good matchup or a counter to a Pokémon is not always a straightforward or easy task, and in some cases it may even be more of an aspiration than an achievable goal. In this article, we’ll go over what countering means to us, and how we go about building better matchups versus the Pokémon that we hate to fight against.
Common Misconceptions
It’s not easy to purposely beat another Pokémon, and there are a few pitfalls that may lie in your way when you try.
- It is impossible to knock out a Pokémon 100% of the time. This may work in Single Battles, but in Doubles, your enemy can do a lot to prevent you taking a knockout, such as Fake Out, Follow Me/Rage Powder, Protecting that Pokémon, switching in Intimidate, or gaining Speed control. At the end of the day, your opponent can always switch out that enemy Pokémon and attack you with its partner.
- Simply surviving a Pokémon’s attacks (“walling”) isn’t going to cut it, either. If you have a “wall” Pokémon that can survive an attack from an enemy Pokémon, but can’t damage it very quickly in return, the enemy can always target the wall’s partner, and come back for the wall later.
- Some Pokémon are too powerful to be immediately “countered”. Some enemy Pokémon have a large effect on the battles that they are brought to and it isn’t possible to have one Pokémon whose job it is to beat it. That’s not saying that those Pokémon can’t be beaten– there are always ways to beat enemy Pokémon– but doing so may be more than a one-Pokémon job, and may require careful thought over the entire structure of your team.
- There are a lot of enemy Pokémon out there, and if you tunnel vision on beating one, your team may suffer overall. If you have one Pokémon whose “main job” is to beat another Pokémon, and it does nothing else, you’ll only be able to use it effectively in games where that enemy appears. This is a crude example, but in VGC your Pokémon often need to work flexibly together, and if you have a Pokémon that is only on your team to accomplish a minutely specific goal, it may be at odds with the rest of your team.
Because of these reasons, we advise that you make it your goal to find good Pokémon with a good matchup– Pokémon that are strong in general, have a variety of situations that they are useful in, and happen to be useful against the Pokémon that you want to beat.
How do I find a good matchup?
First, you’ll have to identify the strengths of the Pokémon you’re trying to beat. What is it good at? What about its options in gameplay make you want to beat it so badly? Make a list. Some things you could include are:
- Is the Pokémon’s offensive coverage strong?
- Does the Pokémon’s defensive stats and typing make it hard to hit for high damage?
- Does the Pokémon have utility (e.g. Fake Out, Intimidate, sleep moves, etc)
- Does anything else about the Pokémon’s stats stand out? (e.g. Speed)
- Does the Pokémon have unique moves or a unique style of playing that gives you a tough time?
Now, look at the Pokémon’s weak points, and find Pokémon with tools that help you beat that Pokémon.
You could find ways to hit that Pokémon for high damage (maybe super effective).
- However, think about what will happen if that Pokémon has utility support (e.g. Fake Out, Follow Me, Intimidate, Speed control). Make sure you can still beat it in most of those situations as well.
Is the Pokémon frail? Consider options that can outspeed and knock it out (including priority). Speed control can help in this situation.
Does the Pokémon have a reliance on other conditions (e.g. Rain, Sun, Trick Room, etc)? How do you counteract those?
Look for utility moves that are useful versus that Pokémon’s strength.
- Does the Pokémon lack offense? Consider Pokémon that can ignore its utility and set up, or stop it in some way (e.g. Taunt).
- Is the Pokémon weak to strong status conditions (burn or sleep?)
Finally, test your idea. You want to make sure that your team is working well against the enemy Pokémon that you’re targeting.
When do I want to find a counter or a check?
This situation comes up when you have a team of 4 or 5 Pokémon that you like (maybe a core), and they’re weak to one enemy Pokémon in particular. In that situation, adding a Pokémon that gives the enemy Pokémon a tough time can make your team much stronger. Maybe you want to add a Pokémon that focuses on beating that enemy Pokémon (a counter), or you want to add a Pokémon that is useful in other situations, but is merely favored against the target enemy Pokémon (a check). The strength of your response depends on how challenging that Pokémon is for you to fight, and how often it appears on opposing teams.
How to Beat a Combo or a Team
Rather than beating one Pokémon in particular, you may want to beat a combination of Pokémon or even a whole archetype. Maybe you have five Pokémon that work quite well against a number of teams, but there’s one team that is quite strong against you, and you would like to add a sixth Pokémon to beat that team frequently.
Beating Pokémon combinations, modes, cores, archetypes and teams is more challenging than beating a single Pokémon, and often you won’t find a Pokémon that does so on its own. This is because you have to consider the strengths and weaknesses of each individual Pokémon that you would like to beat, as well as the synergy between them– a Pokémon team is more than the sum of its parts. It feels easy to look for one Pokémon that counters all of a team by itself, and you can scroll through the list of available Pokémon to find something with just the right typing– but often, that dream Pokémon doesn’t exist. Here’s what to do in this situation:
- Follow the steps in the above sections and identify which aspects make each of these enemy Pokémon so strong.
- Now, follow those same steps again, but try to identify the strengths and weaknesses of their synergy: why do these Pokémon work so well together?
At this point, if you have laid out most of the framework of a team, you might not have many slots free on your team. Brainstorm some Pokémon that have a good matchup against the synergies that you have identified. It is unlikely that you’ll find one good Pokémon that covers everything, but it’s worth thinking about– you never know what you’ll find. Evaluate how it synergizes with the Pokémon that already exist on your team, and see if there is any synergy that is particularly useful against the enemy Pokémon. Maybe test some attempted solutions out on the ladder.
If that doesn’t work, it may be the case that you have to take a step back and use more than one slot to beat these particular enemy Pokémon. Now, brainstorm some combinations of strong Pokémon that would match up well against the synergy that you’ve identified. At this point, it’s synergy against synergy– can you find Pokémon with synergy that make life hard for the enemy Pokémon?
If you haven’t started building yet, but you know you want to match up well against a team and you’re looking for a starting point, start from this type of synergy. Do something strong with your core that is naturally advantaged versus the Pokémon that you want to beat.
As always, test your ideas to make sure that they do work in practice.
Wrapping Up
When you build and test teams, you’ll often find flaws in the team quickly, and want to plug up those holes with Pokémon specifically designed to fix them. However, as I’ve shown above, it is a tall order to beat or counter a Pokémon. Consistentlybeating strong Pokémon is challenging at best and nearly impossible in the most skewed metagames, and adjusting the Pokémon on teams to work against the Pokémon that you want to counter is where a lot of time is spent during teambuilding. At the end of the day, if you can pull off a team that is naturally advantaged versus the important threats that you identify, many of your battles will be easier to win.
“Island” Pokémon
“Island” Pokémon
Make sure your team doesn’t have Pokémon that get stuck doing nothing.
Written by Wolfe Glick If I asked you what the key difference is between Single Battles and Double Battles, you would probably answer that the primary difference is the number of Pokémon on the field at any given time. What’s less obvious is the various ways in which the difference in the number of Pokémon changes the ways in which battles progress. In this article, we’ll make a case on why you want to think twice before adding purely “defensive” Pokémon to your team.
What are “Island” Pokémon?
One of the key elements of Double battles is how Pokémon interact together dynamically. Your two Pokémon on the field will work together in harmony– they’ll attack different Pokémon, use supportive moves, or defend each other. Because the interaction between your two Pokémon is important, Pokémon that are typically successful in VGC have an immediate or near-immediate impact on the state of the game. This is sometimes called board presence. Impact on the state of the game can take the form of offensive pressure (threatening damage with your Pokémon’s attacks) or supportive pressure (protecting another Pokémon or setting up to threaten offense in the near-immediate future).
Most Pokémon need some offensive pressure because without it, there’s nothing stopping your opponent from ignoring that Pokémon while they destroy the rest of your team. We coined the term “Island Pokémon” because the Pokémon is isolated and often just watches as the foe ignores it, KOes all its partners, and deals with it in the end by abusing constant 2v1s after all the teammates have fainted.
In Single Battles, these traits may not be as much of an issue. Let’s look at a Pokémon like Toxapex. Toxapex is an incredibly bulky Pokémon with good defensive typing that primarily does damage using Toxic, gradually wearing down the opponent over time using recovery options coupled with its gigantic natural bulk to outlast most foes. In Single Battles, this strategy is typically highly effective and challenging to counter. So why does this more defensive approach not work in doubles?
Well, the key word for Toxapex is gradual. In order for Toxapex to do damage, it needs time for Toxic to stack up. Even if we assume that Toxapex has a favorable matchup and still has the bulk to answer most threats, this strategy still wouldn’t work because Toxapex has to have a second Pokémon next to it on your side of the field. If you try to use Toxapex to stall out your opponent’s health as Toxic gradually whittles away at them, there’s nothing stopping your opponent from continually attacking Toxapex’s partner Pokémon.
Now, obviously using both your Pokémon to attack one of your opponents’ is a pretty rudimentary strategy when it comes to Double Battles, but there’s more going on here. Toxapex offers no immediate offensive pressure - it doesn’t threaten nearly any Pokémon in the short term. In Single Battles this is fine because Toxapex is able to sponge damage and heal, but in Double Battles it won’t cut it. It cannot heal or defend its partner.
In fact, many popular defensive strategies from Single Battles don’t translate well to Double Battles for this reason– the defensive needs of Pokémon are different in Doubles. For this reason, we don’t recommend attempting “stall” strategies or including “walls” on your team.
You can see an example of this here.
Are all Defensive Pokemon Island Pokemon?
Some defensive Pokémon still exert pressure– many defensive Pokémon have seen success in VGC. The real question to ask yourself when determining whether or not a Pokémon might be an Island Pokémon is: can my opponent safely ignore this Pokémon without consequence? This explains why extremely defensive Pokémon like Amoonguss and Smeargle are not Island Pokémon, as ignoring them results in either status or attack redirection (supportive pressure). Even Pokémon like Dusclops which typically use only Night Shade and Pain Split to do damage are not Island Pokémon, as the chip damage makes Dusclops difficult to ignore.
“In my experience, the Pokémon most likely to be Island Pokémon are Pokémon that rely on slow chip turn based damage AND cannot exert offensive pressure. Some examples from Single Battles include Toxapex and Shuckle. Although Pokémon like Ferrothorn and Celesteela have performed well before, they sometimes end up in situations where they can be safely ignored. ”
— Wolfe
EXAMPLE
Some defensive Pokemon can exert pressure by setting up. One example of this is a team that attempts to set up a very annoying Chansey by using Guard Split to raise Chansey’s defenses coupled with setup moves like Minimize and Defense Curl. These teams intend to win by sacrificing their supporting pieces and then winning a 1 against 4 with the Pokemon that was set up. One example of this is the first game of this set between DaWoblefet and Raider, where DaWoblefet uses Chansey to win a 1 vs 4.
EXAMPLE
Another example is the Iron Defense/Leech Seed/Body Press/Protect Ferrothorn that popped up during Sword and Shield. Teams that lacked the coverage to damage it could quickly be overwhelmed due to Body Press’ unique property of using the Defense Stat when doing damage, allowing Ferrothorn to boost both its Defensive and Offensive capabilities. Typically strategies that set up Pokemon like Chansey or Ferrothorn are extremely susceptible to losing a game off a singular critical hit, but that’s a separate issue.
In this match between Aaron Zheng and Markus Stadter, Markus uses his Iron Defense Body Press Ferrothorn in tandem with Max Steelspike Excadrill to quickly boost Ferrothorns defenses, allowing Ferrothorns Body Press to do significant damage quickly and making it difficult to remove.
Wrapping Up
In summary, when deciding whether or not to put a Pokémon on your team, ask yourself: what is this Pokémon doing? And, do I think it will be safe in most cases for my opponent to ignore? If the answer is yes, consider using a different Pokémon. Not every Pokémon needs to be putting out tons of damage in order to be contributing to the battle, but every Pokémon does need to be an active participant.
When do You Move on from a Team?
Learn how to decide when it’s time to stop working on a team.
Written by Wolfe Glick There are ebbs and flows to each team’s performance– you might find yourself winning a tournament one weekend and then losing quickly the next. It can be especially disheartening to lose with a team that you once found success with, or with a team that you really like. You might feel like you need to move on or try a different tactic, but you’re not sure if it’s the right thing to do. This is a natural situation that many VGC players find themselves in– and here are our tips for when or when not to put a favorite team behind you.
What does it mean to “move on” from a team?
You can only bring one team to a tournament– for this reason, usually players only have one team that they’re currently working with at a time. “Moving on” means stopping work on one team and picking up a different one.
Note that moving on from a team doesn’t mean that it was a waste of time. You definitely learned something by building it and/or battling with it. Furthermore, although the main goals on a new team might be different, you could potentially include your favorite concepts from your original team as well. Finally, it’s okay to leave a team on a shelf and come back to it later– moving on doesn’t mean you’re done with the team forever! When you return to an old team with a fresh perspective, you’ll often fix old problems in new ways.
“Remember, not all weaknesses are created equally. I personally am ok with having some harder matchups, but I try to avoid matchups that put me at an especially large disadvantage. There is a difference between “this matchup will be hard for me but if I play well I can win” and “I have almost no options in this matchup, even if I play much better than my opponent I may still lose”.”
— Wolfe
Move on if you’re not having fun battling
VGC battling is something that I enjoy– if I’m not having a good time, I need to take a step back and reconsider my thought process. Having fun with a team is one of the first things that I look for when I pick teams for serious high-stakes tournaments, but it applies to any context in which you’ll play VGC. If a team doesn’t feel fun, it may be a sign that the underlying thought process doesn’t click intuitively, or that you have some underlying issue with the team that’s challenging to put into words.
Move on if you’re not in control of your battles
A good goal in a VGC battle is to control the game and to force your opponent to react to what you’re doing. Furthermore, when you’re in control, you’ll have many options for possible moves. Your team may not be doing you favors if you frequently find yourself forced to make certain moves or risk losing the game instantly. Misplays during battling are not always your fault as a battler. If you’re frequently losing games because a prediction goes wrong for you, that may be a sign that your Pokémon don’t let you fully take control of a game.
EXAMPLE
In the semi-finals of the first Player’s Cup, Yuri pilots a more standard team against Santino’s Coalossal team. In game 1, Yuri leads Excadrill and Rotom (two Pokemon with a positive matchup against Coalossal) against Santi’s Coalossal and Dragapult. This puts Yuri in a tough position - they can Dynamax Excadrill but risk losing Excadrill to a Max Flare and Surf. Alternatively, they can Dynamax Rotom, but if Santino goes for Max Flare and Surf Rotom won’t be able to pick up a KO with Max Geyser thanks to the sun being up.
Because of this, Yuri makes what I consider to be an extremely intelligent play - they go for Dynamax and Max Guard with Excadrill, to prevent the Sun from going up to allow Rotom to KO Coalossal with Hydro Pump. Unfortunately for Yuri, Santino instead goes for Max Overgrowth and KOs Rotom in game 1.
Yuri made a good play here, but it doesn’t pay off in large part because Santino identifies that Yuri is backed into a corner. Nearly every play Yuri has access to will lose to the combination of Surf and Max Flare. By identifying this, Santino is able to make an educated prediction and gain an enormous lead that leads him to victory in the first game.
In game 2, Santino makes the same play while Yuri adjusts, but Santino still ends up winning despite his Coalossal getting knocked out on turn 1. In these games, Santino had many more viable options each turn (especially early) than Yuri, and it gave a tangible advantage that resulted in his victory.
I wanted to highlight these games in particular because 1) I think Yuri played well and made good adjustments and 2) I think Yuri’s team was overall well built. It’s a good lesson that even if you find yourself in control of most of your team’s matchups, running into a matchup where you aren’t in control against a good player can be devastating for a tournament run.
It’s up to you to decide which matchups you feel comfortable not being in control of, if any at all. Sometimes teams will win tournaments despite having some really difficult matchups, but there will also be times where you run into a niche rough matchup more than you expect. Even though Yuri lost this set, the decisions they made weren’t inherently wrong. Selecting a team for a tournament and deciding where and how much control you’re willing to give up are personal decisions and can’t be evaluated on a binary right or wrong decision axis.
Move on if you believe the metagame has shifted to become unfavorable
One reason that you might struggle is that a recent metagame development has disadvantaged your team. Adjusting in this situation can be as easy as changing one Pokémon or its moves, which we definitely recommend thinking about. Sometimes, the goals of your team are fundamentally weak to what you see on a majority of teams, and that can either be due to bad luck, or maybe the metagame has turned against your team in particular. Your options are either to stubbornly choose the uphill battle with your current team, or to switch to a new strategy– we recommend the latter.
If you’re running into a rough patch on the ladder, however, that isn’t always representative of the metagame. Rather than instantly throwing your team out the window, reevaluate in a few days– sometimes, portions of the ladder get weird, and you don’t notice the same trend the next week.
Move on if you feel your opponents are too prepared for your team’s options
This scenario can happen either when you play a common team and your opponents clearly have countermeasures, or if you’re running a nonstandard element on your team that isn’t consistent enough to beat opponents.
In the former scenario where your opponents respect your strength, if you feel like you’re at a disadvantage in every game, it may be worth thinking about whether the metagame has accommodated your team. This is not always an insurmountable barrier, as many Pokémon are strong enough to resist counterplay measures. However, you’ll have to take a step back to think about how to use your Pokémon in this situation, and maybe switch up either your play or the details of your team to better respect your opponent’s counterplay. If you don’t like that your opponents understand your team in the first place, you’ll definitely want to change things up.
In the latter scenario, where your opponents seem naturally ready for your tactics, it may be worth reconsidering weaker parts of your team.
EXAMPLE
The 2016 format featured the strongest team archetype I have ever seen in my 10+ years playing VGC. Nicknamed “Big 6”, it featured Groudon, Xerneas, Kangaskhan, Smeargle, Salamence, and normally one of Cresselia/Bronzong/Talonflame. This team was so strong that despite people identifying early that it was the team to beat, it continued to have success for the entire year, even winning multiple National Championships shortly before the World Championships. However, by the time the World Championships came around, players had finally figured out consistent counterplay. This resulted in Big 6 having only two finishes in the top 8 of the world championships, despite its format-long success, with both of those teams having unique perspective on a played-out archetype.
Move on if you’ve tried everything and it just doesn’t work
Sometimes a team almost works: it’s very close to being a complete concept, but just keeps missing the mark. You’ve tried everything in that last slot, but you’re not finding the success that is so close by. This is a case of sixth Pokémon syndrome, which we have a separate article on. In this scenario, it’s much more likely that the first five Pokémon on your team are the culprit of the team feeling incohesive. Take another look at them, and if you find a solution, great– but if you keep trying and nothing works, it may be worth dropping the concept partially or entirely.
Caution: reconsider moving on if a big tournament is close
Are you reading this article because a tournament is coming up? Locking in a team on the first day of a tournament that you’ve spent weeks preparing for is a stressful decision to make. As the clock marches down and a large tournament approaches, it’s natural to get second thoughts about whatever team you’re going to choose, especially if you suffer a big loss or discover an important weakness of your team. Stay calm and evaluate your situation carefully. The first thing to consider is– how much time do you have left before the tournament? Weigh that amount of time versus how long you think it will take you to make or find a new team and become comfortable on it. Secondly, seriously evaluate the flaws of your team and whether you can outplay opponents despite them. In our opinion, locking in a knowingly flawed but well-practiced team typically leads to better performance than a team made in the last few minutes.
For more on this, check out our article on what to do when the clock winds down.
Wrapping Up
It’s not only challenging to say goodbye to a team because you need to start over, but it’s also personal– we invest a lot of time and creative energy into our teams. In the most extreme example, a team can feel like an extension of ourselves, and thinking that it might be flawed can feel like admitting a weakness in your own philosophy. Know, though, that your job as teambuilder and team selector are separate. When teambuilding, you have to be creative and follow through on your ideas. When selecting a team to battle with, you have to be honest with yourself and factually evaluate your team’s strengths and weaknesses– especially if you’re picking a team for an event that you care about.
If you don’t want to move on from your team, you don’t have to– it’s great to have a team that you feel comfortable on, and you shouldn’t lose that because of a moment of doubt. But if you’re genuinely on the fence, and your team doesn’t meet the criteria above, you might want to consider making or using something new.
Why You Should Keep an Open Mind
Don’t rule out an idea just because it’s unorthodox.
Written by Wolfe Glick Pokémon teambuilding is about making a whole lot of decisions. To make things a bit easier, many people look at what others have done or what is currently popular in order to make their own decisions easier– for example, taking a rental code that succeeded in some tournament, putting a Pokémon on your team because it’s high in the usage statistics, or picking particular moves for a Pokémon because it “has to have them”. Making assumptions and working quickly is a completely fine thing to do when building a team, but it also comes with some risks.
EXAMPLE
Adding a Pokemon: People tend to justify putting Pokemon with high usage rates on their teams “because they’re good”. Classic examples here are Incineroar, Mega Kangaskhan, and Xerneas. However, usage statistics are merely descriptive– high usage Pokemon are popular because they are good, not vice versa. The question to answer is– what does this Pokemon do, and why do I want it on my team?
Deciding on Moves, Items, or EVs: In every format there are some Pokemon that are typically used in one standardized way. For example, Xerneas almost always run Moonblast, Dazzling Gleam, Protect, and Geomancy with the Power Herb item. Many players adding Xerneas to their teams will make these same choices without giving them much thought. Although these moves are quite strong, automatically adding them runs the risk of missing a specific option that could be better for your team in particular.
Test your ideas
Namely, the risk is that you don’t always know how your ideas are going to work out. Assumptions are linked to the skill of “theorymon”, or knowing how a Pokémon team will function together in your head before you ever battle with it. When you have the time, it’s better to test an idea or a move or an EV spread rather than write it off as good or bad without seeing how it actually works in practice.
Testing your ideas is a great way to discover strong niche things about a Pokémon or trends that are currently being undervalued. Of course, part of testing effectively is learning how to identify whether something is strong or weak when you test it, which is a topic for another article. You also don’t need to equally distribute time across testing your ideas - often even one game is enough to tell an idea isn’t going to work.
Sometimes ideas that don’t work will lead you to ideas that will. Being able to identify the strong points, trends, or concepts on a team can push you towards something strong, even for ideas that “fail”. Additionally, if you want to eventually be able to use ideas that aren’t already known to be strong you’ll need to get experience for yourself identifying good starting points and supplemental pieces, even if it’s more challenging than taking something already established as good.
Pushing the Envelope
When teambuilding, you give yourself more freedom by questioning every aspect of your team, from the broad reason you chose each Pokémon down to the last EV and move. Being especially intentional can be a strength when used to make smart creative choices to push the envelope of a team and showcase ideas not already popular, but it is also intensively time- and effort-consuming and can be a hindrance if the choices you’ve made don’t hold up in practice. Not every tournament winning team has novel ideas, though many do. Finding the balance between creativity and established strength is a difficult skill that is necessary when deviating from the norm.
Exceptions (times when we support making assumptions)
As with everything, there’s exceptions to our guidelines- the biggest one being when you’re on a time crunch. “Time crunch" in this context is when there’s a deadline for your team to be ready - normally for a tournament. When the clock is ticking, assumptions are great– by working with ideas that you already know are strong, you can iterate on a team faster.
Additionally, assumptions are only a negative in teambuilding - assumptions are a necessary component of most high level Pokémon battles.
Be Objective and Constructive
A few disclaimers - people tend to get very attached to their own original ideas especially if they want to go against the grain. I’d strongly encourage anyone who wants to build creatively to try and remain as objective as possible about their own ideas so as to improve in the long run. It’s good to remember that teambuilding is subjective - I often see established players immediately ruling out a newer player’s idea on the basis that it hasn’t yet seen success. Even if someone else doesn’t think an idea has merit, that doesn’t necessarily mean it’s the case. There’s very rarely only one “right way” to do things in Pokémon.
Best of 1 vs Best of 3
Best of 1 vs. Best of 3
Learn about how different tournament styles influence team selection.
Written by Wolfe Glick One major distinction when playing Pokémon against another person is how many games you need to win in order to win the set. Most major Pokémon tournaments are best of 3 (the first player to win 2 games wins), though there are occasions where best of 1 (winning one game wins you the set) is used.
When teambuilding, it’s important to keep in mind whether you’ll primarily use the team in best of 1 or in best of 3. In best of 3, you’ll have more time to test and adjust your gameplans, assess the threats on your opponent’s side of the field, and scout for key information such as moves, items, speed tiers, and abilities. In best of 1, a single wrong move can spell defeat, meaning players are incentivized to catch opponents off guard through play or strategy. Although many decisions for best of 3 games are made during battling, many players approach best of 1 and best of 3 battles differently at the teambuilding stage.
Best of 1
In best of 1, you only get one shot at beating your opponent, so there’s little room for error. Furthermore, in most best of 1 situations, you won’t know the details of your opponent’s team outside of the information that you get during the battle– and you won’t find out what surprises your opponent has in store before they happen. Best of 1 battles are challenging because you have to react and hedge your bets appropriately to deal with multiple potential options from your opponents.
Surprise factor is a big deal in best of 1 due to how there often is far less wiggle room to react to something unexpected. Surprise factor can include an unorthodox move, item, Pokémon, or even EV spread. This is sometimes also called a gimmick. Many players are excited by the chance to surprise their opponents with an uncommon strategy or tactic; but your opponents may be doing the same as well! This means that players will build teams explicitly for the purpose of using them in best of 1 tournaments.
I personally don’t often build teams with a surprise factor explicitly for the sake of surprising my opponent. Our recommendation is that you make the choices that are best motivated for your team regardless of whether or not they end up surprising your opponent.
That being said, if you’re interested in adding surprise factor to your team (which is certainly not mandatory), here’s our recommended steps:
- First, you have to know what opponents will expect of your Pokémon. You won’t be able to subvert their expectations otherwise.
- Make sure that your surprise is effective. Is it going to actually accomplish something in battle?
- Test your surprise factor out; how often do opponents fall for it? If you catch your opponent off guard, and pull off your strategy, is it as effective as you expected?
- Is it still effective even if opponents know it’s coming? (It may no longer be a gimmick in this case.)
EXAMPLE
One example of surprise factor is the Trick + Eject Button strategy showcased in this video. The strategy works by using the move Trick (or Switcheroo) to give your opponents Dynamax Pokemon an Eject Button, while following up with an immediate fast attack to force them off the field. While gimmicky, this strategy is still effective once your opponent is aware of it as it may cause them to be more hesitant to dynamax or force them to use more resources to safely dynamax.
On the other hand, how do you deal with your opponent’s surprise factor? Doing so requires knowledge, experience, and intuition.
You can play safely and scout for moves with Protect.
- You can also make less committal moves, or moves with less severe downsides if your opponent has something unexpected
Are you able to cover multiple possibilities with one good move?
Can you make any assumptions based on how your opponent is behaving? Are they positioning their Pokémon in a way that allows you to draw conclusions?
- I often ask myself “What are the moves/items/abilities they could have that would cause me to lose this otherwise winning position?”*
EXAMPLE
In this match between Wolfe Glick and Aaron Zheng, on the second turn of game 2 Aaron goes for Max Flare with Noivern as opposed to a stronger max move such as max Dragon. Because Max Flare was strictly worse than the other options, I (Wolfe) was able to infer that another Pokemon on his team had Weather Ball, as there was no other reason in my mind that Aaron would choose to go for Max Flare in that position.
Best of 3
In best of 3, consistency is key. While there is still room for creativity and unorthodox tactics, teams need to be able to hold up on their own even once the opponent knows about their strategies. Teams with a more defensive backbone also have more breathing room in a best of 3 battle. Additionally, best of 3 play can include more complex strategies such as multiple modes of a team that require your opponent to guess which threats you will bring.
EXAMPLE
At Worlds 2017, I had a very tricky team to deal with because it had two distinct modes. The first mode was the more dangerous one, and utilized the Mimikyu and Snorlax combination that had been present throughout the format. The second mode used Kartana, Arcanine, Tapu Fini, and Togedemaru as a generally solid well balanced team composition with multiple threats and supports. Opponents would focus on Mimikyu and Snorlax during team preview of game 1, allowing my second mode to win. When opponents adjusted for mode 2 during game 2, I would switch to Mimikyu and Snorlax and win. I did this in nearly every set of the tournament, but one example is this set against Toby.
In a best of 1 format, you’re incentivized to use all your tricks and catch opponents off guard early in a game to try and snowball an advantage. In a best of 3, conserving key information until a crucial moment can be the difference between winning and losing. This means that teams explicitly designed for best of 1 play might not work as well in best of 3. Conversely, teams designed for a best of 3 tournament are used in best of 1 situations all the time (such as testing a team on the ladder). So, I would really only say that there are teams designed for best of 1 (reliant on surprise factor) and teams that are not designed for best of 1.
To learn more about battling in best of 3, click here.
Wrapping Up
As with everything in this guide, the guidelines above aren’t hard and fast rules. There are times where a team with lots of surprise factor performs well in a best of 3 tournament and times when teams with absolutely no tricks win a large best of 1 event. Whether a tournament is best of 1 or best of 3 is something you should consider when building, but at the end of the day the most important thing is to use a team that you have fun playing with and feel is strong– check out our guide to team selection for tournaments for more.
How do You Know if a Team You’ve made is Good?
How Do You Know if a Team You’ve Made is Good?
Learn how to assess the teams you build.
Written by Aaron Traylor Although it’s hard to paint things as good or bad in VGC because so many aspects of the game are subjective and contextual, you probably want to know if you’re on the right track when you’re teambuilding. I’ve come up with some examples of positive indicators that I look for to tell me if I’m working in the right direction.
The Team Is Fun
Pokémon is a game and I want to have fun, even if I’m taking it super seriously and competitively. If I’m enjoying playing a team in my battles– even my most serious ones, or the ones that I lose– that’s the first sign that I want to keep moving forward with that team.
You’re In Control
You should feel like you have lots of options in your games– you should feel like there are many paths to victory, and you shouldn’t feel like you’re forced to make any moves on any given turn or you’ll lose immediately. I like it when a team allows me to be a better player than my opponent (but doesn’t require me to be better than them). Pay attention to when your Pokémon are acting proactively and reactively. If your opponents are threatened to respond to your Pokémon or risk losing ground, you’re in the driver’s seat, and you’re able to direct the course of the battle.
Furthermore, a good team will make it easy for you to win games– winning should feel natural, and you shouldn’t have to invest too much cognitive effort to get the Pokémon to do what you want them to do. In other words, the Pokémon should do the work. That’s not saying that every game will be easy– many of your games will be hard– but when your Pokémon make your life easier, you’re able to play in a way you feel comfortable with, and that’s what leads to success in battles.
You Know Your Weaknesses, and You’re Okay With Them
Every team will have weaknesses, even if it’s the best team you’ve ever made. Be up front with yourself about your team’s weaknesses and what you have to do to win against them. If you’ve made a threatlist, identify which Pokémon and teams you’re strong against, and think about how common your weaknesses are. If your team is naturally advantaged versus common Pokémon and archetypes, that’s a great indicator of future success. And if the elements which you are weaker against are less common– you might be able to make it through a tournament without ever battling against them.
“Remember, not all weaknesses are created equally. I personally am ok with having some harder matchups, but I try to avoid matchups that put me at an especially large disadvantage. There is a difference between “this matchup will be hard for me but if I play well I can win” and “I have almost no options in this matchup, even if I play much better than my opponent I may still lose”.”
— Wolfe
Consistency is Key
Especially if you’re interested in best of 3 tournament play, good teams are consistent: they work even if the opponent knows most of the details or has played against the team before. You’ll play the same opponent in both Swiss and Top Cut more frequently than you expect. I spend most of my time in practice making sure my teams consistently work in best of 3 because I think it’s the best way to identify whether a team will work for me in a tournament. Check out our consistency checklist for more information about how you can identify whether your team is consistent.
Wrapping Up
At the end of the day, metagames advance and change, and a team’s performance is often bound to the changes in context like a boat is to a current. I build teams to be used in a particular time and place, and the above criteria help me decide when I’m ready to take a team to a tournament. Use my ideas to come up with your own list of indicators that a team is ready for whatever situation you want to use it in.
How Do You Know Which Team To Take To A Tournament
How Do You Know Which Team to Take to a Tournament?
Things to consider when a tournament is approaching.
Written by Aaron Traylor If you have several teams that you like pretty much equally, and you have a tournament coming up, it can be hard to choose just one to lock in. Which one will give you the best shot of success? Here’s how we decide.
If you’re feeling panicked, we also recommend our article about making last-minute decisions before a tournament.
Comfort vs. metagame relevance
If you’re keeping a close eye on the metagame, you may have a team in mind that takes advantage of the metagame trends– a “smart meta call”. The issue with these teams is that often you don’t have very much experience with the team because it may be newly built and you’ll have less time to learn how it plays. These teams can often seem tempting in comparison to teams which you know inside and out, but aren’t as cutting-edge.
Typically, I prefer to pick teams that I am comfortable with and know well. I value having at least a week or two of experience over coming up with something last-minute that seems strong. This is because tournaments can often take a long time, and I’d prefer to be in my comfort zone when I play in them, so I don’t get exhausted by the end of the day. This doesn’t mean that I can’t tweak details the day before, but generally, I want to understand the game plans for the team that I’m using beforehand, and not figure them out over the course of the tournament (which is possible, and potentially a fun tournament experience– it’s just not how I like to play.)
Consistency
In tournaments, my teams should work well in many different scenarios versus many different players, some of which could be quite strong. I tend to pay close attention to how consistent my team is and rely on surprise factor very sparingly. Which of your teams gives you the best options if your opponent has seen your team before, or maybe even heard about your team from a friend who played you in an earlier round? Check out our consistency checklist for more ideas.
Consider your tournament goals
What do you want out of the tournament? Are you aiming to reach a certain placing (maybe to earn Championship Points), to top cut, or even to win it all? Different teams are better suited for each type of tournament run.
- If your goal is to just get championship points out of the tournament, your goal is probably to land in the top 32, 64, or even 128. You might want to consider a consistent and standard team with few risky choices that you know well.
- If your goal is to top cut, your goal is similar to the above player– although the margin for error is a little bit smaller.
- If your goal is to win the tournament, you may want a team that takes a few risks or advances past what players expect (especially if the tournament is larger). The further you go in a tournament, the more people will be prepared for standard teams, and you want to force them out of their own comfort zone. This doesn’t mean to use surprise factorfor the sake of surprising your opponents, but if winning the tournament is your goal, we recommend either being prepared to play the team extremely well or doing something unique.
Further, the type of tournament that you’re going to will also make a difference in how effective each team is:
If it’s a small tournament (such as an 8-person Premier Challenge), it’s tough to say which strategy will lead you to the top, because the matchups you’ll run into depend on the few other people that attend.
For a large tournament (Regionals, Internationals, Worlds, etc), players will be more varied but will generally be aware of larger metagame trends.
- At large tournaments, there’s a smaller chance someone will know you and your team, which means that surprises will be a bit more effective.
- It is typically more challenging to make Top Cut the larger the event gets.
- Furthermore, larger events can be tiring– if you have to play 9 or even 10 rounds with a team, make sure it’s a team that you like. In these scenarios, we recommend team styles that finish games faster.
Wrapping Up
When the clock ticks down, you can only pick one team to bring to a tournament, and sometimes I get lost in the what-ifs– which team would I be sadder to leave behind? The important thing is to feel confident in your choice going into a tournament, so make sure to give yourself time to decide, and to realize what the right option is.
What to do When Time is Running Out
What do You do When Time is Running Out?
A guide to approaching crunch time before a tournament.
Written by Wolfe Glick For VGC tournaments, you’ll “lock” the six Pokémon on your team at the start of the tournament, and you won’t be able to make any changes to them until the tournament ends. When a big tournament nears, the day when teams are locked can loom over you. As you approach team lock, you may realize that you don’t feel good about locking in your team, and if this tournament is high stakes or otherwise means a lot to you, that may mean that the approaching deadline comes alongside panic, anxiety, or other unpleasant feelings.
If this sounds like you, or you could see the above paragraph applying to you in the future, that’s alright. Firstly, if you’re stressing out, you are not alone. It’s natural to feel pressured in these situations, and it will happen to every player during their VGC career. In fact, if it’s right before a tournament, many players probably feel the same way you do at this very moment.
Here’s some advice based on how we make these situations less stressful for ourselves.
Remain Calm
Keeping a cool head will help you make the most out of the time before the tournament. If you’re not in love with the team that you thought you were going to bring to this event, there’s a real chance that you may have to accept its flaws or rework major parts of your team. Teambuilding involves making a lot of decisions, and if you have a clear mind, you’ll be more objective and confident in the decisions that you’ll make before the tournament begins. You know yourself better than we do– what headspace do you need to be in to make decisions that you feel comfortable with?
Consider How Much Time You Have Left
How much time does it take you to prepare for a tournament? Here’s a checklist of the things you’ll need to do before the tournament, in order:
- Build or find a team
- Finalize EV spreads, moves, and items
- Get ladder / best of 3 practice – iterate on team if necessary
- Catch or breed the Pokémon that you’ll need in game
- Finalize the Pokémon in game (EVs, items, Hyper Training, etc)
- Fill out team sheet
- Double-check all stats on the sheet vs. EVs/IVs vs. in game
Think about how much time you’ll need to do each of the above things, and then think about when you’ll be able to get them done before the tournament. Based on how much time you have left before the tournament begins (factoring in work, school, family, etc), and how much you need to change your team, you may be fine– or you may have to abbreviate your schedule.
Focus on the Format’s Fundamentals
When the clock is ticking down, it’s easy to get wound up about all of the different teams and Pokémon that you might play against. When this happens, it’s easy to start thinking in circles and feel increasingly backed into a corner, especially with regards to your options for team choice. You may feel like you have to have a counter for every single Pokémon or archetype out there.
Our advice in this situation is to take a step back and break what you know about the format and metagame down into simple, concrete statements. What are the strongest Pokémon? Are any of them so powerful that you couldn’t see yourself not using them or having a plan against them? What teams do you think you’ll play against most frequently? From there, you’ll be able to make a strong, focused game plan going into the tournament– rather than trying to do too much at once.
There are No Magic Bullets
Especially if you’ve been focusing on a format, metagame, or several popular teams for a long time, you might start to look frantically for one Pokémon or combination of Pokémon that is going to answer all of the threats at once. These Pokémon rarely exist. Pokémon are not strong because they are popular, but they are often popular because they are strong– and a set of the format’s most popular Pokémon can often have a variety of strengths that isn’t possible to cover for at a teambuilding level. Rather than searching for a magic answer that accounts for everything, focus more on finding Pokémon that have strengths that you believe in, and know which of the popular Pokémon you’re taking on weaknesses to.
EXAMPLE
Going into the North American Internationals in 2019, Aaron Traylor and I struggled to find a team we liked until closer to the event than we would have preferred. We managed to build a team that fit a lot of our criteria, but one of the holes that we identified was the teams absolutely abysmal Ferrothorn matchup. We could have weakened our Xerneas matchup by dropping Roar for Flare Blitz on our Incineroar, but this seemed like a mistake. In the end, we decided that we were ok with having a bad Ferrothorn matchup and hoped to either not play against any or rely on outplaying them. I did end up playing against two Ferrothorn in back to back rounds and beat them both, here’s how the game against the second one ended.
Take a look at it here.
Similarly, other people’s teams may look excellent, and they may even look like they outclass your own. You may have a real desire to scrap what you’ve been working on and take someone else’s team without hesitation. This “grass is greener” effect is particularly dangerous, and we urge you to be cautious in these situations. Every team has its weaknesses, and when you look at a new team, you might not realize what that team’s weaknesses are at first glance. This experience is the complete opposite of when you use a team that you know inside and out, where you will be acutely aware of the weaknesses. Being surprised by a shortcoming of your own team is one of the worst things that can happen during a tournament– making a concrete plan during a battle is key to success, and your opponents and the RNG will be doing enough to trip you up as it is! Make sure to evaluate whatever teams you consider using at the tournament as keenly as you would if you created it yourself.
Play to your Strengths
Prioritize having experience with Pokémon and strategies rather than switching to an entirely new technique. You have some certain way of Pokémon that feels natural and correct to you– don’t lose that, because when it’s time to make difficult decisions during a battle, you want to put yourself in your comfort zone and fall back on your own experience as much as you can. You’ll want to expend your cognitive effort during the tournament on more than figuring out how your team works. When do you feel best playing Pokémon? How do you get to that position from a teambuilding stage? Are there mechanics or tactics that make you feel in control? Work from there.
A Team Doesn’t Need to be Perfect to Win
Many players believe that a team needs certain properties to be good. While having good matchups, novel ideas, and smart tech options are a few things that are often found on successful teams, none of these are necessary to secure victory. Knowing the weaknesses of your own team well will help you to understand the countermeasures you can take for covering them, and experience with a team can be the most important factor in determining a win. In some cases, it’s better to have a flawed team that you know how to pilot well rather than a perfect team you’re inexperienced with.
Furthermore, you don’t have time to be picky, and you might have to cut corners in your process. In this guide, we talk a lot about our teambuilding principles, but when a tournament comes, it’s much better to find something that works than to worry about following good principles to the letter.
Wrapping Up
Picking a team to use at a tournament can sometimes be one of the more stressful elements of the VGC experience; second only, perhaps, to playing in the tournament itself. As challenging as it can be, try to look at the situation objectively within the time that you have left. Play to your own strengths, and try to make piloting the team at the tournament feel as natural as possible. When all is said and done, have fun at the tournament– that’s why we play VGC!
Part 9 — Teambuilding Methodology (HARI)
Section 15 – Construction d’Equipe
15.1 Introduction a la Construction d’Equipe en Doubles
La construction d’equipe (teambuilding) est le pilier central de la competition Pokémon. Dans Pokémon Champions, le format est exclusivement le Double Battle : chaque joueur amene 6 Pokémon, en selectionne 4 pour le combat, et en envoie 2 sur le terrain simultanement. La victoire s’obtient en mettant KO les 4 Pokémon selectionnes par l’adversaire, ou en ayant l’avantage au timer.
Contrairement au Solo, le Double impose de penser en termes de synergies : vos deux Pokémon sur le terrain doivent se compléter, se protéger mutuellement, et creer des situations ou la somme est supérieure aux parties. Un Pokémon individuellement puissant peut être mediocre en Doubles s’il n’a pas de partenaires adequats.
Les 6 Principes Fondamentaux du Teambuilding Doubles
Controle de la vitesse – Qui attaque en premier decide souvent du match. Chaque equipe doit avoir au moins un moyen de manipuler l’ordre d’attaque (Vent Arriere, Distorsion, Paralysie, Vent Glace).
Couverture offensive – Vos 6 Pokémon doivent pouvoir toucher l’ensemble du metatjeu de maniere super-efficace. Aucun type adverse ne doit être “intouchable”.
Couverture defensive – Vos resistances et immunités doivent permettre des switches securises. Si votre equipe entiere craint le type Sol, un seul Séisme adverse peut vous balayer.
Synergies de terrain – Les deux Pokémon presents simultanement doivent avoir des interactions positives : redirection + setup, Intimidation + attaquant fragile, meteo + abuseur.
Plan de jeu clair – L’equipe doit avoir un mode de victoire primaire (le “win condition”) et un mode alternatif. Exemple : votre plan A est de sweeper sous Vent Arrière ; votre plan B est de pivoter defensivement avec Intimidation quand le plan A est contrecarre.
Adaptation en Team Preview – Vos 6 Pokémon doivent offrir suffisamment de flexibilite pour que la selection de 4 puisse s’adapter a l’equipe adverse revealee en Team Preview.
15.2 Les 8 Synergies Fortes du Debut de Pokémon Champions
Source : HARI (@HariPKMN) – “8 Synergies TRES FORTES au debut de Pokémon Champions”
Ces synergies sont des combinaisons de 2-3 Pokémon dont l’interaction cree un avantage stratégique majeur. Certaines sont des classiques eprouves du VGC remontant a 2014 ; d’autres exploitent des mécaniques plus recentes jamais confrontees aux Méga-Évolutions.
Avertissement important : Ces synergies sont basees sur le pool de Pokémon confirmes dans les trailers avant le lancement. Le roster definitif sera plus large, ce qui pourrait modifier la viabilite de certaines combinaisons.
SYNERGIE 1 : Le Lock avec Méga-Ectoplasma
Pokémon : Méga-Ectoplasma (Mega Gengar) + Farfaduvet (Whimsicott)
Talents :
- Méga-Ectoplasma : Marque Ombre (Shadow Tag) – empeche les adversaires de quitter le terrain (sauf Spectres ou porteurs de Marque Ombre)
- Farfaduvet : Farceur (Prankster) – priorité +1 sur toutes les attaques de statut
Attaques de Farfaduvet :
- Encore – Force la cible a repeter sa derniere attaque pendant 3 tours (avec priorite Farceur)
- Croco Larme (Fake Tears) – Baisse la Defense Speciale de -2 crans (avec priorite Farceur)
- Provoc (Taunt) – Empêche les attaques de statut
- Vent Arrière (Tailwind) – Double la vitesse des allies pendant 4 tours
Attaques de Méga-Ectoplasma :
- Entrave (Disable) – Empêche la cible d’utiliser sa derniere attaque lancee pendant 4 tours
- Ball’Ombre (Shadow Ball) – Attaque speciale Spectre STAB
- Bombe Beurk (Sludge Bomb) – Attaque speciale Poison STAB
Plan de jeu – Le Lock Total :
- Farfaduvet utilise Encore (priorite) sur un adversaire qui vient d’utiliser une attaque de statut (Abri, Danse Lames, etc.)
- L’adversaire est bloque sur cette attaque. Sa seule issue : switcher.
- Marque Ombre de Méga-Ectoplasma empêche le switch.
- Méga-Ectoplasma utilise Entrave : le Pokémon adverse ne peut plus utiliser la seule attaque autorisee par Encore. Il est force d’utiliser Lutte (Struggle), s’infligeant des degats et devenant totalement inutile.
Plan de jeu – L’Offensive Rapide :
- Farfaduvet utilise Croco Larme (priorite) sur une cible : -2 Défense Spéciale.
- Méga-Ectoplasma, très rapide (130 Vitesse de base en Mega), attaque immediatement la même cible avec Ball’Ombre ou Bombe Beurk pour un KO probable.
Ce que ca counter : Les Pokémon dependant de moves de statut pour se placer (Danse Lames, Abri repete, Distorsion).
Ce qui le counter : Il faut eliminer Farfaduvet ou Ectoplasma AVANT que le lock ne s’installe. Les Pokémon Spectre peuvent fuir Marque Ombre.
Partenaires recommandes :
- Felinferno (Incineroar) – Intimidation, switch sur les attaques Spectre/Ténèbres
- Ekaiser (Kommo-o) – Talent Pare-Balles (Bulletproof) = immunise a Ball’Ombre et Bombe Beurk, excellent contre un Méga-Ectoplasma adverse
Note historique : Le quatuor Farfaduvet + Méga-Ectoplasma + Felinferno + Ekaiser etait très fort en VGC 2018. HARI considere que ce core sera naturellement reproduit au debut de Champions.
SYNERGIE 2 : Hyper Offense Physique Anti-Intimidation
Pokémon : Méga-Drattak (Mega Salamence) + Scalpereur (Kingambit)
Talents :
- Méga-Drattak : Peau Celeste (Aerilate) – transforme les attaques Normal en Vol + boost de 20%
- Scalpereur : Acharne (Defiant) – +2 Attaque si une stat est baissee par l’adversaire = contre direct a Intimidation
Attaques de Méga-Drattak :
- Damocles (Double-Edge) – Devient une attaque Vol surpuissante via Peau Celeste
- Draco-Meteore – Option speciale pour surprendre les joueurs attendant du physique
- Megaphone (Hyper Voice) – Devient attaque de zone Vol
- Temper Flare – Couverture Feu
Attaques de Scalpereur :
- Coup Bas (Sucker Punch) – Priorité Ténèbres
- Genusection (Kowtow Cleave) – Attaque Ténèbres puissante, ne rate jamais
- Tête de Fer (Iron Head) – STAB Acier
Pourquoi ca marche : Scalpereur punit l’adversaire qui utilise Intimidation (omnipresente via Felinferno). Chaque Intimidation subie donne +2 Attaque a Scalpereur via Acharne (resultat net : +1). Méga-Drattak peut alterner physique et special pour s’adapter aux contres adverses.
Ce que ca counter : Les equipes basees sur Intimidation. Les Pokémon a défenses boostees (Genusection ignore les boosts).
Ce qui le counter : Pokémon plus rapides menacant les deux. Feu Follet neutralise les attaquants physiques.
Note importante : Scalpereur est meilleur que Scalproie (Bisharp) même sans Evoluroc (Eviolite). Ne gaspillez pas de VP sur Scalproie.
SYNERGIE 3 : Double Degats de Zone (Soleil)
Pokémon : Méga-Dracaufeu Y + Nymphali (Sylveon) + Famignol (Maushold, support)
Talents :
- Méga-Dracaufeu Y : Sécheresse (Drought) – invoque le Soleil pour 5 tours
- Nymphali : Peau Féerique (Pixilate) – transforme Normal en Fee + boost 20%
- Famignol : Garde-Ami (Friend Guard) – reduit les degats recus par l’allie de 25%
Attaques de Méga-Dracaufeu Y :
- Canicule (Heat Wave) – Attaque de zone Feu, boostee par le Soleil
- Lance-Soleil (Solar Beam) – Se charge en 1 tour sous le Soleil, couverture Eau/Roche/Sol
- Surchauffe (Overheat) – Option mono-cible très puissante
Attaques de Nymphali :
- Megaphone (Hyper Voice) – Devient attaque de zone Fee via Peau Féerique
Attaques de Famignol :
- Par Ici (Follow Me) – Redirige toutes les attaques mono-cible sur Famignol
- Croc Fatal (Super Fang) – Divise les PV actuels de la cible par 2
- Ruse (Feint) – CRUCIAL : brise Abri (Protect) ET Garde Large (Wide Guard)
- Croco Larme (Fake Tears) – Aide les attaquants speciaux
Objets :
- Nymphali : Spray Gorge (Throat Spray) pour +1 Attaque Speciale après Megaphone, ou Lunettes Choix (Choice Specs), ou Plume Enchantee (Pixie Plate)
- Famignol : Ceinture Force (Focus Sash) ou Cape Obscure (Covert Cloak) contre Bluff
Plan de jeu : Spammer Canicule + Megaphone = deux attaques de zone de types Feu et Fee, une combinaison très difficile a resister. Famignol protège les attaquants avec Par Ici et affaiblit les tanks avec Croc Fatal.
Ce qui le counter : Garde Large (Wide Guard) bloque les deux attaques principales – c’est pourquoi Ruse sur Famignol est indispensable. Le controle de la meteo adverse annule le boost solaire. Canicule et Croc Fatal ont 90% de précision, ce qui peut poser probleme.
SYNERGIE 4 : Auto-Activation de Delestage (8G)
Pokémon : Farfurex de Hisui (Sneasler) + Lanssorien (Dragapult)
Talents :
- Farfurex : Delestage (Unburden) – double la Vitesse si l’objet est consomme ou perdu
- Lanssorien : Corps Sain (Clear Body) – empêche les baisses de stats par l’adversaire
Attaques de Farfurex :
- Griffe Funeste (Dire Claw) – 80 puissance, 50% de chance d’empoisonner, paralyser ou endormir
- Close Combat – Attaque Combat très puissante
- Coaching – +1 Attaque et +1 Défense a l’allie
- Bluff (Fake Out) – Temporisation
Attaques de Lanssorien :
- Draco-Fleches (Dragon Darts) – Attaque signature : frappe une fois chaque adversaire (ou 2 fois la même cible en 1v1)
- Hantise (Phantom Force) – Attaque Spectre en 2 tours, passe a travers Abri
Objet de Lanssorien : Bandeau Choix (Choice Band)
Plan de jeu :
- Lanssorien, plus rapide, utilise Draco-Fleches. L’une des fleches touche son allie Farfurex.
- Si Farfurex tient un objet qui s’active en etant touche (Baie, Graine), il le consomme.
- Delestage s’active : Vitesse de Farfurex doublee.
- Farfurex, desormais le plus rapide, utilise Coaching sur Lanssorien pour le booster avant son prochain tour.
Ce qui le counter : Les Pokémon Fee (immunises a Draco-Fleches, empechant l’activation). Par Ici peut rediriger la fleche destinee a Farfurex.
Note : Synergie recente apparue en Reglement H (Ecarlate/Violet). Jamais confrontee aux Megas auparavant.
Partenaires recommandes :
- Scalpereur – Profite aussi de Coaching, contre les Spectres avec Genusection et Coup Bas
- Méga-Aligatueur (Mega Feraligatr) – Partenaire physique profitant de Coaching
SYNERGIE 5 : Dracolosse + Méga-Metalosse
Pokémon : Dracolosse (Dragonite) + Méga-Metalosse (Mega Metagross)
Talents :
- Dracolosse : Multi-Ecaille (Multiscale) – divise par 2 les degats recus a PV pleins
- Méga-Metalosse : Griffe Dure (Tough Claws) – +33% puissance des attaques de contact
Attaques de Dracolosse :
- Rafale Ecailles (Scale Shot) – Multi-coups, augmente la Vitesse et baisse la Défense
- Balayage (Low Kick) – Couverture contre Scalpereur
- Vent Arrière (Tailwind) – Controle de vitesse
- Vitesse Extreme (Extreme Speed) – Priorité puissante
Attaques de Méga-Metalosse :
- Tête de Fer (Iron Head) / Tacle Lourd (Heavy Slam) – STAB Acier
- Psykoud’Boul (Zen Headbutt) / Psycho-Croc (Psychic Fangs) – STAB Psy
- Pisto-Poing (Bullet Punch) – Priorité Acier
- Trepignement (Stomping Tantrum) – Couverture Sol
Objet de Dracolosse : De Pipe (Loaded Dice) – garantit au moins 4 coups de Rafale Ecailles
Pourquoi ca marche : Dracolosse n’est PAS une Méga-Évolution, ce qui libere le slot Mega pour Metalosse. Méga-Metalosse gere les types Fee qui menacent Dracolosse. La double priorité (Vitesse Extreme + Pisto-Poing) assure une pression constante.
Ce qui le counter : Intimidation, Feu Follet. Pokémon plus rapides avec des frappes super-efficaces.
Partenaires recommandes :
- Farfurex de Hisui – Coaching pour booster l’un ou l’autre
- Felinferno – Support universel (Intimidation, Bluff, Dernier Mot)
SYNERGIE 6 : Méga-Kangourex + Superdofin – Pression de Priorités
Pokémon : Méga-Kangourex (Mega Kangaskhan) + Superdofin (Palafin) + Felinferno (Incineroar)
Talents :
- Méga-Kangourex : Amour Filial (Parental Bond) – chaque attaque frappe 2 fois (2e coup = 25% degats)
- Superdofin : Supermutation (Zero to Hero) – se transforme en forme Heros après avoir quitte le terrain
- Felinferno : Intimidation
Attaques de Méga-Kangourex :
- Bluff (Fake Out) – Priorite qui frappe DEUX FOIS (Amour Filial), degats enormes
- Coup Bas (Sucker Punch) – Priorité Ténèbres
- Point Boost (Power-Up Punch) – +1 Attaque par coup, x2 via Amour Filial = +2 par tour
Attaques de Superdofin :
- Poing Sonique (Jet Punch) – Priorité Eau, extremement puissant en forme Heros
- Aqua-Breche (Wave Crash) – Attaque Eau très puissante
Attaques de Felinferno :
- Bluff – Priorité
- Dernier Mot (Parting Shot) / Demi-Tour (U-turn) – Pivoter pour faire entrer Superdofin
Plan de jeu :
- Tour 1 : Méga-Kangourex + Felinferno = double Bluff, neutralisant les 2 adversaires
- Felinferno pivote avec Dernier Mot ou Demi-Tour pour faire entrer Superdofin
- Superdofin se transforme en forme Heros et utilise son Poing Sonique devastateur
- Méga-Kangourex continue de snowball avec Point Boost
Ce qui le counter : Intimidation affaiblit les trois attaquants physiques. Feu Follet les neutralise. Garde-Ami reduit les degats.
Partenaires recommandes :
- Gaulet (Amoonguss) – Poudre Fureur pour la redirection
- Ectoplasma non-Mega avec Ceinture Force – Contre Méga-Kangourex adverse, gere les types Combat
SYNERGIE 7 : Mimiqui + Ursaking – Distorsion
Pokémon : Mimiqui (Mimikyu) + Ursaking (Ursaluna)
Talents :
- Mimiqui : Fantomasque (Disguise) – ne subit aucun degat de la premiere attaque recue (deguisement brise)
- Ursaking : Cran (Guts) – +50% Attaque si affecte par un statut
Attaques de Mimiqui :
- Distorsion (Trick Room) – Inverse l’ordre d’attaque pendant 5 tours
- Griffe Ombre (Shadow Claw) – Attaque Spectre physique
Attaques d’Ursaking :
- Facade – Puissance doublee si brule, paralyse ou empoisonne
- Assaut Frontal (Headlong Rush) – Sol très puissant
- Séisme (Earthquake) – Sol de zone
Objets :
- Ursaking : Orbe Flamme (Flame Orb) – Active Cran a la fin du Tour 1
- Mimiqui : Herbe Mental (Mental Herb) – Protège d’un Provoc pour garantir la Distorsion
EVs importants : Ursaking doit avoir une Vitesse minimale (0 IV, nature neutre ou negative en Vitesse).
Plan de jeu :
- Tour 1 : Mimiqui utilise Distorsion. Fantomasque garantit de survivre au moins 1 attaque.
- Fin du Tour 1 : Orbe Flamme active Cran sur Ursaking.
- Tour 2+ : Sous Distorsion, Ursaking (très lent) attaque en premier et devaste avec une Facade surpuissante (STAB + brulure doublant la puissance + Cran +50%).
Ce qui le counter : Provoc empêche Distorsion (d’ou l’Herbe Mental). Attaques multi-coups brisent Fantomasque et KO Mimiqui en un tour. Inconscient (Unaware) ignore le boost de Cran.
Partenaires recommandes :
- Felinferno – Bluff et Dernier Mot aident Mimiqui a poser la Distorsion en securite
- Porygon2 – Second poseur de Distorsion avec Evoluthe pour le bulk
SYNERGIE 8 : Observations Transversales
Pokémon revenant dans presque toutes les synergies : Felinferno (Incineroar) est mentionne comme partenaire dans 6 des 7 synergies ci-dessus. C’est le Pokémon de support universellement utile du format, grace a la combinaison Intimidation + Bluff + Dernier Mot/Demi-Tour.
Themes recurrents identifies :
- L’importance capitale du controle de vitesse (Vent Arriere, Distorsion)
- La menace omnipresente d’Intimidation et les moyens de la contrer (Acharne, sets speciaux, Talisman Sain)
- La valeur des Pokémon non-Mega puissants (Dracolosse, Scalpereur, Superdofin) qui liberent le slot Mega
- L’equilibre entre controle (Encore, Entrave, Par Ici) et puissance brute
15.3 Archétypes d’Equipes Meteo
La meteo est au coeur du Double Battle depuis toujours. Pokémon Champions ne fait pas exception. Chaque archétype meteo a un poseur (le Pokemon qui invoque la meteo via son talent), des abuseurs (qui profitent de la meteo), et des roles de support adaptes.
EQUIPE PLUIE (Rain)
Poseurs :
- Bekipan (Pelipper) – Talent Crachin (Drizzle). Préféré a Tarpaud (Politoed) car plus joue historiquement. Type Vol + Vent Violent met une pression reelle. Pas un “bot a talent”.
- Tarpaud (Politoed) – Talent Crachin. Alternative confirmee dans le roster.
Abuseurs principaux :
- Pondralugon (Archaludon) – Glissade (Swift Swim) sous Pluie. Son Fulgurayon (Electro Shot) se charge immediatement sous Pluie, donnant un boost d’Attaque Spéciale gratuit. Avec Veste de Combat pour compenser sa faible Défense Spéciale.
- Paragruel (Basculegion) – Glissade sous Pluie. Aqua-Tacle booste. Avec Bandeau Choix ou Orbe Vie.
- Méga-Laggron (Mega Swampert) – Glissade sous Pluie. Attention : Gorythmic pose un gros probleme a Méga-Laggron.
Support Pluie :
- Felinferno – Support universel
- Farfaduvet – Vent Arrière supplementaire (cumul Pluie + Vent Arriere = domination de vitesse totale)
Chiffres : La Pluie booste les attaques Eau de +50% et reduit les attaques Feu de -50%. Glissade double la Vitesse.
EQUIPE SOLEIL (Sun)
Poseurs :
- Méga-Dracaufeu Y – Talent Sécheresse automatique en Méga-evoluant. L’un des meilleurs poseurs car il est aussi un attaquant redoutable.
- Chartor (Torkoal) – Talent Sécheresse. Très lent, fonctionne bien avec ET contre la Distorsion. Support avec Baillement et Coup de Main.
- Méga-Méganium – Nouveau talent Mega Sol : toutes ses attaques beneficient du Soleil en permanence, sans avoir besoin de poser la meteo. Situation unique.
Abuseurs principaux :
- Florizarre (Venusaur) – Chlorophylle double sa Vitesse sous Soleil. Poudre Dodo (Sleep Powder) + palette offensive large.
- Nymphali (Sylveon) – Pas directement booste par le Soleil mais combine bien avec les attaquants Feu (couverture Fee + Feu = très difficile a resister).
Support Soleil :
- Famignol – Garde-Ami + Par Ici pour protéger Méga-Dracaufeu Y
- Felinferno – Toujours utile
Chiffres : Le Soleil booste les attaques Feu de +50% et reduit les attaques Eau de -50%. Chlorophylle double la Vitesse.
EQUIPE SABLE (Sand)
Poseur :
- Tyranocif (Tyranitar) – Talent Sable Eternel (Sand Stream). Bon bulk, bonne pression offensive. Excellent en Dex Regional.
Abuseurs principaux :
- Méga-Carchacrok (Mega Garchomp) – Talent Force Sable (Sand Force, +30% attaques Roche/Sol/Acier). Simulation a 72.5% de winrate en core avec Motisma Chaleur (Heat Rotom).
- Baggiguane (Excadrill) – Si present, Force Sable + Foreur (Sand Rush, double Vitesse).
Avantage defensif : La Tempête de Sable booste la Défense Spéciale des types Roche de +50%, augmente le bulk de Tyranocif considerablement. Elle casse les Ceintures Force adverses (degats de fin de tour).
Chiffres : Tempête de Sable : +50% Défense Spéciale types Roche, degats de 1/16 PV par tour aux non-Roche/Sol/Acier.
EQUIPE NEIGE (Snow/Hail)
Poseur :
- Feunard d’Alola (Alolan Ninetales) – Talent Alerte Neige (Snow Warning). Le meilleur poseur de Neige de loin : bonne vitesse, Vent Glace, Voile Aurore (Aurora Veil, -33% degats physiques ET speciaux pendant 5 tours si actif sous Neige).
Abuseurs principaux :
- Méga-Onistoise (Mega Glalie) – Si present, talent potentiellement interessant.
- La Neige est historiquement l’archétype meteo le plus faible en Doubles, mais Voile Aurore est un outil defensif extremement puissant.
Chiffre-cle du Voile Aurore : -33% degats physiques ET speciaux pendant 5 tours = equivalent de Mur Lumiere + Protection combines.
15.4 Donnees de Simulation : Meilleurs Cores (Paires Synergiques)
Source : Champions Lab (championslab.xyz) – 2 000 000 de combats simules, classement ELO, matrices de winrate sur 250 equipes de tournoi.
Attention : Ces donnees sont pre-lancement. Le méta reel emergera après le 8 avril. Utilisez-les comme cadre de depart, pas comme verite absolue.
Top Cores par Winrate de Synergie
| Core (Paire) | Winrate Combine |
|---|---|
| Motisma Chaleur (Heat Rotom) + Méga-Carchacrok | 72.5% |
| Léviator (Gyarados) + Méga-Florizarre | 72.5% |
| Méga-Florizarre + Scalpereur (Kingambit) | 72.5% |
| Motisma Chaleur + Feunard d’Alola | 70.8% |
Analyse de ces Cores
Motisma Chaleur + Méga-Carchacrok (72.5%) – Motisma Chaleur resiste aux types Glace et Fee qui menacent Carchacrok. En retour, Carchacrok gere les types Feu et Électrique. La Lévitation de Motisma l’immunise au Séisme de Carchacrok. Core offensif + defensif parfait.
Léviator + Méga-Florizarre (72.5%) – Leviator apporte une seconde Intimidation et du speed control (Vent Glace, Cage Eclair). Méga-Florizarre avec Chlorophylle sous Soleil (ou Secheresse d’un allie) devient un monstre offensif. Couverture defensive complementaire (Eau resiste Feu, Plante resiste Eau).
Méga-Florizarre + Scalpereur (72.5%) – Cross-generationnel : un Pokemon de Gen 1 (Mega) avec un de Gen 9. Scalpereur punit les Intimidations adverses. Florizarre gere les types Combat et Sol qui menacent Scalpereur.
Motisma Chaleur + Feunard d’Alola (70.8%) – Combinaison meteo-controle. Feunard d’Alola pose la Neige + Voile Aurore. Motisma Chaleur profite de la reduction de degats et menace avec son typing unique Feu/Électrique.
15.5 Principes de Composition en Doubles
Structure Type d’une Equipe (6 Pokemon)
| Slot | Rôle | Exemple(s) |
|---|---|---|
| 1 | Méga-Évolution (attaquant principal ou menace stratégique) | Méga-Ectoplasma, Méga-Dracaufeu Y, Méga-Kangourex, Méga-Drattak |
| 2 | Support universel / Pivot (Intimidation, Bluff, pivotage) | Felinferno (priorite absolue) |
| 3 | Controle de vitesse (Vent Arriere ou Distorsion) | Farfaduvet, Mimiqui, Porygon2 |
| 4 | Attaquant secondaire (non-Mega, complementaire) | Scalpereur, Dracolosse, Carchacrok, Superdofin |
| 5 | Support complementaire / Redirigeur | Famignol, Gaulet (Amoonguss), Wimessir (Indeedee-F) |
| 6 | Couverture / Flex (comble les trous typiques et strategiques) | Variable selon le reste de l’equipe |
Règles de Composition
Règle du slot Mega : Un seul Pokémon peut Méga-evoluer par combat. Choisissez votre Mega avec soin – elle conditionne le reste de l’equipe. Les Pokémon non-Mega puissants (Dracolosse, Scalpereur, Superdofin) sont particulierement valorises car ils n’entrent pas en conflit avec le slot Mega.
Règle de l’objet Mega : Le Pokémon qui Méga-evolue DOIT porter sa Méga-Gemme. Il ne peut pas porter de Talisman Sain, de Ceinture Force, de Bandeau Choix, etc. C’est pourquoi les Megas physiques souffrent d’Intimidation – elles ne peuvent pas porter le Talisman Sain pour s’en protéger.
Règle Mega + Téra : Un Pokémon Méga-evolue ne peut PAS Teracristalliser dans le même combat. Ce sont deux ressources distinctes sur deux Pokémon differents. Planifiez quel Pokémon utilisera la Teracristallisation.
15.6 Identification des Counterplays
Pour chaque menace majeure du metatjeu, il est essentiel d’avoir une reponse planifiee. Voici les menaces centrales et leurs contres :
Contre Méga-Ectoplasma (Marque Ombre + piege)
| Contre | Explication |
|---|---|
| Pokémon type Spectre | Immunises a Marque Ombre, peuvent fuir le piège |
| OHKO avant Méga-Évolution | Ectoplasma base est très fragile (60 PV, 60 Def) |
| Paragruel (Basculegion) | Type Eau/Spectre, peut fuir ET menacer avec Hommage Posthume |
| Scalpereur | Coup Bas avec priorité, peut KO avant que le lock s’installe |
| Ekaiser avec Pare-Balles | Immunise a Ball’Ombre et Bombe Beurk |
Contre Intimidation (Felinferno omnipresent)
| Contre | Explication |
|---|---|
| Scalpereur (Acharne) | +2 Attaque pour chaque Intimidation subie = net +1 |
| Talisman Sain (Clear Amulet) | Immunise aux baisses de stats |
| Attaquants speciaux | Intimidation ne baisse que l’Attaque physique |
| Kangourex pre-Mega (Querion/Scrappy) | Immunité a Intimidation avant la Méga-Évolution |
| Courrousinge (Annihilape) avec Acharne | Même logique que Scalpereur |
Contre Vent Arrière
| Contre | Explication |
|---|---|
| Distorsion (Trick Room) | Inverse l’ordre de vitesse, rendant le Vent Arrière contre-productif |
| Votre propre Vent Arrière | Retour a la neutralite, la vitesse de base compte |
| Paralysie (Cage Eclair, Vent Glace) | Réduit la Vitesse même sous Vent Arrière |
| Attaques prioritaires (Coup Bas, Vitesse Extreme) | Ignorent l’ordre de vitesse |
Contre Distorsion (Trick Room)
| Contre | Explication |
|---|---|
| Provoc (Taunt) | Empêche le poseur de lancer Distorsion |
| Votre propre Distorsion | Re-inverse l’ordre (retour a la normale) |
| Vent Arrière + endurance | Survivre 5 tours de Distorsion puis dominer |
| Attaques prioritaires | Fonctionnent dans les deux sens sous Distorsion |
15.7 Méthodologie Pratique de Construction d’Équipe (HARI)
Source : vidéo “Comment CONSTRUIRE SON ÉQUIPE ?” — HARI, ~20 min. Deuxième vidéo de la mini-série team building. Orientée débutants.
Objectif de HARI : Permettre même aux débutants de construire une équipe qui “tient la route” pour leurs premières parties. Pas besoin de viser les Worlds — le but est de s’amuser avec les Pokémon qu’on aime tout en ayant une composition viable.
Prérequis supposés : Les bases couvertes dans les sections précédentes de ce guide (table des types, stats, attaques, talents). Si vous lisez ceci sans avoir lu les Parties 1 à 4, revenez-y d’abord.
15.7.1 Le Concept de “Route” — Choisir son Point de Départ
Avant de choisir un seul Pokémon, il faut déterminer sa route — c’est-à-dire la motivation initiale de l’équipe. HARI identifie trois routes principales :
| Route | Description | Exemple |
|---|---|---|
| Mon Pokémon préféré | Vous partez d’un Pokémon que vous aimez et construisez autour | “Je veux jouer Amphinobi (Greninja) quoi qu’il arrive” |
| Ma Méga préférée | Vous partez de votre Méga-Évolution favorite comme pièce maîtresse | “Je veux jouer Méga-Momartik (Mega Froslass)” |
| L’équipe optimale | Vous partez du méta et choisissez les Pokémon les plus performants | “Je veux gagner un maximum de matchs, peu importe les Pokémon” |
Il n’y a pas de mauvais chemin. Toutes les routes sont valides. La clé est de savoir ce qu’on veut avant de commencer, car cela conditionne les compromis qu’on sera prêt à faire.
Conseil de HARI : Vous pouvez vous inspirer des top équipes montrées en vidéo ou en stream, mais le but est de créer quelque chose qui vous est propre, pas de copier-coller aveuglément.
15.7.2 La Checklist de Vérification — 6 Questions Essentielles
Une fois votre route choisie et vos premiers Pokémon sélectionnés (2 à 4 pour commencer), passez votre composition naissante à travers cette checklist :
Question 1 : Est-ce que j’ai des outils de Speed Control ?
Le contrôle de la vitesse décide de qui attaque en premier — c’est souvent la différence entre gagner et perdre.
Vérifiez que votre équipe dispose d’au moins un des éléments suivants :
- Vent Arrière (Tailwind) — double la Vitesse de l’équipe pendant 4 tours
- Distorsion (Trick Room) — inverse l’ordre d’attaque pendant 5 tours
- Vent Glacé (Icy Wind) — réduit la Vitesse adverse
- Paralysie (Thunder Wave, etc.) — réduit la Vitesse individuelle
Si votre équipe n’a aucun speed control, vous serez constamment en réaction. C’est le premier point à corriger.
Question 2 : Est-ce que j’ai un équilibre Physique / Spécial ?
Si tous vos attaquants sont physiques, un seul Feu Follet (Will-O-Wisp) ou Intimidation peut neutraliser toute votre offense. Inversement, une équipe purement spéciale souffre face aux murs spéciaux (Veste de Combat, hauts stats en Défense Spéciale).
Visez au minimum : 2 attaquants physiques + 1 attaquant spécial, ou l’inverse. Un équilibre parfait n’est pas obligatoire, mais un minimum de diversité est crucial.
Question 3 : Est-ce que j’ai un conflit d’objets ?
Chaque Pokémon doit porter un objet différent — c’est une règle du jeu. Mais au-delà de la règle, vérifiez que vos choix d’objets n’entrent pas en conflit stratégique :
- Deux Pokémon qui veulent absolument la Ceinture Force (Focus Sash)
- Le slot Méga-Gemme bloque un objet défensif important
- Trop de Bandeau/Lunettes Choix (Choice items) limitant votre flexibilité
Question 4 : Est-ce que j’ai des sensibilités au Bluff / Provoc ?
Bluff (Fake Out) neutralise un Pokémon pour un tour — si votre plan de jeu dépend d’un setup Tour 1 (Vent Arrière, Distorsion, Danse Lames…), un Bluff adverse le retarde dangereusement.
Provoc (Taunt) empêche les attaques de statut — si plusieurs de vos Pokémon dépendent de moves de support (Vent Arrière, Abri, Poudre Fureur…), une Provoc bien placée peut démolir votre plan.
Solutions : Cape Obscure (Covert Cloak) contre Bluff, Herbe Mental (Mental Herb) contre Provoc, ou simplement avoir des alternatives qui ne dépendent pas du setup.
Question 5 : Est-ce que j’ai mes outils ?
Vérifiez que votre équipe dispose des “outils” de base du format Doubles :
- Redirection (Par Ici / Follow Me, Poudre Fureur / Rage Powder) pour protéger un allié
- Pivotage (Demi-Tour / U-turn, Dernier Mot / Parting Shot) pour contrôler le rythme
- Pression offensive suffisante pour ne pas se faire murer
- Couverture de types pour ne pas être impuissant face à un type précis
Question 6 : Est-ce que je manque d’Abri ?
Abri (Protect) est l’attaque la plus importante du format Doubles. La majorité de vos Pokémon devraient avoir Abri ou un équivalent (Détection, Crains-Plume…).
Exceptions légitimes : Les porteurs de Bandeau/Lunettes Choix (bloqués sur une attaque), ou les Pokémon dont les 4 slots d’attaque sont tous indispensables.
Si plus de 2 Pokémon de votre équipe n’ont pas Abri, c’est probablement un problème.
15.7.3 La Méthodologie Étape par Étape
Voici le processus complet recommandé par HARI :
ÉTAPE 1 : Choisir sa route
    ↓
ÉTAPE 2 : Sélectionner 2-4 Pokémon de départ
    ↓
ÉTAPE 3 : Identifier les forces de ce core
    ↓
ÉTAPE 4 : Passer la Checklist (6 questions)
    ↓
ÉTAPE 5 : Combler les lacunes identifiées
    ↓
ÉTAPE 6 : Compléter à 6 Pokémon
    ↓
ÉTAPE 7 : Jouer, observer, ajuster
Principe fondamental : Partez de vos forces, puis comblez les faiblesses. Ne cherchez pas à tout couvrir dès le début — identifiez ce que votre core fait bien, puis ajoutez des Pokémon qui compensent ce qui manque.
Ne vous focalisez pas uniquement sur la table des types. La couverture de types est importante, mais les synergies de talents, le contrôle de vitesse et la cohérence du plan de jeu comptent davantage.
15.7.4 Exemple Pratique : Construction autour de Méga-Amphinobi
HARI construit un exemple en direct pour illustrer la méthodologie.
Route choisie : Mon Pokémon préféré — Amphinobi (Greninja)
Étape 1-2 — Core de départ :
| Pokémon | Rôle | Talent | Objet |
|---|---|---|---|
| Méga-Amphinobi (Mega Greninja) | Pièce maîtresse, attaquant spécial versatile | Protéen (Protean) — change de type selon l’attaque utilisée | Méga-Gemme |
| Bekipan (Pelipper) | Poseur de Pluie | Crachin (Drizzle) — invoque la Pluie | — |
Pourquoi ce duo : Amphinobi est un attaquant spécial ultra-rapide. Sous la Pluie posée par Bekipan, ses attaques Eau (Hydrocanon, Surf) sont boostées. Protéen lui permet de changer de type offensivement, rendant son STAB imprévisible.
Étape 3 — Forces identifiées : Vitesse, puissance spéciale sous Pluie, imprévisibilité de type.
Étape 4 — Checklist :
- Speed control ? ❌ Pas encore — besoin de Vent Arrière ou Distorsion
- Physique/Spécial ? ❌ Tout spécial pour l’instant
- Conflit d’objets ? ✅ Pas de conflit
- Sensibilité Bluff/Provoc ? ⚠️ Amphinobi fragile, vulnérable au Bluff Tour 1
- Mes outils ? ❌ Pas de redirection, pas de pivotage
- Abri ? ⚠️ À vérifier sur les movesets
Étape 5-6 — Ajouts pour combler les lacunes :
| Pokémon | Rôle comblé | Talent |
|---|---|---|
| Dracolosse (Dragonite) | Attaquant physique + Vent Arrière | Multi-Écaille (Multiscale) |
| Sinistcha | Support + soin + redirection | Hospitalité (Hospitality) |
Dracolosse apporte le contrôle de vitesse (Vent Arrière) et l’équilibre physique/spécial. Sinistcha fournit le support et la redirection manquants.
Étape 7 — Jouer et ajuster. Rien n’est gravé dans le marbre. HARI insiste : beaucoup de choses ne se comprennent qu’avec la pratique. N’ayez pas peur de modifier votre équipe après vos premières parties.
15.7.5 Conseils Pratiques pour Débutants
Ne copiez pas aveuglément les top teams. Inspirez-vous, mais comprenez pourquoi chaque Pokémon est là. Copier sans comprendre, c’est perdre dès que l’adversaire fait quelque chose d’imprévu.
Commencez par 2-4 Pokémon, pas 6. Construire un core solide puis l’étoffer est plus efficace que de choisir 6 Pokémon séparément et espérer qu’ils fonctionnent ensemble.
La table des types n’est pas tout. Les synergies de talents, le speed control et le plan de jeu global comptent souvent davantage qu’une couverture de types parfaite.
N’ayez pas peur des erreurs. Chaque défaite enseigne quelque chose. Le teambuilding est un processus itératif, pas un exercice théorique parfait du premier coup.
Rien n’est définitif. Vous pouvez (et devez) modifier votre équipe au fil du temps. Les patchs d’équilibrage de Pokémon Champions changeront régulièrement le méta.
Amusez-vous. Le but ultime est de jouer avec les Pokémon que vous aimez. Une équipe que vous prenez plaisir à jouer vous motivera à progresser bien plus qu’une équipe “optimale” qui vous ennuie.
15.8 Choisir son Archétype — Les 8 Archétypes Compétitifs (HARI)
Source : vidéo “Choisir son ARCHÉTYPE” — HARI, 34 min. Première d’une mini-série de 3 vidéos sur le team building.
Principe fondamental de HARI : Arrêtez de mettre des étiquettes rigides. Les archétypes s’imbriquent et se mélangent. Une équipe “Distorsion” peut aussi avoir un mode rapide. Les archétypes météo dépendent du format ; les archétypes de play style sont universels.
Archétype 1 : SOLEIL
Pièce maîtresse : Méga-Dracaufeu Y (pose le Soleil via Sécheresse) Pokémon clés : Florizarre (Chlorophylle = x2 Vitesse), Carchacrok (couverture Sol + synergie type Vol) Attaques : Canicule (zone), Lance-Flamme (monocible fiable), Surchauffe (burst), Poudre Dodo, Séisme Forces : Proactif, bonne palette physique+spéciale, variété de types Faiblesses : Dépendance totale à la bataille de la météo. Manque de précision (Canicule 90%, Surchauffe 90%, Poudre Dodo 75%, Éboulement 90%). Si vous perdez la météo, ni la Méga ni les abuseurs ne fonctionnent.
Archétype 2 : PLUIE
Pièce maîtresse : Békipan (Crachin pose la Pluie) Pokémon clés : Pondralugon (Fulgurayon se charge directement sous Pluie), Paragruel (Glissade = x2 Vitesse), Méga-Dracolosse, Méga-Laggron Attaques : Fulgurayon, Vent Violent, Herbe Pouvoir (alternative sans Pluie pour Pondralugon) Objets : Bandeau Choix (Paragruel + Glissade) ou Mouchoir Choix (Paragruel + Adaptabilité) Forces : Synergies éprouvées (Écarlate/Violet), base solide avec 3-4 Pokémon, beaucoup de Mégas compatibles Faiblesses : “Ennemi public n°1” — la méta sera la mieux préparée contre. Dépendance météo forte (Paragruel perd son bonus Eau sans Pluie, pire encore sous Soleil).
Archétype 3 : TEMPÊTE DE SABLE
Pièce maîtresse : Tyranocif (Sable Volant) Pokémon clés : Minotaupe (Baigne Sable = x2 Vitesse), Méga-Tyranocif (repose le sable en méga-évoluant) Forces : Météo plus facile à maintenir (Tyranocif rentre plus simplement que Békipan). Grande variété de Mégas compatibles. Variété de vitesses dans l’équipe. Semble très fort au début de Champions. Faiblesses : Vulnérable à Corvélius et Kaizer. Conflits d’objets fréquents (Talisman Sain, Veste de Combat = un seul exemplaire par équipe). Big Splash est très problématique. Note : HARI a dû “gratter pour trouver des inconvénients” — la Tempête de Sable a l’air très forte au lancement.
La Neige n’est PAS un archétype selon HARI pour Champions : pas assez de synergies fortes comparées aux trois autres météos.
Archétype 4 : SETUP / BOOST
Pièce maîtresse : Pirax (Papillodanse) + Méga-Aligatueur (Danse Draco) Concept : Deux Pokémon capables de se booster = adaptabilité selon le matchup. Un redirigeur protège le sweeper. Forces : Énorme place pour l’adaptation. Rôles bien déterminés. Apprend bien le jeu : “quand tu perds avec ça, tu apprends plus qu’avec les autres archétypes.” Faiblesses : Si le matchup empêche le boost, manque cruel de dégâts. Difficile à jouer (il faut connaître les calques de dégâts). Pas recommandé pour les débutants mais excellent pour progresser. Concept stratégique — Le Trade : Un move de setup crée un dilemme : soit l’adversaire cible le boosteur (les autres tapent librement), soit il l’ignore (le boosteur devient monstrueux).
Archétype 5 : DISTORSION (Hard Trick Room)
Pokémon clés : Mimiqui (poseur via Déguisement), Ursaking (attaquant lent), Chartor (Éruption + Soleil) Forces : Rouleau compresseur si la Distorsion est posée. Très fort contre les débutants. Plan simple et linéaire. Faiblesses : Un seul plan de jeu. Ne fait pas progresser : “c’est celui qui est le plus difficile comme point de départ pour passer sur un autre archétype, et de très très loin.” Crée un biais cognitif : gagner fort donne un faux sentiment de compétence.
HARI déconseille fortement cet archétype aux débutants qui veulent progresser.
Archétype 6 : HYPEROFFENSE
Pokémon clés : Lanssorien (Bandeau Choix, Corsin), Farfurex (très rapide, Acharné), Scalproie Forces : Énorme pression de dégâts. Attaquer en premier = plus de chances de profiter des coups critiques, flinches, effets secondaires. Jouissif. Faiblesses : Faible aux réductions de dégâts (Intimidation, Murs). Si le Pokémon clé tombe, aucune capacité de repositionnement. Faux sentiment de compétence — même biais cognitif que la Distorsion. Concept — La RNG : Quand vous attaquez en premier, vous avez plus de chances de profiter de l’aléatoire (crits, flinches). Quand vous subissez, c’est l’inverse.
Archétype 7 : TAILROOM (Vent Arrière + Distorsion)
Pokémon clés : Farfaduvet (Vent Arrière), Typhlosion de Hisui (attaquant spécial), Farigiraf (Distorsion + Mur Codal anti-priorité), Chartor (lent + Soleil) Référence : Cette base de 4 a remporté le Championnat d’Amérique Latine cette saison (Yumakinwa). Tous disponibles au lancement de Champions SANS Méga. Forces : Adaptabilité énorme avec deux modes de speed control. Pokémon qui font double emploi. Capacité de piéger l’adversaire en changeant de mode en cours de BO3. Faiblesses : Très difficile à jouer — il faut calculer sur 3-5 tours en avance. Vulnérable aux priorités (d’où Mur Codal).
Archétype 8 : STRONGBOX / GOODSTUFF
Pokémon clés : Méga-Kangourex (Bluff + Poing Boost), Super Dauphin (forme Héros), Félinferno (pivot) Concept : Pas de synergie évidente — c’est volontaire. Comme un “Strong Box” en TCG : des bonnes cartes individuelles. Si l’un ne fonctionne pas, les autres continuent. Forces : Énorme capacité d’adaptation et de comeback. Excellente capacité de switch/pivot. Pas dépendant d’une condition (météo, Distorsion). C’est l’archétype préféré de HARI. Faiblesses : Pas de “truc très fort” qui force l’adversaire à répondre. Peut être difficile de savoir dans quelle direction partir.
Recommandations pour débutants (classement HARI)
| Archétype | Recommandé débutant ? | Raison |
|---|---|---|
| Tempête de Sable | ✅ Oui | Fort au lancement, facile à maintenir |
| Pluie | ✅ Oui | Synergies éprouvées, base solide |
| Soleil | ⚠️ Moyen | Dépendance météo + problèmes de précision |
| Setup | ⚠️ Non mais éducatif | Difficile mais apprend beaucoup |
| Tailroom | ⚠️ Avancé | Très adaptable mais très complexe |
| Strongbox | ⚠️ Avancé | Nécessite expérience pour savoir quoi faire |
| Distorsion | ❌ Non | Gagne des games mais ne fait PAS progresser |
| Hyperoffense | ❌ Non | Faux sentiment de compétence |
Conseil économie VP : Ne vous éparpillez pas entre les archétypes. Concentrez vos VP et votre recrutement sur UN archétype au départ.
Part 10 — Recommended Pokémon & Sets (HARI)
Section 16 – Pokémon Recommandes
16.1 Top 10 Premiers Recrutements (avec raisonnement)
Source : HARI – “Les 10 PREMIERS Pokémon a RECRUTER dans CHAMPIONS”
Cette liste est ordonnee par priorité d’investissement des VP au Jour 1. La philosophie : privilegier les supports polyvalents et les Pokémon s’integrant dans de nombreuses equipes, plutot que les attaquants purs dependant d’allies non confirmes.
#1. FELINFERNO (Incineroar) – “Le roi du jeu”
Rôle : Support / Pivot defensif Cout : 2 500 VP
Pourquoi #1 : HARI le qualifie de “litteralement le roi du jeu” et “le meilleur Pokémon de l’histoire”. Il se glisse dans absolument toutes les equipes, même agressives. C’est le choix le plus sur possible et le premier Pokémon dans lequel depenser vos VP.
Stats : 95 PV / 115 Atk / 90 Def / 80 Atk Spe / 90 Def Spe / 60 Vit. Meilleure stat = Attaque, mais utilise principalement pour son profil defensif. On investit massivement dans les stats defensives.
Talent : Intimidation – Baisse l’Attaque des deux Pokémon adverses en entrant sur le terrain. Crucial car les Méga physiques ne peuvent pas porter le Talisman Sain.
Attaques cles :
- Bluff (Fake Out) – Utilisable uniquement au tour d’entree. Flinch 100%. “Tu utilisés une action de ton support pour enlever une action a un Pokémon offensif adverse.”
- Dernier Mot (Parting Shot) – Pivoter en baissant Attaque et Attaque Spéciale de la cible. Cle du “kit de switch”.
- Demi-Tour (U-turn) – Alternative de pivot.
- Bout de Feu (Flare Blitz) – Option offensive.
- Sabotage (Knock Off) – Retire l’objet adverse. NOTE : Felinferno perd Sabotage dans Champions selon les changements d’equilibrage.
Avertissements : Aucun. C’est l’investissement VP le plus securise du jeu. Sans même regarder les autres Pokémon, vous savez a 100% que Felinferno sera omnipresent.
#2. FARFADUVET (Whimsicott) – Speed control suprême
Rôle : Support pur / Controle de vitesse Cout : 2 500 VP
Pourquoi #2 : Meilleur poseur de Vent Arrière grace a Farceur. Boreas (Tornadus), son principal rival historique, n’est pas confirme au lancement.
Stats : 60 PV / 67 Atk / 85 Def / 77 Atk Spe / 75 Def Spe / 116 Vit. Potentiel offensif quasi inexistant. Defensivement faible. Vitesse de 116 base utile même avec Farceur pour certaines interactions.
Talent : Farceur (Prankster) – Priorité +1 a toutes les attaques non offensives. Sans ce talent, Farfaduvet serait “très faible”.
Attaques cles :
- Vent Arrière (Tailwind) – Double la vitesse des allies pendant 4 tours. Avec la vitesse dynamique, l’allie en profite immediatement dans le même tour.
- Encore – Force la cible a repeter son move (priorite Farceur).
- Provoc (Taunt) – Bloque les moves de statut.
- Mur Lumiere (Light Screen) – Reduction degats speciaux.
- Croco Larme (Snarl) – Baisse la Défense Spéciale.
- Pouvoir Lunaire (Moonblast) – Seule option offensive.
- Baston (Beat Up) – Synergie avec Pondralugon/Endurance (voir #10).
Synergies : Farfaduvet + Felinferno + Méga-Ectoplasma = archétype reconnaissable de 2018.
#3. ECTOPLASMA (Gengar) – Mega tier S + support non-Mega
Rôle : Mega : Attaquant special + trappeur / Non-Mega : Support Cout : 2 500 VP + Méga-Gemme (cout inconnu, potentiellement 5 000 VP)
Pourquoi #3 : “L’une des meilleures Megas de l’histoire.” A contribue a la victoire des Worlds 2016 (equipe Raichu/Capoera de Wolfe Glick). Même sans Mega, c’est un support très interessant dans un format ou les alternatives (Flotte-Meche) ne sont pas disponibles.
Stats Mega : 60 PV / 65 Atk / 80 Def / 170 Atk Spe / 95 Def Spe / 130 Vit. Enormement d’Attaque Spéciale et de Vitesse. Très friable defensivement.
Talents :
- Marque Ombre (Shadow Tag) [Mega] – Piège les adversaires, les empêche de switcher. Exception : types Spectre.
- Corps Maudit (Cursed Body) [base] – 30% de chance de desactiver une attaque subie.
Attaques cles :
- Bombe Beurk (Sludge Bomb) – STAB Poison special.
- Ball’Ombre (Shadow Ball) – STAB Spectre special.
- Vent Glace (Icy Wind) – Speed control, très bon outil.
- Feu Follet (Will-O-Wisp) – Neutralise les attaquants physiques. Gagne en valeur si Coup Bas est omnipresent.
- Provoc (Taunt) – Option de support.
- Entrave (Disable) – Combine bien avec Marque Ombre en Mega. NOTE : Ectoplasma perd Encore dans Champions (nerf cible pour Méga-Ectoplasma).
Objet non-Mega : Ceinture Force (Focus Sash) – survie garantie vu la fragilite.
Set typique non-Mega : Bombe Beurk/Ball’Ombre + Vent Glace + Feu Follet (ou Provoc).
#4. PARAGRUEL (Basculegion) – Attaquant comeback
Rôle : Attaquant physique (Eau/Spectre) Cout : 2 500 VP
Pourquoi #4 : Pokémon recent (Legendes Arceus), mal connu des joueurs qui reviennent. Très efficace contre Méga-Ectoplasma (type Spectre). Jouable même sans les poseurs de Pluie.
Stats : 120 PV / 112 Atk / 65 Def / 80 Atk Spe / 75 Def Spe / 78 Vit. Pas une “très grosse attaque” brute mais compensee par son talent.
Talents :
- Glissade (Swift Swim) – Double Vitesse sous Pluie. Jouer Bandeau Choix ou Orbe Vie.
- Adaptabilité (Adaptability) – Augmente le STAB de 1.5x a 2x. Recommande sans Pluie.
Attaques cles :
- Aqua-Tacle (Wave Crash) – Physique Eau puissant avec recul.
- Hommage Posthume (Last Respects) – Spectre dont la puissance augmente avec chaque allie KO. Mécanique de “comeback”.
Objets :
- Avec Adaptabilité : Mouchoir Choix (Choice Scarf) obligatoire (sinon trop lent).
- Avec Glissade/Pluie : Bandeau Choix ou Orbe Vie.
Avertissements : Très vulnerable a Coup Bas (qui sera omnipresent via Scalpereur). Sans Mouchoir Choix + Adaptabilité, trop lent.
#5. SCALPEREUR (Kingambit) – Anti-Intimidation
Rôle : Attaquant physique puissant Cout : 2 500 VP
Pourquoi #5 : Stats enormes + talent Acharne en font le predateur naturel des equipes a Intimidation. Felinferno sera partout, donc Scalpereur sera toujours pertinent.
Stats : 100 PV / 135 Atk / 120 Def / 60 Atk Spe / 85 Def Spe / 50 Vit. Attaque et Défense physiques excellentes. Vitesse mediocre – on n’essaie pas de depasser, on investit defensivement.
Talent : Acharne (Defiant) – Quand une stat est baissee par l’adversaire, +2 Attaque. Contre Intimidation : prend -1 Atk mais gagne +2 Atk = net +1.
Attaques cles :
- Coup Bas (Sucker Punch) – Priorité Ténèbres. Compensant la faible Vitesse.
- Genusection (Kowtow Cleave) – Ténèbres puissant, ne rate jamais.
- Tête de Fer (Iron Head) – STAB Acier.
- Danse Lames (Swords Dance) – Setup pour snowball. “Peut faire la game a lui tout seul.”
Objets :
- Lunettes Noires (Black Glasses) – Boost degats Ténèbres.
- Veste de Combat (Assault Vest) – Compense la Défense Spéciale.
- Baie Prine (Lum Berry) – Contre Feu Follet. HARI : “Je ne serais pas choque qu’on joue la Baie Prine sur Scalpereur au debut de Champions.” Méga-Kangourex ne peut pas le faire (porte Méga-Gemme).
Avertissements : Typing Ténèbres/Acier genante sans Teracristallisation. Faible Vitesse compensee par Coup Bas.
#6. FAMIGNOL (Maushold) – Support redirection + Garde-Ami
Rôle : Support pur Cout : 2 500 VP
Pourquoi #6 : Protège les Megas qui veulent setup (Méga-Kangourex + Point Boost). HARI ne recommande PAS le set Technicien + Proliferation.
Talent : Garde-Ami (Friend Guard) – Réduit de 25% les degats subis par l’allie. Baisse de degats passive, sans action requise.
Attaques cles :
- Par Ici (Follow Me) – Redirige les attaques mono-cible sur Famignol. Double protection avec Garde-Ami.
- Croc Fatal (Super Fang) – Divise les PV restants par 2. Pour un support, faire de vrais degats = très fort.
- Baston (Beat Up) – Tape un petit coup par Pokemon en vie dans l’equipe. Booste Scalpereur (Acharne) ou Pondralugon (Endurance).
- Provoc, Encore, Coup de Main (Helping Hand), Cage Eclair, Après Vous (After You) – Options variees.
Objets :
- Ceinture Force – Survie garantie (très fragile).
- Casque Brut (Rocky Helmet) – Méga-Kangourex en face prend 2 fois le Casque Brut via Amour Filial.
- Lunettes Filtre (Safety Goggles) – Immunité poudres.
#7. LEVIATOR (Gyarados) – Intimidation #2
Rôle : Support / Pivot / Seconde source d’Intimidation Cout : 2 500 VP
Pourquoi #7 : Deuxieme porteur d’Intimidation, “un Pokémon qu’on a un peu oublie”. HARI le cite SURTOUT pour sa forme non-Mega.
Stats : 95 PV / 125 Atk / 79 Def / 60 Atk Spe / 100 Def Spe / 81 Vit. Bon bulk physique (surtout avec Intimidation). Bon bulk special naturel.
Talent : Intimidation [base] – Préféré par HARI. La Méga (Brise Moule) “n’apporte pas grand-chose”.
Attaques cles :
- Cascade (Waterfall) – STAB Eau + 20% flinch.
- Vent Glace (Icy Wind) – Speed control.
- Cage Éclair (Thunder Wave) – Paralysie.
- Provoc (Taunt) – Shutdown de supports adverses.
- Pietisol (Bulldoze) – Option Sol.
- Croc de Glace (Ice Fang) – Couverture Glace (pas assez puissant pour OHKO les Carchacrok).
- Si-Fond (Whirlpool) – Piège + degats passifs.
Avertissements : Double faiblesse Électrique a noter. La Méga n’est pas l’une des plus fortes.
#8. CARCHACROK (Garchomp) – Valeur sure intemporelle
Rôle : Attaquant physique polyvalent Cout : 2 500 VP
Pourquoi #8 : “Valeur sure dans les debuts d’environnement, dans les debuts de generation, dans les dex regionaux – il est toujours très très fort.” Dernier vu très fort au debut de la 9G.
Stats : 108 PV / 130 Atk / 95 Def / 80 Atk Spe / 85 Def Spe / 102 Vit. Excellentes statistiques offensives et bon bulk. Typing Dragon/Sol parfait offensivement.
Talent : Peau Dure (Rough Skin) [base] – Degats infligés aux attaquants de contact. Préféré par HARI. La Méga (Force Sable) est jugee “pas terrible” malgre de bonnes stats.
Attaques cles :
- Séisme (Earthquake) – Degats de zone Sol. Necessite un allie immunise ou en Abri.
- Trepignement (Stomping Tantrum) – Sol mono-cible, 75 base. “Vous voudrez peut-être jouer les deux pour être plus versatile.”
- Draco-Griffe (Dragon Claw) – STAB Dragon fiable.
- Danse Lames (Swords Dance) – Setup. Note : Carchacrok n’a PAS Danse Draco.
- Abri (Protect), Eboulement (Rock Slide) – Options standard.
Objets :
- Talisman Sain (Clear Amulet) – Immunité Intimidation. “Pas peur d’Intimidation.”
- Orbe Vie (Life Orb) – Meilleur plafond de degats mais vulnerable a Intimidation.
- Bandeau Choix (Choice Band) – Possible mais moins frequent.
Avertissements : Double faiblesse Glace, faiblesse Fee. Mais “l’environnement n’a pas l’air de fourmiller de très bons Pokémon Fee” – Méga-Gardevoir et Nymphali sont plus lents. Ne PAS recruter pour la Méga.
#9. KANGOUREX (Kangaskhan) – Potentiellement la meilleure Mega de l’histoire
Rôle : Mega attaquant physique devastateur Cout : 2 500 VP + Méga-Gemme
Pourquoi #9 : “Potentiellement la meilleure Mega de l’histoire.” A domine 2014, 2015, 2016. S’est fait buff de deux manieres pour Champions.
Les nerfs historiques (2018) :
- Amour Filial : 2e coup passe de 50% a 25%
- Coup Bas : 80 -> 70 puissance
- Perte de Point Boost (Power-Up Punch)
Les deux buffs pour Champions :
- Récupère Point Boost dans Legends ZA – le nerf est retabli.
- Immunité a Intimidation avant Mega – Querion (Scrappy) donne l’immunite Intimidation ET permet de Bluffer les types Spectre (Ectoplasma). Ce buff est arrivee en 8G.
Talent pre-Mega : Querion (Scrappy) – Préféré a Attention (Inner Focus). Touche les Spectres avec Normal/Combat + immunité Intimidation.
Talent Mega : Amour Filial (Parental Bond) – Chaque attaque frappe 2 fois (2e coup = 25% degats).
Attaques cles :
- Point Boost (Power-Up Punch) – 40 puissance mais frappe 2 fois (Amour Filial) + 2x +1 Atk = +2 Attaque par tour. Devastateur.
- Damocles (Double-Edge) – 120 puissance Normal, option principale avec recul.
- Bluff (Fake Out) – Degats “pharamineux” grace a Amour Filial.
- Coup Bas (Sucker Punch) – Priorité Ténèbres.
- Balayage (Low Kick) – Combat, “c’est a peu pres toujours Balayage”.
Perte notable : Retour/Frustration n’existent plus depuis Epee/Bouclier. Damocles (120 + recul) est le remplacement.
Avertissements : Le nerf du talent (50% -> 25%) reste. Vulnerabilite a Intimidation APRES Méga-Evolution (mais Querion protege avant).
#10. PONDRALUGON (Archaludon) – Polyvalent physique/special
Rôle : Tank physique / Attaquant special / Setup avec Endurance Cout : 2 500 VP
Pourquoi #10 : Plusieurs manieres de le jouer, ne rentre jamais en conflit d’objet avec les allies (Herbe Pouvoir est rarement dispute), et peut être “extremement fort” même sans la Pluie.
Stats : 90 PV / 105 Atk / 130 Def / 125 Atk Spe / 65 Def Spe / 85 Vit. Enorme Défense physique, bonne Attaque Spéciale, faible Défense Spéciale.
Talents :
- Fermete (Sturdy) [set Herbe Pouvoir] – Survie a 1 PV si PV max.
- Endurance (Stamina) [set Baston] – +1 Défense chaque fois qu’il est touche.
Attaques cles :
- Fulgurayon (Electro Shot) – Spéciale Électrique puissante, charge immediate sous Pluie ou avec Herbe Pouvoir. Donne un boost d’Attaque Spéciale pendant le chargement.
- Draco-Meteore – Special Dragon puissant.
- Luminocanon (Flash Cannon) – STAB Acier.
- Corps Perdu (Body Press) – Combat 80 puissance, utilise la DEFENSE comme stat d’attaque. Synergie parfaite avec Endurance.
- Aboiement (Snarl) – Utilitaire.
Deux sets principaux :
- Fermete + Herbe Pouvoir – Fulgurayon immediat + survie Fermete. Standalone.
- Endurance + Baston (de Famignol ou Farfaduvet) – Famignol fait Baston (4 coups), Pondralugon prend +4 Défense, puis Corps Perdu tape avec cette Défense boostee. “Superbe combinaison.” Jouer avec Veste de Combat.
16.2 Tier List des Starters (S / A / B / C / F)
Source : HARI – “Tier List des STARTERS avant Pokémon Champions”
Classement par viabilite competitive dans Champions, pas par appreciation du design.
Système de Tiers
- S – Merite vos VP. Investissement prioritaire.
- A – Probablement aussi, mais pas a n’importe quel moment.
- B – Potentiellement bon a un moment, depense a eviter en général.
- C – Faible. Ne merite pas vos VP.
- F – Cataclysmique. Pokémon très mauvais.
RANG S (3 Pokemon)
| Pokémon | Raison |
|---|---|
| Dracaufeu (Charizard) | 2 Méga-Évolutions. Mega Y = Sécheresse, l’une des meilleures Megas historiques. Mega X correct aussi. Synergie Colossinge + Méga-Dracaufeu anticipee comme très forte. |
| Felinferno (Incineroar) | Meilleur Pokémon de l’histoire. Intimidation + Bluff + Dernier Mot + Sabotage. Support absolu. Type Ténèbres sans faiblesse Fee – rare et precieux. |
| Gorythmic (Rillaboom) | Presque au niveau de Felinferno. Champ Herbu automatique (soin passif). Bluff + Glisserbe (priorite sous Champ Herbu) + Marteau Bois. Avec Veste de Combat. Sa presence pose un gros probleme a Méga-Laggron. |
Observation de HARI : “Vous rendez compte que les meilleurs starters, c’est des supports et des Megas.” Les S sont des supports (Felinferno, Gorythmic) ou des Megas (Dracaufeu).
RANG A (1 Pokemon)
| Pokémon | Raison |
|---|---|
| Aligatueur (Feraligatr) | Seul starter en A. Mega inconnue mais stats impressionnantes. Minimum déjà bon, maximum potentiellement insane avec un bon talent Mega. Typing Eau/Dragon (Mega). HARI croit vraiment en sa Méga. |
RANG B (6 Pokemon)
| Pokémon | Raison |
|---|---|
| Florizarre (Venusaur) | Fort specifiquement en 8G (Dynamax). Mega en retrait. Probleme : pas de Chartor/Feunard Kanto confirmes pour le Soleil au lancement. |
| Typhlosion de Hisui | A gagne le Championnat d’Amerique Latine et le Regional de Stuttgart. Type Spectre = immunité a Bluff. |
| Brasegali (Blaziken) | Mega avec Coaching + Turbo (Speed Boost). Support/offensif versatile. Equipes agressives en 2018 avec Scalproie. |
| Clamiral de Hisui (Samurott-H) | Move signature avec Picots. Sabotage. Talent augmentant les attaques tranchantes. |
| Blindépique (Chesnaught) | Par Balle (Bulletproof) = immunité totale a Bombe Beurk. Mega defensive avec Corps Perdu. Synergie anti-Ectoplasma. |
| Oratoria (Primarina) | Megaphone de zone type Eau (ne touche pas le partenaire). Bon typing Eau/Fee. Perd tout interet quand les semi-legendaires arrivent. |
RANG C (15 Pokemon)
| Pokémon | Raison cle |
|---|---|
| Méganium | Rang B si Sécheresse confirmee, C par prudence (talent Mega inconnu). |
| Jungko (Sceptile) | Mega faible. Delestage inferieur aux autres utilisateurs. |
| Laggron (Swampert) | Mega Glissade problematique vs Gorythmic. |
| Torterra | A terrorise le ladder 2 jours en Reglement H puis plus rien. |
| Simiabraz (Infernape) | Support correct mais inferieur a Brasegali. |
| Pingoleon (Empoleon) | Rework Battant (Competitive). Angle situationnel. |
| Majaspic (Serperior) | Contestation + Tempête Verte jamais viable même avec Terrasse Stellaire. |
| Roitiflam (Emboar) | Hard Trick Room uniquement, dependant de sa Méga. |
| Goupelin (Delphox) | Mega penalisee par Evitation. Jeu agressif avec Wimessir possible. |
| Amphinobi (Greninja) | 0 resultat VGC. Mega = Orbe Vie en pire. |
| Archeduc de Hisui (Decidueye-H) | Très bon C, meilleur que les autres C, sous le B. Mini hype Reglement H mais 0 top 8. |
| Pyrobut (Cinderace) | “N’existe plus depuis le Covid.” Eclipse sans Dynamax. |
| Lezargus (Inteleon) | Support secondaire (Detrempage, Vent Glace, Provoc). |
| Miascarade (Meowscarada) | N’existera pas face aux Megas malgre un debut de 9G fort. |
| Flamigator (Skeledirge) | Inconscient inutile vs Megas qui n’ont pas besoin de se booster. |
RANG F (4 Pokemon)
| Pokémon | Raison |
|---|---|
| Typhlosion de Johto | Strictement inferieur a la forme Hisui. |
| Clamiral de Johto (Samurott) | Strictement inferieur a la forme Hisui. |
| Archeduc d’Alola (Decidueye) | Stats nulles, typing defensif mauvais, aucun apport. |
| Palmaval (Quaquaval) | Aucune qualite, aucune niche, aucun angle. |
Tableau Recapitulatif Complet
| Rang | Nombre | Pokémon |
|---|---|---|
| S | 3 | Dracaufeu, Felinferno, Gorythmic |
| A | 1 | Aligatueur |
| B | 6 | Florizarre, Typhlosion-H, Brasegali, Clamiral-H, Blindépique, Oratoria |
| C | 15 | Méganium, Jungko, Laggron, Torterra, Simiabraz, Pingoleon, Majaspic, Roitiflam, Goupelin, Amphinobi, Archeduc-H, Pyrobut, Lezargus, Miascarade, Flamigator |
| F | 4 | Typhlosion-Johto, Clamiral-Johto, Archeduc-Alola, Palmaval |
16.3 Les 20 Pokémon a Préparer via Pokémon HOME
Source : HARI – “20 Pokémon a PREPARER AVANT Pokémon Champions”
Chaque Pokémon préparé dans HOME avant le lancement = 1 000 VP economises (pas de cout de recrutement). Cette liste est composee quasi exclusivement de Pokémon “outils” – des supports et poseurs de meteo/champ qui brillent par leur talent plutot que leurs stats brutes.
Les 20 Pokémon
| # | Pokémon | Gen | Rôle cle | Pourquoi le préparer |
|---|---|---|---|---|
| 1 | Dracaufeu | 1 | Mega Y/X | 2 Megas historiquement top tier |
| 2 | Arcanin Kanto | 1 | Support Intimidation | Meilleur remplacant de Felinferno en Dex Regional |
| 3 | Arcanin de Hisui | 1/LA | Support Feu/Roche | Qualites differentes du Kanto, complementaire |
| 4 | Ectoplasma | 1 | Mega / Support | Top 3 Megas historiques. Excellent sans Mega (Ceinture Force) |
| 5 | Porygon2 | 2 | Poseur de Distorsion | “Jamais mauvais.” Bulk extraordinaire avec Evoluthe. Telecharge offensif |
| 6 | Tyranocif | 2 | Poseur Sable | Toujours bon en Dex Regional. Casse les Ceintures Force |
| 7 | Bekipan | 3 | Poseur Pluie | Bien plus joue que Tarpaud. Crachin + Vent Violent + Coup de Main |
| 8 | Chartor | 3 | Poseur Soleil | Sécheresse. Très lent = profite de Distorsion. Baillement + Coup de Main |
| 9 | Drattak | 3 | Mega / Intimidation | Top 3 Megas. Même sans Mega, Intimidation + stats defensives |
| 10 | Metalosse | 3 | Mega / Tank | Mega excellente. Griffe Dure. Pisto-Poing priorité |
| 11 | Carchacrok | 4 | Attaquant physique | Staple intemporel de Dex Regional. Pas pour la Méga |
| 12 | Gaulet (Amoonguss) | 5 | Support/Redirigeur | “L’un des tout meilleurs Pokémon de l’histoire.” Spore + Poudre Fureur + Régé-Force |
| 13 | Farfaduvet | 5 | Support Farceur | Vent Arrière prioritaire, Provoc, Encore. A remporte les Worlds en 9G |
| 14 | Felinferno | 7 | Support universel | “Meilleur Pokémon de l’histoire.” Priorité absolue |
| 15 | Gorythmic | 8 | Support + attaquant | Champ Herbu automatique. Bluff + Glisserbe. Top 5 historique |
| 16 | Angoliath (Grimmsnarl) | 8 | Poseur de murs | Mur Lumiere + Protection + Cage Éclair + Dernier Mot |
| 17 | Wimessir femelle (Indeedee-F) | 8 | Support Champ Psy | Champ Psychique (bloque priorites). Par Ici (redirection). Graines Psy |
| 18 | Ursaking | 8/LA | Attaquant Trick Room | Cran + Orbe Flamme + Facade = degats monstrueux sous Distorsion |
| 19 | Courrousinge (Annihilape) | 9 | Support/Anti-Mega | Acharne dissuade Intimidation. Coaching pour les allies Mega. Tout ou Rien vs Megas |
| 20 | Gros-Mago (Gholdengo) | 9 | Attaquant special immunise | Corps en Or = immunité statut. Machination ou Lunettes Choix |
Mentions Honorables (Hors Top 20)
| Pokémon | Raison |
|---|---|
| Feunard d’Alola | Meilleur poseur de Neige. Voile Aurore. Juste en dehors du top 20 |
| Farigiraf | Armure Caudale bloque les priorités adverses |
| Togekiss | Mention honorable explicite |
| Flambusard (Talonflame) | Vent Arrière prioritaire, mais souvent depasse |
| Mimiqui (Mimikyu) | Pourrait redevenir très fort en format restreint |
| Dracolosse | Jamais ete bon avant la Teracristallisation. Mega incertaine |
| Famignol (Maushold) | Synergies Baston + Garde-Ami |
| Oyacata/Dozo-Tatsu (Dondozo/Tatsugiri) | Gameplay deteste mais puissant |
| Superdofin (Palafin) | Peut être très interessant |
| Paragruel (Basculegion) | Vraiment pas mal |
| Kangourex | Mega top 3 historique. Facilement obtenu via LPA |
| Mefousse (Dusclops) | Evoluthe + Trick Room |
Paradoxes et Semi-Legendaires (non inclus mais importants a avoir)
- Flotte-Meche (Flutter Mane) – Le premier cite
- Rugilune (Iron Moth)
- Paume de Fer (Iron Hands)
- Hote de Fer (Iron Bundle)
- Hurle-Queue (Roaring Moon)
- Koraidon / Miraidon – “Blaspheme de ne pas les avoir”
16.4 Les 7 Pokémon Nerfes mais Toujours Forts
Source : HARI – “7 Pokémon NERF mais TOUJOURS FORTS”
Ces Pokémon ont subi des nerfs significatifs au fil des generations mais sont restes competitifs grace a l’adaptation de leur kit ou a l’emergence de nouvelles mécaniques. Comprendre leur resilience est crucial pour predire leur performance dans Champions.
1. GAULET (Amoonguss)
Nerfs (6G) :
- Arrivee des Lunettes Filtre : immunité aux poudres (Spore, Poudre Fureur)
- Types Plante immunises aux poudres
- Redirection perd sa priorité supérieure a Bluff
Pourquoi il survit : Kit de support pur et exceptionnel. Spore reste une menace que l’adversaire doit “respecter”. Excellentes resistances (Eau, Combat, Plante). Le cout d’opportunite des Lunettes Filtre profite aussi a Gaulet. “Les supports bien concus perdurent.”
2. FULGURIS (Thundurus-Incarnate)
Nerfs (7G) : Quintuple nerf simultane :
- Cage-Éclair : 100% -> 90% précision
- Paralysie : Vitesse /4 -> /2
- Confusion : 1/2 -> 1/3 chance d’auto-degats, limitee a 3 tours
- Farceur : inactif contre types Ténèbres
- Arrivee des Tapus (Champ Psychique bloque priorites, Champ Brumeux reduit paralysie)
Pourquoi il survit : Reinvente via le talent Acharne (Defiant) en 8G. Max Vol + Dynamax + Acharne = sweeper redoutable. A gagne les Worlds 2022 en Serie 12. Retour ponctuel en 9G via Farceur (demi-finale Championnats d’Europe).
3. FLAMBUSARD (Talonflame)
Nerf (7G) : Ailes Bourrasque (Gale Wings) ne donne la priorité Vol que si le Pokémon est a 100% PV.
Pourquoi il survit : En 9G, la Cape Obscure (immunite effets secondaires) le protege de Bluff. Avec 126 de Vitesse de base + Cape Obscure, il est extremement difficile de l’empecher de poser Vent Arriere. La Vitesse Dynamique (8G+) rend son Vent Arrière encore plus impactant.
4. MEGA-DRATTAK (Mega Salamence)
Nerf (7G) : Peau Celeste : bonus de conversion Normal -> Vol passe de +30% a +20%.
Pourquoi il survit : “Drattak tape toujours fort, c’est aussi simple que ca.” Le type Vol offensif est très difficile a repliquer. Stats defensives excellentes. A remporte les Worlds 2018 et 2019. Le nerf est numerique, pas mécanique.
5. MEGA-KANGOUREX (Mega Kangaskhan)
Nerfs (7G) : Triple nerf :
- Amour Filial : 2e coup 50% -> 25%
- Coup Bas : 80 -> 70
- Perte de Point Boost
Pourquoi il survit : Bluff double-coup reste fantastique. Adaptation du moveset (Morsure contre Lunala en 2019). Buff en 8G : Attention/Querion donne l’immunite a Intimidation avant Mega. Recuperation de Point Boost dans Champions (via Legends ZA). Très present en 7G malgre les nerfs (victoire Special de Tour).
6. QUEULORIOR (Smeargle)
Nerfs (7G) :
- Trou Noir : inutilisable par les non-Darkrai
- Lunatique : ne peut plus augmenter Esquive/Précision
Pourquoi il survit : Spore (100% precision) remplace Trou Noir. Gros Bisous (75%) touche les types Plante ET les porteurs de Lunettes Filtre. Movepool unique grace a Gribouille (Sketch) : Bluff + Par Ici + Garde Large + Spore sur un seul Pokémon. Eduardo Cunha Top 4 NAIC 2024, finale Regional de Lille.
7. FELINFERNO (Incineroar) – Le GOAT
Nerfs indirects :
- 8G : Talents immunises a Intimidation (Querion, Attention, Tempo Perso)
- 9G : Talisman Sain (contre Intimidation + Dernier Mot), Cape Obscure (contre Bluff)
Pourquoi il survit : Kit de support inegale. L’adversaire qui porte Talisman Sain ou Cape Obscure renonce a un autre objet – logique du “donnant-donnant”. Sabotage en 9G règle le probleme des objets anti-Felinferno. Obtient Dernier Mot en 8G. “Les meilleurs supports ne meurent pas.”
Theme transversal de la video : Les supports bien concus perdurent. Les attaquants purs finissent par disparaitre via le power creep. Construisez votre equipe autour de supports solides.
16.5 Méta Tier List Pre-Lancement (Donnees de Simulation)
Source : Champions Lab (championslab.xyz) – 2 000 000 de combats simules
Avertissement : Donnees de simulation pre-lancement, pas de resultats de tournois reels. Le méta vivant emergera après le 8 avril. Ces donnees sont un point de depart, pas une certitude.
Top Pokémon par ELO et Winrate
| Pokémon | Winrate | ELO |
|---|---|---|
| Méga-Scarabrute (Mega Pinsir) | 54.8% | 9 355 |
| Méga-Kangourex | 49.1% | 9 349 |
| Florizarre (Venusaur) | 51.5% | 9 345 |
| Méga-Dracaufeu Y | 53.1% | – |
| Méga-Metalosse | 50.1% | – |
| Méga-Gardevoir | 49.7% | – |
Analyse des Donnees
Méga-Scarabrute en tête est surprenant mais logique : son talent Peau Celeste (Aerilate) + Vive-Attaque (Quick Attack, priorite devenant Vol) etait déjà tier S en 6G VGC. Le retour des Megas dans un écosystème enrichi par 10 ans de nouveaux Pokémon cree des interactions inedites.
Méga-Kangourex a 49.1% winrate mais 9 349 ELO : le winrate de 49.1% est trompeur. Un ELO eleve avec un winrate sous 50% signifie qu’il est joue dans les matchups les plus durs (les meilleures equipes l’affrontent, donc il gagne plus de rating par victoire). C’est le signe d’un Pokémon central du metatjeu.
Florizarre a 51.5% confirme la force des equipes Soleil. Avec Chlorophylle sous Sécheresse de Méga-Dracaufeu Y, Florizarre est un monstre offensif qui peut aussi endormir avec Poudre Dodo.
Cores les Plus Performants (rappel)
| Core | Winrate |
|---|---|
| Motisma Chaleur + Méga-Carchacrok | 72.5% |
| Léviator + Méga-Florizarre | 72.5% |
| Méga-Florizarre + Scalpereur | 72.5% |
| Motisma Chaleur + Feunard d’Alola | 70.8% |
16.6 Priorités de Recrutement par Catégorie (Guide F2P)
Source : HARI – “Les Pokémon a RECRUTER en PRIORITE” (video 50)
Pour qui ? Principalement les joueurs free-to-play avec un espace de stockage limite, mais aussi tous les joueurs qui veulent optimiser leurs tickets de recrutement et leurs VP. Ces Pokémon serviront sur le long terme – ils resteront forts même quand les reglements changeront.
Catégorie 1 : Votre Mega préférée + Synergie
Conseil de HARI : Avant tout, recrutez votre Mega préférée et un allie qui synergise. Même si c’est pas la Méga la plus forte du méta, l’important est de se faire plaisir et d’apprendre le jeu. Au pire, les Pokémon qui completent l’equipe autour de la Méga serviront ailleurs.
Exemple : Méga-Dracaufeu Y + Florizarre. Florizarre n’existe pas sans Dracaufeu Y, mais Dracaufeu Y fonctionne sans Florizarre.
Si vous avez besoin de conseils pour choisir une synergie Mega, HARI recommande de demander en live.
Catégorie 2 : Felinferno (le seul Pokemon unique cite)
Le meilleur Pokémon du jeu. Couteau suisse exceptionnel :
- Intimidation contre tous les physiques
- Bluff pour neutraliser un adversaire au tour d’entree
- Dernier Mot / Demi-Tour pour pivoter en securite
HARI : “Ce serait de la folie de ne pas avoir un Felinferno.” Il rentre dans enormement d’equipes et vous aide contre quasiment toutes les Megas physiques.
Catégorie 3 : Supports (Vent Arriere / Ecrans)
Choisissez UN support selon votre style de jeu :
| Support | Style | Pourquoi |
|---|---|---|
| Farfaduvet | Polyvalent | Vent Arrière + Farceur, fonctionne dans les equipes agressives ET defensives. Meilleur choix par defaut. Servira longtemps. |
| Flambusard | Agressif | Vent Arrière + Bourrasque + degats. Plus agressif que Farfaduvet, mais peut perdre en interet sur le long terme. A jouer avec Carchacrok, Minotaupe. |
| Angoliath | Controle | Ecrans (Mur Lumiere, Protection) + Farceur + Cage Éclair + Dernier Mot. Pour les joueurs qui preferent le controle aux equipes agressives. Servira longtemps. |
Conseil : Ne jouez pas les deux poseurs de Vent Arrière a la fois. Si vous etes indecis entre agressif et controle, partez sur Farfaduvet.
Catégorie 4 : Poseurs de Meteo
| Pokémon | Meteo | Pourquoi le recruter |
|---|---|---|
| Bequipan (Pelipper) | Pluie | Archétype Pluie (avec Pondralugon, Paragruel) OU outil pour contrer la meteo adverse. |
| Tyranocif (Tyranitar) | Tempete de Sable | Archétype Sable (avec Minotaupe) OU reponse contre Méga-Dracaufeu Y / equipes Soleil. |
Note : Chartor (Soleil) est plus specifique. Méga-Momartik (Neige) se sert de la Neige “un peu tout seul”. Ces deux poseurs ne sont pas dans cette catégorie prioritaire.
Valeur long terme : Quand les gros legendaires arriveront, Bequipan et Tyranocif perdront en interet. Mais d’ici la, il se passera beaucoup de temps – vous n’aurez pas perdu une place de stockage.
Catégorie 5 : Redirecteurs
Toutes les equipes n’ont pas besoin de redirection, mais si oui :
| Pokémon | Forces | Ideal pour |
|---|---|---|
| Effroyable (Sinistcha) | Hospitalite (soigne 25% PV allie a l’entree) + Poudre Fureur + Distorsion + bon matchup contre Ursaking. Le plus polyvalent au lancement car peu de bons Pokémon Plante au debut. | Equipes qui ont besoin de support + redirection + Distorsion |
| Mélodelfe (Clefable) | Par Ici (redirection pure) + Inconscient (ignore les boosts adverses) + resistance Ténèbres. Plus precis et extreme en tant que redirecteur. | Equipes ou le typing Fee et Inconscient sont meilleurs |
| Pyrax (Volcarona) | Poudre Fureur + Vent Arrière + Survinsecte + option Papillodanse pour faire des degats. Meilleur potentiel long terme. | Equipes qui veulent un redirecteur qui peut aussi devenir offensif |
Catégorie 6 : Sacs de Stats (Pokemon a hautes statistiques)
Des Pokémon avec beaucoup de stats, peu de defauts (malgre une double faiblesse chacun). Quand vous jouez avec plus de statistiques que l’adversaire, il doit faire des efforts supplementaires pour prendre l’avantage.
| Pokémon | Pourquoi | Support ? |
|---|---|---|
| Carchacrok (Garchomp) | Stats elevees, pas de mauvaise stat. Va bien a côté de Léviator, Flambusard. Bon pendant longtemps. | Non – purement offensif |
| Léviator (Gyarados) | Stats solides + Intimidation + Cage Éclair + Provoque. Beaucoup d’outils de support en plus des stats. | Oui – Intimidation, Cage Éclair, Provoque |
| Trioxydre (Hydreigon) | Stats elevees + Aboiement + Vent Arriere. Peut être joue agressivement (Orbe Vie, Lunettes Choix) ou en support. Meilleur que Carchacrok dans certaines equipes selon le typing. | Oui – Aboiement, Vent Arrière |
Note : Dracolosse et Pondralugon sont aussi dans cette catégorie mais plus specifiques.
Catégorie 7 : Extremes de Vitesse
Avoir un Pokémon très lent ET un Pokémon très rapide dans une equipe est souvent benefique :
Côté lent (anti-Distorsion) :
| Pokémon | Rôle |
|---|---|
| Chartor (Torkoal) | Excessivement lent = avantage sous Distorsion. Pose le Soleil (Secheresse). Support : Baillement, Coup de Main. Utile même si VOTRE equipe ne joue pas Distorsion – contre les equipes adverses qui la posent. |
| Faregiraf (Farigiraf) | Pas extremement lent mais possède Distorsion pour la poser/reverser. Armure Codale bloque les priorités. Support : Coup de Main. |
Côté rapide (finisseur) :
| Pokémon | Rôle |
|---|---|
| Farfurex (Sneasler) | L’un des tout meilleurs Pokémon très rapides. Quand un Pokémon adverse est bas en PV mais trop rapide pour être acheve, Farfurex règle le probleme. Très present au debut de Champions. |
Catégorie 8 : Regleurs de Matchup
Des Pokémon qui resolvent un probleme specifique de votre equipe :
| Pokémon | Règle quel probleme | Comment |
|---|---|---|
| Ectoplasma (Gengar) | Equipes qui se boostent, matchups varies | Provoc, Vent Glace, plein d’outils. + Excellente Mega. Restera une option tant que les Megas existent. |
| Dracolosse (Dragonite) | Equipes Soleil et Pluie | Type Dragon + bonnes stats defensives + Multi. Force l’adversaire a ramener un Pokémon Fee. Peut se jouer avec ou sans sa Méga. |
| Scalpereur (Kingambit) | Intimidation, Méga-Ectoplasma | Acharne punit Intimidation. Kuba pour la priorité. Avec Baie Prine : pas peur de Feu Follet, Genusection directement. Servira longtemps. |
| Paragruel (Dondozo) | Méga-Ectoplasma, fin de game | Pas piege par Marque Ombre (pas Spectre). Au Revoir pour repositionner. Hommage Posthume en fin de game = devastateur. |
Recruter un Pokémon de chaque catégorie vous donne une base solide pour construire plusieurs equipes competitives au fil des reglements.
Section 18 – 50 Sets Competitifs a Connaitre (Reglement MA)
Source : HARI – “50 SETS A CONNAITRE dans Pokémon Champions” (video 49)
Ce chapitre est une reference rapide. Pour chaque Pokémon, vous trouverez le ou les sets par defaut que HARI recommande pour le Reglement MA (format de debut de Pokemon Champions en combat classe duo). Les repartitions de statistiques ne sont pas couvertes ici – elles feront l’objet de videos dediees.
18.1 FLORIZARRE (Venusaur) – Sans Mega, Chlorophylle
Talent : Chlorophylle (double la vitesse sous Soleil) Objets : Ceinture Force / Cape Obscure / Orbe Vie Synergie : Se joue en combinaison avec Méga-Dracaufeu Y
| Slot | Attaque | Notes |
|---|---|---|
| 1 | Lance-Soleil | Move Plante principal, instantane sous Soleil |
| 2 | Bomberbe (Sludge Bomb) | Meilleur move Poison disponible |
| 3 | Poudre Dodo | Force l’adversaire a porter Lunettes Filtre ; les Plantes sont immunisees mais Dracaufeu les explose |
| 4 | Abri | Plus facile a justifier avec Cape Obscure (pas besoin de se protéger de Bluff) ; remplacable par Bal Meteo ou Téra Force |
Notes strategiques :
- On investit au max en Vitesse et Attaque Spéciale
- Ceinture Force sur les Pokémon fragiles, Cape Obscure contre Bluff, Orbe Vie pour vocation offensive
- Air d’Herbe + Air de Feu est une combinaison possible mais complexe (mécanique unique)
18.2 MEGA-DRACAUFEU Y – Sécheresse
Talent avant Mega : Brasier (aucun interet d’avoir Force Soleil avant Mega puisqu’on ne tape pas sans mega evoluer) Talent Mega : Sécheresse (pose le Soleil en mega evoluant)
| Slot | Attaque | Notes |
|---|---|---|
| 1 | Canicule (Heat Wave) | Obligatoire sur 100% des sets – degats de zone Feu |
| 2 | Surchauffe / Lance-Flamme / Bal Meteo | Surchauffe = degats enormes mais -2 Atk Spe ; Lance-Flamme = sans inconvenient, bon contre Garde Large ; Bal Meteo = type Feu sous Soleil a 100 puissance, mais dependant de la meteo |
| 3 | Lance-Soleil / Vent Arrière / Lame d’Air | Lance-Soleil si l’equipe a déjà du speed control ; Vent Arrière si l’equipe en a besoin ; Lame d’Air si Ekaiser est un probleme |
| 4 | Abri | Standard |
Notes strategiques :
- Il y a un vrai debat pour le 2e move Feu – Bal Meteo est souvent associe a un “move Feu” mais devient nul sous la pluie
- Vent Arrière moins necessaire si l’equipe a déjà Chlorophylle ou autre speed passif
18.3 MELODELFE (Clefable) – Redirecteur
Talent : Inconscient (ignore les changements de stats des Pokemon qui nous attaquent et qu’on attaque) Objet : Baie Citrus (recuperation de PV pour compenser le sacrifice de redirection)
| Slot | Attaque | Notes |
|---|---|---|
| 1 | Par Ici (Follow Me) | Redirection, coeur du set |
| 2 | Pouvoir Lunaire (Moonblast) | Attaque offensive, on ne s’en prive pas |
| 3 | Coup de Main / Vent Glace / Fontaine de Vie | Debat entre support offensif et utilitaire |
| 4 | Chambrumeux / Berceuse / Vent Glace | A determiner selon les pertes de movepool au debut de Champions |
Notes strategiques :
- On investit massivement en defensif, les stats defensives deviennent “plutot bonnes” avec l’investissement
- Un Pokémon booste ne prend pas de valeur contre Mélodelfe grace a Inconscient
- Pas assez de Poudre présenté au debut de Champions pour justifier les Lunettes Filtre
- Mélodelfe n’a pas la vitesse pour embeter l’adversaire avant qu’il n’attaque
18.4 MEGA-ECTOPLASMA – Marque Ombre
Talent avant Mega : Importe peu (Corps Maudit possible) Talent Mega : Marque Ombre (piege les adversaires sur le terrain) Objet : Ectoplasma-ite (slot Mega)
| Slot | Attaque | Notes |
|---|---|---|
| 1 | Ball’Ombre / Bonk | Un seul move offensif le plus souvent ; Ball’Ombre tape SE sur les Spectres qui ne sont pas pieges par Marque Ombre |
| 2 | Requiem (Perish Song) | L’atout principal du piège – forcer le KO en 3 tours |
| 3 | Feu Follet / Provoque | Feu Follet contre physiques/Kuba ; Provoque contre boosteurs/poseurs de Distorsion |
| 4 | Abri | Indispensable – trop fragile en physique avec faiblesse Ténèbres |
Notes strategiques :
- Le moveset varie beaucoup selon l’equipe : on peut avoir les 2 moves offensifs, ou Clonage, ou Feu Follet + Provoque pour un rôle purement defensif
- Se combine bien avec Farfaduvet et Croco Larme
- Abri est OBLIGATOIRE – le Pokémon est trop fragile avec des faiblesses trop genantes
18.5 MEGA-KANGOUREX – Amour Filial
Talent avant Mega : Cureler (Scrappy – touche les Spectres avec les attaques Normales/Combat) Note : On joue quasiment toujours Cureler plutot qu’Attention ; roller a trop de valeur en open team list. Bluff possible pour bluffer un Spectre (Ectoplasma, Effroyable) et les empecher de poser Distorsion/rediriger.
| Slot | Attaque | Notes |
|---|---|---|
| 1 | Damocles (Double-Edge) | Meilleure attaque Normale pour les gros degats |
| 2 | Kuba (Sucker Punch) | Priorité Ténèbres, touche les Spectres ; plus d’utilite que Machouille |
| 3 | Balayage (Low Kick) | Cherche Scalpereur et Tyranocif (x4 en Combat) |
| 4 | Abri / Point Boost | Point Boost si disponible dans Champions : a +1 ou +2, les degats sont gigantesques |
Notes strategiques :
- Sans Bluff, Cureler perd un peu d’interet, mais Damocles reste notre meilleur move
- A +2 avec Méga-Kangourex, c’est le chaos en pagaille
18.6 LEVIATOR (Gyarados) – Support / Anti-Soleil
Talent : Intimidation Objets : Baie Citrus / Lunettes Filtre / Cape Obscure / Baie Parma (faiblesse elec peu utile vu le peu d’attaques electriques en meta)
| Slot | Attaque | Notes |
|---|---|---|
| 1 | Cascade | Meilleur move Eau |
| 2 | Vent Glace | Speed control |
| 3 | Provoque | Empêche les attaques de soutien adverses |
| 4 | Cage Éclair / Indignition / Zénith / Pluie | Cage Éclair = plus de speed control ; Indignition = Trepignement type Feu, touche les Plantes sous Soleil ; Zénith/Pluie = contrer la meteo adverse |
Notes strategiques :
- Excellent contre Dracaufeu/Florizarre : resistance Feu, aucune faiblesse contre ces deux
- Lunettes Filtre = pas peur de Poudre Dodo non plus
- Cape Obscure = pas de Bluff, pas de statue sur Griffe Funeste de Farfurex
- Coup de Main et Hurlement aussi disponibles
- Très peu d’attaques electriques au debut de Champions, ce qui arrange bien Léviator
18.7 DRACOLOSSE (Dragonite) – Deux variantes
Variante A : Sans Mega + Depipe (Loaded Dice)
Talent : Multiecaille Objet : Depipe (garantit 4 coups aux attaques multi-hit)
| Slot | Attaque | Notes |
|---|---|---|
| 1 | Rafale-Caille (Scale Shot) | 4-5 coups garantis avec Depipe, attaque très puissante, gagne en vitesse mais perd en défense |
| 2 | Buee Noire / Trepignement / Tête de Fer / Vitesse Extreme / Balayage | Selon les besoins de l’equipe |
| 3 | Vent Arrière | Combine bien avec Rafale-Caille (+1 vitesse) pour donner le speed au partenaire |
| 4 | Abri | Difficile de s’en passer ; sans Teracristallisation ni Bandeau Choix, Abri est necessaire |
Variante B : Méga-Dracolosse – Special Pluie
Talent avant Mega : Multiecaille (mieux qu’Attention – on veut tanker le 1er coup, pas contrer Intimidation car on tape en special) Talent Mega : Multiecaille (conserve)
| Slot | Attaque | Notes |
|---|---|---|
| 1 | Vent Violent (Hurricane) | Immanquable sous la Pluie |
| 2 | Draco Meteor | KO d’un coup sur beaucoup de cibles |
| 3 | Vent Arrière | Profite a l’equipe |
| 4 | Abri | Double faiblesse a gerer, protège Multiecaille |
Notes strategiques :
- Fatal Foudre envisageable mais les cibles sont limitees
- On perd en attaque physique par rapport a la forme non-méga – tout se joue en special
18.8 MEGA-ALIGATUEUR – Draconiser (Dragonize)
Talent Mega : Draconiser (les attaques Normales deviennent Dragon) Objet : Aligatueur-ite (slot Mega)
| Slot | Attaque | Notes |
|---|---|---|
| 1 | Aqua-Breche (Liquidation) | Meilleur move Eau |
| 2 | Danse Draco (Dragon Dance) | Setup obligatoire pour fonctionner |
| 3 | Damocles | Devient Dragon via Draconiser – degats enormes |
| 4 | Abri | Bonnes stats defensives mais indispensable quand même |
Notes strategiques :
- HARI n’est pas convaincu qu’il sera très present dans la méta
- Un peu galere a mettre en place : demande du setup
- Danse Lame possible mais necessiterait deux tours de setup
18.9 TARPAUD (Politoed) – Support Requiem
Talent : Crachin (pose la Pluie) Objet : Baie Citrus
| Slot | Attaque | Notes |
|---|---|---|
| 1 | Bal Meteo (Weather Ball) | Meilleur move offensif, devient Eau sous Pluie |
| 2 | Requiem (Perish Song) | 2e utilisateur de Requiem avec Ectoplasma – declenche le piège sans qu’Ectoplasma n’ait a le faire |
| 3 | Encore | Piège l’adversaire dans un move |
| 4 | Abri | Indispensable avec Requiem |
Notes strategiques :
- Prend de la place par rapport a Bequipan grace a Requiem et de meilleures stats defensives
- Ocroupi (Muddy Water) aussi possible mais problemes de précision
18.10 TYRANOCIF (Tyranitar) – Deux variantes
Variante A : Sans Mega – Bulky offensif
Talent : Sable Volant (pose la Tempete de Sable, +50% Def Spe des Roche) Objets : Veste de Combat (bulk special pharamineux) / Talisman Sain / Baie Pomme Rose (anti-Combat)
| Slot | Attaque | Notes |
|---|---|---|
| 1 | Balayage (Low Kick) | Contre Scalpereur et miroir |
| 2 | Assurance (Payback variant) | Double a 120 puissance si la cible a déjà subi des degats – monstrueux avec Minotaupe qui fait des premiers degats |
| 3 | Eboulement (Rock Slide) | Degats de zone + flinch |
| 4 | Abri | Necessaire sans Veste de Combat ; avec Veste, 4 moves offensifs |
Variante B : Méga-Tyranocif – Danse Draco
| Slot | Attaque | Notes |
|---|---|---|
| 1 | Machouille (Crunch) | Extermine tout ce qui ne resiste pas a +1 |
| 2 | Eboulement | Degats de zone enormes pour de la zone |
| 3 | Danse Draco | A +1 en vitesse, depasse beaucoup de choses avec l’attaque physique enorme de la Méga |
| 4 | Abri | Le bulk est enorme mais necessaire |
18.11 BEQUIPAN (Pelipper) – Poseur de Pluie
Talent : Crachin Objets : Ceinture Force / Cape Obscure / Lunettes Filtre
| Slot | Attaque | Notes |
|---|---|---|
| 1 | Vent Violent (Hurricane) | Immanquable sous Pluie ; degats corrects malgre l’Atk Spe mediocre |
| 2 | Bal Meteo | Devient type Eau, puissant sous Pluie |
| 3-4 | Vent Arrière / Abri / Garde Large / Coup de Main | Choisir 2 parmi ces 4 selon les besoins de l’equipe |
Notes strategiques :
- Meilleur ami de Pondralugon
- Face a Florizarre : tenable tant que la bataille de meteo est gagnee
- Cape Obscure contre Poudre Dodo de Florizarre
18.12 MEGA-GARDEVOIR – Peau Féerique
Talent avant Mega : Calque (copie le talent d’un Pokemon adverse a l’entree – peut copier Intimidation, mais danger de copier Acharne face a Scalpereur/Felinferno) Alternatives : Synchro ou Telepathe (si Minotaupe dans l’equipe, pour ignorer Seisme) Talent Mega : Peau Féerique (les attaques Normales deviennent Fee)
| Slot | Attaque | Notes |
|---|---|---|
| 1 | Megaphone (Hyper Voice) | Degats de zone type Fee via Peau Féerique – coeur du set |
| 2 | Psycho / Choc Psy | Psycho = meilleure puissance generique ; Choc Psy = si cibles precises a viser |
| 3 | Distorsion (Trick Room) | Malgre 100 de base vitesse, fonctionne en Tailroom (vent arriere OU distorsion selon le matchup) |
| 4 | Abri | Beaucoup trop fragile en physique |
Options alternatives : Plénitude, Clonage, Aurasphere (contre Scalpereur, mais ne tue pas Tyranocif a cause de la Tempete de Sable)
Notes strategiques :
- On ne joue PAS max vitesse / max Atk Spe – on investit beaucoup en defensif pour tanker
- Veste de Combat envisageable avec le +20 Def Spe en Mega
- Les gens vont se rendre compte que c’est fort
18.13 CHARTOR (Torkoal) – Distorsion Soleil
Talent : Sécheresse Objets : Lunettes Choix (degats max) / Charbon (+20% degats Feu)
Set A : Lunettes Choix (4 offensifs)
| Slot | Attaque | Notes |
|---|---|---|
| 1 | Eruption | Degats monstres a PV pleins |
| 2 | Canicule | Degats de zone |
| 3 | Bal Meteo / Lance-Flamme | Move Feu supplementaire |
| 4 | Lance-Soleil | Couverture Plante |
Set B : Charbon (support)
| Slot | Attaque | Notes |
|---|---|---|
| 1 | Surchauffe / Eruption | Degats principaux |
| 2 | Coup de Main | Support offensif |
| 3 | Baillement (Yawn) | Casse la position adverse, oblige le switch |
| 4 | Abri | Protection |
Notes strategiques :
- Brille dans les equipes Distorsion + Soleil
- Set B = Chartor en support pur qui apporte le Soleil pour les allies
18.14 MEGA-METALLOSSE – Tacle Lourd
Talent Mega : Griffe Dure (Tough Claws) Objet : Metallosse-ite (slot Mega)
| Slot | Attaque | Notes |
|---|---|---|
| 1 | Tacle Lourd (Heavy Slam) | Meilleur move Acier contre la majorite des Pokemon (puissance par palier de poids) |
| 2 | Trepignement (Stomping Tantrum) | Couverture Sol, necessaire pour la couverture neutre |
| 3 | Croc Psychique (Zen Headbutt) | Dommage de s’en priver, mais necessite Trepignement pour la couverture |
| 4 | Abri | Standard |
Options alternatives : Poing Glace (synergie avec Minotaupe qui apprecie les degats Glace), Poing Eclair (contre Leviator), Clonage
Notes strategiques :
- On peut remplacer Croc Psychique par un Poing si l’equipe a déjà la couverture Sol via Minotaupe
- Clonage jouable mais probablement pas dans cette méta sans Gorthmic au lancement
18.15 CARCHACROK (Garchomp) – Offensif pur
Talent : Peau Dure (la plupart du temps) ; Voile Sable possible mais peu convainquant Objets : Talisman Sain / Orbe Vie / Bandeau Choix
| Slot | Attaque | Notes |
|---|---|---|
| 1 | Trepignement (Stomping Tantrum) | Préféré a Seisme si on joue un seul STAB Sol (Seisme a des contraintes avec l’allie) |
| 2 | Séisme / Eboulement | Séisme = 2e STAB Sol zone ; Eboulement contre Dracaufeu |
| 3 | Lame de Roc (Stone Edge) | Précision douteuse mais degats importants avec Orbe Vie |
| 4 | Danse Lame / Abri | Danse Lame avec Talisman Sain ; Draco-Griffe a +2 fait très mal |
Notes strategiques :
- Talisman Sain = pas peur d’Intimidation ni de Vent Glace
- Contre Florizarre/Dracaufeu : agressif avec “as-tu envie de prendre Fait l’Inferno ?” – en realite oui contre eux, donc Talisman Sain est le choix sur
18.16 MEGA-MOMARTIK – Voile Aurore
Talent avant Mega : Corps Maudit (Rideau Neige = l’adversaire ne posera pas la Neige pour toi) Talent Mega : Refrigerant (Refrigerate)
| Slot | Attaque | Notes |
|---|---|---|
| 1 | Blizzard | Attaque Spéciale correcte + bonne vitesse = tout l’interet de la Méga |
| 2 | Voile Aurore (Aurora Veil) | Le VRAI interet : poseur de Voile plus rapide que Feunard d’Alola, avec meilleures stats et plus de pression offensive |
| 3 | Ball’Ombre (Shadow Ball) | Couverture contre les resistants a Blizzard (Méga-Ectoplasma, Exagide) |
| 4 | Abri | Standard |
Notes strategiques :
- Ball’Ombre a plus de valeur que Feu Follet même contre Kuba – Voile Aurore profite a toute l’equipe tant que la meteo n’est pas contestee
- Très peu de raison de jouer autrement au lancement
18.17 MINOTAUPE (Excadrill) – Ceinture Force / Offensif
Talent : Force Sable (si equipe Sable) / Brise Moule Objets : Ceinture Force (par defaut) / Orbe Vie (depasse le cap de degats de la Méga) / Talisman Sain (pas d’Intimidation, contrairement a Mega)
| Slot | Attaque | Notes |
|---|---|---|
| 1 | Cavalerie Lourde (Iron Head) | Meilleur move Acier même si pas très puissant |
| 2 | Tête de Fer (Iron Head – alt) / Séisme | Séisme = degats de zone, attention a l’allie ; permet d’ignorer la redirection |
| 3 | Eboulement / Danse Lame | Eboulement combine bien avec Assurance de Tyranocif |
| 4 | Abri | Standard |
Notes strategiques :
- Les 3 objets (Ceinture Force, Orbe Vie, Talisman Sain) rendent Minotaupe plus interessant que sa Méga dans beaucoup de cas car il ne prend pas le slot Mega
- Précision de Cavalerie Lourde pas impeccable mais difference de puissance importante
18.18 BETOCHEF (Conkeldurr) – Distorsion Tank
Talent : Cran (Guts) / Les 3 talents sont viables selon l’equipe Objets : Orbe Flamme (active Cran) / Veste de Combat
Set A : Cran + Orbe Flamme
| Slot | Attaque | Notes |
|---|---|---|
| 1 | Close Combat / Cheri Force | Degats Combat principaux |
| 2 | Mach Punch (Poing Mach) | Priorité Combat, excellent type |
| 3 | Garde Large (Wide Guard) | Contre les attaques de zone, très utile sous Distorsion |
| 4 | Abri | Standard |
Set B : Veste de Combat
| Slot | Attaque | Notes |
|---|---|---|
| 1 | Cheri Force (Drain Punch) | Degats + soin |
| 2 | Mach Punch | Priorité |
| 3 | Poing Glace | Touche Léviator (qui est Intimide en plus) |
| 4 | Poing Éclair | Couverture supplementaire |
Notes strategiques :
- Se joue principalement sous Distorsion
- Très bon bulk physique, repond bien a Tyranocif/Minotaupe
18.19 FARFADUVET (Whimsicott) – Builds detailles
Talent : Farceur (Prankster) Objets : Cape Obscure (pas peur de Bluff) / Ceinture Force (mauvaises stats defensives)
| Slot | Attaque | Notes |
|---|---|---|
| 1 | Pouvoir Lunaire | 99% du temps ; Que Magique très rarement |
| 2 | Encore | Impose enormement a l’adversaire, Encore + Farceur = immanquable |
| 3 | Vent Arrière | Raison d’être du Pokémon, Farceur + vitesse dynamique |
| 4 | Variable | Baston (avec Pondralugon), Croco Larme (avec Méga-Dracaufeu Y), Coup de Main, Mur Lumiere, Provoque (attention : Farceur + Provoque ne marche pas sur les Tenebres), Charm, Chambrumeux (vrai contre a Ursaking), Zénith, Chatouille |
Notes strategiques :
- Cape Obscure : pas de Bluff = on peut jouer plus de moves de support au lieu d’Abri
- Ceinture Force + Abri si on choisit cet objet
- A pris des buffs indirects entre la 8G et la 9G, etait déjà très fort avant
18.20 TRIOXYDRE (Hydreigon) – Support Dragon
Talent : Lévitation Objets : Cape Obscure (le plus souvent) / Lunettes Filtre / Orbe Vie / Lunettes Choix
| Slot | Attaque | Notes |
|---|---|---|
| 1 | Draco Meteor | Bons degats même sans investissement offensif |
| 2 | Vibr’Obscur (Dark Pulse) | Touche Méga-Ectoplasma, Effroyable |
| 3 | Aboiement (Snarl) | Excellent move de support – degats + baisse Atk Spe. Peut remplacer Vibr’Obscur |
| 4 | Vent Arrière / Provoque | Provoque + Cape Obscure = empêche beaucoup de choses adverses |
Notes strategiques :
- Se glisse dans les equipes avec un mix de Pokémon rapides et lents
- Lunettes Filtre = ignore Poudre Dodo de Florizarre et Poudre Fureur d’Effroyable
- Peut jouer les 2 moves Ténèbres (Vibr’Obscur + Aboiement) en retirant Provoque
- Très bon profil defensif Dragon contre Dracaufeu/Florizarre
18.21 PYRAX (Volcarona) – Support ou Papillodanse
Set A : Support (recommande)
Talent : Corps Ardent / Essaim Objet : Cape Obscure / Baie Citrus / Casque Brut
| Slot | Attaque | Notes |
|---|---|---|
| 1 | Survinsecte (Struggle Bug) | Comme Aboiement : degats + baisse Atk Spe des 2 adverses a coup sur |
| 2 | Poudre Fureur (Rage Powder) | Redirection |
| 3 | Vent Arrière | Speed control |
| 4 | Feu Follet / Surchauffe / Canicule | Feu Follet = neutralise une cible ; Surchauffe = degats corrects même sans investi offensif grace a la grosse Atk Spe naturelle |
Set B : Papillodanse (moins recommande)
Objet : Baie Citrus
| Slot | Attaque | Notes |
|---|---|---|
| 1 | Papillodanse (Quiver Dance) | Setup |
| 2 | Canicule | Degats Feu |
| 3 | Giga-Sangsue | Preferable a Bourdon – les Pokémon Feu bloquent moins |
| 4 | Abri | Se protéger pendant le setup |
Notes strategiques :
- HARI ne croit pas trop a Papillodanse sans Teracristallisation
- Baie Citrus car pas de poseur de champ pour une Graine
- Même base vitesse que Dracaufeu Y : pas envie de se pointer face a lui avec Lunettes Filtre
18.22 FLAMBUSARD (Talonflame) – Vent Arrière Bourrasque
Talent : Ailes Bourrasque (Gale Wings – priorite +1 aux attaques Vol a PV pleins) Objet : Cape Obscure (solution contre Bluff même si on perd Bourrasque – reste plus rapide que presque tout)
| Slot | Attaque | Notes |
|---|---|---|
| 1 | Vent Arrière | Avec Bourrasque, priorité +1 |
| 2 | Rapace (Brave Bird) | Degats importants avec recul ; les degats de recul peuvent aider face a Faregirafe (perte de PV = perte de priorite Bourrasque) |
| 3 | Bout de Feu (Flare Blitz) | Couverture Feu ; Flambusard a une très mauvaise Attaque mais grosse puissance sur ses moves |
| 4 | Provoque / Abri / Feu Follet / Prevention | Provoque en général ; Abri si pas de Cape Obscure ; Prevention (Quick Guard) = excellent contre les priorités pour les equipes qui en ont besoin |
Notes strategiques :
- Acrobatie sans objet a gagne le championnat du Japon 2023 (exception)
- Prevention protège l’equipe de Bluff, Vitesse Extreme, Kuba adverse
18.23 PRISMILLON (Vivillon) – OEil Compose
Talent : OEil Compose (precision augmentee) / Garde Ami (reduction degats sur l’allie) Objet : Ceinture Force (stats defensives catastrophiques)
| Slot | Attaque | Notes |
|---|---|---|
| 1 | Poudre Dodo (Sleep Powder) | ~99% de précision avec OEil Compose |
| 2 | Poudre Fureur (Rage Powder) | Redirection |
| 3 | Vent Violent (Hurricane) | ~91% de précision avec OEil Compose, touche les Plantes immunisees a Poudre Dodo |
| 4 | Vent Arrière | Speed control |
Notes strategiques :
- Un “Colori du pauvre” mais avec une vitesse correcte + Poudre Fureur ET Poudre Dodo a la fois
- Bon pour les equipes avec mix de vitesse
- On considere Cape Obscure mais les stats defensives sont vraiment trop mauvaises
18.24 FELINFERNO (Incineroar) – Builds detailles
Talent : Intimidation Objets : Veste de Combat (booste Def Spe, compense côté special) / Lunettes Filtre / Baie Citrus / Cape Obscure / Baie anti-Eau (contre Pluie/Paragruel)
Set A : Veste de Combat (pivot)
| Slot | Attaque | Notes |
|---|---|---|
| 1 | Demi-Tour (U-turn) | Pivot avec Veste de Combat (pas de Dernier Mot car la Veste bloque les moves de statut) |
| 2 | Bout de Feu (Flare Blitz) | Meilleur move Feu, difficile de s’en priver |
| 3 | Dark Lariat / Execution | Dark Lariat = ignore les changements de stats, signature ; Execution = bloque les moves sonores (Megaphone de Gardevoir/Faregiraf, Dernier Mot du Felinferno adverse) |
| 4 | Bluff (Fake Out) | Standard |
Set B : Sans Veste (pivot support)
| Slot | Attaque | Notes |
|---|---|---|
| 1 | Dernier Mot (Parting Shot) | Pivot + baisse stats, signature |
| 2 | Bout de Feu / Feu Follet / Provoque | Offensif OU defensif selon l’equipe |
| 3 | Dark Lariat / Execution | Move Ténèbres |
| 4 | Bluff | Standard |
Notes strategiques :
- N’a PLUS Sabotage dans Champions
- Abri a peu d’interet – il tanke suffisamment bien
- Baie anti-Eau permet de survivre a Bal Meteo de Bequipan contre la Pluie
- Solidifie l’equipe : un Pokémon en danger ? Felinferno rentre en securite et retire l’allie
18.25 EKAISER (Kommo-o) – Spray Gorge
Talent : Pare-Balles / Anti-Bruit / Blindage Objet : Spray Gorge (s’active sur les moves sonores)
| Slot | Attaque | Notes |
|---|---|---|
| 1 | Move signature sonore (Clangorous Soulblaze) | -1/3 PV + toutes stats +1 + active Spray Gorge = +2 Atk Spe total |
| 2 | Vibrecille (Clanging Scales / Dracophonie) | Degats de zone Dragon, baisse la Défense mais on part de très haut |
| 3 | Lance-Flamme / Aurasphere | Lance-Flamme = couverture Feu ; Aurasphere = excellente reponse a Scalpereur (meilleure du jeu selon HARI) |
| 4 | Abri | Standard |
Set alternatif : Restes + Big Splash + Mur de Fer – set tank avec embarras du choix pour le dernier move
Notes strategiques :
- Absolument genialissime contre Scalpereur, Minotaupe, Tyranocif
- Peut aussi contrer Vent Glace grace au boost vitesse du setup
18.26 MIMIQUI (Mimikyu) – Poseur de Distorsion
Talent : Deguisement (absorbe le 1er coup) Objet : Herbe Mentale (solution contre Provoque)
| Slot | Attaque | Notes |
|---|---|---|
| 1 | Distorsion (Trick Room) | Rôle principal |
| 2 | Feu Follet | Neutralise un physique en face |
| 3 | Ombre Portée (Shadow Sneak) | Priorité Spectre – acheve les Ceinture Force a 1 PV même avec peu de degats |
| 4 | Bluff / Provoque / Lien du Destin / Calinerie | Variable selon equipe |
Notes strategiques :
- Se combine avec Ursaking, Felinferno (Bluff + Distorsion, Demi-Tour + Distorsion, Dernier Mot + Distorsion)
- Lien du Destin est sous-côté selon HARI
- Pas les degats pour jouer offensif – rôle purement utilitaire
18.27 CORVAILLUS (Corviknight) – Deux variantes
Variante A : Win condition (Gonflette)
Talent : Armure Miroir (renvoie les baisses de stats vers l’adversaire – Vent Glace, Intimidation renvoyees) Objet : Baie Citrus (combine avec Atterrissage pour recuperation PV active)
| Slot | Attaque | Notes |
|---|---|---|
| 1 | Gonflette (Bulk Up) | +1 Attaque + +1 Défense = plus de degats sur Rapace ET Big Splash |
| 2 | Rapace (Brave Bird) | STAB Vol |
| 3 | Big Splash (Body Press) | Utilise la Défense comme stat d’attaque |
| 4 | Atterrissage (Roost) | Soin – sustain pour gagner seul en fin de game |
Variante B : Support
Objet : Cape Obscure
| Slot | Attaque | Notes |
|---|---|---|
| 1 | Provoque | Controle |
| 2 | Vent Arrière | Speed control |
| 3 | Rapace / Big Splash | Un move offensif |
| 4 | Atterrissage | Soin |
Notes strategiques :
- Tyranocif/Minotaupe n’arrivent PAS a gerer Corvaillus – ils ont besoin d’aide
- Armure Miroir fait que Felinferno se fait Intimider lui-même
- Peut gagner “tout seul” en fin de partie contre les equipes Sol/Acier
18.28 ANGOLIATH (Grimmsnarl) – Ecrans Farceur
Talent : Farceur Objet : Lumargile (etend les ecrans de 5 a 8 tours)
| Slot | Attaque | Notes |
|---|---|---|
| 1 | Mur Lumiere (Light Screen) | Ecran special, priorité Farceur |
| 2 | Protection (Reflect) | Ecran physique, priorité Farceur |
| 3 | Cage Éclair (Thunder Wave) | Speed control + disruption |
| 4 | Choc Emotionnel (Spirit Break) | Move signature, 100% de chance de baisser l’Atk Spe – bonne attaque physique pour des degats corrects |
Notes strategiques :
- Dernier Mot Farceur = debat : avoir la priorité sur Dernier Mot n’est pas forcement bon car le Pokémon qui rentre prend les degats a la place d’Angoliath (qui est cense les encaisser grace aux ecrans)
- Stats defensives pas bonnes MAIS il pose un ecran en priorité donc pas trop inquiete
18.29 LANCORIEN (Dragapult) – Bandeau Choix
Talent : Infiltrateur / Corps Transparent Objet : Bandeau Choix
| Slot | Attaque | Notes |
|---|---|---|
| 1 | Draco Fleche (Dragon Darts) | Signature – un hit sur chaque adversaire (sauf Abri/type Fee) |
| 2 | Antise (Phantom Force) | Invulnerable pendant le chargement, passe a travers Abri |
| 3 | Colère (Outrage) | Move Dragon monocible, bon en fin de game quand il reste peu de cibles |
| 4 | Demi-Tour (U-turn) | Repositionnement si le matchup est defavorable |
Notes strategiques :
- Attaque pas gigantesque mais bonne + pas d’Intimidation = degats constants avec Bandeau Choix
- Draco Fleche + Bandeau Choix = très oppressant
- Feu Follet doit être fait AVANT que Lancorien n’attaque
18.30 ARCANIN DE HISUI – Talisman Sain offensif
Talent : Intimidation Objets : Talisman Sain (principal) / Bandeau Choix
Set A : Talisman Sain
| Slot | Attaque | Notes |
|---|---|---|
| 1 | Eboulement (Rock Slide) | Cherche Leviator, Felinferno et les Arcanin de Hisui adverses (les 3 Intimidateurs principaux) |
| 2 | Vitesse Extreme (Extreme Speed) | Priorité +2, très utile |
| 3 | Bout de Feu (Flare Blitz) | Vrais bons degats, même Bout de Feu que Felinferno mais plus d’investissement offensif |
| 4 | Abri | Standard |
Set B : Bandeau Choix (max degats)
| Slot | Attaque | Notes |
|---|---|---|
| 1-4 | Eboulement, Vitesse Extreme, Bout de Feu, Fracass’Tete | Fracass’Tete = degats mais précision et recul terribles |
Notes strategiques :
- Talisman Sain = degats constants, pas peur d’Intimidation ni de Vent Glace
- Si Intimide 2 fois, fait moins de degats qu’avec Talisman Sain
- Arcanin de base (Kanto) complètement depasse par Felinferno et Arcanin de Hisui
18.31 TYPHLOSION DE HISUI – Eruption Soleil
Talent : Brasier (Open Team List) / Fouille (Close Team List – connaitre les objets adverses) Objet : Lunettes Choix / Mouchoir Choix
| Slot | Attaque | Notes |
|---|---|---|
| 1 | Eruption | Degats monumentaux a PV pleins + Lunettes Choix + Soleil |
| 2 | Ball’Ombre (Shadow Ball) | Meilleur move Spectre (mieux que l’attaque signature – plus de puissance) |
| 3 | Canicule | Degats de zone independants des PV |
| 4 | Surchauffe | Burst monocible contre Garde Large, assure les KO que Canicule ne fait pas hors full PV |
Notes strategiques :
- Doit être mis en place : Farfaduvet (Vent Arriere), Faregiraf, Chartor
- Lunettes Choix + Vent Arrière + Soleil = la combinaison ideale
18.32 URSAKING – Cran + Orbe Flamme
Talent : Cran (Guts) Objet : Orbe Flamme (active Cran)
| Slot | Attaque | Notes |
|---|---|---|
| 1 | Facade | Booste par la brulure via Cran, degats monumentaux |
| 2 | Assaut Frontal (Headlong Rush) | Close Combat type Sol, degats monocibles |
| 3 | Séisme | Degats de zone Sol, attention a l’allie |
| 4 | Abri | Standard |
Notes strategiques :
- Mis en place par Felinferno/Effroyable + Distorsion (pas très rapide)
- Attaque très bonne + Cran + Orbe Flamme + Facade = degats les plus enormes du format
- Les Pokémon Spectre ne sont pas forcement immunises au Sol (certains y sont faibles)
- Les Pokémon Acier/Roche posent probleme a Facade mais le STAB Sol les touche
18.33 PARAGRUEL (Dondozo) – Mouchoir Choix Adaptabilité
Talent : Adaptabilité (double le STAB) Objet : Mouchoir Choix (principal) / Bandeau Choix + Glissade (si Pluie)
| Slot | Attaque | Notes |
|---|---|---|
| 1 | Aquatacle (Wave Crash) | Meilleurs degats Eau |
| 2 | Hommage Posthume (Last Respects) | +50 puissance par KO subi – en 1v1 final, 200 de puissance + Adaptabilité = monstrueux |
| 3 | Au Revoir (Flip Turn) | Degats + sortie du terrain, remet la meteo, très utile |
| 4 | Abri | Standard |
Notes strategiques :
- Mouchoir Choix + Adaptabilité = moins de dependance a la Pluie que Bandeau + Glissade
- Dans la bataille de meteo, c’est mieux de ne pas dependre de la pluie
- Hommage Posthume en fin de game est absolument terrrifiant
18.34 FARFUREX (Sneasler) – Offensif rapide
Talent : Delestage (double vitesse après perte d’objet) / Toxy Touche (30% chance de poison sur attaques) Objets : Ceinture Force / Herbe Blanche (avec Minotaupe/Tyranocif – Ceinture Force prise par Minotaupe)
| Slot | Attaque | Notes |
|---|---|---|
| 1 | Close Combat | STAB Combat puissant |
| 2 | Griffe Funeste (Dire Claw) | Attaque signature Poison, effets secondaires |
| 3 | Bluff / Coaching / Abri | Bluff standard ; Coaching si support ; Abri si besoin |
| 4 | Bluff / Coaching / Abri | 2e parmi les options ci-dessus |
Notes strategiques :
- Herbe Blanche + Delestage : l’herbe se consomme facilement, double la vitesse
- Toxy Touche = 30% poison après effets secondaires de Bluff, Close Combat, Griffe Funeste
- PAS d’Acrobatie (pas de poseur de champ au lancement, pas de Téra Vol)
- Très present dans la méta
18.35 MIASCARADE (Meowscarada) – 120 Vitesse de base
Talent : Protean / Engrais (Overgrow) Objet : Ceinture Force
| Slot | Attaque | Notes |
|---|---|---|
| 1 | Flower Trick (signature) | 100% coup critique, booste par Engrais a 1 PV (après Ceinture Force) |
| 2 | Sabotage (Knock Off) | Retire l’objet adverse, garde le STAB même avec Protean |
| 3 | Triple Axel / Demi-Tour | Triple Axel = couverture Glace (si oui, Protean pour le STAB Glace) ; Demi-Tour = pivot |
| 4 | Demi-Tour / Abri | Repositionnement ou protection |
Notes strategiques :
- 120 de base vitesse : vrai cap difficile a deplacer, au-dessus de presque tout
- Avec Triple Axel : jouer Protean (besoin du STAB Glace)
- Sans Triple Axel : jouer Engrais (Protean inutile pour Demi-Tour)
- Flower Trick a 1 PV + Engrais + coup critique = degats enormes
18.36 FAMIGNOL (Indeedee-F) – Redirection + Croc Fatal
Talent : Garde Psychique (Psychic Surge) Objet : Ceinture Force (très fragile mais bonne vitesse)
| Slot | Attaque | Notes |
|---|---|---|
| 1 | Par Ici (Follow Me) | Redirection |
| 2 | Croc Fatal (Helping Hand alt) / Ruse | Croc Fatal = amene a mi-vie ; Ruse = casse Garde Large et Ceinture Force |
| 3 | Coup de Main (Helping Hand) | Support offensif sans probleme de précision |
| 4 | Provoque / Baston / Croco Larme / Cage Éclair | Provoque = l’un des moves les plus importants sur Famignol ; Baston = avec Pondralugon ; Après Vous aussi possible |
Notes strategiques :
- Va falloir beaucoup de games pour determiner le meilleur dernier move
- Couroinge (Indeedee-M) n’est pas dans le jeu au debut
18.37 SUPER-DAUPHIN (Palafin) – Forme Zéro a Hero
Talent : Forme Zéro (revient en forme Hero avec stats monumentales après switch) Objet : Eau Mystique (Mystic Water, +20% degats Eau)
| Slot | Attaque | Notes |
|---|---|---|
| 1 | Jet Punch (signature) | Aqua Jet a 60 de puissance, priorité +1 |
| 2 | Aquatacle (Wave Crash) | Degats enormes + Eau Mystique + attaque physique monstrueuse = KO en un coup sur beaucoup |
| 3 | Abri | Indispensable |
| 4 | Close Combat / Poing Glace / Buee Noire | Close Combat = neutre sur les resistants Eau et contre Scalpereur ; Poing Glace = contre Dragons (sauf Pondralugon qui a faiblesse Combat pas Glace) ; Buee Noire = reset les boosts |
Notes strategiques :
- Stats plus elevees que la plupart des Méga-Évolutions en forme Hero
- On accepte de jouer lentement au debut de partie (forme faible)
- Au Revoir possible avec Mouchoir Choix mais complique sans la vitesse
18.38 FLEUR-ECLAT (Glimmora) – Herbe Pouvoir + Laser Meteor
Talent : Depot Toxique (envoie des Pics Toxiques si touche par une attaque physique) / Corrosion (avec Toupie Eclat) Objet : Herbe Pouvoir (skip le tour de chargement de Laser Meteor + donne +1 Atk Spe)
| Slot | Attaque | Notes |
|---|---|---|
| 1 | Laser Meteor (Meteor Beam) | 120 puissance, +1 Atk Spe via Herbe Pouvoir, instantane |
| 2 | Bomberbe (Sludge Bomb) | STAB Poison |
| 3 | Téra Force / Puissance Cachée | Contre les Pokémon qui resistent a Laser Meteor et Bomberbe (Acier, Poison) |
| 4 | Abri / Toupie Éclat | Toupie Éclat = empoisonne les 2 adverses, offensive (pas bloquee par Provoque), très fort |
Notes strategiques :
- Très bonne arme contre Felinferno
- A +1, Bomberbe et Téra Force font très mal
- Depot Toxique oblige l’adversaire a reflechir a 2 fois avant de taper en physique
- Toupie Éclat avec Corrosion = option viable mais on voit surtout le set Herbe Pouvoir
18.39 D’OZOTATSU + NIGERIRIGON – Duo Commandant
D’OZOTATSU (Dondozo) avec Commandant
Talent : Benet (Unaware – ignore les boosts adverses, pas bloque par Provoque) Objet : Talisman Sain (contre Intimidation, Vol Force d’Effroyable, Dernier Mot de Felinferno) / Restes
Set A : Avec Nigeririgon (Commandant)
| Slot | Attaque | Notes |
|---|---|---|
| 1 | Aquatacle | STAB Eau principal |
| 2 | Séisme | Couverture Sol |
| 3 | Plat du Jour (Order Up) | Signature – boost aleatoire |
| 4 | Abri | Standard |
Set B : Solo (sans Commandant)
| Slot | Attaque | Notes |
|---|---|---|
| 1 | Aquatacle | STAB Eau |
| 2 | Baillement (Yawn) | Casse la position adverse, oblige le switch |
| 3 | Big Splash (Body Press) | Bonne défense naturelle, touche Scalpereur |
| 4 | Abri | Standard |
NIGERIRIGON (Tatsugiri) – Solo
Objet : Mouchoir Choix / Ceinture Force
| Slot | Attaque | Notes |
|---|---|---|
| 1 | Draco Meteor | Burst special |
| 2 | Ocroupi (Muddy Water) | Couverture Eau |
| 3 | Abri / Provoque / Vent Glace | Utilitaire |
| 4 | Variable | Selon les besoins |
Notes strategiques :
- Pas de Sabotage dans le jeu = Talisman Sain ne sera pas retire
- Nigeririgon a des stats très mauvaises seul mais doit pouvoir finir la game
- Benet sur D’ozo = pas bloque par Provoque pour Baillement
18.40 FAREGIRAF (Farigiraf) – Spray Gorge Distorsion
Talent : Pare-Balles / Anti-Bruit Objets : Spray Gorge / Herbe Mentale / Baie Citrus / Lunettes Filtre
| Slot | Attaque | Notes |
|---|---|---|
| 1 | Distorsion (Trick Room) | Rôle principal |
| 2 | Megaphone (Hyper Voice) | Move sonore, active Spray Gorge pour +1 Atk Spe |
| 3 | Psycho (Psychic) | STAB Psy, fait peur après le boost |
| 4 | Coup de Main / Dissonance Psi | Coup de Main = support offensif pour l’attaquant sous Distorsion (ex: Chartor Eruption) ; Dissonance Psi = empeche le soin pendant 2 tours (contre Vampirisme etc.) |
Notes strategiques :
- Avec Spray Gorge : après 1 Megaphone, on est a +1 Atk Spe et on met de la pression
- Herbe Mentale = pas bloque par Provoque
- Lunettes Filtre = pas gene par Poudre Dodo/Poudre Fureur de Florizarre
- Protège des priorités (Bluff) grace a Anti-Bruit/Pare-Balles sur les allies
18.41 SCALPEREUR (Kingambit) – Acharne
Talent : Acharne (Supreme Overlord – +10% degats par allie KO) Objets : Baie Prine (soigne Brulure – solution totale contre Feu Follet) / Baie Pomme Rose (anti-Combat) / Veste de Combat / Lunettes Noires (+20% Tenebres)
| Slot | Attaque | Notes |
|---|---|---|
| 1 | Genusection (Kowtow Cleave) | Signature, ne rate jamais |
| 2 | Tête de Fer (Iron Head) | Contre les Pokémon Fee qui resistent aux Ténèbres ; on est soi-même Ténèbres SANS faiblesse Fee |
| 3 | Kuba (Sucker Punch) | Priorité, defence quand on n’a pas le speed control |
| 4 | Balayage (Low Kick) | Contre miroir Scalpereur et Tyranocif |
Notes strategiques :
- Baie Prine = la revelation – contre Feu Follet, on fait Genusection même en etant brule, la Baie soigne, et on tape normalement derriere. Règle totalement le probleme de Méga-Ectoplasma qui a Feu Follet
- Veste de Combat = PV plutot bons + Def Spe OK + Veste = tanke super bien en special en plus du physique excellent
- Pas de Danse Lame sans Teracristallisation – trop complique de setup
- Baie Pomme Rose = survive aux Balayage qu’il n’est pas cense tanker
18.42 EFFROYABLE (Sinistcha) – Au Petit Soin Redirecteur
Talent : Au Petit Soin (Hospitality – soigne 1/4 des PV de l’allie a l’entree) Objet : Baie Citrus / Casque Brut / Baie anti-Feu / Baie anti-Ténèbres
| Slot | Attaque | Notes |
|---|---|---|
| 1 | Mortier Matcha (Matcha Gotcha) | Signature = Ebullition-like + vol de vie + degelage + chance de brulure |
| 2 | Poudre Fureur (Rage Powder) | Redirection |
| 3 | Distorsion (Trick Room) | Joue pour ou contre Distorsion |
| 4 | Ball’Ombre / Vol Force / Fontaine de Vie | Ball’Ombre = touche les Spectres adverses et Méga-Ectoplasma (neutre) ; Vol Force = contre Oyakata ; Fontaine de Vie = soigne allie si on ne peut pas switch pour re-trigger Au Petit Soin |
Notes strategiques :
- Mortier Matcha est “vraiment n’importe quoi” selon HARI – fait tout a la fois
- Baie Citrus la plus courante grace aux stats defensives + investissement massif
- Baie anti-Feu contre Méga-Dracaufeu Y garantit mieux la pose de Distorsion
- Casque Brut punit la Ceinture Force de Farfurex/Griffe Funeste
- Pas de faiblesse Poison (malgre le type Plante) contre Florizarre
18.43 PONDRALUGON (Archaludon) – Veste de Combat Pluie
Talent : Endurance (Stamina – +1 Defense a chaque attaque recue) Objets : Veste de Combat (principal, sous Pluie) / Herbe Pouvoir (sans Pluie, avec Fermete)
Set A : Pluie + Veste de Combat
| Slot | Attaque | Notes |
|---|---|---|
| 1 | Big Splash (Body Press) | Utilise la Défense – les stacks d’Endurance augmentent les degats |
| 2 | Draco Meteor | Burst special ; les drops en Atk Spe sont compensees par Fulguayon |
| 3 | Fulguayon (Electro Shot) | Se charge instantanement sous la Pluie, +1 Atk Spe automatique – seuls vrais degats electriques de la méta |
| 4 | Luminocanon / Aboiement | Luminocanon = couverture supplementaire ; Aboiement = support |
Set B : Herbe Pouvoir + Fermete (sans Pluie)
Talent : Fermete (Sturdy – survit a un KO, comme une 2e Ceinture Force gratuite)
| Slot | Attaque | Notes |
|---|---|---|
| 1 | Fulguayon | Charge instantanement via Herbe Pouvoir |
| 2 | Dracochoc (Dragon Pulse) | Pas de drops comme Draco Meteor (on ne veut pas switch après s’être booste) |
| 3 | Luminocanon | Couverture |
| 4 | Big Splash | Défense utilisée comme attaque |
Notes strategiques :
- Meilleur ami de Bequipan – la Pluie active Fulguayon instantanement et booste l’Atk Spe
- Combo fantastique : Paragruel Mouchoir Choix fait Au Revoir sur lui-même, envoie Bequipan, Pondralugon profite de la Pluie
- Veste de Combat compense la Def Spe mediocre
- Endurance + peu de degats recus = rentabilisation enorme (perd peu de PV, gagne en Defense)
- Quasiment les seuls degats electriques de la méta via Fulguayon
- Herbe Pouvoir evite le conflit d’objets car très peu de Pokémon l’utilisent
Ce chapitre sera mis a jour au fur et a mesure que HARI publiera de nouvelles videos et que le méta evoluera après le lancement du 8 avril 2026.
Part 11 — Economy, Day 1 Strategy & Beginner Teams (HARI)
Section 17 – Economie et Stratégie Jour 1
17.1 L’Economie des VP (Victory Points)
Qu’est-ce que les VP ?
Les Victory Points (VP) sont la monnaie in-game principale de Pokémon Champions. Ils servent a :
- Recruter des Pokémon : 2 500 VP par recrutement permanent
- Acheter des objets en boutique (Bandeau Choix, Ceinture Force, etc.)
- Modifier des Pokémon (attaques, stats, talents)
Règle Critique Confirmee
Les VP ne peuvent PAS être achetes avec de l’argent reel. Cela a ete dit clairement par les developpeurs. C’est la pierre angulaire du modele anti-P2W de Champions.
Nuance Importante
Si le Battle Pass Premium donne des VP en recompense de niveaux premium, c’est techniquement un moyen indirect d’obtenir des VP via de l’argent. Mais les developpeurs pourraient intentionnellement ne PAS mettre de VP dans les recompenses premium pour respecter leur engagement.
Ce que les VP Peuvent Acheter en Boutique
| Élément | Cout Estime |
|---|---|
| Recrutement d’un Pokémon | 2 500 VP (confirme) |
| Méga-Gemme | ~5 000 VP (speculation HARI) |
| Objets (Bandeau Choix, Ceinture Force, etc.) | 1 000 - 10 000 VP (estimation) |
Comment Gagner des VP
Les VP se gagnent principalement en jouant et gagnant des combats :
- Combats classes (Ranked) – source principale
- Missions quotidiennes et hebdomadaires
- Potentiellement le Battle Pass gratuit
Les meilleurs joueurs accumulent les VP plus vite car ils gagnent plus souvent. C’est un système ou la competence accelere la progression.
17.2 Le Système du Roster Ranch (Recrutement)
Fonctionnement de Base
- Toutes les 24 heures (exactement 22 heures selon certaines sources), une lineup de 10 Pokémon est proposee au joueur
- Le joueur peut recruter parmi cette lineup : un ou plusieurs, potentiellement tous
- Cout par recrutement : 2 500 VP OU 1 ticket de recrutement (economisant 2 500 VP)
Tickets de Recharge (Refresh Tickets)
- Pour obtenir un nouveau pool de 10 Pokémon AVANT les 22h d’attente, il faut utiliser des tickets de recharge
- 1 ticket = 1 heure de reduction du timer
- Système similaire au sablier de Pokémon TCG Pocket
- Le Battle Pass gratuit donne 12 tickets de recharge au niveau 3 (= 12h de reduction, permettant potentiellement d’ouvrir la banniere une 2e fois des le Jour 1)
Tickets de Recrutement (Recruitment Tickets)
- Permettent de recruter sans depenser 2 500 VP
- Sources : Battle Pass gratuit (x2 dans les premiers niveaux), Pack de Demarrage (x30)
Recrutement d’Essai (Trial Recruitment)
- 1 fois par jour, gratuit (pas de VP)
- Recrute un Pokémon sur une periode d’essai de 7 jours
- Permet de tester le Pokémon en combat avant de s’engager
- HARI les ecarte pour les joueurs serieux – pas interessants pour la progression competitive
Transfert via Pokémon HOME
- Les Pokémon transferes depuis HOME arrivent comme “visiteurs”
- Ils peuvent être recrutes de maniere permanente (cout reduit ? a confirmer au lancement)
- Pas de cooldown sur les transferts HOME – qualite de vie appreciable
- Seuls les Pokémon déjà dans le Pokédex de Champions peuvent être transferes
17.3 Budget Optimization
Cout Total pour Differents Profils de Joueurs
| Profil | Éléments | Cout |
|---|---|---|
| F2P total | 0 EUR. Free to start sur Switch et futur mobile | 0 EUR |
| Premium Champions (1 an) | Pack de Demarrage (~30 EUR) + Battle Pass 12 mois (~60 EUR) | ~90 EUR |
| Smart avec Switch | Switch (300 EUR) + Ecarlate+DLC (90 EUR) + BP 6 mois (30 EUR) | ~420 EUR |
| Smart sans Switch (mobile) | Pokemon GO (gratuit) + BP 6 mois | ~30 EUR |
Comparaison avec le Cout Historique du VGC
| Scenario | Composition | Cout |
|---|---|---|
| Avant Champions – minimum | Switch (300 EUR) + Ecarlate/Violet (60 EUR) + Nintendo Online | ~360 EUR |
| Avant Champions – full access | Switch + LPA + Epee + Bouclier + DLC + Ecarlate + Violet + DLC x2 | ~690 EUR |
| Champions Premium (1 an) | Pack de Demarrage + Battle Pass 12 mois | ~90 EUR |
Argument massue de HARI : “90 EUR par an pour Pokémon Champions Premium vs 360 EUR minimum avant. C’est immensement moins cher.”
17.4 Analyse du Battle Pass
Structure
- Niveaux gratuits et niveaux premium (icone specifique pour les recompenses premium)
- Une saison = duree du Battle Pass. Estimation HARI : 1 mois par saison.
- Les dates affichees (1er janvier - 31 decembre 2099) sont des placeholders.
Recompenses Gratuites Confirmees (Premiers Niveaux)
| Niveau | Recompense |
|---|---|
| 1 | Méga-Gemme de Dracolosse (gratuite) |
| 3 | Tickets de recharge x12 |
| suivants | Tickets de recrutement x2, autres recompenses |
Recompenses Premium Confirmees
| Niveau | Recompense |
|---|---|
| 2 | Roitiflam (Emboar) comme Pokémon |
| suivants | Méga-Gemme de Roitiflam, icones de joueur (cosmetique) |
Prix Estime du Battle Pass Premium
- 5-7 EUR/mois (estimation HARI)
- Soit 60-84 EUR/an si pris tous les mois
- Possibilite de saisons plus longues (2-3 mois) avec BP a 10-15 EUR
Question Cruciale : Les Méga-Gemmes
Certaines Méga-Gemmes sont en recompense premium du Battle Pass. Seront-elles aussi disponibles en boutique contre des VP ?
Pire scenario : Certaines Méga-Gemmes ne seraient disponibles que temporairement via le BP premium = probleme de temporalite pour les F2P.
Attenuation : Il est peu probable qu’une Méga-Gemme soit bloquee en BP temporaire sans jamais être rendue accessible autrement.
Verdict
Le Battle Pass Premium est un investissement correct a 5-7 EUR/mois pour un joueur competitif. Les recompenses gratuites (Méga-Gemme de Dracolosse, tickets de recharge) sont déjà significatives.
17.5 Analyse du Pack de Demarrage (Starter Pack)
Contenu Confirme
| Élément | Quantite | Impact Competitif |
|---|---|---|
| Places de stockage supplementaires | +50 (de 30 a 80) | ENORME qualite de vie |
| Tickets d’entrainement | 50 | Modifie un Pokémon entierement (4 attaques, stats, talent) sans VP |
| Tickets de recrutement | 30 | 30 Pokémon recrutables sans VP = 75 000 VP economises |
| Musiques exclusives | Incluses | Cosmetique, zero avantage |
| Theme dresseur Let’s Go | Inclus | Cosmetique |
Analyse de la Valeur
- 30 places de stockage de base = seulement 5 equipes. C’est très restrictif pour un joueur competitif qui veut iterer sur des compositions.
- 80 places avec le pack = 13 equipes + marge de manoeuvre. “Complètement clutch” selon HARI.
- 50 tickets d’entrainement eliminant le besoin de depenser des VP pour customiser 50 Pokémon = enorme avantage de progression.
- 30 tickets de recrutement = 30 Pokémon gratuits, soit 75 000 VP economises.
Prix Estime
- 30 EUR (estimation HARI, “je vois mal le pack a plus que ca”)
- Possiblement ~10 EUR selon certaines sources anglophones ($9.99)
- Si 10 EUR : rapport qualite/prix exceptionnel
- Si 30 EUR : investissement solide mais non indispensable
Verdict
Le Pack de Demarrage est l’achat le plus efficace du jeu pour un joueur serieux. Les 30 tickets de recrutement + 50 tickets d’entrainement + espace de stockage representent un gain de temps enorme sans avantage competitif direct (les memes Pokemon et stats sont accessibles au F2P, juste plus lentement).
17.6 Stratégie de Transfert HOME
Jeux Compatibles au Lancement
| Jeu | Compatible ? |
|---|---|
| Pokémon Ecarlate / Violet | OUI |
| Pokémon Epee / Bouclier | OUI |
| Legends Pokémon ZA | OUI |
| Legends Pokémon Arceus | NON (pas au lancement) |
| Pokémon GO | NON (pas au lancement, attendu pour la sortie mobile) |
| Jeux 3DS et anterieurs | NON |
Règles de Transfert
- Pokémon GO -> HOME : Aller simple, pas de retour vers GO.
- Ecarlate/Violet <-> HOME : Aller-retour possible. MAIS un Pokémon qui passe par un jeu du “bloc 10G” (LPZA et au-dela) ne peut plus retourner dans les jeux anterieurs.
- Champions fonctionne en “emprunt” : Le Pokémon reste dans HOME, vous l’utilisez dans Champions. Les modifications (stats, attaques) sont gardees tant que la forme n’est pas modifiee dans un autre jeu.
Méga-Gemmes via LPZA
En envoyant un des starters 6G ou Floette Fleur Eternelle de Legends ZA -> HOME -> Champions, on obtient la Méga-Gemme correspondante. C’est potentiellement le seul moyen d’obtenir ces Méga-Gemmes specifiques.
Meilleur Investissement Switch
- Pokémon Ecarlate + DLC = le meilleur ratio cout/benefice pour alimenter Champions (le plus grand nombre de Pokemon transferables)
- Le DLC est important : il debloque significativement plus de Pokémon
Recommandation d’Echange
- Utilisez le Discord de la communaute pour trouver des partenaires d’echange
- N’utilisez JAMAIS la GTS – “les Pokémon sont sales la-bas, vous pouvez jamais savoir ce que vous allez recuperer”
17.7 Chemin de Recrutement Prioritaire Jour 1
Voici l’ordre de depense recommande de vos VP et tickets au lancement, base sur l’ensemble des analyses precedentes.
Phase 1 : Les Fondations (Jour 1, premieres heures)
| Priorité | Pokémon | Cout | Méthode | Justification |
|---|---|---|---|---|
| 1 | Felinferno | 2 500 VP ou ticket | Recrutement OU transfert HOME | Le roi du jeu. Dans toutes vos equipes. Aucun risque. |
| 2 | Farfaduvet | 2 500 VP ou ticket | Recrutement OU transfert HOME | Speed control indispensable. |
| 3 | Ectoplasma | 2 500 VP ou ticket | Recrutement OU transfert HOME | Meilleure Mega + excellent support non-Mega. |
Budget Phase 1 : 7 500 VP maximum (0 si vous avez les 3 dans HOME et utilisez des tickets)
Phase 2 : Les Attaquants Versatiles (Jour 1-2)
| Priorité | Pokémon | Cout | Justification |
|---|---|---|---|
| 4 | Scalpereur | 2 500 VP | Anti-Intimidation. Frappe massive. Acharne. |
| 5 | Carchacrok | 2 500 VP | Valeur sure intemporelle. Talisman Sain = pas peur d’Intimidation. |
Budget cumule : 12 500 VP
Phase 3 : La Méga Premium (Jour 2-3)
| Priorité | Pokémon | Cout | Justification |
|---|---|---|---|
| 6 | Kangourex + Méga-Gemme | 2 500 VP + ~5 000 VP | Investissement Mega physique de long terme. Point Boost retrouve. |
Budget cumule : ~20 000 VP
Phase 4 : Supports Complementaires (Jour 3-5)
| Priorité | Pokémon | Cout | Justification |
|---|---|---|---|
| 7 | Famignol | 2 500 VP | Garde-Ami + Par Ici. Protège vos Megas pendant le setup. |
| 8 | Léviator | 2 500 VP | 2e Intimidation + speed control versatile. |
Budget cumule : ~25 000 VP
Phase 5 : Attaquants Niche (Jour 5-7)
| Priorité | Pokémon | Cout | Justification |
|---|---|---|---|
| 9 | Paragruel | 2 500 VP | Anti-Spectre/comeback. Efficace contre Méga-Ectoplasma. |
| 10 | Pondralugon | 2 500 VP | Polyvalent. Endurance + Baston. Pas de conflit d’objet. |
Budget cumule : ~30 000 VP
Phase 6 : Expansion Meteo et Alternatives (Semaine 2+)
| Pokémon | Justification |
|---|---|
| Dracaufeu + Méga-Gemme Y | Equipe Soleil |
| Bekipan/Tarpaud | Equipe Pluie |
| Tyranocif | Equipe Sable |
| Porygon2 | Distorsion |
| Gaulet (Amoonguss) | Redirection + Spore |
| Gorythmic | Si disponible, quasi-obligatoire |
17.8 Optimisation VP : Conseils Pratiques
Maximiser les VP Gratuits
- Transferez depuis HOME tout ce que vous pouvez avant de recruter au Roster Ranch. Chaque transfert = 2 500 VP economises.
- Utilisez les tickets de recharge du Battle Pass gratuit (12 tickets au niveau 3 = une 2e banniere de 10 Pokemon le Jour 1).
- Utilisez les tickets de recrutement avant les VP. Les tickets n’ont pas de cout VP ; gardez vos VP pour les Pokémon non disponibles via tickets.
- Le recrutement d’essai quotidien peut servir a tester un Pokémon avant d’engager 2 500 VP.
Erreurs a Eviter
- Ne recrutez PAS des Pokémon dependant d’allies non confirmes. Exemple : Ursaking est puissant mais ses allies (Porygon2, Cresselia) ne sont pas confirmes au Jour 1. Attendez.
- Ne depensez PAS de VP sur les nouvelles Megas non testees. HARI : “Les nouvelles Mega, je vais pas vous les vendre.” Attendez les premiers retours competitifs.
- Ne recrutez PAS les starters rang C ou F sauf si vous avez un plan d’equipe precis qui les necessite.
- Ne depensez PAS de VP pour la Méga de Carchacrok. HARI juge Méga-Carchacrok “pas terrible” a cause du talent Force Sable. Carchacrok est excellent en non-Mega.
- Ne negligez PAS le stockage. 30 places de base sont insuffisantes pour un joueur serieux. Evaluez le Pack de Demarrage.
Ce que l’Argent Peut et Ne Peut Pas Acheter
| L’argent PEUT acheter | L’argent NE PEUT PAS acheter |
|---|---|
| Battle Pass Premium | VP directement |
| Pack de Demarrage | Stats supplementaires sur les Pokémon |
| Espace de stockage | Avantage competitif reel |
| Cosmetiques | Plus de competence au jeu |
Conclusion de HARI : “Le joueur premium a des facilites d’accessibilite – il obtient les choses plus vite. Mais il n’a PAS d’avantage competitif sur le joueur F2P. Il existe un palier a partir duquel tu as des ressources plus abondantes, mais tu ne peux pas depasser ce palier pour devenir plus fort.”
17.9 Changements d’Equilibrage Impactant le Jour 1
Le Nerf de Protection (Abri/Protect)
Avant : 10 PP standard (augmentable avec PP Up) Dans Champions : 8 PP, pas de PP Up
Impact : Le stall devient moins viable. Les equipes agressives qui forcent l’adversaire a depenser son Abri tot ont un avantage en fin de partie. Adaptez votre style en consequence.
Felinferno Perd Sabotage (Knock Off)
En Reglement H final (Ecarlate/Violet), Sabotage etait sur 96.6% des sets de Felinferno. Dans Champions, il ne l’a plus.
Impact : Felinferno reste excellent (Intimidation + Bluff + Dernier Mot sont intacts) mais perd sa capacite a retirer les objets adverses. Les alternatives : Aboiement (Snarl) ou Balayage (Low Kick) pour le slot d’attaque.
Ectoplasma Perd Encore
Impact : Le combo Marque Ombre + Encore (piege + lock) est specifiquement cible. Méga-Ectoplasma reste très fort mais perd une option de controle.
Nouvelles Capacités de Méga-Évolution (via Legends ZA)
| Mega | Nouveau Talent | Effet |
|---|---|---|
| Méga-Méganium | Mega Sol | Toutes ses attaques beneficient du Soleil en permanence |
| Méga-Aligatueur | Dragonize | Convertit Normal en Dragon + 20% boost |
| Méga-Dracolosse | Multi-Ecaille | Degats divises par 2 a PV pleins |
| Méga-Momartik (Froslass) | Alerte Neige | Invoque la Neige automatiquement |
| Méga-Blindépique | Pare-Balles | Annule les attaques balle/bombe |
Pas d’IV dans Champions
Impact majeur : Plus besoin de breeding pour des IV parfaits. La preparation d’une equipe competitive passe de dizaines d’heures a quelques minutes. L’adaptation au méta sera beaucoup plus rapide. Concentrez-vous sur la théorie et la pratique plutot que sur le grinding.
Patchs d’Equilibrage Continus
Premiere pour Pokémon : Champions recevra des patchs d’equilibrage reguliers. Les stats de base, capacités et talents peuvent changer après le lancement. Exemple pre-lancement : Scorvol (Gliscor) a recu des buffs en PV et Défense Spéciale.
Impact : Le méta n’est pas fixe. Une tier list du Jour 1 peut être obsolete au bout d’un mois. Restez informes des patchs.
17.10 Resume Stratégique Final – Votre Plan Jour 1
HEURE 0 (Lancement)
  |-- Telecharger le jeu
  |-- Transferer vos Pokémon depuis HOME (Felinferno, Farfaduvet, Ectoplasma en priorite)
  |-- Passer les premiers niveaux du Battle Pass gratuit (Méga-Gemme Dracolosse + tickets)
  |
HEURE 1-2
  |-- Recruter Felinferno si pas transfere (2 500 VP)
  |-- Explorer le Roster Ranch : regarder la lineup de 10 Pokémon disponibles
  |-- Utiliser le recrutement d'essai quotidien sur un Pokémon d'interet
  |
HEURE 2-6
  |-- Recruter Farfaduvet + Ectoplasma (5 000 VP ou tickets)
  |-- Commencer a jouer en Ranked pour accumuler des VP
  |-- Construire votre premiere equipe : Felinferno + Farfaduvet + Ectoplasma + 3 flex
  |
JOUR 1, SOIR
  |-- Utiliser les 12 tickets de recharge (Battle Pass niveau 3) pour ouvrir une 2e banniere
  |-- Recruter Scalpereur ou Carchacrok si disponibles
  |
JOUR 2-3
  |-- Continuer a accumuler des VP via Ranked
  |-- Recruter Kangourex + Méga-Gemme si le budget le permet
  |-- Ajuster votre equipe en fonction des tendances du ladder
  |
JOUR 3-7
  |-- Compléter le roster : Famignol, Léviator, Paragruel, Pondralugon
  |-- Explorer les synergies meteo si les poseurs sont disponibles
  |-- Observer le méta emergent et adapter
  |
SEMAINE 2+
  |-- Expansion vers les archétypes meteo (Pluie, Soleil, Sable)
  |-- Suivre les patchs d'equilibrage
  |-- Préparer la Global Challenge I (1-4 mai 2026)
Calendrier Competitif Immediat
| Date | Evenement | Format |
|---|---|---|
| 8 avril 2026 | Lancement de Pokémon Champions | – |
| 1-4 mai 2026 | Global Challenge I (en ligne) | Regulation Set M-A |
| Juin 2026 | Indianapolis Regional Championships | Regulation Set M-A |
| 6-7 juin 2026 | Turin Special Event | Regulation Set M-A |
| 12-14 juin 2026 | NAIC (North America Internationals) | Regulation Set M-A |
| 28-30 aout 2026 | Pokémon World Championships | Regulation Set M-A |
Vous avez exactement 23 jours entre le lancement et la Global Challenge I pour construire et rodder votre equipe competitive. Chaque VP compte.
Section 19 – Etat des Objets au Lancement (Post-Launch)
Source : HARI – “Ces OBJETS ont DISPARUS ?? Pokémon Champions” (video 51) – 9 avril 2026, jour de lancement
IMPORTANT : Cette section est specifique au lancement du jeu. De nombreux objets emblematiques sont absents au debut. Les builds de la Section 18 restent valables pour quand ces objets arriveront, mais en attendant, des substitutions sont necessaires. Les objets seront ajoutes progressivement via les mises a jour.
19.1 Objets ABSENTS au Lancement
Objets offensifs manquants
| Objet | Effet | Pokémon affectes |
|---|---|---|
| Bandeau Choix (Choice Band) | x1.5 Attaque, bloque sur un move | Lancorien, Arcanin Hisui, tous les physiques CB |
| Lunettes Choix (Choice Specs) | x1.5 Atk Spe, bloque sur un move | Typhlosion Hisui, Trioxydre offensif, Chartor |
| Orbe Vie (Life Orb) | +30% degats, -10% PV par attaque | Carchacrok, Minotaupe, tous les attaquants hybrides |
Objets defensifs/utilitaires manquants
| Objet | Effet | Pokémon affectes |
|---|---|---|
| Cape Obscure (Covert Cloak) | Protège de Bluff et effets secondaires | Farfaduvet, Trioxydre, Pyrax, Flambusard, Corvaillus |
| Talisman Sain (Clear Amulet) | Protège des baisses de stats adverses | Carchacrok, Arcanin Hisui, D’ozotatsu |
| Veste de Combat (Assault Vest) | +50% Def Spe, bloque moves de statut | Pondralugon, Felinferno, Tyranocif, Betochef |
| Lunettes Filtre (Safety Goggles) | Immunite poudres + meteo | Leviator (anti-Florizarre), Trioxydre |
| Casque Brut (Rocky Helmet) | Degats de contact renvoyes | Effroyable, Corvaillus |
| Orbe Flamme (Flame Orb) | Brulure volontaire | Ursaking (Cran), Betochef (Cran) |
| Orbe Toxique (Toxic Orb) | Poison volontaire | Aucun use courant en Reg MA |
| Herbe Pouvoir (Power Herb) | Charge instantanee (moves en 2 tours) | Pondralugon (Fulguayon), Fleur-Eclat (Laser Meteor) |
Objets speciaux manquants
| Objet | Effet | Pokémon affectes |
|---|---|---|
| Depipe (Loaded Dice) | Garantit 4-5 coups multi-hit | Dracolosse (Rafale-Caille) |
| Spray Gorge (Throat Spray) | +1 Atk Spe après move sonore | Ekaiser, Faregiraf |
| Lumargile (Light Clay) | Ecrans durent 8 tours au lieu de 5 | Angoliath (poseur d’ecrans) |
| Chariot Distordu (Room Service) | Baisse vitesse sous Distorsion | Pokémon lents sous Trick Room |
| Balle Fer (Iron Ball) | /2 vitesse + touche le sol | Aucun use courant |
| Pouvoir Poignet / Cerat | /2 vitesse | Pas d’usage courant |
Objets Mega specifiques
- Méga-Gemmes des Starters 6G (Blindepique, Goupelin, Amphinobi) et Floette Fleur Eternelle : accessibles UNIQUEMENT via transfert LPZA → Home → Champions. Pas achetables en boutique pour le moment.
- Méga-Z : egalement absentes.
19.2 Objets DISPONIBLES au Lancement
Objets cles presents des le depart
| Objet | Disponibilite |
|---|---|
| Ceinture Force (Focus Sash) | Des le depart |
| Baie Citrus (Sitrus Berry) | Des le depart |
| Baie Prine (Lum Berry) | Des le depart |
| Restes (Leftovers) | Des le depart (ou boutique) |
| Herbe Blanche (White Herb) | Des le depart |
| Herbe Mentale (Mental Herb) | Boutique |
| Mouchoir Choix (Choice Scarf) | Boutique |
| Méga-Gemmes | Toutes sauf 6G starters et Floette |
| Baies anti-type | Toutes les 18 (anti-Eau, anti-Feu, etc.) |
| Baie Pomme Rose (anti-Combat) | Des le depart |
| Objets boost par type | Eau Mystique, Charbon, etc. — tous disponibles |
| Antiscope (Scope Lens) | Disponible |
Note sur la boutique
Presque tous les objets utiles sont obtenus des le depart. La boutique propose principalement :
- Le Mouchoir Choix (a acheter en priorite)
- L’Herbe Mentale (pour poseurs de Distorsion)
- Les objets boost par type (specifiques, a acheter selon vos besoins)
19.3 Consequences sur le Méta
Felinferno est encore plus fort
Sans Cape Obscure ni Talisman Sain, les deux principaux contre-play a Intimidation et Bluff sont absents. Felinferno est le grand gagnant de ce méta d’objets reduits. Ses propres objets de predilection manquent aussi (Lunettes Filtre), mais c’est un moindre mal.
Les physiques souffrent
Pas de Talisman Sain contre Intimidation. Les attaquants physiques qui dependaient de cet objet (Carchacrok, Arcanin Hisui) doivent s’adapter :
- Herbe Blanche prend de la valeur (alternative a Talisman Sain, consommable mais efficace)
- Farfurex peut aussi s’en servir (avec talent Delestage)
- Carchacrok pourrait tester l’Herbe Blanche
Florizarre est plus genant
Sans Lunettes Filtre, il n’y a plus de protection “propre” contre Poudre Dodo. Solution de remplacement :
- Baie Prine (Lum Berry) : soigne le statut une fois (au lieu de l’immunite permanente)
- Accepter le risque et jouer autour
Pondralugon perd enormement
Son objet principal (Veste de Combat) ET son objet alternatif (Herbe Pouvoir) sont tous les deux absents. Solutions temporaires :
- Peau Metal (+20% degats Acier) pour Luminocanon
- Ceinture Force en dernier recours
- C’est la “version TMU” de Pondralugon selon HARI
Dracolosse perd le Depipe
Le set Rafale-Caille + Depipe n’est pas jouable au lancement. Il faudra s’adapter avec d’autres sets (Multiecaille + Ceinture Force, ou Méga-Dracolosse).
Ekaiser et Faregiraf perdent le Spray Gorge
Leur setup principal (+1 Atk Spe via move sonore) n’est pas disponible. Ekaiser joue avec les Restes a la place. Faregiraf peut jouer Herbe Mentale ou Baie Citrus.
Angoliath perd l’Humargile
Les ecrans durent 5 tours au lieu de 8. Toujours jouable mais moins dominant.
Les Baies anti-type prennent de la valeur
En l’absence d’objets defensifs puissants (Veste, Casque Brut), les Baies qui divisent par deux les degats d’un type super efficace deviennent des options serieuses :
- Baie anti-Eau (Pocpoc) sur Felinferno contre les equipes Pluie
- Baie anti-Combat (Pomme Rose) sur Tyranocif/Scalpereur
- Baie anti-Feu sur Effroyable pour garantir Distorsion face a Méga-Dracaufeu Y
- Baie anti-Dragon (Befrego) contre les Dragons
Antiscope + Puissance sur Trioxydre
Combo unique : Puissance (+1 crit) + Antiscope (+1 crit) = 100% coup critique garanti. Draco Meteor sans subir les drops d’Atk Spe (les coups critiques ignorent les baisses du lanceur). Set de niche mais potentiellement redoutable.
Double-Mega legerement valorise
Avec moins d’objets disponibles, le desavantage d’avoir un Pokémon qui porte une Méga-Gemme mais ne méga-evolue pas est reduit. L’ecart entre “Méga-Gemme inutile” et “bon objet” est plus faible quand les bons objets n’existent pas.
Section 22 – Changements Post-Lancement et Talents des Megas
Source : HARI – “Tous les CHANGEMENTS & TALENTS des MEGAS” (video 54)
Cette section couvre les changements confirmes au lancement de Pokémon Champions par rapport aux mécaniques connues de la generation 9. Certains changements etaient attendus (PP), d’autres sont des surprises (statuts, moves).
22.1 Changements de Problemes de Statut
| Statut | Avant (Gen 9) | Maintenant (Champions) | Impact |
|---|---|---|---|
| Paralysie | 1/4 (25%) chance d’immobilisation | 1/8 (12.5%) chance d’immobilisation | Nerf important — la paralysie etait déjà nerfee en 7G |
| Sommeil | 3 tours max (0%, 33%, 50%, 100% reveil) | 2 tours max (0%, 33%, 100% reveil) | Le palier 50% supprime — reveil garanti au 3e tour d’action |
| Gel | 20% degalement, pas de limite de tours | 25% degelament, cap a 3 tours | Gros buff anti-gel — ne peut plus rester gele indefiniment |
| Confusion | Cap variable | Cap a 3 tours | Clarifie et limite la confusion |
Note : L’attaque Repos n’est pas affectee par le changement du Sommeil.
22.2 Changements d’Attaques
Changements majeurs
| Attaque | Avant | Maintenant | Impact |
|---|---|---|---|
| Tête de Fer (Iron Head) | 30% flinch | 20% flinch | Nerf significatif |
| Pouvoir Lunaire (Moonblast) | 30% drop Atk Spe | 10% drop Atk Spe | Beaucoup moins de chance de drop parasite |
| Griffe Funeste (Dire Claw) | 50% statut (1/6 poison, 1/6 para, 1/6 sommeil) | 30% statut (10% poison, 10% para, 10% sommeil) | Nerf enorme – et le move devient tranchant (beneficie du talent Incisif) |
| Salaison (Salt Cure) | 1/4 degats residuels (Eau/Acier) | 1/8 degats residuels | Nerf de Gigansel |
| Botte Sucree (Trop Kick) | 70 puissance | 85 puissance | Buff de Sucraine/Tsareena — degats corrects + -1 Atk a 100% |
Autres changements notables
- Griff’Ombre (Shadow Claw) et Draco-Griffe (Dragon Claw) deviennent des attaques tranchantes
- Parade Infernale (Infernal Parade, Typhlosion Hisui) : legere hausse de puissance
- Pince Masse : précision passe a 95% (au lieu de 90%) — plus acceptable
Système de PP
| PP d’origine | PP dans Champions |
|---|---|
| 5 PP | 8 PP |
| 10 PP | 12 PP |
| 15 PP | 16 PP |
| > 15 PP | 20 PP (fixe) |
Impact majeur : Abri avait 10 PP (montait a 16 avec PP Plus). Maintenant c’est effectivement 5 PP → 8 PP. Les fins de partie changent.
22.3 Talents des Nouvelles Méga-Évolutions (LPZA)
Classement de HARI : 1. Méga-Floette, 2. Méga-Fleur-Éclat, 3. Méga-Staross, 4. Méga-Golemastoc (mention). Le reste est globalement faible.
Méga-Floette Fleur Eternelle — Aura Féerique ⭐ #1
Le même talent que Xerneas. Méga-Floette est un mini-Xerneas :
- 102 de vitesse (egalite avec Carchacrok)
- Enorme Attaque Spéciale + Aura Féerique = tape plus fort que Xerneas en type Fee
- Bulk special très important
- Particulierement fort dans un méta sans Veste de Combat
- Merite une video dediee selon HARI
Méga-Fleur-Éclat — Adaptabilité ⭐ #2
STAB passe de x1.5 a x2.0 sur les types Roche et Poison :
- Rayon Gemme et Bomberbe deviennent devastateurs
- Téra Force ne beneficie PAS du boost (pas de STAB)
- Très dangereux dans les equipes hyper-agressives
- Avec Ceinture Force actuellement (Herbe Pouvoir absente)
Méga-Staross — Colo Force ⭐ #3
Double l’Attaque physique (equivalent de Force Pure) :
- Stat d’attaque de base basse, mais doublee = correct
- HARI pense que c’est correct mais pas extraordinaire
- “Ne soyez pas matrices par les formats solo” — moins fort en Double
Méga-Golemastoc — Points Invisible (mention honorable)
Traverse Abri (mais seulement 1/4 des degats desormais) :
- Interessant sous Distorsion
- Probleme : les bonnes attaques Spectre (Esprit Frappeur) ne font pas contact
- Assaut Frontal profite du talent
Megas decevantes
| Mega | Talent | Pourquoi c’est decevant |
|---|---|---|
| Méga-Mélodelfe | Reflet Magique | Renvoie les attaques non offensives — mais Mega support n’est pas viable |
| Méga-Empiflore | Talent de Concombaf | Inflige les degats recus au KO — beaucoup trop situationnel et faibles PV |
| Méga-Airmure | Nerf d’Acier | Ignore la redirection — pas assez impactant, pas de boost de degats |
| Méga-Eoko | Lévitation | Stats de base trop faibles même avec +100 — il fallait un talent crack |
| Méga-Minotaupe | Points Invisible (nerf) | Seulement 1/4 degats a travers Abri — autant jouer Minotaupe normal |
| Méga-Lugulabre | Infiltration | HARI desappointe — aurait du avoir Marque Ombre pour être une alternative a Méga-Ectoplasma. Attaque Spéciale monstrueuse gachee. |
| Méga-Mystherbe | Calque | Copier un talent adverse en tant que Mega = inutile. Catastrophique. |
| Méga-Brutalibré | Annulegarde | Gimmick avec Tendance + OHKO moves. Du cheese qui perd contre tout ce qui est fort. |
| Méga-Crabominable | Point de Fer | Pas Contestation comme les leaks suggeraient. Rien contre Intimidation. |
| Méga-Drial | Berserk | +1 Atk Spe a 50% PV. Aurait du avoir Crachin — c’est litteralement un nuage. |
| Méga-Scovilain | Brule l’attaquant (contact direct) | Talent crack… mais sur un Pokémon catastrophique. |
Espoir de HARI : Les devs ont déjà change des talents (Pingoléon : Acharne → Battant). Ils pourraient rework Méga-Lugulabre (Marque Ombre), Méga-Drial (Crachin), Méga-Mystherbe, et Méga-Airmure (Griffe Dure).
Section 23 – 2 Equipes pour Bien Debuter
Source : HARI – “2 EQUIPES pour BIEN DEBUTER” (video 55)
Concept : Deux equipes progressives. L’Equipe 1 est agressive et simple d’utilisation (plan A clair). L’Equipe 2 est plus positionnelle et subtile (apprend le placement). Aucune n’utilise de Méga-Floette ni de starters 6G (barriere d’acces aux Méga-Gemmes).
23.1 Equipe 1 : Méga-Dracaufeu Y Soleil (Agressive)
Archétype : Soleil agressif — plan A clair, vitesse elevee, degats de zone Difficulte : ⭐ Debutant Pokémon en commun avec Equipe 2 : Motisma Laveuse
Composition
| Pokémon | Objet | Talent | Nature |
|---|---|---|---|
| Méga-Dracaufeu Y | Dracaufeu-ite | Sécheresse (Mega) | Timide (max Vit) |
| Florizarre | Ceinture Force | Chlorophylle | Modeste (max Atk Spe) |
| Carchacrok | Herbe Blanche | Peau Dure | Joviale (max Vit) |
| Motisma Laveuse | Restes | Lévitation | Assuree (+Def) |
| Farfaduvet | Baie d’Aby (anti-Acier) | Farceur | Timide |
| Betochef | Baie Citrus | Point de Fer | Brave (lent) |
Plan A : Dracaufeu + Florizarre
Le duo de base — Sécheresse + Chlorophylle :
- Canicule (degats de zone Feu) + Poudre Dodo (sommeil, pas de Lunettes Filtre dans le jeu)
- Surchauffe pour burst monocible si un Pokémon specifique gene
- Ecosphere sur Florizarre (pas Lance-Soleil — trop dependant de la meteo, pas Tempete Verte — assez de problemes de precision)
- Bomberbe contre les Plantes immunisees a Poudre Dodo
Plan B : Anti-Tempête de Sable
Motisma Laveuse entre a la place de Dracaufeu :
- Immunité Sol (Levitation) contre Séisme de Minotaupe/Carchacrok
- Feu Follet contre Minotaupe/Tyranocif
- Hydrocanon + Tonnerre — pas besoin d’investissement offensif, tape naturellement fort
- Les Restes (pas Baie Citrus — celle-ci va sur Betochef)
Plan C : Anti-physiques lents
Betochef sous Distorsion ou en fin de game :
- Vampirpoint (vol de vie + Baie Citrus = survivabilite)
- Poing Glace (Carchacrok, x4)
- Mach Punch (priorite, acheve les cibles basses)
- Garde Large (protege contre Eboulement adverse, Blizzard de Méga-Momartik)
Vitesse de l’equipe
Beaucoup de speed control :
- Vent Arrière Farceur (Farfaduvet)
- Chlorophylle (Florizarre, x2 sous Soleil)
- Carchacrok et Dracaufeu en max Vit
- Zénith sur Farfaduvet avec Farceur — sauve contre la Pluie (remplace la meteo en priorite)
Notes sur les remplacements
HARI previent : les equipes ne sont pas des “Monsieur Patate” — on ne peut pas remplacer un Pokémon librement. Betochef est le plus remplacable (Paragruel Mouchoir Choix possible, mais on perd Mach Punch et la couverture anti-Scalpereur).
23.2 Equipe 2 : Double Mega Gardevoir + Tyranocif (Positionnelle)
Archétype : Double Mega — Tempête de Sable + Distorsion flexible Difficulte : ⭐⭐⭐ Intermediaire Progression : Apprend le placement et l’adaptation au matchup
Composition
| Pokémon | Objet | Talent | Nature |
|---|---|---|---|
| Méga-Gardevoir | Gardevoir-ite | Calque → Peau Féerique (Mega) | Modeste |
| Méga-Tyranocif | Tyranocif-ite | Sable Volant → ? (Mega) | Brave (lent) |
| Minotaupe | Ceinture Force | Baigne Sable | Joviale (max Vit) |
| Felinferno | Baie Pomme Rose (anti-Combat) | Intimidation | Assure |
| Effroyable | Baie Citrus | Au Petit Soin | Calme |
| Motisma Laveuse | Restes | Lévitation | Assuree |
Le duo Double Mega
Tyranocif n’a pas besoin de méga-evoluer a chaque partie :
- Sa meteo (Tempete de Sable) suffit pour activer Baigne Sable de Minotaupe
- Danse Draco quand il méga-evolue — a +1 Vit en Mega (114 base), il depasse beaucoup de choses
- Machouille plutot que Sabotage (objets faibles dans le meta actuel, Méga-Gemmes non retirables)
- Eboulement pour les degats de zone Roche
Gardevoir avant Mega a Calque (copie un talent adverse — Intimidation idealement) :
- Megaphone (Peau Feerique) = degats de zone Fee enormes
- Choc Psy contre Méga-Floette et Farfurex
- Distorsion pour s’adapter (2e poseur avec Effroyable)
- Investissement defensif massif — pas un glass cannon
Le core defensif : Felinferno + Effroyable
La paire la plus securisante du jeu :
- Typings complementaires (Feu/Tenebres + Plante/Spectre)
- Felinferno : Intimidation + Bluff + Dernier Mot + Bout de Feu
- Effroyable : Au Petit Soin (25% PV allie a l’entree) + Poudre Fureur + Distorsion + Mortier Matcha
- Baie Pomme Rose sur Felinferno = survit a Close Combat de Farfurex (Herbe Blanche)
- Ball’Ombre sur Effroyable plutot que Fontaine de Vie dans cette team
Adaptabilité
L’equipe a trois modes de vitesse :
- Baigne Sable (Minotaupe x2 sous Tempete de Sable)
- Danse Draco (Tyranocif +1 Vit en Mega)
- Distorsion (Gardevoir OU Effroyable — 2 poseurs)
C’est cette flexibilite qui rend l’equipe plus difficile mais plus recompensante.
Gestion de Scalpereur
Probleme principal de l’equipe — pas de KO facile :
- Feu Follet sur Motisma = outil principal
- Megaphone de Gardevoir fait très mal (mais pas le KO)
- Bout de Feu de Felinferno (pas le KO non plus)
- Il faut s’en occuper en plusieurs coups
Motisma Laveuse (identique Equipe 1)
Même set, memes Restes. Immunité Sol essentielle avec Tyranocif + Minotaupe dans l’equipe. Anti-Corvaillus (Tonnerre).
Guide redige a partir des analyses video exhaustives de HARI (@HariPKMN) et des donnees de simulation de Champions Lab (championslab.xyz). Sources secondaires : Pikalytics, Limitless VGC, Victory Road, Serebii, Bulbapedia.
Part 12 — Finding Teams & Pro Stat Spreads (HARI)
Section 20 – Comment Trouver des Equipes
Source : HARI – “Comment TROUVER des EQUIPES ? Pokémon Champions” (video 52)
20.1 Système d’Equipes Calquees
Pokémon Champions remplace les equipes d’emprunt (rental teams) par les equipes calquees. La difference majeure :
| Ancien système (EV/EB) | Nouveau système (Champions) |
|---|---|
| Vous empruntez les Pokémon de quelqu’un d’autre | Vous modifiez VOS Pokémon pour correspondre a l’equipe |
| Pas besoin de posseder les Pokémon | Vous devez posseder tous les Pokémon de l’equipe |
| Gratuit | Coute des VP ou des Tickets d’Entrainement |
Comment calquer une equipe
- Aller dans Entrainement → Equipe Calquee
- Entrer le code de l’equipe
- Le jeu montre les modifications necessaires avec le cout en VP
- Vous pouvez aussi modifier manuellement (souvent moins cher)
- Conseil : Utiliser les Tickets d’Entrainement pour les changements > 1 000 VP
Stats exactes visibles
Le nouveau système affiche les stats exactes avec les investissements — bien mieux qu’avant ou les joueurs japonais ne partageaient pas le pokepaste.
20.2 Sources d’Equipes
VGC Paste (source principale)
La reference communautaire pour trouver des equipes competitives :
- Discord VGC Paste : Salon “Submit Reg MA Teams” — tout le monde peut partager son equipe calquee
- ⚠️ Qualite variable : n’importe qui peut poster. Verifiez le profil du joueur.
- Les equipes de top joueurs (Alex Otto, Yubislow, etc.) sont fiables
- Google Spreadsheet / Repository : Compilation des equipes de top joueurs uniquement
- Lien direct : VGC Paste — Reg MA Teams
- Filtre par archétype (Soleil, Pluie, Sable, etc.)
Comment evaluer une equipe trouvee en ligne
- Verifier qui l’a publiee (top joueur connu = fiable)
- Regarder la coherence : tous les Pokémon ont-ils un rôle clair ?
- Verifier les objets : pas de doublon, pas d’objet inutile
- S’assurer que l’equipe a un plan contre les archétypes majeurs (Soleil, Pluie, Distorsion)
20.3 Méga-Gemmes et Paywall de Transfert
Un probleme specifique au lancement :
| Pokémon | Méga-Gemme accessible ? |
|---|---|
| Tous les Pokémon presents sauf ci-dessous | Oui — achetables en boutique |
| Blindépique (Chesnaught) | Transfert LPZA → Home → Champions uniquement |
| Goupelin (Delphox) | Transfert LPZA → Home → Champions uniquement |
| Amphinobi (Greninja) | Transfert LPZA → Home → Champions uniquement |
| Floette Fleur Eternelle | Transfert LPZA + Pokémon unique par sauvegarde — très difficile a obtenir |
Contournement pour les starters 6G : Trouver quelqu’un sur Discord qui possède le Pokémon dans LPZA, faire un echange, puis transferer vers Home → Champions. Relativement facile.
Pour Floette Fleur Eternelle : Beaucoup plus complique. Un seul par sauvegarde. HARI espere que les Méga-Gemmes seront ajoutees a la boutique VP.
Les objets manquants et les Pokémon supprimes seront ajoutes progressivement via les mises a jour du jeu. Les builds de la Section 18 deviendront pleinement applicables a mesure que ces objets arriveront.
Section 21 – Distribuer les Stats comme un Pro
Source : HARI – “Distribuer les STATS comme un PRO” (video 53)
Prerequis : Comprendre le système de stats de Champions (Section 4) : 66 points a distribuer (0-32 par stat), pas d’IVs (tous a 31 automatiquement), natures x1.1/x0.9.
21.1 Les Règles des Natures
Natures a utiliser
Toujours choisir une nature qui augmente une stat utile et baisse une stat inutile :
| Situation | Nature recommandee | Stat baissee |
|---|---|---|
| Attaquant physique | Joviale (+Vit) ou Rigide (+Atk) | Atk Spéciale |
| Attaquant special | Timide (+Vit) ou Modeste (+Atk Spe) | Attaque |
| Tank physique | Assure (+Def) | Atk Spéciale ou Attaque |
| Tank special | Calme (+Def Spe) | Attaque |
| Pokémon lent (Distorsion) | Brave (+Atk) ou Relax (+Def) | Vitesse (volontaire) |
Natures a NE JAMAIS utiliser
- Natures neutres (Serieux, Hardy, etc.) : jamais optimal mathematiquement
- Gentille (+Def Spe, -Def) et Lache (+Def, -Def Spe) : aucune logique de baisser une défense pour en augmenter une autre
Cas special : baisser la vitesse volontairement
Pour les Pokémon sous Distorsion ou un Felinferno qui veut faire Dernier Mot après que l’adversaire attaque (pour que le Pokemon qui rentre ne subisse pas les attaques du tour).
21.2 Ordre de Priorité pour la Distribution
VITESSE — La stat qui fait le plus de difference a un point pres. Un point de vitesse en plus ou en moins determine qui attaque en premier. Pas d’arrondi, pas de formule complexe : c’est direct.
POINTS DE VIE — La stat defensive avec le plus grand impact proportionnel. Investir dans une stat de base faible rapporte plus proportionnellement que dans une stat déjà elevee.
RESTE (Attaque, Defense, Def Spe) — Distribuer selon les besoins specifiques du Pokémon, en faisant des calculs de degats.
Règle d’or pour les points restants : Si vous ne savez pas ou mettre vos derniers points, mettez-les en PV. Vous pouvez rarement vous tromper.
21.3 Outils Indispensables
Speed Tier (tableau de vitesses)
Un Google Doc par Magical Archer 57 repertorie la vitesse de tous les Pokémon selon le contexte :
- Vitesse brute (max, neutre)
- Avec multiplicateurs : x1.5 (Mouchoir Choix), x2 (Chlorophylle, Glissade, Baigne Sable, Delestage)
- Noms en anglais (cherchez la correspondance sur Google)
Manque important selon HARI : le Speed Tier ne montre pas les vitesses après Vent Glace. Pour calculer : Vitesse cible / 1.5, arrondi a l’entier inferieur.
Calculateur de degats — Nimbasa City Post
Le calculateur de reference, mis a jour pour Champions :
- Onglet “Champ” pour Pokémon Champions
- Permet de voir les stats des Méga-Évolutions (impossible dans le jeu !)
- Montre tous les rolls de degats (16 valeurs possibles)
- Indispensable pour les calculs defensifs
Statistiques in-game
Dans le jeu : Combat → Statistiques de Combat
- Pokémon les plus joues
- Attaques les plus jouees par Pokémon
- Objets les plus portes
- Natures les plus jouees (ex: Carchacrok = 62.5% Joviale, 36% Rigide)
- Repartitions exactes des stats des joueurs
21.4 Formules de Calcul de Vitesse
Depasser un Pokémon cible
Pour être exactement 1 point plus rapide que la cible :
Vitesse necessaire = Vitesse cible + 1
Depasser après Vent Glace (drop -1)
Vent Glace divise la vitesse par 1.5 (arrondi inferieur) :
Vitesse cible après Vent Glace = floor(Vitesse cible / 1.5)
Pour depasser : floor((Vitesse cible + 1) / 1.5) — et verifier avec x1.5
Exemple : Méga-Ectoplasma a 200 de vitesse.
- Après Vent Glace : floor(200 / 1.5) = 133
- Pour le depasser : 134 minimum
Avec Mouchoir Choix (x1.5)
Vitesse effective = floor(Vitesse brute x 1.5)
Exemple : Paragruel Jovial 32 Vit = 143 brut → floor(143 x 1.5) = 214
Toujours arrondir a l’entier inferieur
C’est la règle la plus importante de Pokémon Champions. Que ce soit pour les PV, les degats, la tempête de sable, les Restes, le calcul d’une stat — toujours arrondi a l’entier inferieur.
21.5 Optimisation des Points de Vie
Multiples importants
| Multiple | Pourquoi | Exemple |
|---|---|---|
| Multiple de 2 (pair) | Baie Citrus s’active a exactement 50% | Cognobidon → Citrus activation immediate |
| Multiple de 4 | Recuperation optimale de Baie Citrus (1/4 PV) | 156 PV → récupère 39 |
| Multiple de 16 | Degats minimaux de Tempête de Sable/Grele, recuperation maximale des Restes (1/16) | 160 PV → perd/récupère 10 par tour |
| Impair | Survit aux attaques super efficaces a 1 PV | Les attaques SE font toujours des degats pairs (x2 a la fin de la formule) |
| 4n+1 | Optimal pour Clonage (3 clones + survie) | 165 PV → clones de 41, survit avec 42 après 3 clones |
Quand pair vs impair ?
- Pair : si vous jouez Baie Citrus ou Cognobidon (activation exacte a 50%)
- Impair : dans la plupart des autres cas (survie aux SE)
- Ni l’un ni l’autre n’est absolu : ca depend du Pokémon et de son set
“Jump Point” / “Extra Point” / “Bump” de Nature
Le multiplicateur de nature (x1.1) s’applique après les arrondis. Il y a des seuils ou un point d’investissement en plus fait passer le bonus de nature de +N a +N+1 :
- Le jeu met en evidence ces segments dans l’ecran de distribution
- Il est optimal d’être pile sur un seuil ou juste au-dessus pour la stat avec nature +
Exemple : 140 Défense x 1.1 = 154. Mais 139 Défense x 1.1 = 152 (arrondi de 152.9). Le point entre 139 et 140 vaut 2 points de stat effective.
21.6 Exemples Pratiques
Exemple 1 : Miascarade — Glass Cannon (Niveau debutant)
Le cas le plus simple : un Pokémon très offensif et fragile avec Ceinture Force.
| Stat | Investissement | Raison |
|---|---|---|
| Vitesse | 32 | Maximiser — doit depasser les autres rapides |
| Attaque | 32 | Maximiser — vocation offensive pure |
| PV | 2 | Points restants, en PV par defaut (aide contre les degats de recul) |
| Def / Def Spe | 0 | Ceinture Force = pas besoin de bulk |
Nature : Joviale (+Vit, -Atk Spe) — on utilise que l’Attaque physique
Exemple 2 : Paragruel Mouchoir Choix — Le choix de la nature (Niveau intermediaire)
Le debat : Joviale (plus rapide) vs Rigide (plus de degats) ?
Pourquoi Joviale gagne :
- Paragruel Jovial + Mouchoir Choix max Vit = 214 de vitesse effective
- Lancorien max Vit = 213 → Paragruel est 1 point au-dessus
- Méga-Ectoplasma max Vit = 200 → largement depasse
- Méga-Goupelin → aussi depasse
- Si Rigide : on ne depasse pas ces cibles, ils nous eliminent avant
| Stat | Investissement | Raison |
|---|---|---|
| Vitesse | 32 | Depasser Lancorien d'1 point |
| Attaque | 32 | Maximiser les degats |
| Défense | 2 | Survivre potentiellement a Kuba d’un Scalpereur non max-Atk |
Nature : Joviale (+Vit, -Atk Spe) — le Speed Tier tranche le debat
Exemple 3 : Motisma Laveuse (Rotom-Wash) — Tank sans calcul precis (Niveau intermediaire)
Un Pokémon defensif ou l’on optimise sans calcul de degats specifique.
| Stat | Investissement | Raison |
|---|---|---|
| Vitesse | ~6 pts (= 118) | Juste au-dessus de Bequipan Modeste (117) |
| PV | 32 (max) | Base PV faible (125) → proportionnellement enorme |
| Défense | ~20 pts | Nature +Def, viser un Jump Point |
| Def Spe | ~9 pts | Pas negligeable, même sans nature + |
| Atk Spe | 0 | Pas besoin d’investir — tape naturellement fort avec Hydrocanon |
Nature : Assuree (+Def, -Atk) PV : 156 (multiple de 4 pour Baie Citrus) ou 157 (juste sous multiple de 16 pour minimiser degats Tempete de Sable)
Exemple 4 : Méga-Ectoplasma — Calculs complexes (Niveau avance)
Le cas le plus technique : multiples objectifs defensifs + Clonage.
Objectifs simultanes :
- Depasser Méga-Momartik Timide max Vit (189) → besoin de 190
- Tanker Aquatacle de Paragruel Jovial Adaptabilité a 100%
- Tanker Trepignement de Carchacrok Jovial (non-Rigide)
- Optimiser PV pour Clonage (4n+1)
| Stat | Investissement | Raison |
|---|---|---|
| Vitesse | 23 pts (= 190 en Mega) | Timide necessaire — ne peut pas atteindre 190 sans nature + |
| PV | ~28 pts (= 165, soit 4x41+1) | Optimal pour 3 clones + survie ; Impair = survie aux SE |
| Défense | ~8 pts | Survit a Aquatacle Paragruel Jovial a 100% (166 max roll < 167 PV) |
| Def Spe | ~1 pt | Derniers points : 1 roll de moins contre Ball’Ombre miroir |
| Atk Spe | ~6 pts | Ce qui reste après les besoins defensifs |
Nature : Timide (+Vit, -Atk) — necessite un outil externe car le jeu ne montre pas les stats Mega
Remarque de HARI : “La realite du jeu, c’est pas de mettre 32-32. Il y a un ordre de priorité, et c’est a vous de determiner ce qui est important pour vous.”
21.7 Consulter les Stats des Autres Joueurs
Dans le jeu : Combat → Statistiques de Combat → Pokémon
Vous pouvez voir pour chaque Pokémon :
- Les attaques les plus jouees
- Les objets les plus portes
- Les Pokémon partenaires (par ordre, pas de taux)
- Les natures les plus jouees (avec pourcentages)
- Les repartitions exactes les plus courantes
Exemple concret : Carchacrok → 62.5% Joviale, 36% Rigide, 0.2% Solo. Effroyable → repartitions très variees avec des spreads techniques (pas du 32-32).
Conseil : Si la plupart des joueurs jouent un Pokémon avec une nature specifique, il y a probablement une bonne raison. Utilisez ces donnees comme point de depart, puis affinez avec vos propres calculs.
Part 13 — Battling Fundamentals (VGCGuide)
Building Up a Knowledge Base
Learn about how you can prepare yourself to fight against the most common Pokémon in a format.
Written by Aaron Zheng *Note: This article was written in early March 2022, some statistics may be slightly different today.
Competitive Pokémon is a tough game because you are often playing with imperfect information. As a game progresses, you learn more about your opponent’s team, but you will typically start a battle with a blank slate. This can be daunting, especially for newer players, since it feels like high-level players often read into what their opponent may do before the game even starts. How are they able to accomplish that, and how can you build up that knowledge base?
First of all, I think one of the keys to winning in Pokémon is to identify every single option your opponent has and come up with a play that beats all of those options. This is really difficult to do, and a lot of it comes from the team that you are using. For now, let’s first focus on the first step - identifying every single play your opponent can make.
To be able to identify your opponent’s possible plays, you first have to understand what their Pokémon do. This can feel overwhelming because there are so many Pokémon in the format. I recommend players who are starting out to focus on the ~20 most common Pokémon.
One great resource for this is Pikalytics, which has usage stats on every single Pokémon in the format. Pikalytics conveniently has information on both Battle Stadium & Showdown stats, and you can toggle between the two with this drop-down menu:

(note that “Series 12 VGC 2022” = Showdown, and “Stadium 12 Battle Stadium Doubles” = in-game ladder)
For Showdown, you can also toggle between rating cut-offs!
Let me walk you through an example of how you can use this resource to identify what a Pokémon may do. Generally, the most important parts I’d focus on learning are the following:
- Most common attacks
- Most common items
- How it’s generally trained (nature/EV spread)
Take, for example, Kyogre - one of the most common Pokémon in Series 12 VGC. What can we learn from its Pikalytics page?

Attacks
I generally divide attacks into the following buckets:
- Attacks that a Pokémon will very likely carry (>25% usage rate)
- Attacks that a Pokémon may carry but are not very common (<25% usage rate, remaining moves listed on Pikalytics)
- Attacks that a Pokémon rarely carries (moves that aren’t even on Pikalytics)
Attacks that a Pokémon will likely carry: From this, we can see that the most common attacks, by far, are Water Spout, Origin Pulse, Ice Beam, Thunder, and Protect. (44%+ usage on all). Given this, I’ll normally assume that opposing Kyogres have all of these attacks until I see otherwise.
Attacks that a Pokémon may carry but are not very common: If you scroll down to the rest of the moves, you’ll also see that occasionally, moves like Scald, Blizzard, Calm Mind, Hyper Beam, and Hydro Pump are run, but at a far less frequent rate (all <10% usage). Since these moves are far less common, I won’t go out of my way to try to play around them but I’ll still keep them in mind if I’m in a scenario where the moves could give my opponent a significant advantage.
Attacks that a Pokémon rarely carries: At this point, Pikalytics doesn’t list any more attacks. Examples of rare options on Kyogre include Icy Wind, Psych Up, Rest, Thunder Wave, etc. These are moves that I will never cover for as they are so uncommon. When you face moves in this bucket, you’ll have to rely a bit more on your ability to adapt.
The 25% usage rate benchmark is relatively arbitrary, so use your best judgment. Generally, if you want to make things easier, I’d just learn the top 6 moves for each Pokémon. As you battle, also keep in mind that a Pokémon can only have four moves – as a result, if it’s using a uncommon/rare attack, that also means it’s often giving up one of the common attacks – you can utilize this to your advantage!
Items
Generally, there are not too many items that an individual Pokémon will frequently run, but it’s important to learn the most common ones as they often dictate how the Pokémon is used. In this example, we see that 10% of Kyogre have an Assault Vest, 34% have a Mystic Water, 15% have a Choice Scarf, and 21% have a Life Orb.
My general rule of thumb here is to cover all items with >10% usage – that is, when I face Kyogre, I’ll immediately assume it has AV/Mystic Water/Life Orb until I can confirm the actual item. As for other items, I’ll keep them in mind but won’t go out of my way to play around them until I’ve confirmed them.
How it’s Trained
This section on Pikalytics is a little more complicated, since it gives you the breakdown for each individual EV spread/nature combination. I’d generally focus a bit more on the big picture here and look at the following:
- How much speed investment are players generally putting in?
- Are there any common trends among the most used spreads?
- Are there different types of spreads that I should look out for (e.g. all offensive & no bulk vs. lots of bulk & no speed)
In this example, we can see that the most used Kyogre spreads all have a significant amount of speed investment (212+ EVs). As a result, I’ll generally assume that Kyogre is Timid 252 EVs when I fight against it until I can confirm that it is slower. The common trend for Kyogre here is that the top spreads all generally invest very heavily in special attack and speed. However, that doesn’t mean all Kyogres are trained like that - as you scroll down, you’ll also see some builds that are very bulky and have little speed investment. Overall, it appears that the majority of popular spreads are either very offensive/fast or very offensive/bulky
Conclusion
This guide is not exhaustive by any means - rather, it’s meant to teach you how you can absorb valuable information and have a general idea of what to expect when you face any Pokémon. The general goal is for you to see a Pokémon and be able to identify 1) what moves it will most likely carry 2) what items it may carry & 3) how it’s generally trained.
A big caveat here is that creative team-building is a valuable element of Pokémon. Sometimes, your opponent may have a surprise Pokémon, move, item, EV spread, or strategy that you just can’t expect, no matter how much you’ve practiced or studied. Part of what makes the best players stand out is their ability to adapt to an unfamiliar scenario. At the end of the day though, you want to make sure you are at least prepared for the common sets/Pokémon in the format.
Between learning from practice battles and using Pikalytics as a resource, you should be able to build up a knowledge base & understand what the most common Pokémon do and how they are trained. The better you build up this knowledge base, the more informed decisions you’ll be able to make during a battle!
Approaching Best of 1 vs. Best of 3
As you play VGC, you’ll play both best-of-1 battles and best-of-3 sets. Learn about key differences between the two and how you should approach both.
Written by Aaron Zheng
Introduction
In VGC, it’s important to learn how to approach both best-of-1 and best-of-3. The in-game ladder and International Challenges (online Wi-Fi tournaments) use the best-of-1 format, while most major IRL tournaments use the best-of-3 format. My goal is to break down various components of the game (team building, team preview, battling) and help you think about how you should approach each.
Best of 1
Team Building
Note: Wolfe covered the difference between teambuilding for best of 1 and best of 3 in this article.
If you are team building explicitly for best-of-1, the element of surprise can give you huge advantages during a battle. It’s no surprise that many of the #1 teams in best-of-1 tournaments feature unique sets that are generally difficult to predict. You don’t necessarily need any surprises to succeed in best-of-1, but they can give you some major advantages & swing the battle heavily in your favor from just one turn. Examples of surprises include the following:
- Taking a conventional Pokémon and running it in an unconventional way (e.g. offensive Dynamax Porygon 2)
- Using attacks or items that your opponents generally would not expect (e.g. Iron Defense/Babiri Berry Calyrex-I)
- Using an unpopular Pokémon that players will likely have little experience battling against
- Using an unconventional EV spread to catch opponents off guard (e.g. max speed Incineroar + Tailwind to outspeed Zacian)
- Taking a popular team and slightly modifying the moves/EV spreads
EXAMPLE
Japanese player kogepannachan won the Global Challenge Winter tournament, an online qualifier for Players Cup III, using a team with several surprises. Most notably, his team had a Porygon 2 with max Attack and Special Attack investment & four offensive attacks. This Porygon set deviated significantly from the standard set at the time, often featuring lots of bulk and Trick Room/Recover, and was a strong choice as most players do not expect Porygon 2 to Dynamax and normally try to stop it by using moves such as Fake Out or Taunt.
Another factor to think about is the context for which you are building for. For example, if you expect to grind out lots of games because you are playing in an online International Challenge, which can give Championship Points towards Worlds, you’ll want to think about the pace of your team and how quickly you can win battles. I generally value teams that can win quickly and have fast paced offense, rather than slow paced teams that are more vulnerable to critical hits/secondary effects, for these kinds of events.
EXAMPLE
European player marcofiero won the February 2022 International Challenge, an online tournament that had over 300K+ players, using a hyper offense team centered around Barraskewda & Kyogre. This team was an excellent pick for the tournament as it 1) featured Barraskewda, a Pokemon that had not seen much play until then & 2) had lots of Pokemon that could deal huge amounts of damage in a short amount of time.
One last area you may want to think about for best-of-1 is your general comfort and knowledge with a team, especially as you’ll often be playing against unorthodox Pokémon/teams. Best-of-3 events generally are a bit more centralized, while best-of-1 ladder/tournaments can feature a much more diverse pool of Pokémon & strategies. If you understand your team deeply, you’ll be able to adapt & improvise as you go up against surprising Pokémon/strategies.
Team Preview
When approaching team preview in best-of-1, you have to be extra cautious as games can often be decided solely from a bad lead match-up/turn 1, especially in a Dynamax format. Our team preview guide covers principals you’ll want to think about, but here are the main rules I generally try to follow:
- Pick risk-averse leads: Falling behind quickly due to a bad lead match-up is incredibly stressful in best-of-1, so I generally try to find a lead that doesn’t gamble the game away on turn 1 (the one exception to this is when I recognize my team just matches up poorly vs. my opponent’s)
- Cover for your opponent’s strongest combinations: I generally try to highlight the most overwhelming offensive combinations on my opponent’s team (e.g. Weezing + Regigigas, Charizard + Groudon) and make sure they can’t just win the game off a strong turn 1
- Have answers against all 6 of your opponent’s Pokémon: I try to ensure that between the four Pokémon I’ve selected, I can deal reliable damage to each of my opponent’s six Pokémon to make sure I’m not super weak to any certain Pokémon
- When lost, go with comfort: I play towards my team’s core strengths/leads rather than trying something that I’m unconfident in when I don’t really know what to pick
Battling
When battling in best-of-1 specifically, here are some general principles you may want to consider:
- You’re often working with very limited knowledge of your opponent’s team (e.g. sets, EV spreads, items). As a result, try to assume they have all their strongest attacks (generally, their top 6 most common attacks, as seen on Pikalytics) until they reveal otherwise.
- It’s especially good to lean into any surprises that your team may have in best-of-1 as your opponents will often not be prepared for them, and subsequently, not be able to adequately predict your moves.
- Understand the dynamic between how your teams match up and play accordingly. If you feel like you have a neutral or positive match-up, you can afford to play a bit more risk averse. If you feel like you have a bad match-up, you’ll probably have to make more predictions throughout the course of the battle.
- It’s very possible that you essentially win, or lose, the game from just a single turn. Always try to identify what the worst case scenario is on each given turn and do your best to prevent that scenario from happening. In Sword/Shield, be extra wary of ways that your opponent can one-hit KO your Dynamax Pokémon.
- Accept that best-of-1 is very volatile (especially in Sword/Shield) and be ok with losing. Pokémon is unique as a competitive game in that team-building adds a whole layer of depth - a single smart teambuilding choice can lead to a quick victory in best-of-1. You are going to lose to lots of unexpected Pokémon & strategies throughout your VGC journey, and that’s totally OK. What’s important is learning from these losses.
Best of 3
Note: This section is generally meant for closed team sheet tournaments (you are not given any information about their team), which is the standard for IRL events. Some online tournaments use an open team sheet format (you are given your opponent’s six Pokémon & their respective moves/items).
Team Building
One thing that we’ve emphasized throughout our guide is the idea of consistency, and that concept is especially relevant for best-of-3 teams. As Wolfe highlighted in his article, strong teams for best-of-3 generally feature:
- Multiple modes, forcing your opponent to guess what threats you will bring (and on that note, multiple consistent lead options)
- Strong options that don’t rely solely on surprises: even if your opponent knows about your team’s sets/strategies, you shouldn’t be at a major disadvantage
It’s important to point out that surprises can still be extremely valuable in a best-of-3 team. Here are some examples of some different types of surprises & why they were effective:
Meta Call Example: In 2014, Sejun Park won the World Championships with Pachirisu, a Pokémon that did not see much play before the tournament. Sejun chose Pachirisu because it was an effective redirection user. Amoonguss was the most popular redirection user going into Worlds, but since it was common, many players went out of their way to counter it. Pachirisu, on the other hand, was a great call given the metagame as few people had reliable answers for it. Even once everyone figured out what Sejun’s Pachirisu set was during the tournament, they still struggled against it as few players had actually prepared for it during the team-building process.
Move Set Example: Chongjun Peng won the 2022 Salt Lake City Regional Championships using Charti Berry Ancient Power Charizard and Light Clay Dual Screens Grimmsnarl. The team he used was originally popularized by Rinya Kobayashi, who had Lum Berry Heat Wave Charizard and Iron Ball Grimmsnarl. Many of Chongjun’s opponents likely expected Rinya’s version of the Sun team, and were subsequently caught off guard by the slight modifications Chongjun had made. Chongjun was also one of the first players to use both Ancient Power and Charti Berry on his Charizard, giving him a major advantage against opposing Sun teams. This is an example of a strong surprise - Chongjun didn’t lose very much by giving up Lum Berry + Heat Wave on Charizard, and even if players knew about Charti + Ancient Power, they still couldn’t reliably deal with it.
Team Preview
Team preview in best-of-3 is a different beast than best-of-1. You and your opponents will make adjustments based on how the previous games went. Our team preview guide covers principals you’ll want to think about, but here are the main rules I generally try to follow:
In a best-of-3, you have more room to take risks, especially with your lead choice. You also have more time to gather information about your opponent’s team, which you can use in subsequent games.
Predicting one specific lead from your opponent and countering that lead is much more frequent in best-of-3s, especially in games two and three. This approach is a riskier strategy on best-of-1 since it can be highly volatile, but is a key strategy in best-of-3s once you’ve learned about your opponent’s team & playstyle.
- It’s especially common for a player who lost a game to find a new lead combination that matches up well against what their opponent just led against them
During each battle, I constantly think about my opponent’s Pokémon selection - did they have any Pokémon that I struggled to deal with? If so, is there a Pokémon that I didn’t bring or exposed too early that could be useful for me in the next game?
If I win a game, I ask myself whether or not my opponent brought their best answer to my team selection. If they did, then it may be ok to just go with the same core in the next game. If they didn’t, I’ll start thinking about ways to counter new Pokémon/leads that they may bring.
Conserving information is also critical in a best-of-3 - you want to focus on winning while not revealing unnecessary information. Even a single surprise move or item can lead to major victories, especially on a Pokémon that you haven’t brought out very much during a set.
You can’t always predict what your opponent is going to do - team preview for best-of-3 is one of the most difficult parts of competitive battling. Sometimes, your opponent will switch things up when you don’t expect them to, and other times, they won’t adjust even when you think they will. You should still try your best during team preview, but you can make up for a bad team preview phase by playing well.
Battling
Best-of-3 battles are a lot more dynamic than best-of-1 as both players will make adjustments and use what they’ve learned from previous games to inform their decision making. When you’re approaching best of 3 battles, you should think about the following:
You’ll be able to gather a lot more information in a best-of-3 set as opposed to a best-of-1 game - use that to your advantage. One key skill in VGC is being able to make good decisions based on all the information you have available to you**.**
You have to be willing to adjust your strategy. Being able to adapt to your opponent’s play & come up with solutions to strategies they’ve previously shown is critical in best-of-3 play. Thinking on the fly & improvising is a skill that you’ll have to develop, and comes with practice.
When you’re up a game, you have more room to work with. This doesn’t mean you should just mix things up for the sake of mixing things up, especially if your winning strategy was consistent. However, it does mean you can play a bit riskier in game 2 (e.g. try to predict your opponent’s specific lead & counter them, take calculated risks that can immediately win you the match).
- Example: At the 2022 Salt Lake City Regional Championships, I played against Chongjun Peng in the Top 8. In Game 2, Chongjun goes for a play that gives him a chance at winning the game immediately (link) by going for Blast Burn + Max Rockfall. In order for the play to work out, he needs to 1) win a speed tie between our Charizards (50%) 2) connect on Blast Burn (90%) 3) pick up the OHKO onto Indeedee with it (62.5%). All three conditions happen, allowing him to essentially win the game on turn 1 as I’ve lost far too many resources.
Consider the mental aspect of the game. Best-of-3s can be grueling and can last up to an hour. Stay focused on your overall goals/strategy, even when things don’t necessarily go your way early on.
In general, best-of-3s reward the stronger player more frequently as they reduce the amount of variance, whether it be from unexpected strategies or luck/RNG. Before we finish, I also want to highlight that as you prepare for events, it’s valuable to get multiple best-of-3 sets in so you understand how you can make adjustments with your team between games. Online laddering is generally valuable for testing an idea & making sure it can win consistently against a wide variety of teams, but since it’s only best-of-1, it won’t teach you how to make proper adjustments.
Analyzing your opponent’s teams
Breaking down your opponent’s team quickly & understanding their general strategy will help you make better choices
Written by Aaron Zheng One powerful skill in VGC is the ability to analyze your opponents’ teams and break it down into different components. You’ll generally want to think about a team’s key strengths and draw from your experience & knowledge of the format/metagame. This is something that comes with practice - knowing how the most common Pokemon are generally used will help you a lot here.
This article will focus on some of the key things you’ll want to think about as you look at opposing teams. Keep in mind that these areas are relevant to any VGC format, not just the current one, but some areas will be more crucial to the current format (e.g. in Series 12 VGC, each player is allowed two “Restricted” Pokemon, so teams will generally center very heavily around those two Pokemon).
Strong Pokemon: What Pokemon on my opponent’s team are the primary offensive options? How can my opponent get these Pokemon to move before mine?
- These are typically Pokemon that get access to very powerful attacks & have good base Attack/Special Attack
- Also pay attention to Pokemon that can boost their stats (e.g. Swords Dance Landorus-T, Iron Defense Ferrothorn)
- In Sword/Shield specifically, think about which Pokemon are likely to Dynamax
Speed Control: Does my opponent have any way to control the speed?
- Common methods include Trick Room, Tailwind, Electroweb, Icy Wind, Thunder Wave, Scary Face, and Max Moves
- Think particularly about how your opponent can use these attacks to immediately give their partners an advantage – e.g. Whimsicott + Kyogre (Tailwind allows Kyogre to immediately outspeed everything and use Water Spout)
Pace and playstyle of their team: What is the pace at which the opponent will play the game? See here for more tips for defining and identifying this.
General speed of my opponent’s team: What are the base speeds of all of my opponent’s Pokemon? Do my key Pokemon outspeed theirs without any speed control?
Typing: Are there any types that can hit the majority of my opponent’s team for neutral or super-effective damage? Are they very weak to any specific type?
Pairs of Pokemon: Are there any duos that specifically synergize well with each other while on the field together? Which work particularly well as leads?
Support vs Offense: How many of my opponent’s Pokemon are supportive vs. offensive? If they have too many of one or the other, can I take advantage of that?
- Note: Support Pokemon are those that typically don’t focus on dealing damage (e.g. Whimsicott, Incineroar, Grimmsnarl, Dusclops)
Item Choice: What items are my opponent likely to be running on each Pokemon? Are there any multiple Pokemon that normally like to run the same item, and if so, which one do I think is actually carrying said item?
Now, let’s take some of the concepts we’ve described & take a look at some examples.
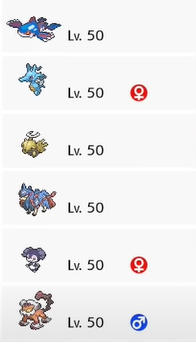
EXAMPLE 1
In this example, the opposing team is a fast-paced team centering around multiple offensive options in Kyogre, Kingdra, Zacian, and Landorus-T. The general goal of the team is to overwhelm you with offense before you can attack. My main observations, as I look at the team, are as follows:
Strong Pokemon: The team has four powerful attackers in Kyogre, Kingdra, Zacian, and Landorus-T. Kingdra/Landorus-T are significantly stronger when Dynamaxed, so I expect one of those two to Max most of the time. I also have to make sure I have answers to Shedinja, both in the early and late game.
Speed Control: The team can increase Kingdra’s speed via the Rain. Kingdra and Landorus-T both can use Max Airstream to boost their partner’s speeds. Choice Scarf Kyogre is also a likely item to consider here.
Pace & Playstyle: This team generally feels like a hyper offense team. I wouldn’t expect too much bulk on any Pokemon other than Indeedee, and I would expect an early (turn 1 or 2) Dynamax.
General Speed of their Team: The team is fast paced, and Kingdra in the rain can outspeed almost everything in the format.
Pairs: There are some clear duos here: Kingdra + Kyogre allows Kingdra to be fast via Swift Swim immediately, and Indeedee + Landorus-T allows Landorus to potentially set up a Swords Dance early on.
Support vs Offense: The team indexes heavily on offense. Indeedee is one of the few support options, while Shedinja serves as a potential switch-in thanks to Wonder Guard.
Here are some of my general thoughts when I see this team:
- This team is super fast faced and centers really heavily around KOing your opponent before they can move. However, as a result, the Pokemon are generally more frail.
- Shedinja can be a nightmare to deal with and can be a strong late game win-condition for my opponent. I want to make sure that I have multiple ways to deal with it in the endgame.
- Kingdra and Landorus-T are both super strong Dynamax options for my opponent. They’re also a lot weaker if NOT Dynamaxed, so I expect one of the two to Max in the majority of games.

EXAMPLE 2
In this example, the opposing team centers around Palkia and Calyrex-I as the primary attackers. It’s a slower paced team that can utilize Trick Room effectively. My main observations, as I look at the team, are as follows:
Strong Pokemon: The team will generally rely on Palkia and Calyrex-I for damage output. I expect one of those two to Dynamax in the majority of games.
Speed Control: The team has three potential Trick Room users in Palkia, Porygon 2, and Calyrex-I. I don’t think it’s likely that all 3 will run it, but that’s going to be their main means of speed control. Regieleki can also Electroweb, allowing my opponent to play with a faster mode of their team (e.g. Regieleki + Palkia lead)
Pace & Playstyle: Palkia and Calyrex-I generally feel like a bulky offense core. I generally expect my opponent to play a bit slower, but I also want to be wary of a turn 1 Dynamax from Palkia in particular.
General Speed of their Team: Calyrex-I and Palkia are likely to be slower given the Trick Room component of the team. Max Speed Palkia, however, is still a possibility.
Pairs: If my opponent wants to set up Trick Room, I really have to look out for Incineroar + a Trick Room user or Amoonguss + a Trick Room user as their lead.
Support vs Offense: Palkia and Calyrex will deal the majority of damage generally. Porygon 2 also can be annoying to deal with - it’s incredibly bulky & can heal itself with Recover but also gets access to solid attacking moves like Foul Play and Tri-Attack.
Here are some of my general thoughts when I see this team:
- The team, generally, is on the slower end with Porygon 2/Calyrex-I/Amoonguss/Incineroar. I think they’ll generally look to set up Trick Room, but they don’t need to 100% depend on it as Regieleki and Palkia can be fast.
- It’s difficult to outright deny my opponent Trick Room in the early game since 1) they have both Incineroar + Amoonguss to support the Trick Room users 2) they have three potential Trick Room options. I should expect it to go up - can I look towards either reversing it or stalling it out?
- The Palkia + Calyrex-I core is scary as both are great Dynamax options. If I can get one to Dynamax early, it means the other cannot Dynamax, limiting its options.

EXAMPLE
In this example, the opposing team is a fast paced team generally centered around Yveltal and Zacian as the primary attackers. My main observations, as I look at the team, are as follows:
Strong Pokemon: The team will generally rely on Yveltal, Zacian, and Regieleki for damage output. I expect Yveltal or Regieleki to Dynamax the majority of the time in this composition, but there’s a chance Incineroar is also trained offensively.
Speed Control: The team has a Whimsicott, so I have to watch out for Tailwind. Regieleki also potentially has Electroweb and Yveltal can Max Airstream while Dynamaxed.
Pace & Playstyle: The team is generally very offensive, but I do have to watch out for more passive combos with Amoonguss, especially early on (e.g. Incineroar + Amoonguss lead)
General Speed of their Team: Regieleki & Zacian are incredibly fast, while Yveltal is also decently speedy. They may not even need to use any speed control to outspeed many teams.
Pairs: Any combination of Yveltal, Zacian, and Regieleki as a lead can be incredibly potent, with lots of damage potential early on. Whimsicott + any of the three and Incineroar + any of the three are all also viable leads.
Support vs Offense: The majority of the offense on this team comes from Yveltal/Zacian/Regieleki, while Whimsicott and Amoonguss really lack damage output here.
Here are some of my general thoughts when I see this team:
- The team has some of the fastest Pokemon in the format in Zacian and Regieleki and has Whimsicott as well. It may be difficult to outspeed my opponent consistently here.
- I think it’s likely they’ll want to Dynamax early on in the game since their team has so much damage. Since they’re fast as well, can I look to stall out my opponent’s Dynamax, then retaliate with a late game Dynamax of my own?
- Yveltal sticks out as the clear Dynamax option, with Regieleki as another likely option. Incineroar CAN be an option, but I think it’s far less likely than Yveltal/Regieleki.
- None of their main offensive trio (Yveltal/Regieleki/Zacian) resist Fire/Water-type attacks - do I have any of those that I can utilize effectively?
Closing Words
At the end of the day, you can only analyze your teams to the best of your ability, and you’re not always going to get everything right – your opponents may be running an unexpected strategy, Pokemon, move, or even item. In fact, that first example is a popular team in Series 12 VGC that actually features physical Kingdra, which few players generally expect.
The most important thing is to start training yourself to recognize key patterns. Ideally, you’ll be able to look at a team of six Pokemon and understand the overall goal of the team. As you further build up your ability to analyze your opponent’s team, you’ll be able to make better decisions both in team preview & during the battling process!
Team Preview
Picking the proper Pokemon in team preview can give you a major advantage before the game even starts. Learn about frameworks for how you can approach it.
Written by Aaron Zheng Team Preview is one of the most important parts of a Pokemon battle. It plays a far more significant role in VGC than 6v6 formats as you have to not only have to identify a good lead - you also have to decide which two Pokemon won’t come into the battle.
One of the most common questions we hear from players is, “how do I pick the right Pokemon in team preview?” There’s a lot of depth to this question, and we wish we could give you an easy answer. Our goal with this article is to help you understand our personal approaches to team preview & help you ask the right questions as you approach it.
Before we get started, it’s important to point out a couple of things:
- Team preview is heavily influenced by the team you are using. This may seem like an obvious statement, but the main point is that stronger teams will allow you to have more options during team preview. Bad match-ups will lead to more difficult team preview phases, and you’ll occasionally be in situations where you don’t have any good leads. Selecting a strong team will make team preview easier for you.
- There are multiple ways you can approach team preview (e.g. finding the “safest” combination of four, predicting a specific lead combination from your opponent and countering that as much as possible, etc). This guide just lays out general principles that we look towards during team preview.
- Team preview is one of the most difficult parts of the game, and it’s hard for even the best players to get it right 100% of the time. Even with a poor team preview phase, you still can win battles by outplaying your opponent. However, you should always aim to select the best possible Pokemon to make battles easier.
Overall, we hope that by showing you how we fundamentally approach the topic, you can get a better understanding of how you should be thinking about team preview!
Aaron Zheng’s Thoughts:
There’s a lot to consider when approaching team preview, but ultimately, I have three main goals during the process:
- Identify a strong lead match-up that can help me set the pace of the battle & accomplish my overall goals
- Figure out which two Pokemon I should bring in the back
- Making sure that through the four Pokemon I’ve selected, I can adequately answer every single Pokemon on my opponent’s team
In order to actually make sure I’ve accomplished these goals, I walk through a mental flowchart during the team preview phase. Please note that you don’t necessarily have to follow each step in the exact order listed!
Step 1: Understanding my opponent’s overall strategy
Before I start thinking about my own Pokemon, I find it valuable to look at my opponent’s team of six and break down the overall strategy. We wrote an article that covers that here! Generally, these are the main things I think about while looking at my opponent’s team:
What are the obvious combinations on my opponent’s team? What Pokemon synergize with each other & can enable each other to succeed?
These combinations are often particularly strong as lead options, so starting here helps me identify threatening leads immediately as you can lose games on turn 1 if you don’t cover for them
Here are some common combinations you’ll want to consider:
- Ability based combos: These combinations rely on using one Pokemon’s ability to fully enable its partner. Examples include Charizard + Groudon, Kyogre + Kingdra, and Weezing + Regigigas.
- Fake Out + strong attacker: These combinations rely on using a Fake Out user to disrupt opposing teams on turn 1, while putting on pressure with a Pokemon that can deal lots of damage. Examples include Incineroar + Zacian and Rillaboom + Zapdos.
- Speed control + strong attacker: These combinations rely on using one Pokemon to help its partner outspeed everything. Examples include Whimsicott (Tailwind) + Kyogre, Regieleki (Electroweb) + Yveltal, and Grimmsnarl (Thunder Wave) + Dialga.
- Redirection + setup: These combinations rely on using a redirection user, such as Indeedee or Amoonguss, to protect a partner Pokemon as it uses a setup move. Setup can be defined as either a stat boosting move or speed control. Examples include Amoonguss + Dusclops (to get Trick Room up) and Indeedee + Xerneas (to set up Geomancy).
- Weakness Policy / Dynamax Setups: This is a bit more exclusive to Gen. 9 thanks to Dynamax, but these combinations rely on enabling Weakness Policy on a particularly strong Pokemon and sweeping with it. Examples include Mimikyu (Shadow Sneak) + Calyrex-I and Tornadus (Brutal Swing) + Solgaleo.
What is the overall speed of my opponent’s team? Do they generally use Pokemon that are slower or faster? How can they make their Pokemon move first?
Are there any individual Pokemon on my opponent’s team that can cause major problems just by itself individually? These are Pokemon that have the potential to “1v4” a game, or win the game against your entire team.
- Examples include Shedinja, which can wall an entire team if you don’t bring super-effective damage to the battle, and defensively setup oriented Pokemon such as Iron Defense Ferrothorn and Bronzong.
Step 2: Thinking about what four Pokemon I should select
Once I’ve gotten a good understanding of my opponent’s team composition, I start thinking about what Pokemon I want to bring into the battle.
What Pokemon do not contribute very much in the match-up for me?
In VGC, you bring 6 Pokemon but only choose 4 for a battle. Thus, it’s often easier to work backwards and eliminate Pokemon that do not contribute very much in a game.
Here are some ways you can identify these Pokemon:
- Offensive Typing: The Pokemon does not contribute very much damage with its attacks as a majority of my opponent’s team can resist its main attacks
- Defensive Typing: The Pokemon takes neutral or super effective damage from a majority of my opponent’s team & also can’t contribute very much offensively (e.g. Ferrothorn into a Sun team with Charizard/Groudon/Zacian/Incineroar).
- No Need for Specific Output: Certain Pokemon are used on teams for one primary reason, such as speed control. You may determine that you don’t need that primary output during the battle (e.g. Whimsicott with Tailwind into an opposing Trick Room Team).
- Part of a Combo: Some Pokemon are a lot stronger when they are together and a lot weaker when they are separated. There’ll often be times where you can’t bring both parts of a combination, thus resulting in you excluding both Pokemon from the battle
- Speed Dynamic: The Pokemon does not match up well relative to your opponent’s speed control (e.g. Cinderace with four offensive attacks / no Protect or Max Guard into an opposing team with Trick Room)
What Pokemon do you need to bring into the match-up?
I first start with my primary attackers - are there any good reasons I need to exclude any of them from battle?
- In Series 12 VGC in particular, you should first ask yourself whether or not you should drop either restricted Pokemon.
- You may want to drop one of your main attackers because 1) it’s incredibly weak into your opponent’s main attackers 2) does not deal good damage to your opponent’s main attackers 3) gets KOed too easily
I then look at the main threats on my opponent’s team - do I have a way to deal good damage to all of their Pokemon, especially their main attacker?
- During this, I also make sure to bring answers to the Pokemon with 1v4 potential that I mentioned earlier (e.g. Shedinja, Iron Defense Ferrothorn)
Step 3: Putting it all together & figuring out a lead
Now that I’ve thought about both my opponent’s team and mine, it’s time to decide what Pokemon I want to lead with. Leads are so important in VGC, especially in Gen. 8 where Dynamax can dictate the pace of the battle right from turn 1.
Before diving into my thought process, it’s important to stress again that the strongest teams will have reliable lead combinations. For example, when I placed 3rd at the 2013 World Championships, I used a team that could reliably lead Cresselia + Rotom-W or Cresselia + Landorus-T into almost any team in the format. A good team will make things easier for you as you select both your lead and team.
Here’s how I think about choosing a lead:
What are my opponent’s most likely leads?
- Before picking my own lead, I always try to think about the strongest combinations from my opponent’s end, which we covered in Step 1.
- As I identify these combinations, I think about how my potential leads can match up against each of these combos, especially on turn 1.
- Note that some Pokemon are a lot stronger as a lead option rather than a secondary option (e.g. Grimmsnarl in Series 12 VGC), so take that into account.
Can I go with one of the “obvious” combinations on my team?
- Generally, good teams in VGC will have strong combinations like I highlighted in Step 1. Many teams just won’t be equipped to deal with these combinations well, and if that’s the case, you can just lead it immediately.
- If you can’t go with one of the obvious combinations, it’s often because your opponent has a direct counter to said combo. If that’s the case, start thinking about what other leads can beat that specific combo.
What am I trying to accomplish with this lead? How does it play into my team’s overall strategy?
- Your lead should have a purpose, whether it be setting up speed control for the rest of your team, putting on offensive pressure via Dynamax early, or playing defensively to stall out your opponent’s early pressure.
- Think heavily about the balance between offense and setup when you lead. If you lead your strongest Pokemon immediately and lose them, that can set you behind significantly. Conversely, if you lead two support Pokemon, you may struggle to deal damage early and fall behind quickly.
How will the Pokemon that I have in the back support my lead? Can they save me from a potentially bad lead match-up?
- You won’t always get a favorable lead match-up, but that can sometimes be mitigated with the proper Pokemon in the back. Think about how the Pokemon in the back can be used to get you out of a tough position.
- In these scenarios, you’ll often have one Pokemon use Protect while the other one switches out, so ideally, the Pokemon that’s switching in can unlock new options for you.
You don’t necessarily need to start the team selection process with a lead, but I find that it’s a naturally good starting point. Once you’ve found a good lead, then use what you’ve thought about in Step 2 to bring it all together.
You won’t always have an obvious group of four Pokemon to bring - in fact, that’s rarely the case. Knowing that, I instead try my best to give myself enough options to win a battle (and conversely, focus on not losing the game immediately off a bad lead).
That’s it for my general approach for team preview! Before I finish things though, I want to highlight a couple of areas that I haven’t talked about yet.
Post Game Analysis
It’s always great to reflect after a battle and think about whether or not you made the best team preview decisions. I focus more on whether or not my logic was sound in the team preview process rather than purely analyzing the results of the game. Some questions I ask myself include:
Did I anticipate my opponent’s lead combination?
- If so, did I bring a lead that can adequately deal with it? What was my absolute best lead against their lead, and should I have brought it here? Is that absolute best lead significantly weaker against other lead combinations they have?
- If not, why did I not expect that combination?
Could one of the Pokemon I left out contribute more to the battle?
- Did any of my Pokemon not do very much during the battle? If so, what was the reasoning? (Sometimes, you may have just not played towards the proper conditions for that Pokemon to succeed. Other times, you may have brought something to counter a specific Pokemon that your opponent didn’t bring)
- Did my opponent bring a Pokemon that I did not anticipate, and subsequently struggled against?
How do I think my opponent would adjust if we were playing again and I went with the exact same lead combination + back two Pokemon?
That last point in particular brings me to my next topic, which is…
Adjusting for Best of 3s
Up until now, this guide has centered more around team preview for a best-of-1 battle. Most major tournaments are actually best-of-3, so it’s important to talk about how team preview changes in a best of 3. Let’s highlight a couple of key areas:
For Game 1: In a best-of-3, you have a lot more room to take risks, meaning you can experiment with certain lead combinations & Pokemon that may not be as consistent in best-of-1. It’s totally fine to just follow the best-of-1 guide and apply it to game 1, but do note that some players like to play more aggressively with their leads to try and get into their opponent’s heads early on. Game 1 is also important as both players gain valuable knowledge of their opponent’s team and playstyle.
After each game: After each game, you’ll have much more knowledge of each other’s teams and playstyles. You’ll want to think about the following areas as you look towards picking your team for games 2 & 3:
Overall Results of the Previous Game: Did I win or lose? How did the battle go overall?
- If I won, was it a comfortable win (e.g. didn’t need to make too many predictions, rely on any good luck)? If it wasn’t, why was that the case and was my strategy actually reliable / do I have a more consistent option?
- If I lost, why led to the loss? Was I caught off guard by any surprises? Did my opponent just execute their strategy better than me, and if so, can I mix things up to prevent them from executing their strategy?
Leads: How did the lead match-up from the previous game play out? Can I lead the same thing again?
- If my lead match-up was GOOD, how can my opponent change their lead to counter me? (Sometimes, the answer is that they simply can’t, meaning you can reliably lead the same thing in subsequent games) If they have a strong lead vs. what I just brought, do I have an answer against that?
- If my lead match-up was BAD, how can I change my lead to better match up against their specific duo? Do I think my opponent will expect me to change my lead & try out something else?
Pokemon Selection: You want to think about the role that each of your Pokemon served in the previous battle & whether or not you need to bring new Pokemon into the next game.
- Were there any Pokemon on my opponent’s team that I struggled with in particular? If so, could I have brought a Pokemon that I didn’t bring in the previous battle? What happens if my opponent doesn’t bring that specific Pokemon in the next game & I’ve given up a slot to counter it?
- Did I give up an important Pokemon too early on in the battle? How can I conserve said Pokemon better?
- Were there any Pokemon that did not do very much for me? Is it because I used it poorly, or is it just not as good into the match-up as I thought? Who would be a better replacement?
Information Management: Now that I’ve seen my opponent’s team, can I use any of the information I gathered to give me a significant advantage?
- Think especially about the moves you’ve seen - if they’ve revealed their entire moveset, you can now play against that Pokemon with much more confidence
- Example: If you’re using a Palkia team and your opponent’s Zacian has revealed that it is using Behemoth Blade / Sacred Sword / Quick Attack / Protect, you now know it does not have Play Rough, meaning that it does not apply nearly as much offensive pressure into Palkia.
At the end of the day, team preview in best-of-3 is one of the most difficult parts of the game. No one is able to call things right 100% of the time. The goal here is to offer a framework so that you can see how players think about making adjustments as each game happens.
That’s it for my thoughts! Here’s how Aaron Traylor generally thinks about the team preview process.
Aaron T. Process
I think the goal during team preview is to arrive at a plan that you can execute during the battle. This plan can be as simple, complicated, rigid, or flexible as you want, but you need to be able to carry it out once the battle starts.
It’s important during team preview to know as much about your own team as possible, because when you go to make a game plan, you’ll know a lot more about how the Pokemon were designed to work together.
My main goal is to come up with a narrative: to imagine the events of the battle that might occur, to figure out what the important elements are on each team, and to think about how I can reach game states where I can win cleanly. Here is a rough sketch of how I think through the battle:
First, I think about the pressure relationships between the Pokemon on each team.
- What Pokemon of mine are most challenging for them to deal with? How can I position them to give my opponent as much trouble as possible?
- What Pokemon are most challenging to deal with for me on their team? How will they position in battle to be most challenging for me?
I then think about how that pressure will be applied throughout the game, starting with the lead Pokemon.
- What leads can I pick? I base this off of the pressure that each Pokemon applies. Can I apply pressure and act proactively in a way such that it’s challenging for my opponent to respond?
- What leads could my opponent pick? Similarly, this is based on the pressure. I imagine my opponent asking themselves the same questions that I’m asking myself, but from their point of view. Are they particularly afraid of anything on my team, or capable of using a threatening Pokemon in their lead to make the early stages of battle as hard for me as possible?
- Are any of those leads really problematic for me or my chosen lead? Why? Can I make any changes? Do I have one lead that is strong against most of the candidate leads that they could make?
It’s then time to think about the later parts of the game. It’s hard to imagine what endgames might look like in Pokemon for the most part, but if you’re able to think about them broadly, you can define some goals for yourself in battle.
- If you remove one of their Pokemon, does that remove pressure on one of yours? For example, if you remove their Fire-type Pokemon, does that mean that your Ferrothorn can win the battle on its own later in the game? Think about how you can remove that Fire-type early in the battle, then.
- What Pokemon can you absolutely not afford to lose? If you lose a Pokemon, what Pokemon on their team are freed from its pressure? If your Kyogre goes down early, then can they use their Incineroar as much as they please to sow havoc on your team? Make note of that during team preview.
The more games you play and reason through this thought process, the easier it will become. I suggest writing your thought process down during team preview of your practice games, and then reviewing it after the game is over. What did you want to happen? Why did you select the Pokemon that you did during team preview? What ended up happening? Why? What could you do better next time from the team preview stage?
Here are some more things to consider during team preview:
Ask yourself if your team has a built-in clear goal. For example, you might have two Pokemon that can be led together to achieve some combination or synergy. Examples include Politoed/Kingdra, Urshifu-Rapid-Strike/Gigantamax Coalossal, and Regigigas/Weezing. This is a potential game plan: try to execute the strategy.
- If you identify a built-in clear goal, then ask yourself: what tools does your opponent have to defend against you? A built-in clear goal is not only clear to you but often to your opponent– they probably know what your Pokemon are going to do. I ask myself: what tools does my opponent have to stop my strategy, and do I have to adjust or ditch my game plan to deal with it?
You can also ask yourself if your opponent’s team has a built-in clear goal. Do they have a lead combination that you know will exert a lot of pressure if they lead it? What would happen if they lead it? What tools do you have to deal with that combination?
- Do you open yourself up to anything else on their team by planning for one built-in clear goal that you can see? Many teams have more than one mode and will force you to choose to prepare for one of them.
Can you rule out any Pokemon on each side?
- What Pokemon do you not want to bring into their team? Maybe you have a Rillaboom on your team, but no Pokemon on their team is weak to its Grassy Glide, and they have several Pokemon that threaten to knock it out or weaken it. Reducing options on your own side can make it easier to assemble your game plan for the match.
- What Pokemon do you think they don’t want to bring versus you? If you can eliminate some of their potential options, you can get a better idea of what Pokemon they will actually bring. Be careful, though: opponents don’t always act how you think they will.
Lastly:
- Do you and your opponent have most if not all of the same Pokemon? Mirror matches can be frightening– after all, your opponent has the same tools that you do. My first step during team preview in a mirror match is to identify what the differences actually are between the teams. If you and your opponent have 5 Pokemon of the same species, how does the 1 unique Pokemon on each side affect the match? Did you add a move or item that changes how a Pokemon functions? If so, how can you use that to your advantage?
Overall Conclusion
Team preview is an incredibly important aspect of the game, but it’s just one part of the equation. As we’ve stressed throughout the article, a good team preview phase can give you an early advantage, but you still have to play well during the battle to get the win. Conversely, you can maneuver out of a bad team preview phase, but it means you’ll generally have to work harder (e.g. make more predictions/risky plays).
You should still do your best to improve your team preview skills, and we hope that this article can help you better understand how competitive players approach it!
What is a game plan?
Game plans will help guide you as you approach a battle - learn about the key concepts that go into making a good game plan.
Written by Aaron Zheng A game plan is a general approach to how you plan on winning a battle. They are helpful because they give you some sense of how you’re going to navigate the battle ahead, and what your goals and objectives are.
You will typically use a combination of the following in creating a successful game plan:
Knowing the key strengths/strategies of your team: a good starting point for creating a game plan is focusing on your team’s primary strengths/strategies and modifying them based on your opponent’s team.
Knowing the nuances of your team: Sometimes, even just a single move choice or EV spread can be specifically designed to beat a Pokemon - the more you understand the team you are using, the easier it will be to create a game plan. This is why familiarity with a team is especially important!
EXAMPLE
The rental team you are using has Jolly 164 Speed EV Incineroar, and another Pokemon has Tailwind. This combination is designed specifically so that you can outspeed and OHKO Zacian-C with Flare Blitz under Tailwind. That may not be apparent when you just look at the team on paper, but knowing this fact can make thinking through the battle a lot easier for you.
- Analyzing your opponent’s teams: game plans need to take the opposing team into account. You’ll often start with your key strengths/strategies & ask yourself how your opponent can handle these strengths.
- Identifying your key win conditions: Being able to figure out what your best path to victory is - this could be from a variety of ways (e.g. identifying the main Dynamax Pokemon you need to play around, identifying a key Pokemon on their side you need to eliminate quickly, etc.)
- Team Preview: If you can figure out what four Pokemon (and lead selection) give you the best chance of victory, you can theory out what you think the first two turns of the battle will look like before it starts.
Play around the strongest attackers/key strategies on your team
Ask yourself how your opponent can beat these Pokemon (look for how they can knock out these Pokemon quickly, especially in one attack)
- If they DON’T have a clear/viable solution, it’s often fine to just start with your strongest combos
- If they DO have a clear/viable solution, think about the odds of your opponent identifying that solution & how you can potentially counter it
Look for key weaknesses in your opponent’s team
No team is perfect - observe your opponent’s team and look at what areas they may be weak in and how your team can take advantage of that.
Examples:
- Typing: Your opponent does not have any Pokemon that resist or are immune to a certain type of attack you have on your team - this makes it more difficult for them to switch throughout a game, often reducing the amount of predictions you need to make.
- Speed: Your opponent’s Pokemon generally revolve around one Speed bracket and rely heavily on certain types of Speed control. You can look towards denying them that Speed control, or how to stall that Speed control until it runs out.
- Specific Pokemon: Your opponent struggles to deal large amounts of damage to a specific Pokemon on your team, making it harder for them to deal with that Pokemon. Pay particular attention to its positioning throughout the battle.
- Lack of Damage: Your opponent does not have too many Pokemon that are strong attackers, meaning they have to rely on a few options in order to actually pick up KOs and win games. Neutralize those threats early.
- Early Game vs. Late Game: Some teams rely heavily on dealing damage in the early game and fall off significantly after their Dynamax is over. Other teams rely on setting up early and struggle to deal damage in the early game. Try to identify how the opposing team wants to approach the game & play accordingly.
The “Pace” of the Battle
When you lead, are you going to have offensive pressure?
- If not, will you have a way to eventually get to that offensive pressure? If you only have defensive Pokemon, you’re not going to have the damage to finish the battle.
- If not, what opportunities will your opponent have to set up or take advantage of your defensive lead?
What Pokemon on their team are going to be threatened by your lead? Which are not going to be threatened by your lead?
What does the end of the battle look like in your head? What happens when Tailwind, Trick Room, or Dynamax run out? Can your Pokemon in the back close the battle out well? For example, if they don’t do very much damage, you might “run out of steam” after you lose a knockout (e.g. supportive Pokemon that have very little attack investment are less useful if they are the last Pokemon remaining). If you can get a Pokemon into a solid defensive position by removing Pokemon that threaten it, or reduce your opponent to Pokemon with weak attacks, you can close out tight endgames.
Think about how turn 1 of the battle will play out
- The first turn of a battle often sets the scene for the rest of the game, especially if one player is able to gain a major advantage via a lead advantage– a lead that’s strong into their opponent’s choice.
- Try to play out the first turn in your head against a variety of lead combinations that you expect them to go with. Do you have a “safe” play that succeeds regardless of what your opponent goes for?
- When you come up with game plans, things can go south quickly if the early game does not play out how you expect it to. Do you have ways to come back from a bad turn 1?
It’s important to point out that game plans are adaptive - you’ll often change and deviate from your main strategy as the game progresses. A key skill in VGC is being able to improvise & adapt in any given turn. However, it’s still important to think about the big picture & have some idea of what goals you want to accomplish during a game.
Pressure (Action/Reaction)
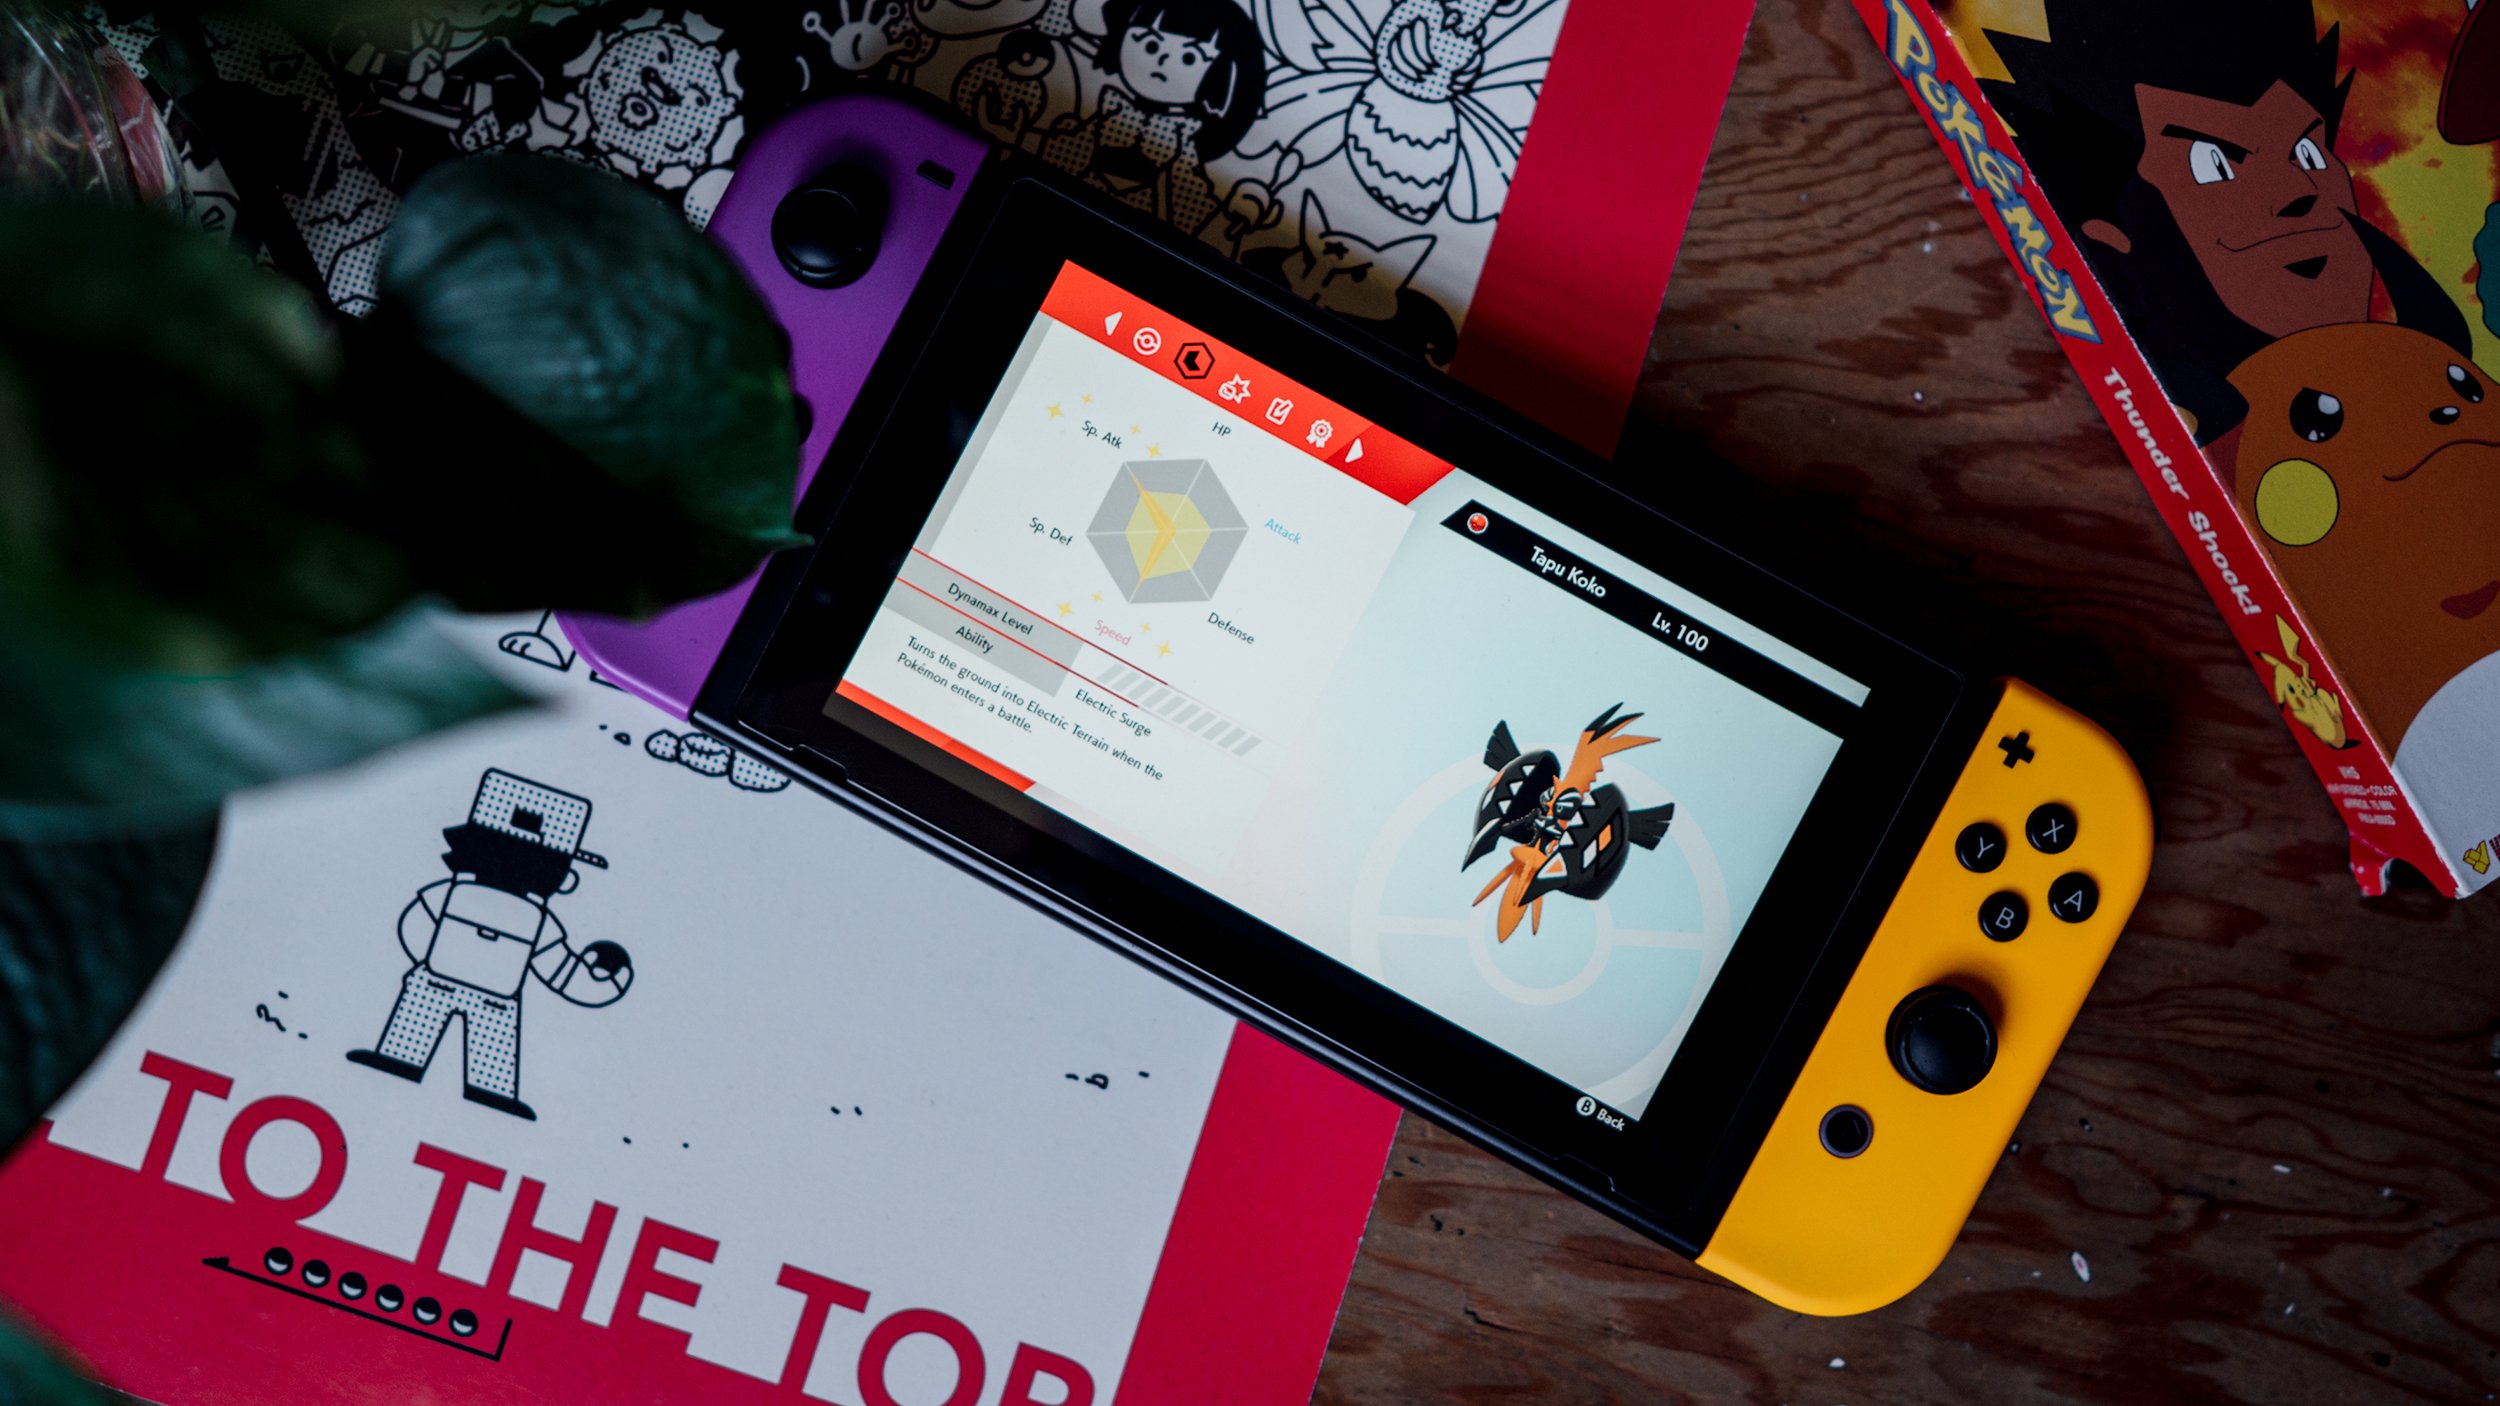
Pressure
Pokemon is not a traditional turn-based competitive game because both players input their moves at the same time. Learn about how this affects how battles unfold.
Written by Aaron Traylor Pokémon is not like other turn-based games, in which one player moves, and then the next; although you might not know for sure what your opponent will do next, you know what the state of the game will be after you finish your turn. In Pokémon battles, both players make their moves independently and simultaneously, and then watch the turn play out. Thus, very little of an upcoming Pokémon turn is set in stone, and you never know for sure what the board will look like after you both finish your moves. How, then, are you supposed to be informed when you make a move? You’ll need to figure out two things:
- Which actions will get you closest to your goal (winning the game)?
- Which actions will get your opponents closest to their goal of beating you?
Proactive actions advance the goals of a player simply and straightforwardly. This means dealing damage, taking knockouts, setting up Speed control or boosts so that future turns are easier, giving enemy Pokémon status conditions such as sleep, et cetera. There are often few if any downsides to proactive action– it only fails if you don’t achieve your goals or if there is some inherent risk (you fail to knock out a Pokémon you thought you would, a move misses, etc).
Reactive actions are always in response to the threat of a specific proactive action. If a move from your opponent threatens to set you back in a big way– you’re going to have to respond quickly, or lose the game. This can mean switching out, Protecting, or using a healing move.
Because we act at the same time as our opponent, all we can do before deciding on a move is think about which moves are being threatened. When Pikachu fights Gyarados, Pikachu threatens to knock out Gyarados with Thunderbolt. The threat of proactive action is how I define pressure; i.e., Pikachu pressures Gyarados.
In battle, understanding the pressure that Pokémon apply to each other lets you determine what your good moves are. Are your Pokémon pressuring your opponent? Do you have any proactive moves that are low-risk? Or, are your Pokémon threatened by your opponent’s, and do you have to react? Furthermore, pressure is your guide to your opponent’s thought process: what are they threatened by? What proactive moves are their safest path to victory? By doing so, you’ll figure out which moves they are most likely to make– which lets you think about the future with much more certainty.
How do I know where the pressure is?
Sometimes, the pressure relationship is intuitive– as in the Pikachu and Gyarados example. Even if you’ve never played a single competitive battle, you understand that the Gyarados is facing certain defeat, and if you’re Gyarados’s trainer, you have to do something or you’ll lose. Pokémon can either apply pressure toone enemy Pokémon (Pikachu pressures Gyarados), or to both enemy Pokémon (Venusaur is applying pressure with the threat of Sleep Powder). Here are some questions you can ask yourself:
- Which Pokémon is moving first this turn? What is it most likely to do, and how does that affect the field? Speed plays an important role in pressure.
- Which Pokémon are threatening knockouts?
- Can both enemy Pokémon work together to secure a knockout?
- Are any Pokémon threatening status moves that disable their opponent? (e.g. Sleep)
- What does the next turn look like? Think about what’s going to happen if every Pokémon accomplishes its main goal this turn– try to imagine the most likely next turn. Which player is favored in this hypothetical next turn? Then work backwards– why is that the case? If you can find that reason, you’ve found which Pokémon is applying pressure.
Other times, it may be less clear how pressure will play out in a turn. In fact, there may be many sources of pressure, and both players may have the opportunity to act proactively or reactively. In these scenarios, try your best to figure out what the most severe threats are and which actions are going to be the most likely to happen.
Next Steps: Taking Advantage of Pressure
With this framework, it’s easy to define a prediction, which is when a player wholeheartedly commits to an action purely based on the existing pressure and how they think their opponent will act or react. Making a prediction is always reactive, in some sense, because you’re focusing on your opponent’s state of mind, but the move you make can still be a proactive action. For instance, you could have multiple proactive actions available, and pick the one that is best against the course of action you think your opponent will take.
Wrapping Up
This topic is rather dense, and thanks for sticking with me: it’s not easy to cleanly talk about how Pokémon interact in battle, because they can do so in many different and complex ways. But, by doing so, we’ve put this really abstract concept down on paper, and the relationship between the active Pokémon gives us concrete insight into what our opponents are thinking about during any given turn and which actions they are most likely to consider. In Pokémon, our actions can never be fully made separate from those of our opponents; which is why the pressure relationship must be first and foremost in your mind.
What is your opponent focusing on? What threats do they notice first, and which might they overlook? The answers to these questions come with experience, as your opponents will all approach the battle differently and their decisions are rarely set in stone.
Predictions
Being able to anticipate your opponent’s attack and respond accordingly is a valuable skill in VGC. Learn about what predictions are and when you should go for them.
Written by Aaron Zheng One major skill in competitive Pokémon is the ability to “predict” what the opponent is going to do and react accordingly. An especially common mistake that newer players make is focusing too hard on trying to predict their opponent’s specific play each turn. It can feel satisfying to call out exactly what your opponent is going to do, but you have to ask yourself what you actually gain from it (as well as what you have to lose from it, if you get it wrong).
I generally divide “predicting” into two major areas:
- Your ability to anticipate every single possible combination of moves that your opponent can go for
- Your ability to anticipate a specific play that your opponent is going to go for & reacting accordingly
Both of these are major skills that you will want to focus on as you play. The first one allows you to better find the best possible play each turn, while the second one allows you to gain major advantages and claw out of bad positions.
Before we go any further, it’s important to note that everyone has different philosophies towards how they approach the game in regards to predictions. Some players are very read-focused and like to play very aggressively by trying to predict their opponent’s move each turn. Others are more conservative and aim to make as few predictions as possible. You’ll have to find a balance that works for you.
Team-building/selection is critical in Pokémon because the best teams offer you more opportunities and reduce the amount of predicting that you need to do. As a result, keep in mind that the team you use directly influences how frequently you may want or need to predict in a game.
One final note to leave you with: you won’t be able to predict everything in Pokémon, especially in best-of-1 games where surprise Pokémon, moves, items, and spreads can pay off heavily. As a result, relying only on predictions to win games in Pokémon can be dangerous.
How can you anticipate every single possible combination of moves that your opponent can go for?
In order to predict what your opponent is going to do, you’re going to have to rely on:
- Your general knowledge of the VGC metagame.
- Information your opponent has revealed to you throughout the course of the battle.
If you don’t have a strong understanding of the most common Pokémon and how they are generally trained/used, it will be difficult to accurately predict your opponent’s plays. Thus, it’s important to build up your general knowledge of the VGC metagame. You can check out the linked article for a more in-depth break down, but I’d focus on a couple of key areas:
- Who are the most common Pokémon?
- What are the 3-4 most common items on that Pokémon?
- What are the ~10 most common attacks on that Pokémon?
- How is that Pokémon typically trained, especially in regards to speed?
- What do people commonly do with this Pokémon when I play against it?
When do you go for a specific prediction (i.e. expect your opponent to make ONE play and react to that play accordingly)?
Here are some principles I have in regards to when you may want to go for a specific prediction. I’ve split it into three different categories, depending on the game state - your feeling about how the game is going.
From when you have a lead in the game:
- Getting a prediction right outright wins you the game, and getting it wrong does not immediately lose the game/throw your lead
From when the game state is neutral:
- Getting a prediction right can swing the battle significantly into your favor
From when you are behind:
- You don’t feel like you have a “safe” play that covers for all your opponent’s options - this normally comes from a bad match-up or falling behind too quickly
- You feel like you are going to lose if you don’t call out your opponent’s specific play
- You don’t think you can win if your opponent finds the “correct” play, so you look for opportunities where they may make a mistake
Protect
Using Protect in Battle
Learn about you can use Protect to gain an advantage in VGC battles.
Written by Aaron Zheng As we covered in our breakdown about Protect in teambuilding, Protect is one of the most important moves in competitive VGC. This guide will cover a couple of key things, including when to use Protect, playing around your opponent using Protect, and more.
When should I use Protect?
There are plenty of reasons as to why you may want to use Protect on a given turn. The most obvious reason is to prevent your Pokémon from getting knocked out, or taking significant damage, but there are several other ways that Protect can also help you. Here are just some examples/scenarios:
- Against a Fake Out user turn 1 of the game into a double-up
- To avoid getting hit by an attack that can KO you
- To keep a key Pokémon healthy
- To reposition safely
- Stalling out your opponent’s Dynamax
- Stalling out your opponent’s speed control (Trick Room, Tailwind)
- Stalling out field effects (Terrain, screens, weather)
- Saving one Pokémon and letting its partner deal with a current threat (or switch)
While using Protect can save your Pokémon, there are actually several potential drawbacks to using the move that you have to think about as well. When you use it, you give your opponent the opportunity to:
- Switch out their Pokémon
- Set up Speed control
- Use a stat-boosting move or strategy
- Attack more confidently into that Pokémon the following turn since the odds of you getting a double Protect are very low
- Double target your other Pokémon
Thus, a key skill in VGC is identifying when you NEED to Protect and when it’s unnecessary to Protect. Here’s a list of questions I ask myself when I’m deciding whether or not to use Protect:
Is my Pokémon at risk of getting KOed this turn by my opponent? Is it at risk of being made “useless” (e.g. a physical attacker getting burnt or a Pokémon getting put to sleep”?
- If so, can I actually gain an advantage by Protecting? What will I do to make sure this threat does not exist next turn?
What is my other Pokémon going to do during this turn?
- Can it deal with the current threat that I am Protecting against, and if not, do I have something to switch into?
Does my opponent have anything on their side of the field that I need to stall out? Is it absolutely necessary for me to stall it out?
- Common examples: Dual Screens, weather, Trick Room, Tailwind
Does my opponent have any way to take advantage of me Protecting?
- Common examples: set-up (Swords Dance, Dragon Dance, Substitute), recovery, switching out for free, attacking into the partner Pokemon, setting up speed control
Did I use Protect on the previous turn?
- If so, you’ll want to be very careful about using it again - the odds of consecutive Protects are only ⅓. If you fail to get the Protect off, then your Pokémon will be completely useless for the turn.
If my Protect plan works, what does the next turn look like?
As you use Protect, you’ll also want to think about the long-term consequences and the future rather than just the immediate turn. If your Pokémon is still at risk of getting knocked out the subsequent turn, Protect may not actually help with the root cause.
In this example, you can see how Protect was not very effective in actually advancing the board state:
EXAMPLE
Protect Extravaganza
Author: Wolfe
In the finals of the 2015 Massachusetts Regionals, I played against Ashton Cox. In game 2 Ashton finds his Terrakion and Landorus trapped in against my Scrafty and Gothitelle. Ashton goes for a double Protect and gets it, and then goes for a triple Protect and gets that too. After Trick Room goes back up, he gets another double Protect successfully, and then fails his second triple Protect attempt. Despite getting “lucky”, because his Choice Scarf Landorus is locked into Rock Slide and isn’t doing any damage, Ashton isn’t advancing his position at all. In this game, it might have been better for Ashton to let his Terrakion get knocked out to allow for a switch into something that had a bit more offensive pressure.
Link to start of set here.
Link to game 2 here.
In this example, you can see how Protect is useful in stalling out field effects:
EXAMPLE
Stalling out Electric Terrain
Author: Aaron Traylor
In this set played at the North American International Championships, Diana Bros stalls out her own Electric Terrain so that she can set it again later in the game, allowing her Stakataka to attack without fear of being put to sleep by Amoonguss’ Spore.
Link to beginning of set here.
Link to beginning of game here.
Link to Protect here.
Link to set analysis here.
How do I play around my opponent using Protect?
In addition to knowing how to properly use Protect, it’s also important to understand how to play around your opponent using Protect.
The first thing that I’d recommend learning is figuring out which Pokémon are more likely to Protect, and which Pokémon are less likely to carry it. (Reference articles: Wolfe’s Protect guide, Building Up a Knowledge Base to Predict Your Opponent’s Plays). For example, in Series 12 VGC, only 5% of Incineroar run Protect, while 97% of Zacian run Protect.
It’s important to learn this because it allows you to take advantage of those Pokémon that don’t frequently run Protect. Some common examples in Series 11 include the aforementioned Incineroar as well as Grimmsnarl, Thundurus, and Porygon 2. Thus, when you’re fighting against these Pokémon, you can generally launch attacks into them more confidently.
One key mistake I often see beginners make is making hard predictions on when their opponent is going to Protect. Sometimes, players are extra confident that a Pokémon will Protect so they ignore it, just for that Pokémon to not actually use Protect and instead use an attack. Thus, you have to always consider the risk/reward of your opponent not using Protect when they seemingly should/have to.
This leads me to the concept of “forcing” your opponent to Protect. Making your opponent use Protect will generally make their next turn substantially more difficult as they cannot use it again with much confidence. As a result, it can actually be useful to attack into something you think that is Protecting: if they don’t Protect, you can just get a large amount of damage off/KO them, and if they do Protect, you can pressure that slot a lot more the subsequent turn.
When do I go for consecutive Protects?
The odds of you getting back-to-back Protects with a Pokémon is ⅓ - that means that ⅔ of the time, your move will fail completely. This not only leaves your Pokémon completely vulnerable for the turn, but it also denies it the option of going for any other attack. As a result, it’s extremely risky to attempt consecutive Protects, and it should generally be seen as a last resort option.
However, in the right situation, going for consecutive Protects can be game-defining if you get it off. Here are some examples of when you may want to consider it:
- You need to stall out speed control (e.g. Tailwind, Trick Room) & you do not have reliable switch options anymore
- You need to save one Pokémon that can win you the game, and the only way to save it is the KO an opposing threat
- You have no better play to make with the Pokémon and don’t want a free switch-in to a Pokémon in the back
Generally, a good principle is to only attempt consecutive Protects when you have absolutely no other options and will lose otherwise.
EXAMPLE
Double Protecting when absolutely necessary
Author: Aaron Traylor
In this set played at the North American International Championships, Paul Chua’s double Protect took center stage. He was in a tough spot facing down an Encore Whimsicott and was able to find a path to victory.
Link to beginning of set here.
Link to beginning of game here.
Link to double Protect here.
Link to set analysis here.
EXAMPLE
Double Protecting… on accident?
Author: Aaron Traylor
Sometimes in the heat of a tournament you can forget that you used Protect on the turn prior, and inadvertently double Protect. This happened to me in Top 4 of a Regional, where I accidentally double Protected with my Bisharp– and Earthquaked with my Landorus! Luckily for me, the double Protect went off, and I got into a great position because of it– but that game could have been over instantly if it had gone the other way.
Link to beginning of set here.
Link to beginning of game here.
Link to beginning of double Protect here.
Conclusion
Protect is one of the most important moves in competitive VGC, so it’s important to understand how to use it properly and how to play against it. Here are some main takeaways from the article:
- Protect can be useful for a wide variety of reasons - in addition to preventing your Pokémon from taking any damage, you also can use it to avoid Fake Out, stall out field conditions, etc.
- There are drawbacks to using Protect as well - one of the most important factors to consider is what you are going to do on the subsequent turn after you use Protect, since the odds of going for a consecutive Protect is only ⅓.
- Going for consecutive Protects is incredibly risky - you generally want to avoid it unless you feel like you truly have no better options.
- It’s helpful to have a general idea of what Pokémon will frequently carry Protect (e.g. Zacian) and what Pokémon will rarely carry it (e.g. Grimmsnarl, Incineroar)
- It can be worth it to attack into a seemingly obvious Protect to 1) deny that Pokémon from doing anything for a turn 2) make the subsequent turn harder for them since they don’t have a safe Protect to go for
Switching
Learn about why you may want to consider switching a Pokemon out & risks associated with switching.
Written by Aaron Zheng When you’re playing through the Pokemon video games, switching isn’t a focus of battles in the story– attacking is a much more direct path to victory. In competitive Pokemon, however, switching your Pokemon in at the right time can turn the battle on its head– and your opponent switching in their Pokemon when you least expect it can be devastating.
Why would you want to make a switch?
Survive an attack
If an opposing Pokemon threatens a powerful attack on one of your Pokemon, you’re going to have to Protect, switch it out, or risk being knocked out. The urge to switch happens instinctually for many players in this situation.
Improve next turn’s positioning
Think about how this turn is going to go, and what the situation next turn will look like. Then, think about if you can afford to switch a Pokemon in for some effect next turn.
Make the most of field conditions
Certain field conditions only last for a set amount of turns (e.g. Trick Room, Tailwind, weather, terrain), and if your active Pokemon don’t make full use of those conditions, they may be gone before you reap their benefits. You can switch in a Pokemon with high damage output that will take advantage of the condition while it lasts.
Save a Pokemon for later
If one Pokemon is crucial to your plan for defeating your opponent, you can switch it out to preserve it for as long as possible. Then, once your opponent’s resources for defeating it are weakened, you can use that crucial Pokemon to close out the battle.
What are the risks of switching?
Some switches happen in the moment, as you instinctively rush to save a Pokemon from an attack. However, for the most part, switching is about setting up for success on a future turn. Because switching requires foresight, you’ll need to be extra careful to think twice before you switch, and cautiously consider what will happen this turn and next turn.
Your opponent could do something that you don’t expect
In most cases, a player will switch because they expect their opponent to make a particular move or play in a particular way. However, opponents don’t always move in the way that you think they will. Before switching, consider what the risks of your switch are, and what the worst case action from your opponent will be– and then think about whether your opponent will actually make that move.
“This reasoning doesn’t have to take the form of “making a prediction” per se. If you think about the future at all, you have to reason about your opponent’s actions to some extent– and your reasoning might be right or wrong.”
— Aaron Traylor
Switch-in could take too much damage
Switching in is ultimately a risky move, and the Pokemon that switches in is entirely defenseless. Some of the time, you’ll switch in a Pokemon and it’ll take too much damage from
Furthermore, pay attention to your team’s total health when you focus on switching. Switching doesn’t do damage– that means that compared to attacking, switching doesn’t immediately advance you towards knocking out all 4 of your opponent’s Pokemon. There may be big payoffs in the future if you can switch into an advantageous position, but if you spend too much time switching, you might take too much damage to be able to make use of the positioning you get.
Finally, switching into an attack can mean your switch-in Pokemon will be the victim of that attack’s undesirable secondary effects– a crit, a burn, or even a freeze. This event is importantly linked to the fact that you get luckier when you have more chances to attack.
Switch-in doesn’t improve your next turn
Your switch-in Pokemon has to be useful to some extent against your opponent’s Pokemon and their attacks. If you switch out a Pokemon to save it, great– but if you’ve switched in a Pokemon that is just as weak in this situation, you may have actually harmed your position by giving your opponent an opportunity to attack without recompense.
Wrapping Up
To make a switch successfully, you have to consider your opponent’s Pokemon’s capabilities, and think about how the next turn will end up in the best case– or in the worst case. At the end of the day, the success of a switch usually depends on your opponent’s actions, so there’s no guarantee even the most well-thought-out switches will end up well. In fact, even the most expert competitive Pokemon battlers make switches that end up poorly for them. However, switching is a fundamental skill of Pokemon, and thinking about switches lets you make more complex plays that get you closer to victory.
Battling Against Trick Room
Trick Room is one of the most common strategies in VGC. Learn how to fight against it.
Written by Wolfe Glick When facing a Trick Room setter, you should ask yourself two questions.
Can I stop Trick Room from going up?
How bad for me is it if Trick Room goes up?
If you don’t explicitly want Trick Room up, it can be good to KO the setter, but there are many instances where that isn’t possible. So, if you can’t stop Trick Room from going up, what do you do?
The Basics
Your goal is to minimize the amount of turns where your opponent can actually benefit from Trick Room. Trick Room only lasts for five turns (effectively four because the setting turn counts). The most straightforward way to stall Trick Room is to make use of Protect. Trick Room only provides four turns to attack, so in the most simple case you can waste half of those by Protecting both your Pokémon every other turn. Although double Protecting frequently is exploitable (setup moves, switching, etc), it’s a good starting place.
Other methods of wasting your opponent’s time during Trick Room are making smart switches (switching Pokémon in defensively when you expect a move of a certain type), status moves, or finding opportunities to use Fake Out. The most effective way, however, is to pay attention to positioning.
Positioning Against Trick Room
Teams that want Trick Room up will frequently avoid leading with their Trick Room sweeper, as they either don’t want it to get focused with attacks immediately or they need some support for their setter. For that reason, a typical lead is Trick Room setter + Trick Room support. Let’s use the example of a bulky Trick Room setter like Dusclops, and a support Pokémon like Indeedee-Female. Many players will KO the Indeedee turn 1 as it uses Follow Me, Dusclops will set Trick Room, and now the Trick Room sweeper comes in and has four turns to exert pressure. But what happens if you DON’T knock out that Indeedee turn 1?
Well, now it’s turn 2 and your opponent has a choice. Stay in with Indeedee and hope it gets KO’d, which is susceptible to a defensive play (like Protecting both Pokémon, switching, or setting up). This would mean your opponent only has 3 turns left of Trick Room which gives at most two for the sweeper to make use of. Their other option is to switch Indeedee out into the sweeper to make use of the remaining 3 turns, which is susceptible to the sweeper taking damage or even being knocked out as it comes in. Compare this choice to what happens if you knock out Indeedee turn 1- your opponent doesn’t have to make a difficult choice and instead can exert pressure immediately.
Pokémon is in many ways a game about making your opponent make difficult decisions.
This is an example of a situation where taking a KO is bad for you in the long run. If your opponent has led two defensive Pokémon, leaving them on the field to waste turns is extremely valuable when you want to stall out a field effect.
What Happens When Trick Room Ends?
You want to be thinking ahead to the turn when Trick Room ends. Just because you stalled out Trick Room doesn’t mean you’ll win automatically. Identify what conditions have to be met in order to prevent a second Trick Room from being set up, and further consider which Pokémon you need to have in order to win the game once Trick Room expires. This isn’t an easy skill but it’s invaluable especially when playing against Trick Room.
I’ll also throw a little note in here that Trick Room is the biggest reason why Hyper Offense (teams that focus entirely on their offensive capabilities and synergies and have little to no defensive capabilities) don’t often perform well. It’s very difficult to use smart defensive positioning without the proper defensive tools.
Wrapping Up
Playing against Trick Room can be challenging (and, at times, frustrating), but it will only get easier the more experience you have fighting in those twisted dimensions.
1 HP is Infinitely More than 0 HP
Even when a Pokemon has just 1 HP, it can still have an impact on the battle. Learn about when you should conserve a low health Pokemon.
Written by Wolfe Glick If you’ve played through a Pokemon game, you’re probably familiar with the HP bar. It starts off green, changes to yellow when the Pokemon loses 50% of its maximum HP value, and changes to red once the remaining HP hits 25% of capacity. In a playthrough, a Pokemon hitting that red zone is bad news - in large part because the music becomes more stressful, though also because it means your Pokemon is probably about to get knocked out. Just like how someone playing through the game might want to save their beloved Pokemon from being knocked out, in competitive Pokemon you might want to preserve one of your Pokemon even when their health is low.
All of your Pokemon will function in exactly the same way no matter how much health they have left - a Pokemon at low HP won’t do less damage than if it was fully healthy. Even with only 1 Hit Point remaining, Pokemon can sometimes be impactful on the battle. The goal of this article is to get you thinking about when a Pokemon is worth saving for later, and when they’ve earned a rest until your next match.
When to preserve a low HP Pokemon
Sometimes the correct move is to switch out one of your Pokemon that has taken damage in order to preserve them for later in the battle. While there’s no hard and fast rule for knowing when to do this, there are a few things to consider.
Will You Be Able to Bring It in Later?
There isn’t much point in saving one of your Pokemon now if you won’t be able to get it in safely later. Some ways of bringing Pokemon in without them taking damage include:
- After another one of your Pokemon gets KOed
- Moves such as Volt Switch, U-Turn, and Parting Shot used after the opponent has attacked
- Switching into a move that does little to no damage (think about moves your Pokemon might be immune to, like if it’s a Flying-type or Ghost-type)
- Switching a Pokemon in while its partner KOs the relevant opposing Pokemon
- Switching a Pokemon in by making a prediction (risky)
If you don’t think you’ll have an opportunity to bring the Pokemon in later, it might be better to let it go down now rather than risk damage on your other team members.
Will the Pokemon be able to have an impact later?
If you’ve decided you’ll be able to bring your Pokemon in safely later, great! The next thing to assess is if the Pokemon will be able to impact the battle in a meaningful way once it has safely re-entered the field. Here are some things to consider:
Will your Pokemon be able to move before your opponent’s Pokemon?
- Most Pokemon need to be able to attack in order to have an impact on the battle. For an attack to have value, it needs to actually be used, and a Pokemon that faints before using an attack won’t get value out of their attack.
- This isn’t always about the Speed stat - many impactful moves have increased priority. These can be both offensive moves (Grassy Glide, Aqua Jet) or support moves (Fake Out, Follow Me).
- Sometimes the reason your Pokemon is currently being outsped is because of some form of Speed control that your opponent has, like Tailwind or Trick Room. If you can outlast these effects, your currently vulnerable Pokemon may have more value.
- Your opponent may have one Pokemon in particular that is faster than your low HP Pokemon - if you focus on removing it, you might give your low HP Pokemon more breathing room.
Does your Pokemon have an ability that will be useful later?
- Some abilities activate when switching in, and can be useful even if the Pokemon fails to attack. Notable examples include Intimidate and abilities that change the weather or the terrain.
Even if your Pokemon doesn’t meet the above criteria, there may still be value in saving it as a sacrifice later in the game. Sacrificial Pokemon provide value to their teammates in a few ways typically.
- Allowing a teammate to reactivate an ability on switch in
- Letting a teammate switch in at the end of the turn safely
- Allowing a teammate to reset stat drops or other negative effects safely
- Stalling out an opponent’s field condition like Trick Room or Tailwind
How much value a Pokemon can provide later depends largely on the context of the battle. In addition to the value, it’s important to consider the cost of switching out a Pokemon. It can be risky to switch, and if the turn doesn’t go in the way you anticipate you may end up in a worse position than if you’d simply sacrificed your Pokemon. When considering saving your Pokemon, try and assess whether the value you might get is worth whatever risks you have to take.
How to analyze a battle
For players who want to improve their play & learn from their battles.
Written by Aaron Zheng One of the best ways to improve in VGC is to analyze your own battles. There can be a lot to break down in just one game, so I want to highlight some of the key areas I focus on when reviewing my matches.
Lead Match Up
After seeing my opponent’s leads, I always like to ask myself what combination of Pokémon on my team can deal with their lead the best. If it’s not the lead I selected, I ask myself why I chose this specific lead.
Your Pokémon Selection
It’s helpful to reflect on each Pokémon you selected (leads and back) and ask how much they contributed to the battle. In the same vein, it’s also helpful to reflect on the two Pokémon you did NOT bring into the battle and ask if they could have replaced any of the four you brought.
EXAMPLE
I got swept by my opponent’s Rotom-W. The best counter I have to that is Venusaur, which I did not bring in this match. Why did I not bring Venusaur into the battle?
Any turn that involves luck/RNG
Luck is undoubtedly an element of Pokémon, but the best players are able to mitigate it and reduce its impact on a match. It’s helpful to look at any turn that involves any luck/RNG & ask yourself how that turn would have played out if you remove that luck/RNG. [It’s also very important to think more about the BIG picture - not just that specific turn, but all the turns leading up to it as well]
EXAMPLE
If you missed a crucial attack and lost the game as a result, ask yourself if you could have used more accurate attacks to secure a victory.
“ This should normally be your absolute last answer for why a turn went wrong. In Pokémon, luck is a skill, so getting bad luck normally means you made a mistake in teambuilding or playing”
— Wolfe
Damage Calculations
In a battle, you’ll generally estimate a ton of different damage calculations throughout the match. I like to look back and ask myself 1) how accurate my “internal” calculations were 2) if there were any moves I potentially missed out on because I was unsure how much damage they would do.
General Feeling
Throughout a battle, I find that I generally feel good, neutral, or bad as each turn starts. I like to pay attention to when my feelings shift (e.g. neutral -> bad, good -> bad) & identify the cause of that.
Turn-by-turn analysis
I like to walk through each individual turn and ask myself:
Did I make the best possible play, regardless of what my opponent could go for? If not, did I miss the best possible play? Why was I not able to recognize it at the moment?
Did I anticipate my opponent’s move as an option? (Often, when the answer to this question is NO, it leads to big swings/surprises)
If I knew my opponent was going to go for their specific play this turn, would I go for the same play I initially went for?
Was my play this turn unnecessarily risky? Even if it worked out, was there a way my opponent could have punished me that they missed?
MOST IMPORTANT TURN - it’s more productive if you can find the most important turns (e.g. for me, these are turns that change my general feeling significantly / turns that feel like they essentially decide the game) & analyze those to the best of your ability
Sometimes, it’s just a match-up/team issue
There will be times where you feel helpless, even after evaluating all the above options. The team you select & how it matches up against your opponent’s is a big element to this game, which is why team-building is so important. It’s important to identify when you are at a significant disadvantage because of the team/match-up.
How do you identify that it’s a match-up/team issue?
- You constantly feel the need to make predictions and make risky plays
- You can’t handle a specific Pokémon or group of Pokémon on your opponent’s team well (e.g. you have very little to hit your opponent’s strongest options)
- Your strongest Pokémon simply just don’t do enough damage (this often is tied to a Pokémon requiring too much effort to get going - e.g. it needs a turn to set-up, it needs a partner to enable it. Other issues include: the Pokémon has bad typing, it relies too heavily on one-two attacks
- You cannot figure out a neutral/strong lead option against the lead that your opponent brought
- You generally feel overwhelmed - even though you feel like you are playing well, you still cannot win games
I will always try to analyze my battles as much as possible before concluding it’s a match-up/team issue.
Conclusion
As you can probably tell, there are a ton of different factors you can review after a battle. If I had to highlight the order in which I personally review games in, I’d go in the following order:
- The turn that decided the match (this doesn’t necessarily have to be the final turn - it’s the turn that I generally define as one player gaining an insurmountable lead over the other)
- Other specific turns where I felt like I did not make the best possible play / did not properly anticipate my opponent’s play
- Overall Pokémon selection (could one of the two Pokémon I did not bring contribute more)
- Lead match-up (if I knew my opponent was going to lead with their lead, do I have a better lead combination to deal with it? Was it possible to anticipate my opponent’s specific lead?
- Overall match-up analysis
There’s no right or wrong way to analyze games, but in my opinion, it’s good to thoroughly assess every part of the game, which is why I find it useful to break it down into a couple of key areas. Battles are deeply complex, and you can do a ton of reflection on even a singular turn.
I’d also like to remind you to not focus as much on results-based analysis - just because a play didn’t work out doesn’t necessarily make it incorrect (and vice versa: just because a play DID work out doesn’t necessarily make it good). If you focus too much solely on results, you’ll often miss ways to improve in the victories that you have.
Overall, I think that being able to objectively analyze your games and highlight both your good and bad plays is a key skill in developing as a player! No one likes losing, but the great thing about losses is that you can learn so much from them. If you’re able to take your learnings and apply them to future games, you will surely increase your chance of success.
Part 14 — Annotated Matches (VGCGuide)
Will Tansley vs. Nils Dunlop, Worlds 2017
Tansley vs. Dunlop, Worlds 2017
Watch two titans of VGC 2017 battle it out in a high-stakes Snorlax positioning match.
Written by Aaron Traylor This set features:
- Switching
- Best of 3 adjustments
- Double targeting
- Pressure
- Setup
- Surprise Factor
This game is a late Worlds Swiss round between Will Tansley (GB) and Nils Dunlop (SE), two titans of the VGC 2017 season. VGC 2017 was marked by slow-paced games featuring heavy amounts of switching, in part due to the “50% berries” (Figy, Iapapa, Wiki, Aguav, and Mago Berry), which restored a large amount of health and could be held by multiple Pokemon per team. This set, conversely, plays at a breakneck pace: Nils sets up his Snorlax with Belly Drum and it’s up to Will to figure out how to stop it from running through his whole team.
VGC 2017 specific information
- Only Pokemon native to the Alola Pokedex were allowed (Sun and Moon)
- Pokemon could Z-move (more details on what these were)
- Check out the usage statistics here to see what Pokemon and moves were popular.
- Figy, Iapapa, Wiki, Aguav, and Mago Berry restore 50% of a user’s lost HP instead of 33% when the user reaches 25% of its max health (50% with Gluttony)
Game Analysis
Game 1
Team Preview
Both teams are fairly standard (at first glance) for the VGC 2017 era, and they both have many options available to them. Nothing really leaps out to me by just looking at Team Preview as to how one player could gain an advantage over another.
Turn 1, Game 1 (2:00)
The Snorlax mirror match is more dangerous than it looks at first glance – in VGC 2017, Snorlax could run either a Curse set (win condition over a long period of time) or a Belly Drum set (win condition over a shorter period of time). If one or both players’ Snorlax have Belly Drum, the situation could get dangerous fast, which is the risk that each player is considering at that moment.
(Note that because Nils’ Persian is faster than Will’s Togedemaru, its Fake Out will go first, so it can flinch Snorlax or Togedemaru. Togedemaru is forced to Fake Out Snorlax, because if Persian uses Fake Out on Snorlax, and Togedemaru uses Fake Out on Persian, Nils’ Snorlax gets a free move.)
Turn 2, Game 1 (3:10)
The situation has become much more precarious for Will, because Nils’ Snorlax is now ready to attack after Belly Drum– and worse, it’s assuredly faster after Will’s Snorlax’s Curse. Nils’ Snorlax is now threatening massive amounts of damage on both of Will’s Pokemon, and Will must respond to the pressure.
Both players learn that Will’s Snorlax survives a +6 Return after one Curse. That is incredibly important information that both players will make use of throughout the set.
Turn 3, Game 1 (4:55)
Both players make relatively safe plays here.
- Will realizes that if Snorlax targets Togedemaru, it won’t survive the +6 Return. However, he realizes that Celesteela can survive that attack (worst-case scenario):
+6 252+ Atk Snorlax Return vs. 252 HP / 4 Def Celesteela: 165-194 (80.8 - 95%) – guaranteed 2HKO
And thus the switch to Celesteela is relatively free. It also covers High Horsepower in case Nils’ Snorlax runs that set. - Nils realizes that Togedemaru can easily pick off his own Snorlax, so he Protects it. If Foul Play 2HKOs Togedemaru, Nils could pick up both Pokemon on the following turn.
Turn 4, Game 1 (6:10)
Trading Snorlax is the best case scenario for both players.
Turn 5, Game 1 (7:04)
At this point Nils has run out of resources to deal with Will’s Tapu Fini and the game ends quickly and without event. Note that Will’s last Pokemon is not revealed, so Nils has less information about Will’s gameplan to work with for future games.
Game 2
Game 2 Team Preview
It’s become clear to both players how central Snorlax is to the battle on each side.
- Will’s Snorlax after Curse survives a +6 Return from Nils’ Snorlax
- Will’s Celesteela survives a +6 Return from Nils’ Snorlax
Each player has to choose their Pokemon for Game 2. They have the option to make adjustments to their strategy based on Game 1. When you pick your Pokemon for Game 2 or 3 of a set, you can do one of several things:
- Change your strategy entirely to challenge your opponent in a new way
- Keep the same strategy, but change your moves slightly on a crucial turn
- If you won Game 1 or 2 soundly, or your opponent got extremely lucky to beat you, you can keep the same strategy and same moves and force your opponent to react to it or lose
The players keep the same leads. This can be interpreted from Will as “I liked how Game 1 went and it’s up to Nils to change things up”, and from Nils as “I can see how a slight deviation in how Game 1 went could turn the game in my favor.” (Especially given the crit on Turn 2 Game 1!)
Turn 1, Game 2 (12:20)
A repeat of leads and moves means that Nils is going to try to change things up to turn the tide in his favor very shortly.
Turn 2, Game 2 (13:34)
And here we see the crux of Nils’ plan: by chipping Will’s Snorlax with Foul Play, Will’s Snorlax is now in range to get knocked out by Nils’ Snorlax’s +6 Return. Even worse for Will is that he’s now blown the surprise of Encore on his Togedemaru. However, Nils may have been playing around this Encore as early as Turn 2, Game 1!
Note that even if Will knew that this was coming, he would still be nearly powerless to stop it. He would have to switch in a Pokemon that could deal with Snorlax, and Persian is still in a commanding position. Furthermore, Nils’ Snorlax could have just as easily attacked either of Will’s Pokemon. Will has absolutely no pressure on the board.
Turn 3, Game 2 (14:20)
A last-ditch switch from Will in an attempt to survive in this game for a little longer. Note that this turn plays out very predictably for Nils– he doesn’t have to do anything crazy to be in a commanding position here.
Turn 4, Game 2 (15:17)
Will is trying desperately to save a lost game but Nils doesn’t have to overthink anything and can just attack.
Turn 5-on, Game 2 (16:16-21:00)
The rest of the game finishes without any error on Nils’ part and, while Will gets some of the luck he is fishing for (Muddy Water accuracy drops, critical hits), he’s still too far behind to bring it back. He does get to see that Nils’ last Pokemon has changed as a result of the luck, which is useful information.
Game 3
Game 3 Team Preview
Now that Nils has found a much more successful move on Turn 2, which Will has little way around, Will must adjusthis game plan for Game 3. Will could continue down the same path as before, leading Togedemaru and Snorlax, but Turn 2 Game 2 was so decisive that he’s unlikely to consider that. What can Will do? He can either try to disrupt Snorlax with supportive moves (like Togedemaru’s Encore) or threaten it with high amounts of damage.
On the other hand, Nils is in a very solid position. He found a move that his opponent has very few solid options against. Furthermore, Persian outspeeds all of Will’s Pokemon. This means that if Nils’ Snorlax gets a Belly Drum up, any threat to knock it out in one hit or to disable it can be stopped with a Quash and +6 Return. With smart double targeting he has very little to worry about given what he’s seen on Will’s team so far.
At this point, Nils could switch up his game plan entirely if he thought he knew what Will was going to try and do to beat Snorlax. However, it’s not exactly clear how Will intends to do that. For example, if Will had a strong Fighting-type Pokemon that could knock out Snorlax in one shot (e.g. Pheromosa) he would probably lead it in Game 3, and Nils would maybe have to plan around that. But Will doesn’t, and Nils probably doesn’t know everything about Will’s team, so it’s much less obvious how Will can change things up. Better to stick to what works so far.
Leads, Game 3 (23:41)
Nils has kept the same lead and Will has changed entirely to Garchomp and Celesteela. In VGC 2017, Garchomp often held Groundium Z for a powerful single-target Z-move. If I were Nils, this would send a plain and simple message: Will intends to Groundium Z the Snorlax to prevent it from setting up Belly Drum. Celesteela can run interference in the meantime with Leech Seed and Heavy Slam, and it generally cares less about Snorlax anyway.
Turn 1, Game 3 (24:14)
Now on this turn Will double switches! Double switching is a risky maneuver because you deal no damage and could take lots of damage. In this case, Will lets a Belly Drum happen for free.
But he has to have some motivation for doing so. Notice that the double switch gives Togedemaru Fake Out pressure on Persian.
From Nils’ perspective, it’s clear that Tapu Fini is about to Haze the boosts of Snorlax away. Tapu Fini wouldn’t have switched in for offensive purposes: Snorlax has huge Special Defense (maybe to knock out Persian, but it could just Parting Shot away). The only reason that Will would make a double switch is to Haze, thinking quickly through Tapu Fini’s moveset. The surprise factor of Haze is thus blown by the knowledge that Nils has about the situation.
Turn 2, Game 3 (25:33)
Will gets the Haze off, but thanks to the Foul Play from Persian, he’s actually not in a great position. Persian threatens a knockout on Togedemaru and Will still can’t really stop Snorlax from doing what it wants, even though Belly Drum’s boosts are gone. Worse, he has no real path to clearing Persian. Togedemaru is forced to switch or Spiky Shield, meaning that Nils has the option to take some initiative: he can either go for the knockout on Togedemaru or Parting Shot off of Tapu Fini for relatively little downside.
Turn 3, Game 3 (26:25)
Will double switches again. Typically double switching too often is a sign that you’re really in trouble, because you’re not doing any damage.
At this point, Nils has both an HP advantage (Togedemaru is low) and a positional advantage (Garchomp is at -2 attack, and Snorlax just recycled its berry). Will is definitely on a back foot.
Turn 4, Game 3 (27:53)
Will cannot prevent the Belly Drum from happening once more, and Swords Dances and switches to Togedemaru in an attempt to Fake Out + Z-Move (Tectonic Rage, Ground-type) into Snorlax.
There are several reasons why the Arcanine could have switched out into Persian:
- Chiefly, if Nils had chosen to Flare Blitz into Celesteela with Arcanine, either Celesteela or Togedemaru likely would have been knocked out– but then Will could just switch in Tapu Fini and Haze while Garchomp deals massive amounts of damage.
- If Celesteela Protects while Garchomp Swords Dances, both Arcanine and Snorlax face a good deal of damage.
- Trying to get Fake Out pressure for the turn after Belly Drum
- Dodging Earthquake + Flying combo (but Garchomp is at -2 Attack)
In any case, it is a very nice play that shows a lot of foresight.
Turn 5, Game 3 (29:05)
Nils once again makes a play that has zero risks.
- Snorlax is always going to be safe from the double target (Fake Out + Tectonic Rage)
- Even if Will makes a prediction and targets Nils’ Persian with Fake Out and Tectonic Rage, thanks to the Fur Coat ability it will survive easily
- Persian’s Foul Play will always pressure both Garchomp and Togedemaru. Garchomp cannot Swords Dance again or risk a potential knockout
After this point Will is unable to reenter the game.
Wrap-Up
Nils used his Persian and Snorlax to their fullest effect and was able to create several zero-risk situations for himself throughout the course of the battle. Will is and was a very talented battler: however, his team did not have the tools to deal with Nils’ Pokemon when used in that way. It’s hard to say exactly what Will could have done better in this set: it’s challenging to play a very skilled player who has a team advantage on you and isn’t making any mistakes mid-battle.
Quash and Belly Drum are risky moves to select in the broader case (in metagames outside of VGC 2017). Indeed, after VGC 2018 both Alolan Persian and Snorlax were much less powerful. However, there are plenty of lessons to be learned from Nils’ play.
- After Game 1 of a best of 3: are there any slight variations to how the game just went that can turn it on its head? (Turn 2, Game 2)
- How can you limit your opponent’s options as much as possible, so that even if they predict, they aren’t able to break through your strategy?
- If you’re going to use setup moves with your Pokemon– what are the risks? What is the payoff if things go your way?
There are plenty of things to notice from Will’s play as well.
- If you find yourself double switching frequently– that’s a good sign that either you’re focusing too much on positioning, or your team is in trouble no matter what you do. Obviously, you can’t change your team during the World Championships. But if you’re testing on the ladder or in practice matches and you find yourself double switching too often, consider changing your team up, or focusing more on dealing damage.
- Sometimes you can come up with a counter to your opponent’s plan (See Turns 1 and 2 of Game 3). But notice that even though the game played out exactly as Will planned, he was still at a major disadvantage. This isn’t easy to do, but if you can manage to think out the consequences of the plans you make mid-battle, you’ll be more informed.
Paul Chua vs. Diana Bros, North American Internationals 2019
Watch how tiny differences in similar battles can have a big effect.
Written by Aaron Traylor This set features:
- Momentum
- Protect and Double Protect
- Surprise factor
- Prediction
This is an early Swiss round at the North American International Championships between two strong American players. VGC 2019 Ultra Series was a year featuring restricted Pokemon, and games in that format were fast-paced and left little room for error.
VGC 2019 Ultra Series specific information
- Held on Pokemon Ultra Sun / Ultra Moon
- “GS Cup” format: two restricted Pokemon are allowed per team.
- Pokemon could Z-move (more details on what these were)
- Pokemon could Mega Evolve (more details on what this is)
- Primal Groudon and Primal Kyogre exist (more details on what these and their weather are)
- Figy, Iapapa, Wiki, Aguav, and Mago Berry restore 50% of a user’s lost HP instead of 33% when the user reaches 25% of its max health (50% with Gluttony)
- Check out the usage statistics here to see what Pokemon and moves were popular.
Game Analysis
Game 1
Team Preview
These teams feature a classic matchup in VGC 2016 and 2019: Xerneas / Primal Groudon versus Rayquaza / Primal Kyogre. Xerneas and Primal Groudon are paired together because they are immensely strong in comparison to everything else in the format, and Rayquaza and Primal Kyogre are paired together because they reliably stop Groudon (and from there, you can target Xerneas). Diana has Stakataka, which is her only reliable way to knock out Xerneas in one hit, whether or not it has boosted using Geomancy. These Pokemon will be the centerpiece of the match.
Turn 1, Game 1
Incineroar and Xerneas is a classic lead: Fake Out and Geomancy, and sweep from there. Paul puts it up to Diana to position well around this threat.
Before you watch this turn, think about what moves each Pokemon is likely to click, and into which targets.
–
This is an extremely interesting turn for two reasons. First, Kyogre has one of the strongest Water-type attacks in the game, and Incineroar is a Fire-type: it’s obscenely clear to both players that Kyogre threatens to one-shot Incineroar. However, from Paul’s perspective, losing Incineroar may not actually be the worst thing. These games go lightning fast, and Incineroar fainting gives Paul a free switch to Groudon between turns 1 and 2, thus rendering Diana’s Kyogre unable to use Water-type moves on the following turn.
Second, Diana switches out her Tapu Koko for Stakataka. This move is a big deal, because at first glance she could have used Volt Switch with Tapu Koko, which would have accomplished the same switch as well as put some important damage onto Xerneas. However, Diana responds to the same realization that Paul had: Kyogre taking the Incineroar knockout was actually what Paul could have wanted, so he was likely to Fake Out Tapu Koko!
Note that should Paul have clicked Fake Out into Kyogre (which I think many would call the more obvious move), she would still be in a great position with Kyogre and Stakataka on the field. Groudon has to manually switch, which is too little too late before Stakataka sets up Trick Room or outright knocks out Xerneas.
Turn 2, Game 1
Groudon threatens to knock out Stakataka. Stakataka threatens to knock out Xerneas (or set Trick Room). Kyogre cannot use Water-type moves in the extremely harsh sun. Diana’s Stakataka could switch out to Rayquaza for its Air Lock, which would negate the extremely harsh sun, but Xerneas applies massive pressure with its Geomancy-boosted Fairy-type attacks.
–
Look at the reaction from Paul once Dazzling Gleam fails to knock out Rayquaza! He did not expect for it to survive that attack. It’s just been revealed that Rayquaza is holding an Assault Vest– and is probably pretty bulky on top of that. This was a fairly common Rayquaza set at some points during the Ultra Series metagame but there’s no way that Paul could have known that Diana had the item– otherwise he may have doubled into Stakataka with Moonblast + Earth Power.
Turn 3, Game 1
It’s now challenging for Diana to reach the boosted Xerneas, but Stakataka should clean this game up without major problems regardless.
–
This is a nice prediction from Paul to regain a bit of ground. Note that, of course, this play lost to Dragon Ascent into Amoonguss and any attack by Kyogre. But that would be a prediction on Diana’s end as well, and now we’re getting ahead of ourselves.
Turn 4, Game 1
Xerneas and Amoonguss will not be able to resist Stakataka’s onslaught, but Paul will do his best. Two Moonblasts from Xerneas should take out Stakataka.
–
Tapu Koko Protects here for a very important reason: to reset Electric Terrain after Turn 5. The only way that this game spirals out of Diana’s control is if Stakataka falls asleep, which Electric Terrain prevents. By Protecting on Turn 4, she assures that she will at most lose one Pokemon that turn, leaving herself on Turn 5 with one Pokemon in the back to switch in for Tapu Koko on Turn 5 when the terrain expires. Then Tapu Koko can reset it any time it wants. Paul has no counterplay to this.
Turn 5, Game 1
–
Diana successfully preserves Tapu Koko. Trick Room means that Stakataka will move before both Xerneas and Amoonguss.
Turn 6, Game 1
–
Stakataka cleanly takes the KO on Xerneas and that should be the game, as Amoonguss can’t win 1v3.
Note that two worlds exist in which Diana loses this game– first, another Protect/Spore play. Paul likely did not make this play because he doesn’t want Diana to take advantage of that pattern. Second, Amoonguss can Rage Powder away Gyro Ball, forcing Diana to Rock Slide, which can miss. However, this play invites an Origin Pulse as well (which can also miss, but the combined probability of one connecting with Xerneas is high). Paul respects Diana’s pattern recognition ability, as well as Kyogre’s attacking option on this turn, which Diana takes advantage of with her own ultimately successful prediction.
Turn 7, Game 1
The game concludes from here.
–
Game 2
Team Preview between Game 1 and 2
The chief thing on both players’ minds is still the relationship between Xerneas/Groudon and Rayquaza/Kyogre/Stakataka. From Paul’s perspective, now that he knows that Rayquaza is Assault Vest, he can adjust and clear it with a Moonblast. He would not mind the game returning to the same state as it did on Turn 2 of Game 1. From Diana’s perspective, she had to play very well through some tough spots to reach that win. Of the two players, despite her victory, I think she’s more likely to switch things up for Game 2 given Game 1.
Turn 1, Game 2
Diana has substituted Whimsicott. Presumably, this means that Tapu Koko hit the bench– Stakataka and Rayquaza are too important.
Whimsicott is a chaotic Pokemon with access to many disruptive moves. Paul will have to tread lightly, as he likely has no idea what its moveset is. This is a dangerous position to be in down 0-1 of an important set.
–
Whimsicott preserves its Focus Sash. From Paul’s point of view, however, he probably doesn’t want to risk losing his Incineroar for free again.
Turn 2, Game 2
This is another dangerous turn for both players, with Diana having a slight advantage thanks to that Focus Sash. Incineroar is still in a tricky position.
–
Whimsicott reveals Encore, but Paul plays around it! This cautious play saves his skin, as being trapped into Geomancy in front of an angry Kyogre and Rayquaza is almost certain doom.
Turn 3, Game 2
However, Paul isn’t out of the woods yet, as Whimsicott could repeat Encore, this time trapping Xerneas into Protect. Diana is firmly in the driver’s seat.
–
Diana makes a risky play, but this time she is punished hard for it, as Groudon takes a firm knockout onto Rayquaza.
Diana could have made this play for many reasons, and although it went wrong for her there are some easy explanations. First– she could have expected Paul to double Protect with Xerneas, knowing that he knows he’s backed into a corner. This is almost certainly the case as she and Paul have respected each other’s abilities and decision making throughout the game. Second– she could have thought that Kyogre would move before Groudon anyway, as they could have been speed tying. Groudon is much more likely to be max Speed with a boosting nature than Kyogre is (especially if it’s the special attacking set), but it’s not out of the question that Groudon could be slower.
This turn has an enormous impact on the game.
Turn 4, Game 2
Stakataka has no chance of surviving a double-up attack and the game ends soundly.
Game 3
Team Preview between Game 2 and Game 3
From Paul’s perspective, Diana’s Whimsicott is putting a major dent in the Xerneas setup that he has been aiming for. He needs to play around the play that Diana didn’t make moreso than the one that she did make: ultimately, what is stopping Whimsicott from Encoring Xerneas?
Note that Incineroar needs to be positioned perfectly to use Fake Out to stop Encore from going off on the turn after a Geomancy. This means that he would either need to switch in Incineroar midturn or after a knockout. These maneuvers are generally dangerous and a lot can go wrong. Paul likely would like to find simpler solutions.
From Diana’s perspective, she needs to figure out how to use Whimsicott to clear a path through Paul’s Pokemon. It’s applying a lot of pressure which is a nice position to be in, even though the last game ended up poorly.
Turn 1, Game 3
Diana may have been cautious about leading Stakataka in games 1 and 2 because Groudon can knock it out rather easily, even with Shuca Berry. However, she has learned that Paul prefers the Incineroar / Xerneas and is unlikely to switch from it. Her strong position is a reward for making this call.
–
Diana makes another strong play. Just as in Game 1, a blind Water Spout could mean that Groudon hits the field, which would repeat the game state of Turn 2 Game 1– but now Paul knows about Rayquaza’s Assault Vest. Furthermore, Paul could simply switch Incineroar out for Groudon on this turn for the same effect. By switching Whimsicott in for Kyogre, she checkmates Xerneas, preserves Whimsicott’s Focus Sash, and creates an extremely awkward situation for Paul on Turn 2.
Even if Paul had seen this play coming, there’s not much he could have done for it. What’s more, this is a dangerous play to predict. If he predicts it (with a Fake Out / Moonblast into Xerneas), Stakataka does whatever it wants. If he only attacks with Xerneas, Whimsicott sets Tailwind for free, which means that Rayquaza and Kyogre will walk all over his team in the following turns.
Turn 2, Game 3
Xerneas is checkmated by Encore.
Note that if Paul had Taunt on Incineroar, there’s not much that Diana could do to stay in this game. She has accepted that with her Turn 1 and 2 play.
–
The Stakataka switch is interesting. It may be an attempt to play around an Amoonguss or Groudon switchin in the Incineroar slot. However, ultimately it makes her positioning more challenging.
Turn 3, Game 3
We now have a near-exact replay of the Turn 2 Game 2 scenario. Diana is unlikely to make the same move as she did then, though.
The weight of the double Protect hangs over both players.
–
Paul secures the double Protect and thus a major advantage. There was only a 33% chance of this outcome happening– however, it was the best option for him, as he knows that Diana is probably not going to let a repeat of Game 2 happen. This is an example of a good player taking every chance necessary to stay in the game.
In the future, Diana can secure a victory 66% of the time by always double Encoring. (The Nash Equilibrium mixed strategy provides a slightly higher winrate– but note that the Nash Equilibrium is not useful as humans generally do not act game-theoretically in VGC.)
Turn 4, Game 3
Because Stakataka hit the field, there is no counterplay to the Eruption + Dazzling Gleam play from Paul. If Rayquaza hit the field, Diana may have been able to overwrite the harsh sun by Mega Evolving Rayquaza– however, Paul likely has many outs (such as switching out Groudon for Incineroar and then getting in the extremely harsh sun after Rayquaza faints).
–
The game concludes from here.
Wrapping Up
VGC 2016 and 2019 games were fast-paced and extremely punishing. One small error in positioning or misprediction can end the game nearly instantly. Diana made strong plays throughout all 3 games– however, in Games 2 and 3, things went Paul’s way. Ultimately both players had a deep understanding of the options available to both them and their opponent, and made plays that both respected and capitalized on how their opponent would navigate that space.
There’s a lot to be learned from these games.
- Losing a Pokemon is not always the worst thing in the world– sometimes, the next turn can look very very good
- Surprising your opponent (even if it’s with a common set/item) can cause grave miscalculations and win you a game
- Protect enables you to stall through field effects (e.g. Electric Terrain) without your opponent having any counterplay
- Players will generally change up their moves when similar game states to previous games are reached
- When your back is against the wall, take any move that can give you a chance at the win
Alister Sandover vs. Edoardo Giunipero Ferraris, Player’s Cup 1
Watch two players position their Pokemon perfectly as the Trick Room timer winds down.
Written by Aaron Traylor Twitch link
Teams:
Concepts:
- Protect
- Momentum with Dynamax (Dynamax stalling)
- Double Targeting
- Pressure
Series 5 Information
- Dynamax is allowed. Dynamax is the major mechanic of Pokemon Sword and Shield, and you can find out more information about it here.
- Only Pokemon in the Galar Pokedex or the Isle of Armor Pokedex could be used. (Not the Crown Tundra)
Game 1
Team Preview
This set is open sheet, so players won’t be surprised by moves, abilities, or items.
The most important thing to note about each team here is the pace at which they play. Although they have similar concepts– each team features Porygon2, Dragapult, and Fire-type, Water-type, and Grass-type Pokemon, Alister’s team wants to set up with Rotom-Wash and Ferrothorn. Togekiss assists with its Follow Me and Serene Grace Air Slash, and Porygon2 and Incineroar can make it easier for the setup to happen. Dragapult offers pure offense for a dynamic change of pace (and the Incineroar is strangely offensive as well!).
The Pokemon on Edoardo’s side are more immediately offensive– Terrakion, Rillaboom, and Primarina all do strong damage right out the gate. However, Edoardo’s team features the Beat Up + Terrakion combo, which applies offensive pressure on Turn 1. Allister’s leads are therefore going to have to respect that combination.
Turn 1, Game 1
Edoardo did not lead with Dragapult plus Terrakion, perhaps wisely because Togekiss + Life Orb Dragapult puts a stop to it pretty quickly (with Follow me Max Wyrmwind/Phantasm).
Many players Dynamax on Turn 1 to try and gain momentum, taking an advantage over their opponent as soon as possible. However, note that Alister’s Dragapult is not in a great spot to do that on this turn. Both Incineroar and Porygon2 will survive a Dynamax attack, and Porygon2 can easily Trick Room and Recover off any damage.
—
Alister opts to U-Turn with Dragapult instead of Dynamaxing, saving its strength for later. Note that Dragapult is challenging to make work outside of Dynamax, and Alister’s team features several Pokemon that don’t make great use of Dynamax themselves (Ferrothorn/Togekiss), so from Edoardo’s perspective, it’s pretty likely that Alister will Dynamax Dragapult later in the game.
On first instinct, switching Primarina into Ferrothorn is a fool’s errand because of Ferrothorn’s Grass typing. Note, however, that Ferrothorn doesn’t have a Grass-type attack! This is because it’s the Iron Defense Body Press set that became popular in Generation 8. Primarina is thus safe to Dynamax.
Turn 2, Game 1
Alister Protects Togekiss, but Edoardo double targets Ferrothorn. Is this a prediction? Not really– think about how much pressure Togekiss is exerting at this point in time. It can Air Slash for minimal damage on either Pokemon, or Yawn– which will be quickly blocked the next turn by Max Starfall.
Alister is fortunate that Ferrothorn survived that attack (plus the Hail chip): if it fainted, he would have been in a rough spot.
As a side note, this is why it’s often suboptimal to Protect with a Rage Powder or Follow Me Pokemon: your opponent can always double target the Pokemon you would be redirecting attacks from.
Turn 3, Game 1
Togekiss continues to not do much. Edoardo needs it gone, though, or his Trick Room will run out. He’s on two clocks: he needs to do as much damage as possible while his Dynamax is up, and he needs to chew through Alister’s team before Trick Room ends and Dragapult hits the field.
—
I’m curious if a Leech Seed from Ferrothorn would have helped Alister out more than an Iron Defense: there is a risk that Edoardo would just switch Porygon2 out in response.
Turn 4, Game 1
Dragapult hits the field. This should set off alarm bells for both players given that Primarina will knock it out in one hit, even through Dynamax. Dragapult also cannot protect itself, even with Max Guard.
Given from Edoardo’s perspective, we know that Alister wants to Dynamax Dragapult later in this game, it would be possible to make a prediction that it was going to switch out. Now we have to think about the different Pokemon it could switch to: Incineroar, Porygon2, or Rotom-Wash.
If Edoardo wanted to make a hard prediction, he could Max Geyser that slot. What if Dragapult Dynamaxes? He could also Ice Beam with the +1 Special Attack Porygon2. But this play is risky: you leave Ferrothorn open to deal a lot of damage to Porygon2, and if Rotom-Wash comes in instead, you might just lose.
—
However, Incineroar coming in and not fainting means that Edoardo has run out of Dynamax time and is now on the back foot, especially with Trick Room ending next turn.
Turn 5, Game 1
This is the last turn of Trick Room, which is a big deal. Alister has nicely set himself up to have Fake Out pressure, and Ferrothorn is applying a lot of pressure to Porygon2.
—
Edoardo double switches. This play is hard for me to interpret: my best guess is that he is responding both to the Fake Out pressure + Leech Seed in Primarina’s case, and Body Press in Porygon2’s case. Then next turn Edoardo can maybe reposition his Porygon2 back on the field for another Trick Room.
Alister opts to go for the U-Turn (!) into the Porygon2 slot (!!). This is because Porygon2 cannot Protect, so he has an assured switch into Dragapult– right as Trick Room is ending!
Alister has gained a ton of momentum with this play.
Turn 6, Game 1
Dragapult is ready to chew through Edoardo’s team.
Note that before he moves, Edoardo considers switching Incineroar in for Primarina, predicting a Max Wyrmwind. However, he doesn’t pull the trigger, instead opting to try to knock out Ferrothorn.
—
Incineroar takes the hit and now the clock is ticking quickly indeed. Edoardo’s only hope is that Porygon2 can survive whatever attack Alister throws at it.
Turn 7, Game 1
Edoardo is drastically limited by not having any way to target down Dragapult with a Dark-type attack from Incineroar.
—
The double knockout makes short work of Porygon2.
Turn 8, Game 1
Primarina is forced to Protect to try and stay in this game. Alister, in turn, is forced to attack it: predicting the Protect and being wrong (if it Moonblasted anyway) could have drastic consequences in a locked-up position. There’s no need to go overboard here.
Turn 9, Game 1
This Phantom Force seals the game, as it breaks Protect and Edoardo’s Incineroar has no way to target Dragapult.
Game 2
Team Preview between Game 1 and Game 2
Alister successfully stalled out Trick Room in a pretty dominant fashion– the weakest he looked was on Turn 4, when Dragapult was out in front of Dynamax Primarina. From Alister’s end, he probably knows that the same tactic won’t work twice, however.
From Edoardo’s end: in all honesty, the events of the last game weren’t that bad in the long run: he just needed to prevent Ferrothorn from stalling out Trick Room. He also knows that Alister is going to make smart plays (e.g. switching the Dragapult out, U-turn instead of Fake Out with Incineroar) that take advantage of the way that each Pokemon puts pressure on each other.
Turn 1, Game 2
Both players have changed one Pokemon. Note that Alister still has to cover for Dragapult + Terrakion. Edoardo perhaps hoped to accelerate the speed at which Primarina hit the field. Furthermore, if Alister were to lead Dragapult again, Edoardo could easily Max Guard, Dynamax attack, or safely switch out with Primarina, while Porygon2 continued to do whatever it pleased (set Trick Room, get strong attacks out).
Alister can kind of do whatever he wants here– either Nasty Plot (aided by Follow Me), or just clicking Max Geyser/Lightning.
—
Rotom and Primarina trade blows. It’s not too unfortunate for Alister if Trick Room does get set up– because Togekiss can give Rotom the space that it needs to take out Primarina, and then Ferrothorn is nicely positioned. But the flinch is definitely a benefit. This is a good example of how trying for luck can, in the best case, make a decent situation great, and in the worst case maintain positioning.
Turn 2, Game 2
Edoardo is forced to Protect with Primarina here, and is now in a definitely bad spot. Alister again has options: he can predict the Protect and hit Porygon2 with Rotom, or just minimize his risk and target down Primarina.
—
Edoardo takes a chunk out of Togekiss– if Air Slash flinched again, he was most likely unable to come back.
Turn 3, Game 2
Alister saves his Togekiss, despite being at low HP: Ferrothorn could switch in safely that turn.
Turn 4, Game 2
Nothing to say about a bit of bad luck
Turn 5, Game 2
Alister is jockeying for Ferrothorn positioning with this Protect + Switch play. It’ll be able to either Iron Defense or Leech Seed.
Turn 6, Game 2
This double up play takes advantage of the fact that Alister’s Incineroar doesn’t carry Protect. However, it leaves the other slot wide open– Rotom heals in an attempt to get back in the game.
Turn 7, Game 2
Nothing can really save Alister’s Rotom from Porygon2, as Edoardo can always target the Rotom slot (to avoid shenanigans like Nasty Plot).
Turn 8, Game 2
Alister has quite simply run out of resources at this point in the face of Terrakion + Incineroar.
Game 3
Team Preview between Game 2 and Game 3
This game was much rougher for Alister once the Dynamax sort of shook out. Edoardo positioned his Incineroar and Terrakion very nicely to prevent the Ferrothorn from getting out of control. Edoardo’s Porygon2 was able to stay on the field and Alister didn’t have a way to threaten it immediately.
How should Alister proceed? It’s tricky. He has to generate some momentum somehow, but it’s challenging to fight through Edoardo’s bulk and the type advantage that Edoardo is able to generate over the course of the game. Edoardo got into a groove as Game 2 wrapped up and found a strong strategy that demands Alister’s response going into Game 3.
Turn 1, Game 3
Note that in this situation, Edoardo might just force the same turn as in Game 2 and hope that Alister gets less lucky.
—
And here we see Alister’s idea to generate momentum! With Togekiss’ protection, Nasty Plot Rotom-Wash may be able to fight its way through Trick Room and give Ferrothorn enough of an opening to set up on its own.
Note that Trick Room may not benefit Edoardo in the long run because Ferrothorn is so strong under Trick Room. However, it’s definitely beneficial in the short term, because Primarina can attack again, and if Edoardo knocked out Togekiss with a double-up, then Ferrothorn would hit the field. Edoardo would then be in a lot of trouble versus +2 Rotom outside of Trick Room, and Ferrothorn could set up for free, probably for the game.
Turn 2 Game 3
It is obvious to both players that Rotom will probably Dynamax on this turn.
—
The players trade Protects. This is favorable for Edoardo because he can get extra damage onto Rotom, and he doesn’t necessarily care too much about Trick Room’s duration, despite having set it himself– Primarina will probably have done its job before Trick Room expires.
Turn 3 Game 3
From a health perspective, Edoardo has come out vastly ahead on this turn. Note that Electric Terrain is powering up Porygon2 here!
Turn 4 Game 3
Incineroar has Fake Out pressure here, but the Ferrothorn is much more concerned about Burning Jealousy, which also threatens to chip Rotom into a knockout from Thunderbolt as well.
—
This is a nice switch from Alister that would be hard (or dangerous!) to call. Protect allows him to get momentum with Rotom: remember, Edoardo’s Incineroar doesn’t have a Dark-type move, so Alister can Fake Out Porygon2 and Hydro Pump into Incineroar for free.
Turn 5 Game 3
Both players are keenly aware that this is the last turn of Trick Room and there will probably not be another one (Edoardo has no reason to set it).
—
Edoardo fires back with a great switch of his own– and perhaps the most important play of the game! Taking advantage of the Focus Sash to secure the survive, Edoardo has now created a situation where Terrakion can Close Combat into Incineroar without any drawbacks– he’s going to either KO Incineroar or deal a lot of damage to Ferrothorn, because again, this Incineroar can’t Protect. This is sometimes referred to as a “pin”: Alister has run out of room to maneuver. Also, if Rotom responds with a knockout into Terrakion, it just faints to Porygon2.
Note that even if Alister saw this switch coming, there was likely little that he could do. If Incineroar didn’t Fake Out Porygon2 then his Rotom probably fainted.
Turn 6 Game 3
The Iron Barbs damage is the best that Alister can hope for.
Turn 7 Game 3
This situation is now pretty precarious for both players. Edoardo has a very slight advantage, despite being down in Pokemon, because critically, Rotom-Wash just used Protect, and Alister probably will not gamble on a double Protect. This is relevant because Edoardo just gained Fake Out pressure, so he could knock out Rotom on this turn– if it stays in. However, he could just as easily knock out Ferrothorn with Burning Jealousy. This is a stressful situation for both players but Alister faces the loss more plainly.
Some players might refer to this situation as a “50-50”– where each player has two two choices and you have to guess which they’re going to pick. They are called 50-50s because if you guess right you win, and if you guess wrong you lose– however, there are very few true 50-50 situations, as we’ll see.
—
This play could have gone either way. Here are Edoardo’s two plays:
- Porygon2 Thunderbolt into Rotom-Wash, and Incineroar Fake Out into Rotom-Wash
- Porygon2 Thunderbolt into Rotom-Wash, and Incineroar Burning Jealousy (targets both)
Alister’s play dealt with both of them, which is a pretty good solution for staying in the game. However, I don’t think it was the best solution (and I hope it is not overstepping to say this!). If Alister targeted Incineroar with Hydro Pump instead of switching it out, he would surely be sacrificing it to Porygon2. However, this allows Ferrothorn to act without fear of Burning Jealousy (assuming Hydro Pump connects, so this play will work 80% of the time). Even if Incineroar uses Fake Out on Rotom, Ferrothorn is unfettered and can set up an Iron Defense or a Leech Seed. Then Incineroar can switch in when Rotom faints (or with a Protect), Fake Out + Body Press damages Incineroar, and Porygon2 cannot clear Ferrothorn and Incineroar at the same time. Maybe I overlooked something, though.
This play, however, I found while sitting comfortably in my chair in my home on a quiet Wednesday night: it would be much harder to find in the heat of the moment of a high-stakes battle. Always keep that in mind when you critique other people’s tournament play!
Turn 8 Game 3
Alister’s play is now pretty clear.
Leech Seed is better than Body Press here (although it invites a miss): Ferrothorn needs to get some of Porygon2’s HP and fast. Alister’s Incineroar loses to Porygon2 in the long run.
Turn 9 Game 3
Earthquake is a nice tech and allows an extremely safe play from Alister that slowly marches him towards victory.
Turn 10 Game 3
You can tell that Edoardo has a lot to think about on this turn from the speed at which he is choosing his moves. He has to consider whether Rotom will switch in for Ferrothorn (thus gaining the Leech Seed for itself).
From Alister’s point of view, if he targets Porygon2, he can knock it out this turn or next. However, if Porygon2 uses Recover, he’s in a load of trouble. Switching in Rotom takes advantage of the Recover play.
—
Edoardo calls the switch correctly, and the scales have tipped in his favor.
Turn 11 Game 3
Alister is now in a bind: he needs Porygon2 off the field. Ferrothorn is as good as fainted in front of this Incineroar, and is actually getting in the way of Earthquake: Earthquake deals reduced damage as a spread move.
—
Letting Ferrothorn faint may actually be the better move for Alister here.
Turn 12 Game 3
So close! A photo finish to an excellent set that was well-played by both players.
Wrapping Up
This set showed off some of the nice parts of early Sword and Shield: slow, methodical games where the Dynamax was incredibly important but not the end of the story for both players.
It is hard to say what Alister could have done better for sure in this set. He played well throughout the whole set and made some very nice plays that capitalized on Edoardo’s hesitation, especially in Game 1. This set was a grind for both players– in part due to the bulky Pokemon that they had on their teams.
I think there are many things that can be learned from this set, even after Series 5 is long gone:
- Delaying your Dynamax can be quite strong
- Be careful when a team has to make the most of its Trick Room turns: and know what will happen on the turns immediately following Trick Room
- Look for “pins” where your Pokemon can deal damage for sure, no matter what your opponent does (even if they switch out!)
- Focus Sash can actually make your Pokemon a great switch-in, even on powerful, super effective attacks
Part 15 — Tournament Circuit (VGCGuide)
What is the Circuit?
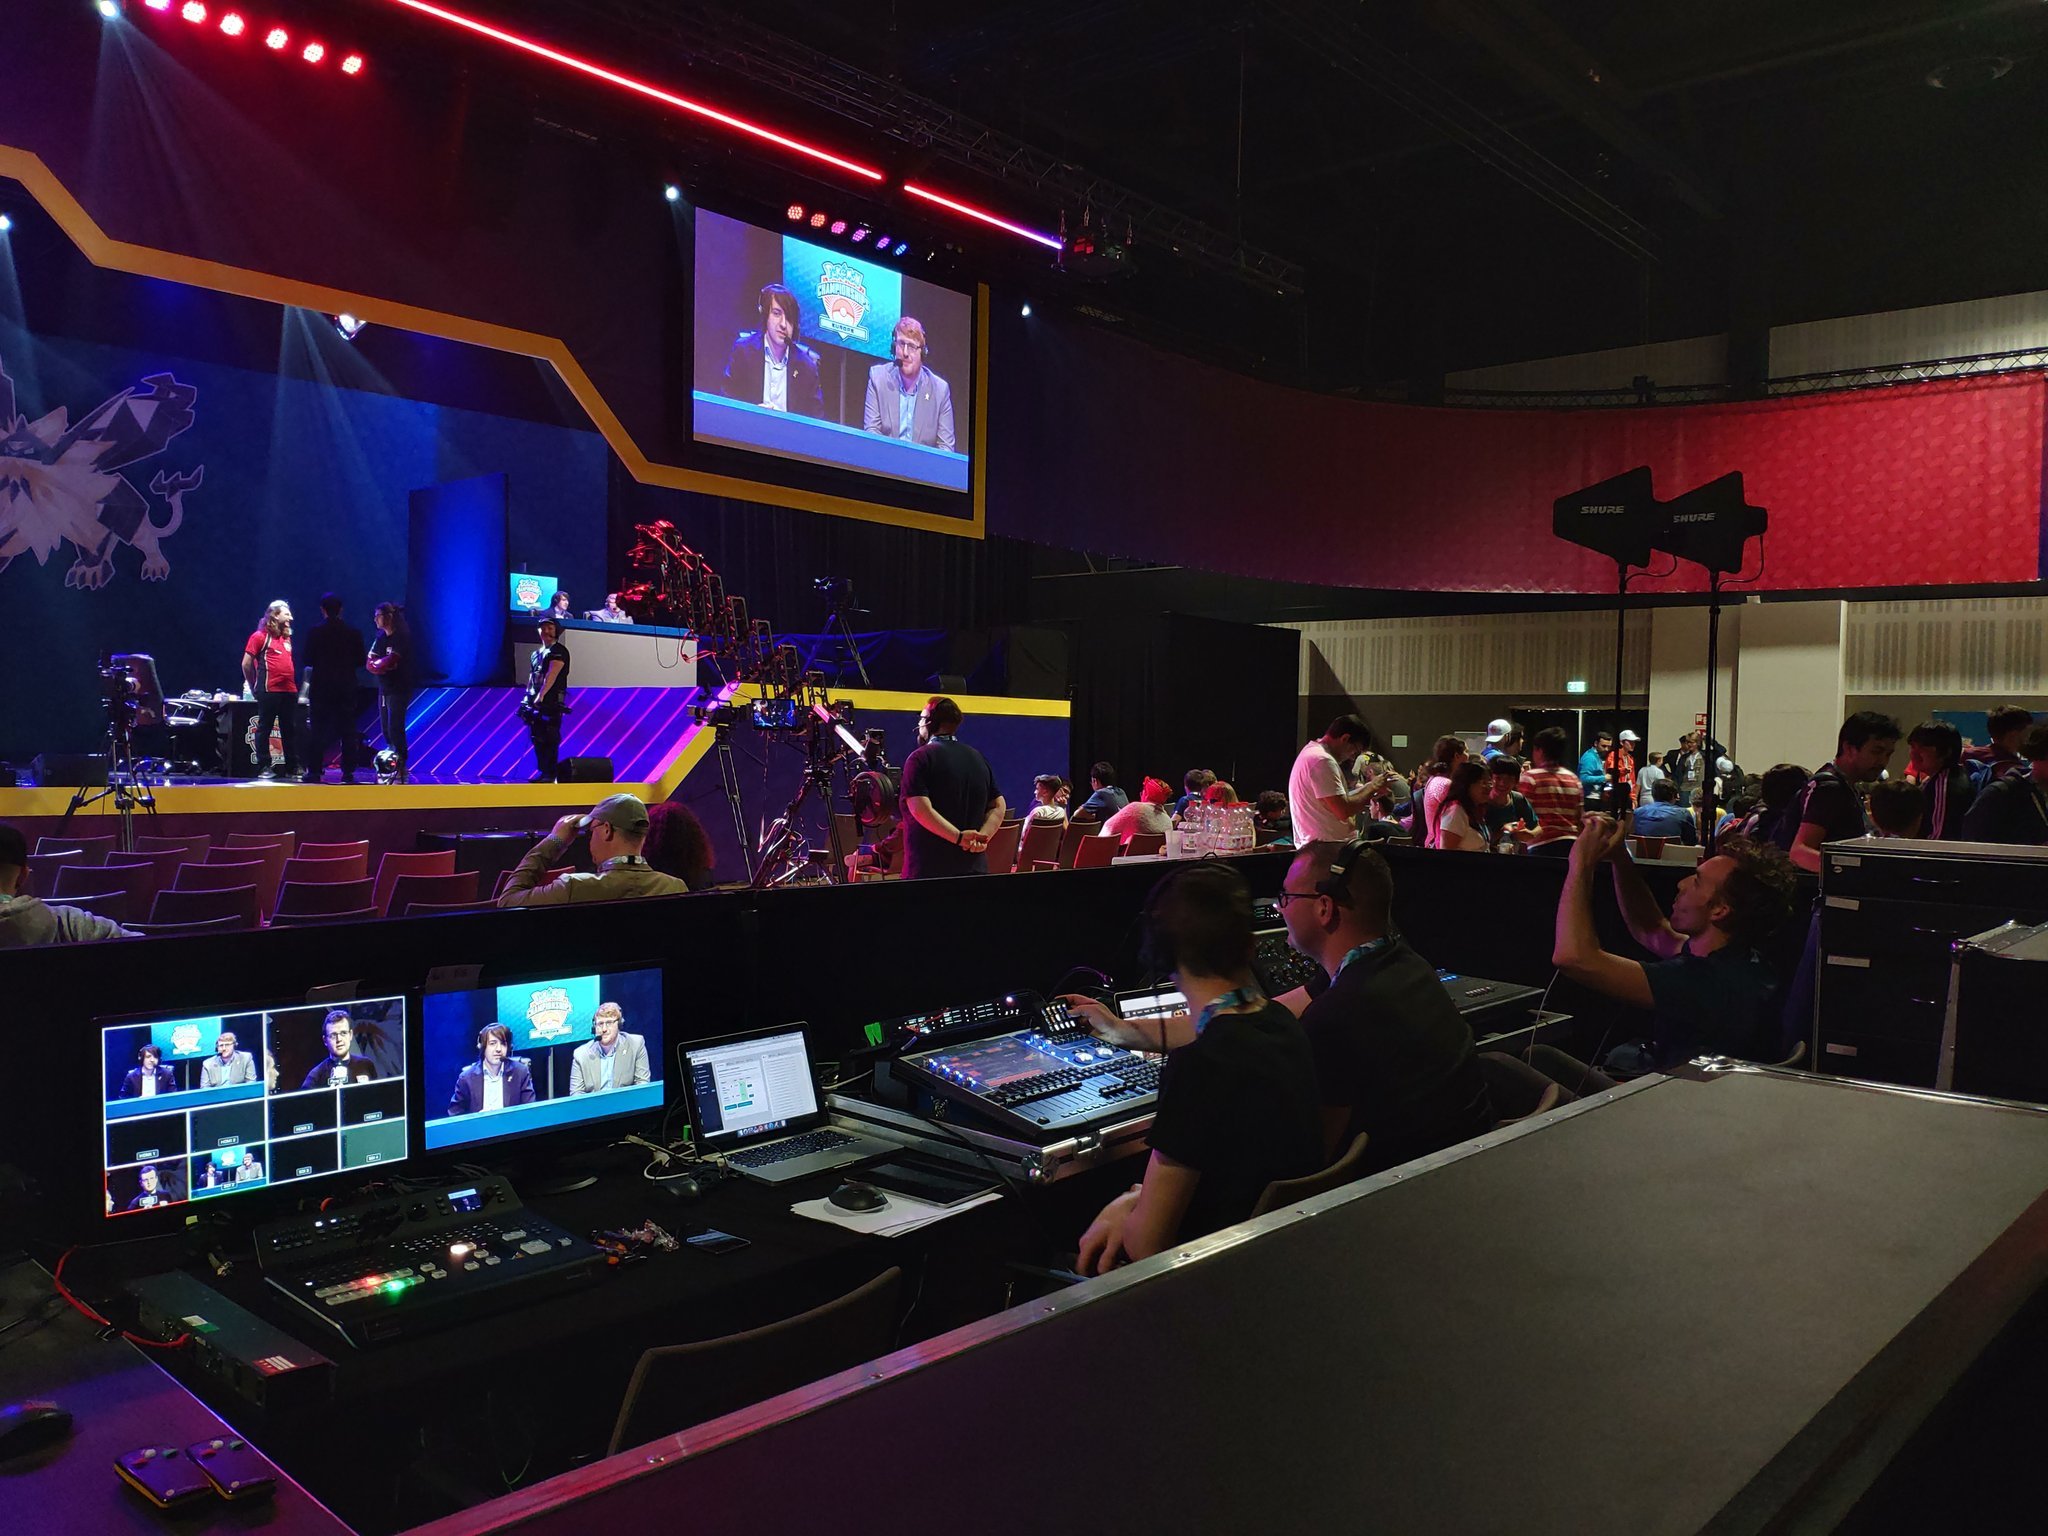 Written by Aaron Traylor
If you just got started with VGC, you might be wondering what sort of tournaments you can compete in. The Play! Pokémon circuit is the official circuit run by The Pokémon Company International (TPCi). These tournaments are held in person (with one minor exception) throughout the year, culminating in the invite-only World Championships in August. There are tournaments of all shapes and sizes– from laid-back small events in local game stores to international championships where the world’s best battle it out for prizes and trophies.
Placing well in sanctioned tournaments awards championship points (CP). Players that earn above a certain amount of CP are eligible to play in the World Championships that year. For the most part, even the smallest tournaments will award CP to their top finishers.
Tournaments require a Nintendo Switch and a copy of Pokémon Sword and Shield. For other things you might want for a tournament, click here.
How do tournaments work?
At the beginning of a tournament, you’ll lock in a team of 6 Pokémon, meaning you won’t be able to change anything about it until the tournament is completely over. You’ll fill out a team sheet detailing the stats, moves, abilities, and items of your Pokémon and hand it to the organizer. Tournament games are best of 3. You’ll play an opponent and the first player to win two battles gets the round win. A round can take between 20 and 50 minutes.
Tournaments have two phases: Swiss and Top Cut. In Swiss, you’ll always play an opponent with your round score. For example, if you win your first game, you’ll play someone else who won their first game– and if you lose, you’ll then play another opponent with 1 win and 1 loss. Swiss continues for a set number of rounds based on the number of players at the tournament (which is determined at the start of a tournament). Once Swiss is finished, the players with the best records will move on to Top Cut. Top Cut is a single elimination bracket and players battle until one remains, who is then crowned as champion.
For more about Swiss and Top Cut, click here.
What are the different types of tournaments?
There are five distinct kinds of in-person tournaments.
Premier challenges. These are the smallest and most frequent sanctioned events, and often take a few hours on a weekend afternoon in a local game store. Usually, these tournaments have 4-6 rounds of Swiss and 3 rounds of Top Cut. Prizes are usually small and are determined by the organizer.
Midseason Showdowns. These tournaments also mostly happen at local game stores. They give out more CP, but happen less frequently. More players attend Midseason Showdowns, meaning they take longer than Premier Challenges. Usually, these tournaments have 4-7 rounds of Swiss and 3 rounds of Top Cut.
Regionals. These tournaments are large and happen in convention centers. Usually, a couple hundred players will attend. They take up a full Saturday (Swiss) and Sunday (Top Cut). There are only a handful of them that happen across the four rating zones. They pay out a lot of CP and have cash prizes. Usually, these tournaments have 8-10 rounds of Swiss and 4-5 rounds of Top Cut.
International Championships. Only one of these tournaments happens per year per rating zone. These tournaments take a full Friday to Sunday, although many players will not be actively playing on Saturday and Sunday. Several hundred players will attend. International Championships pay out much more money and CP than Regionals. Players from different rating zones may earn stipends to travel to them.
World Championships. The World Championships are an invite-only tournament in August where players who accumulate above a certain amount of CP can fight for the title and substantial cash prizes. Worlds typically has 3 phases:
- Friday aka Day 1 (Swiss). All players with a Day 1 invitation play, and any player with 2 losses or less moves on
- Saturday aka Day 2 (Swiss + Top Cut) All players with a Day 2 invitation play Swiss into Top Cut, and single elimination Top Cut plays until two players remain.
- Sunday aka Finals: The last two players battle it out for the title of World Champion.
All of these tournaments happen in person and are the only events which pay out CP. The one exception is International Challenges (which are different than International Championships!). These are the only internet tournaments to pay out CP. They pay out roughly the same amount of CP as a Midseason Showdown.
Details of Swiss and Top Cut
Written by Aaron Traylor
Most Pokémon tournaments have two stages: Swiss pairings, where all players play the same number of rounds and Top Cut, which only features the top players from Swiss. Only the winner of a set in Top Cut keeps playing in the tournament.
Swiss
What does “Swiss” pairings mean?
Swiss pairings mean you will always play someone with the same record as you, with rare exceptions.
- In the first round, you can play anyone in the tournament.
- If you won your first round, you’ll play someone who also won their first round. If you lost, you’ll play against someone who also lost.
How many Swiss rounds will there be at this tournament?
The number of Swiss rounds at a tournament are proportional to the number of players at that tournament.
You can find the cutoffs here.
What does “Day 2 Swiss” mean?
Sometimes (at Internationals), there is an extra stage of Swiss pairings before Top Cut. These events are usually structured like so:
- Day 1 Swiss: All players play.
- Day 2 Swiss: Only the top players (ie. Top 32, Top 64, etc.) play an extra amount of Swiss rounds (usually 5-6).
- Day 2 Top Cut: The top players from Day 2 Swiss advance to the final Top Cut bracket (normally 8 players), and play until there are only 2 players left in the tournament.
- Day 3 Finals: The final 2 players play on the big stage.
The players that qualify to Day 2 will either be those who emerge from Day 1 Swiss with 2 or less losses, or the top 32 players, whichever means more people play in Day 2.
Top Cut
What is Top Cut?
Top Cut is the final stage of the tournament which decides the tournament’s winner. It is typically single elimination, best of 3– if you lose a set, you’re out. Top Cut players get a seed based on their final Swiss performance, and a bracket is made.
Who makes Top Cut? How is the number of rounds determined?
The players at the top of the final Swiss standings advance to Top Cut. The number of people who advance are typically between 4 and 32 players (depending on tournament size). For Worlds and certain Internationals, it’s all players who finish the last round of Swiss with 2 or less losses.
What is the tiebreaker?
The first tiebreaker is round wins: the number of best of 3 battles that you’ve won. This is the chief metric which determines who makes Top Cut. There are no ties, with extremely rare exceptions.
The second tiebreaker is opponents’ win percentage: that’s the percentage of best of 3 battles that your opponents won. This number is also called resistance. For example, an opponent that finishes with 4 wins and 4 losses would have a win percentage of 50%, regardless of if you beat them or not. (The tournament software automatically calculates this. There are some edge cases, detailed below.)
The second tiebreaker is opponents’ opponents’ win percentage: that’s the number of best of 3 battles won by the battlers that your opponents played against.
Tiebreaker edge cases
You don’t need to know these numbers off the top of your head, but for completeness’ sake:
Byes count as an opponent with 100% win percentage (ie. an opponent who won all their games).
At minimum, an opponent will count for 25% win percentage. (If an opponent loses all of their games, their win percentage will be 25%.)
You cannot intentionally tie a game, or risk disqualification from the tournament. The only way to tie a game legally is if the game time expires and the game displays a Tie message on the victory/loss screen: this happens when both players have the same number of Pokemon, with the same HP percentages. It’s happened once or twice before. Do not attempt to pull this off on purpose.
Attending Primer Challenges and Mid Season Showdowns

Attending Premier Challenges and Mid Season Showdowns
Written by Aaron Traylor
*NOTE: Premier Challenges and Midesason Showdowns are not currently running, likely because of TPCi’s concern about the ongoing COVID-19 pandemic. Any events of this size are not worth Championship points.
What is it like to attend a Premier Challenge or Midseason Showdown?
Premier Challenges (PCs) and Midseason Showdowns (MSSes) are the “local” tournaments– they are smaller in attendance and prizes than Regionals, Internationals, and Worlds. The difference is that MSSes award more points, but occur less frequently. PCs and MSSes are often held in game/card stores or similar small venues, and happen frequently throughout the year. They are usually one-day events that take around 6 or 7 hours total, though not all players will play for all 6 or 7 hours.
What do I have to do before attending a Premier Challenge or Midseason Showdown?
If you’re spectating
You can most likely just walk into the game store, but check beforehand.
If you’re competing
Get a POP ID and make a Pokémon Trainer Club account. You’ll need a POP (Pokémon Organized Play) ID and a Pokémon Trainer Club account to play in the tournament, earn prizes from it, and obtain Championship Points for qualifying to Worlds. Here’s how you get started. The POP ID is a number that uniquely identifies you within their system. You probably shouldn’t give it out to anyone other than tournament organizers.
Register online. You’ll need a POP ID to register for the tournament.
You should check beforehand if you need to pre-register: before the COVID-19 pandemic, many PC/MSS events were open entry, but now restrictions may have changed. Currently, during the pandemic, they are capped at 30 players in attendance, so you should make sure you can go.
There is no one-stop portal for registering for an event, and many game stores may have their own means of registration. Common places to look are the Pokemon.com event locator, Facebook, and the store’s website.
Registration will probably cost between 5 and 20$.
Make sure you understand the venue and tournament’s COVID rules and regulations.
Get the Pokémon that you want.
Travel to the event. You can read our guide for estimating travel cost here, and a packing list here. You probably won’t be travelling too far for a PC or MSS, unless you live in the middle of nowhere– you’ll probably drive or take public transportation.
Schedule
All times in this schedule are approximate– every tournament will be different. Check the website of whatever tournament you attend, or ask the Tournament Organizer for a rough estimate. They are in charge of their tournament.
Check-in
You’ll need your registration details, your player ID. You’ll also need your Switch and a team sheet. A team sheet is a piece of physical paper outlining every stat, move, item, and ability of your six Pokémon for that tournament. They’ll have some available, but you can also fill them out ahead of time. You’ll hand the team sheet in when you register.
The Tournament (Swiss rounds)
After check-in, the tournament will begin.
You’ll sit down across from your opponent and listen to announcements from the tournament organizer before beginning. Once you’re given the all-clear to start your match, follow the procedure outlined at the table to connect your Switch to your opponent.
You’ll then play a best of three against your opponent. Your Switch might not always be plugged in, so make sure you know where an outlet is if it doesn’t hold a charge well. Once the battles have started, you’re not allowed to use any other electronic devices (if you have a medical concern, talk to a judge beforehand!) It’s okay to use headphones, but they have to be plugged into your Switch. You’re allowed to take notes, but you need to use a clean sheet of paper– you can’t read off anything written beforehand during the battle. It’s also a good idea not to talk to other players except your opponent during the battles, and if you have to do so, talk quietly– other players will be concentrating on their own battles.
Once your games are over, you will record your score. If you are given a match slip, have both you and your opponent sign it, and then give it to the tournament organizer. If you are not, just let the tournament organizer know who won.
You’ll wait for everyone to finish playing before the next round begins.
At the end of all of the Swiss rounds, the tournament organizer will post the standings. The top players will advance to Top Cut, and you can read more about how this is determined here.
If you didn’t make Top Cut, your tournament is over and you’re free to leave.
If you did make Top Cut, you can wait for the tournament organizer to tell you your next round, and where you should be playing.
Top Cut will then continue until the tournament is over and there is a winner. Once you lose a round in Top Cut, you’re free to leave.
Going on Stream
Sometimes these events have streams on Twitch, YouTube, or similar. These are often small streams that are run by the venue or a local player. If your match is selected to go on stream, the stream operator will instruct you on what to do, and you should follow their directions.
Dropping
If you for whatever reason decide to finish the tournament early– maybe you need to go, or you aren’t having fun anymore– don’t just walk off! Check with the tournament organizer. If you earned Championship Points, you can still get them if you drop.
Spectating and Non-tournament Activities
There usually won’t be much to do at the tournament other than compete, so you can enjoy the venue (especially if it’s a game or card store) or the surrounding area. You can also come back at a later time– ask the tournament organizer when they think the Swiss rounds will finish.
Attending a Regional
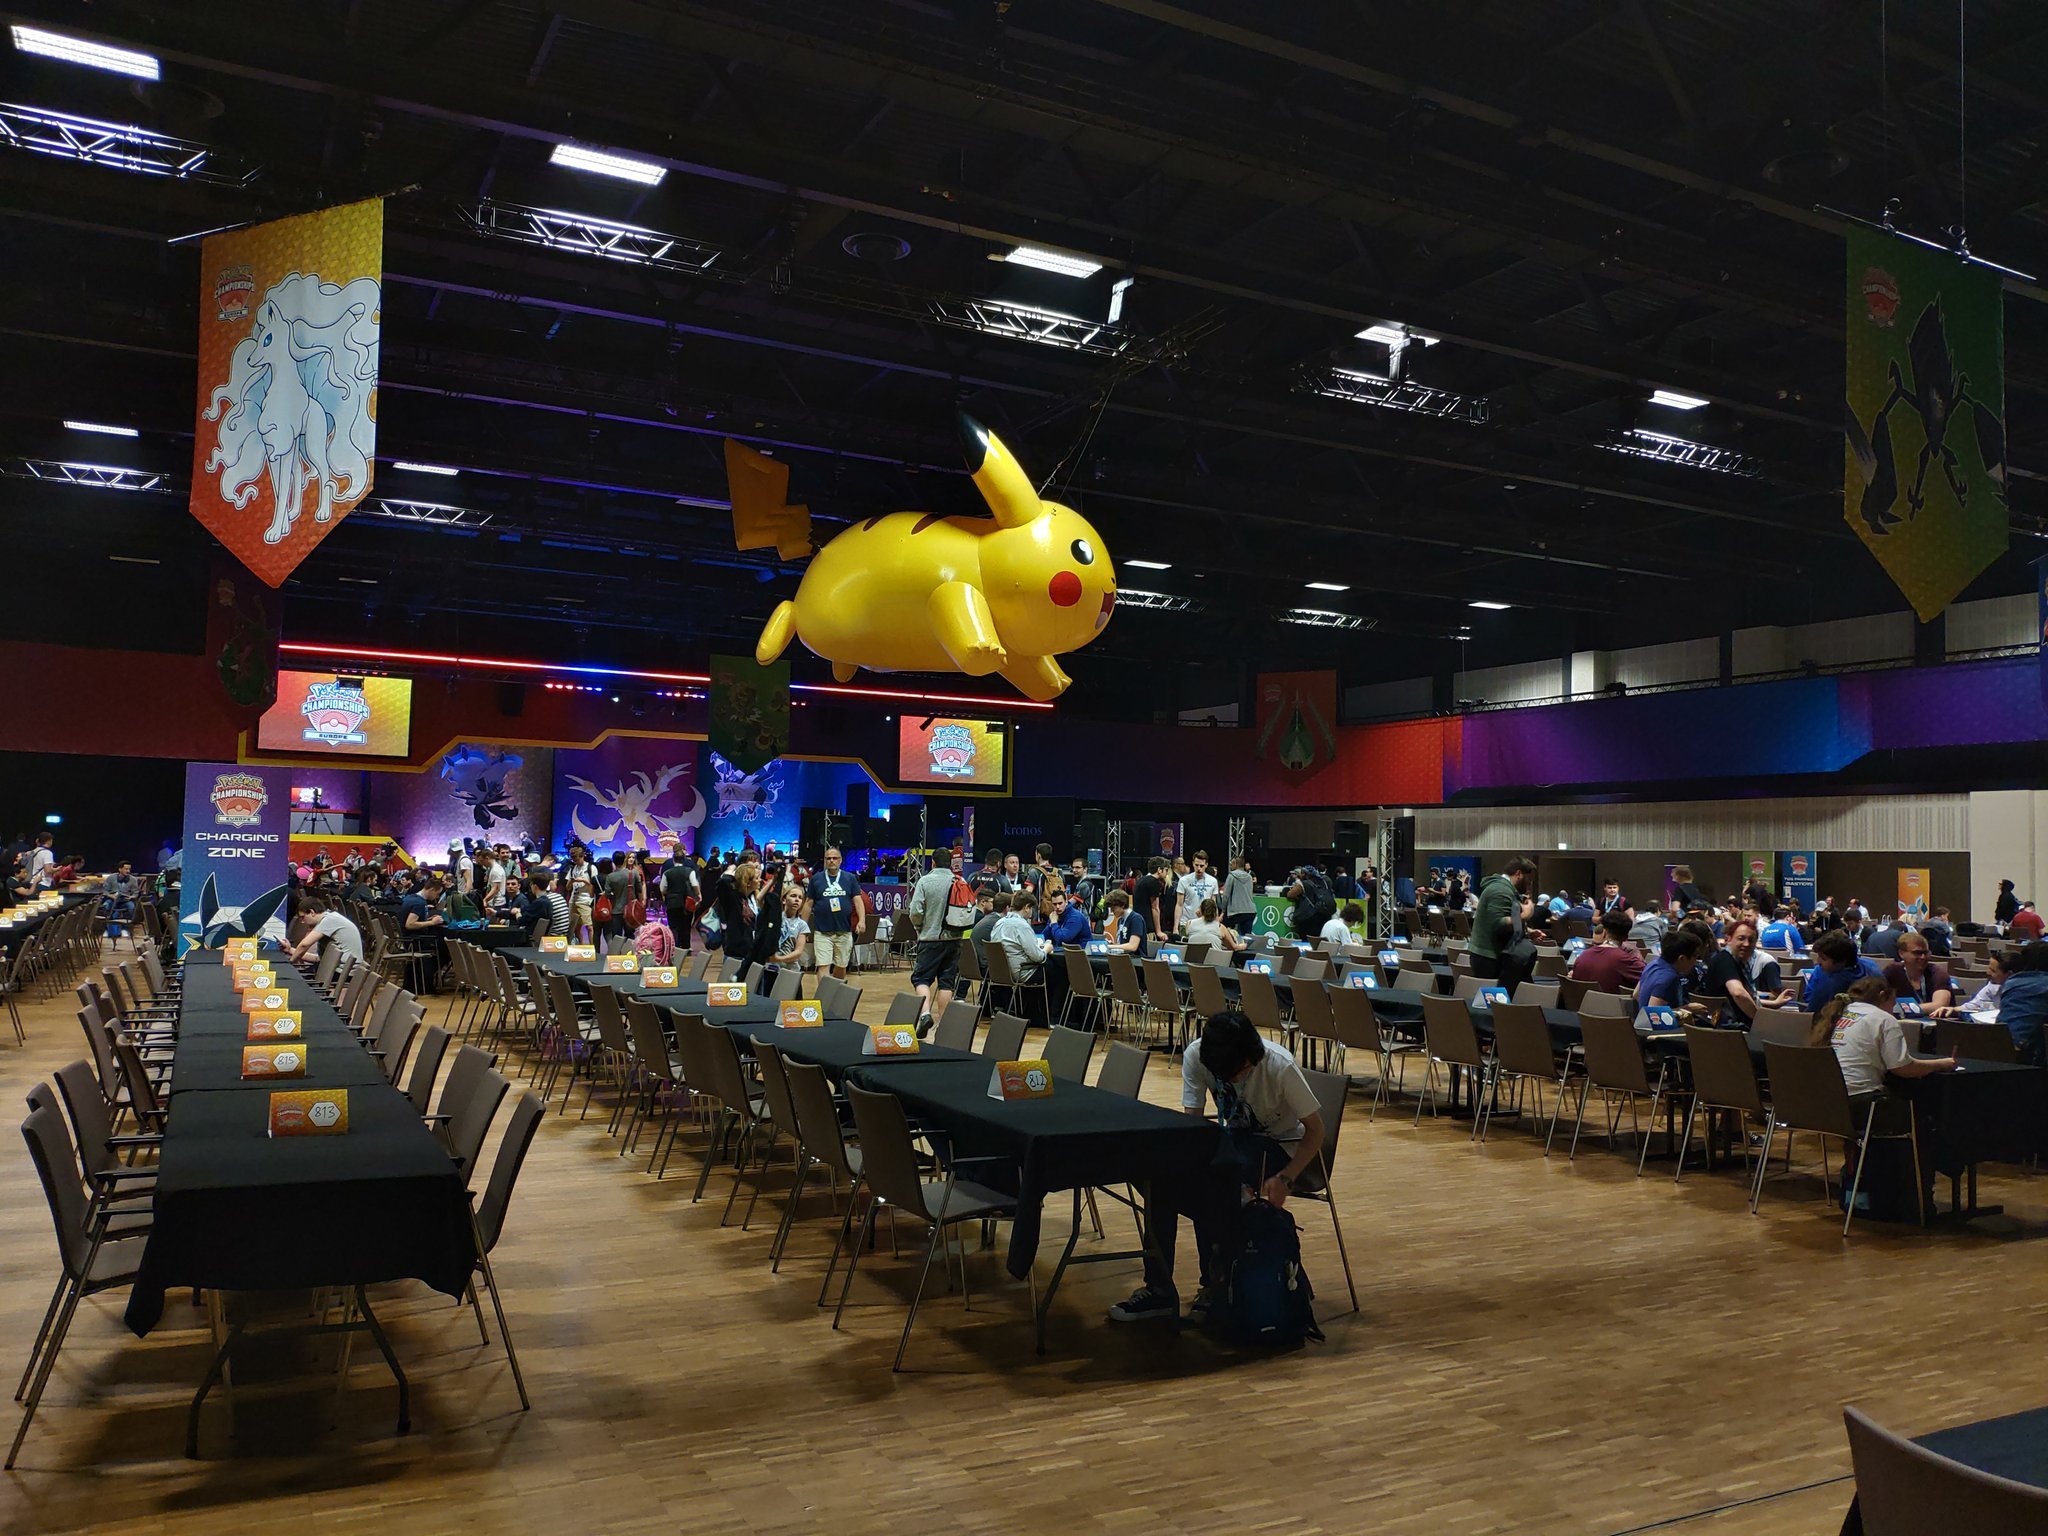
Attending Regionals
Written by Aaron Traylor
What is it like to attend a Regional?
Regionals are large in-person tournaments held over a whole weekend. They offer steep competition and can be a lot of fun. If competition isn’t your thing, there are plenty of activities for spectators as well. To find a list of Regionals in your area, click here.
If you have any questions while you’re at the tournament, look for a judge– they’re easily spotted by their white lab coats. The tournament organizers and judges will make every part of the procedure clear, and you should follow their instructions– they are the ultimate authority! If you’re playing a battle and need to summon a judge for any reason, put your hand up and wait for a bit.
What do I have to do before attending a Regional?
If you’re spectating
If you don’t intend to compete, you don’t have to do anything except follow the COVID safety guidelines provided by the organizer. Regionals are free for spectators. Check out our spectator’s guide below.
If you’re competing
Get a POP ID and make a Pokemon Trainer Club account. You’ll need a POP (Pokemon Organized Play) ID and a Pokemon Trainer Club account to play in the tournament, earn prizes from it, and obtain Championship Points for qualifying to Worlds. Here’s how you get started. The POP ID is a number that uniquely identifies you within their system. You probably shouldn’t give it out to anyone other than tournament organizers.
Register online. You’ll need a POP ID to register for the tournament. You’ll also have to pay the entry fee ahead of time. Entry fees can be steep, and might run you 50 or 60 dollars.
Get the Pokemon that you want.
Travel to the Regional. You can read our guide for estimating travel cost here, and a packing list here. Our preferred time to arrive at the event is midday Friday (the day before the tournament) at the latest– but you might not be able to avoid a late evening arrival. Our preferred time to plan to leave the Regional is, if driving, midday Sunday at the earliest. If we booked scheduled transportation (e.g. planes/buses), we try to leave Sunday evening at the earliest**.**
Schedule
All times in this schedule are approximate– every Regional will be different. Check the website of whatever Regional you attend.
Saturday (Day 1)
Check-in
The first step of the tournament is check-in, which usually lasts until about 8:30 or 9am. You’ll need your registration details, your player ID, and a government ID to corroborate your registration. You’ll also need your Switch and a team sheet. A team sheet is a piece of physical paper outlining every stat, move, item, and ability of your six Pokemon for that tournament. They’ll have some available in line, but you can also fill them out ahead of time. You’ll hand the team sheet in when you register.
When you check in, you’ll probably have to wait in a line with other competitors– make sure it’s for the video game. When you reach the front of the line, you’ll meet judges that will help you check in. First, they’ll check your online registration. After that, they’ll take your team sheet and use special software to lock your battle box. What this means is that you won’t be able to swap the Pokemon out of the battle box (accessible by pressing X twice in the PC in Pokemon Sword/Shield) until you cancel your participation in the tournament on your Switch.
After that, you’ll be good to go- hang out until Round 1 begins. We recommend knowing where the judge’s table, water fountain, bathrooms, and outlets are before the tournament begins.
The Tournament (Swiss rounds)
At around 9:30am, the tournament will start. You will be able to check pairings on your phone using the RK9 website, or look for your name on the paper pairings (you’ll be able to spot them by the throng of people crowding around them). You’ll sit down across from your opponent and listen to announcements from the tournament organizer before beginning. Once you’re given the all-clear to start your match, follow the procedure outlined at the table to connect your Switch to your opponent.
You’ll then play a best of three against your opponent. At Regionals, Internationals, and Worlds, your Switch will be plugged in at all times, so don’t worry if it can’t hold a charge well. Once the battles have started, you’re not allowed to use any other electronic devices (if you have a medical concern, talk to a judge beforehand!) It’s okay to use headphones, but they have to be plugged into your Switch. You’re allowed to take notes, but you need to use a clean sheet of paper– you can’t read off anything written beforehand during the battle. It’s also a good idea not to talk to other players except your opponent during the battles, and if you have to do so, talk quietly– other players will be concentrating on their own battles.
During your best of three, a judge will come over to leave a match slip by your table. The first player to win two battles will be the winner, and then both players will sign the match slip. The winner will circle “Winner” and then walk up to the judge’s table to hand in the match slip. If there is any error in the match slip, let the judges know as soon as possible.
After the match is complete, wait for the next round. You should be ready at all times for the next round to start, as it will begin once all players have finished their matches. A round usually takes about an hour to finish, but it can take a little less, or more if there is a significant delay. If you finished in two quick games, you’ll probably have a good amount of time to mill about the hall, grab water or a snack, or use the restroom. If you finished in three long games, you might only have a few minutes before the next round, so if you need to get anything or use the restroom, go quickly. There will probably not be a break for lunch, so don’t plan on being able to go out and grab food.
There will probably be between 8 and 10 rounds of Swiss– to learn more about this tournament format and how this is decided, go to our Swiss technical article here. That means that if Round 1 began at 9:30am, then the day will probably end between 4:30 and 7:30pm, if not later due to slight delays.
At the end of all of the Swiss rounds, the judges will post the standings. The top players will advance to Top Cut the next day: you can read more about how this is determined here. If you didn’t make Top Cut, your tournament is over and you’re free to leave the tournament and Cancel Participation in your game, thus unlocking your battle box. If you did make Top Cut, listen to what the judges say and do not leave the venue until they tell you to. Also, do NOT cancel participation and unlock your box. These steps are important to make sure you know where to be the next day.
This is what the Regionals prizing and Championship Points structure is like.
Going on Stream
One or two highlight matches (usually of players with 0 or 1 losses) will be selected per round for a stream (if there is one). If your match is selected to go on stream, judges will instruct you on what to do, and you should follow their directions.
Dropping
If you for whatever reason decide to finish the tournament early– maybe you need to drop for a personal reason, or you aren’t having fun anymore– don’t just walk off! Check with the judge’s table to get a drop slip. This is a piece of paper that you sign to let the tournament staff know that you’ll be dropping. If you earned Championship Points, you can still get them if you drop.
Sunday (Day 2)
The Tournament (Top Cut rounds)
At this point, only a few players will remain in the tournament. If you’re spectating at this point, feel free to skip ahead to the spectator section.
Top Cut players should show up at the time that they’re asked to and follow all directions given by the judges. This might involve a little bit of sitting around while the judges hack check all of the Top Cut players.
At this point, losing a best of 3 means that a player is eliminated from the tournament. Play will continue for four or five rounds, with a conclusive final battle that will likely be streamed to a crowd. Expect the finals to wrap up around 3pm, but this is a loose estimate.
Top Cut players should check with the judges once they’re out of the tournament for prizes and to collect contact info to get set up with the cash prize payment system.
Spectating and Non-tournament Activities
For spectators or players who took an early exit from the tournament, there are still plenty of fun things to do at the tournament. You’re free to come and go from the tournament venue– if you know people playing, they’ll likely be very grateful if you deliver them food.
Watching Games
There will be a stream setup for you to watch that should have a VGC battle going with commentary. Do not look over players’ shoulders to watch games– this can get you in trouble with a judge. If there are TVs off to the side broadcasting games, these are okay to watch as well. More and more players will also come to watch the games as the tournament continues and more players are eliminated.
Side tournaments
There are often small side tournaments that award prize wall points, which you can exchange at the prize wall for Pokémon-themed merchandise (e.g. cards, plush, et cetera). This area should be clearly marked.
Vendors
There are often vendors selling Pokémon cards and hard-to-find plushies, some of which are imported from Japan. Most of these vendors target trading card game fans, but some are for Pokémon fans in general.
Classic game setups
In recent years, there have been setups of classic Pokemon games such as Pokemon Stadium 2, Pokemon Snap, and Pokemon Colosseum. Grab some friends and play some party minigames!
Creative corner
For young ones, there’s usually an art station with crayons and blank sheets where they can draw Pokemon.
Wrapping Up
Regionals are a lot of fun- enjoy the experience!
Attending an International Championship
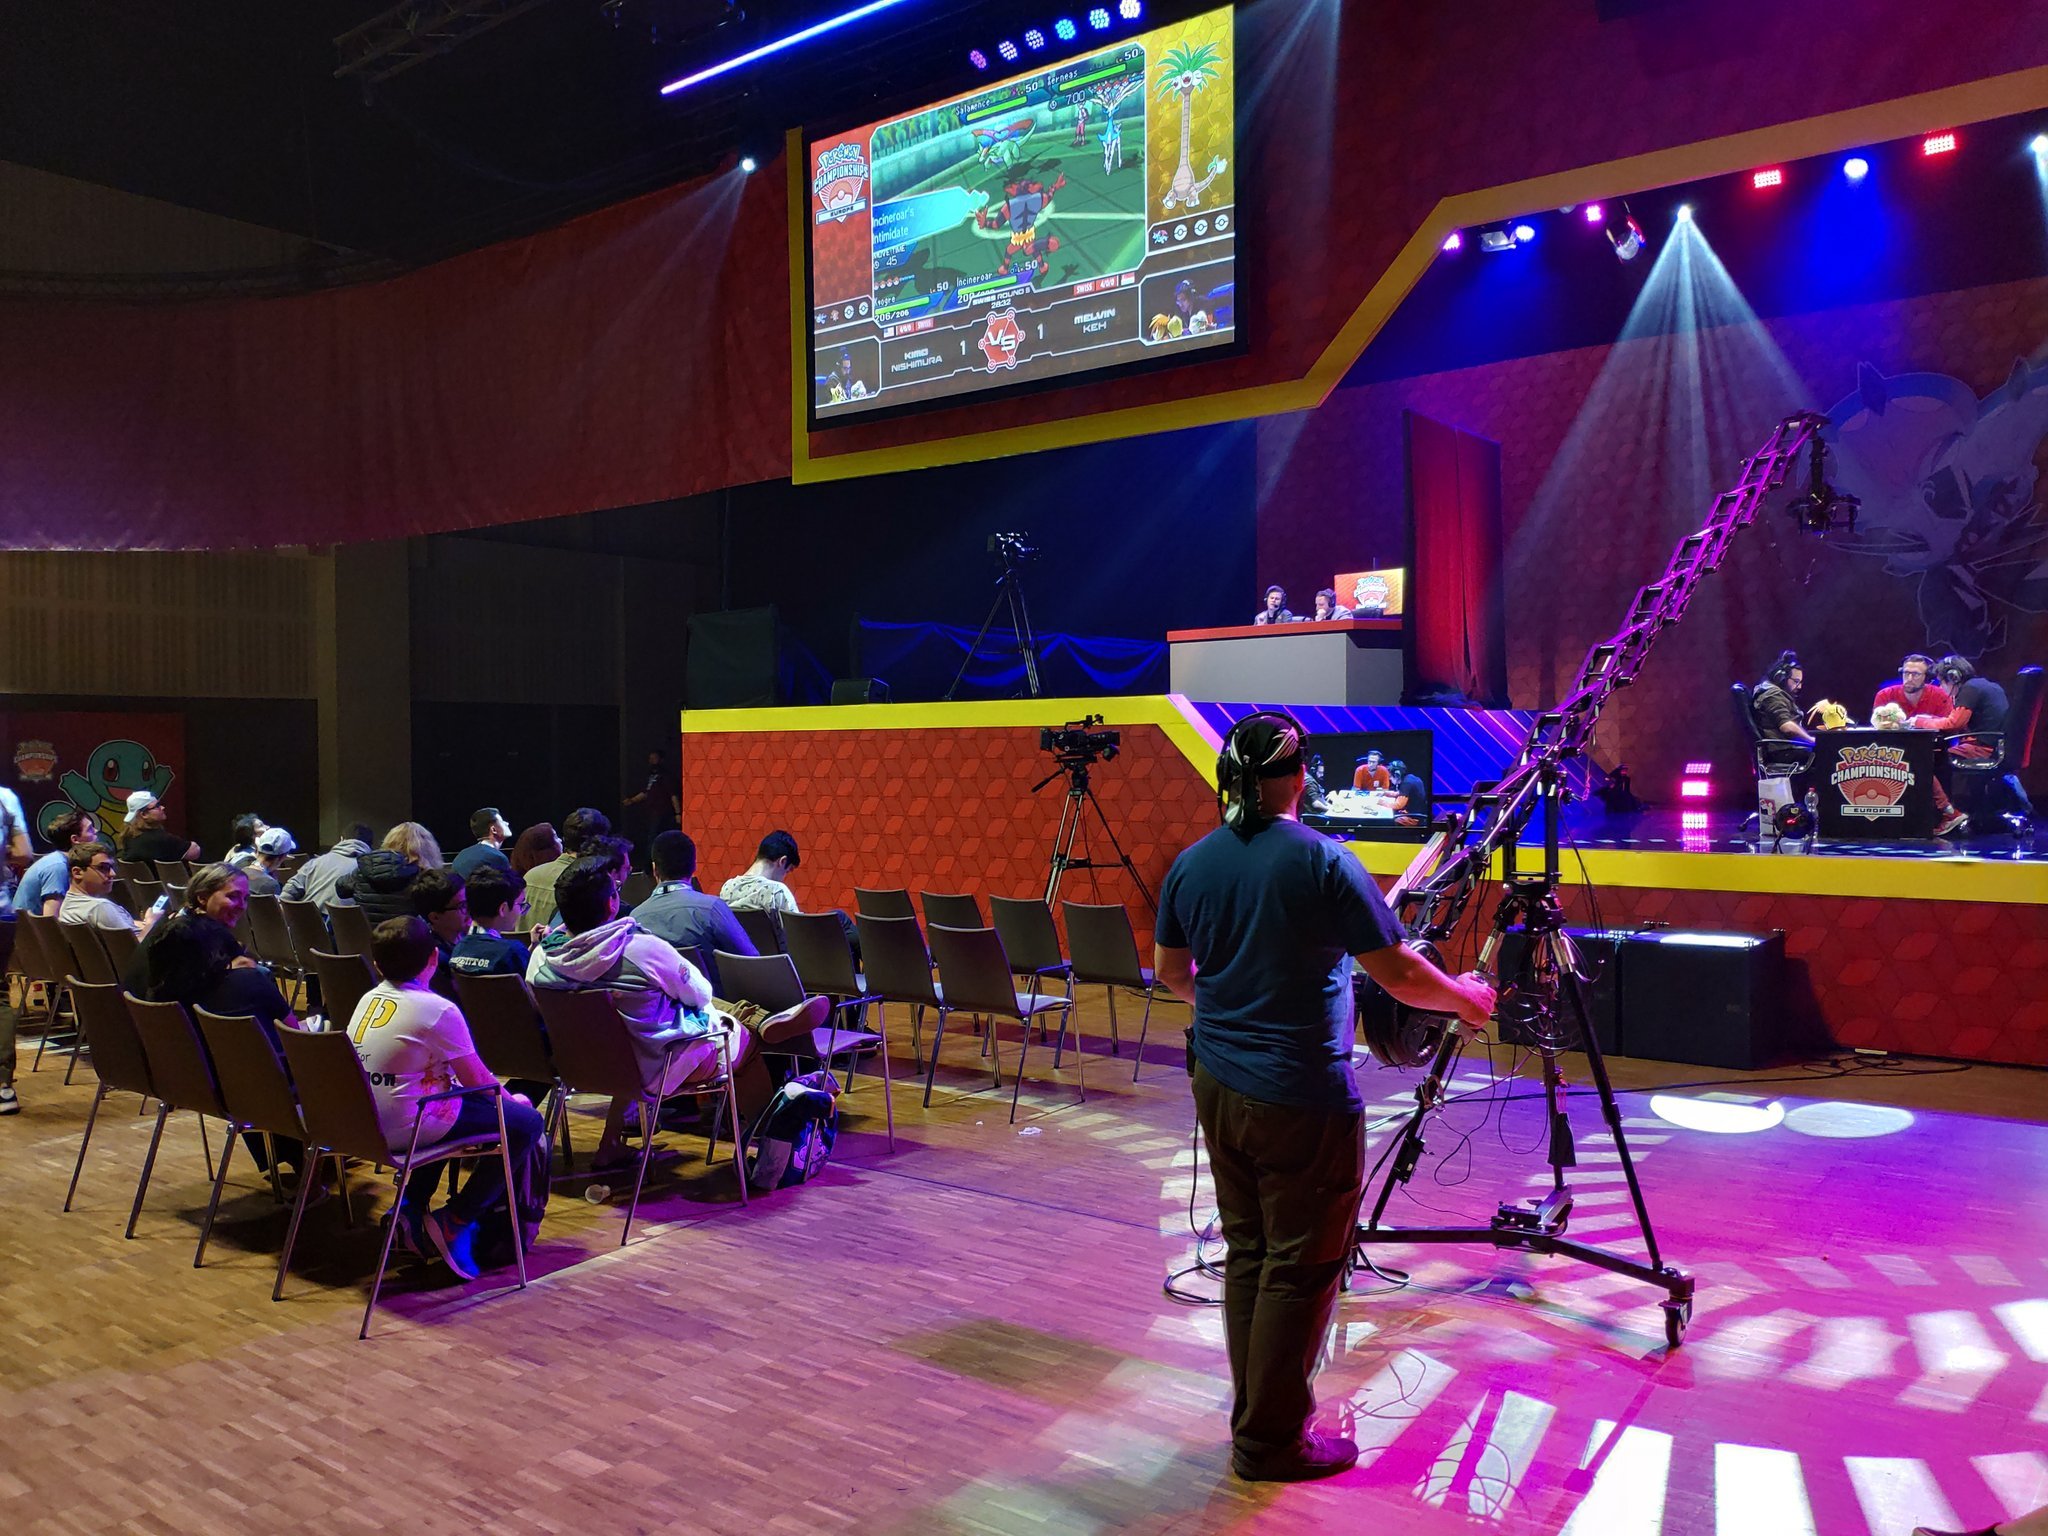 Written by Aaron Traylor
What is it like to attend an International Championship?
International Championships are open tournaments that draw a huge audience from a variety of countries, and are second in prestige only to the World Championships. They last three days (Friday, Saturday, and Sunday). This is in stark contrast to Regionals, which last 2 days, and Premier Challenge / Midseason Showdowns, which usually last one day. In North America and Europe, they are also operated by The Pokémon Company International themselves instead of a secondary party (e.g. card stores, ESL).
There are only 4 International Championships throughout the year, and they are fun for spectators and competitors alike.
If you have any questions while you’re at the tournament, look for a judge– they’re easily spotted by their white lab coats. The tournament organizers and judges will make every part of the procedure clear, and you should follow their instructions– they are the ultimate authority! If you’re playing a battle and need to summon a judge for any reason, put your hand up and wait for a bit.
What do I have to do before attending an International Championship?
If you’re spectating
International Championships sometimes require a spectator’s fee (around 10$.) If you are the parent of a child competing, you will not have to pay this fee. Otherwise, there will be a wide variety of activities. Check out our spectator’s guide below.
If you’re competing
Get a POP ID and make a Pokémon Trainer Club account. You’ll need a POP (Pokémon Organized Play) ID and a Pokémon Trainer Club account to play in the tournament, earn prizes from it, and obtain Championship Points for qualifying to Worlds. Here’s how you get started. The POP ID is a number that uniquely identifies you within their system. You probably shouldn’t give it out to anyone other than tournament organizers.
Register online. You’ll need a POP ID to register for the tournament. You’ll also have to pay the entry fee ahead of time. Entry fees can be very steep, and might run you 60 or more dollars.
Get the Pokémon that you want.
Travel to the event. You can read our guide for estimating travel cost here, and a packing list here. Our preferred time to arrive at the event is midday Thursday (the day before the tournament) at the latest– but you might not be able to avoid a late evening arrival. Our preferred time to plan to leave the International Championship is, if driving, midday Sunday at the earliest. If we booked scheduled transportation (e.g. planes/buses), we try to leave Sunday evening at the earliest**.**
Schedule
All times in this schedule are approximate– every tournament will be different. Check the Pokemon.com website for your event for specifics.
International Championships Schedule
International Championships have 3 phases of play:
- Day 1 Swiss: every player signed up for the event plays several rounds of Swiss.
- Day 2 Swiss: If there are over 227 players in attendance, players who have a final record of 2 losses or less, or the top 32 players, whichever number is greater, will qualify to Day 2. Otherwise, the top 8 players advance directly to Top Cut.
- Top Cut: The top 8 players from Day 2 Swiss will advance to Top Cut, which happens on Saturday, except for the finals, which happen on Sunday.
Friday (Day 1)
Check-in
The first step of the tournament is check-in, which usually lasts until about 8:30 or 9am. You’ll need your registration details, your player ID, and a government ID to corroborate your registration. You’ll also need your Switch and a team sheet. A team sheet is a piece of physical paper outlining every stat, move, item, and ability of your six Pokemon for that tournament. They’ll have some available in line, but you can also fill them out ahead of time. You’ll hand the team sheet in when you register.
When you check in, you’ll probably have to wait in a line with other competitors– make sure it’s for the video game. When you reach the front of the line, you’ll meet judges that will help you check in. First, they’ll check your online registration. After that, they’ll take your team sheet and use special software to lock your battle box. What this means is that you won’t be able to swap the Pokemon out of the battle box (accessible by pressing X twice in the PC in Pokemon Sword/Shield) until you cancel your participation in the tournament on your Switch.
After that, you’ll be good to go- hang out until Round 1 begins. You’ll have gotten some tournament swag from the people who checked you in. We recommend knowing where the judge’s table, water fountain, bathrooms, and outlets are before the tournament begins.
The Tournament (Swiss rounds)
At around 9:30am, the tournament will start. You will be able to check pairings on your phone using the RK9 website, or look for your name on the paper pairings (you’ll be able to spot them by the throng of people crowding around them). You’ll sit down across from your opponent and listen to announcements from the tournament organizer before beginning. Once you’re given the all-clear to start your match, follow the procedure outlined at the table to connect your Switch to your opponent.
You’ll then play a best of three against your opponent. At Regionals, Internationals, and Worlds, your Switch will be plugged in at all times, so don’t worry if it can’t hold a charge well. Once the battles have started, you’re not allowed to use any other electronic devices (if you have a medical concern, talk to a judge beforehand!) It’s okay to use headphones, but they have to be plugged into your Switch. You’re allowed to take notes, but you need to use a clean sheet of paper– you can’t read off anything written beforehand during the battle. It’s also a good idea not to talk to other players except your opponent during the battles, and if you have to do so, talk quietly– other players will be concentrating on their own battles.
During your best of three, a judge will come over to leave a match slip by your table. The first player to win two battles will be the winner, and then both players will sign the match slip. The winner will circle “Winner” and then walk up to the judge’s table to hand in the match slip. If there is any error in the match slip, let the judges know as soon as possible.
After the match is complete, wait for the next round. You should be ready at all times for the next round to start, as it will begin once all players have finished their matches. A round usually takes about an hour to finish, but it can take a little less, or more if there is a significant delay. If you finished in two quick games, you’ll probably have a good amount of time to mill about the hall, grab water or a snack, or use the restroom. If you finished in three long games, you might only have a few minutes before the next round, so if you need to get anything or use the restroom, go quickly. There will probably not be a break for lunch, so don’t plan on being able to go out and grab food.
There will probably be between 8 and 10 rounds of Swiss– to learn more about this tournament format and how this is decided, go to our Swiss technical article here. That means that if Round 1 began at 9:30am, then the day will probably end between 4:30 and 7:30pm, if not later due to slight delays.
At the end of all of the Swiss rounds, the judges will post the standings. The top players will advance to Top Cut the next day: you can read more about how this is determined here. If you didn’t make Top Cut, your tournament is over and you’re free to leave the tournament and Cancel Participation in your game, thus unlocking your battle box. If you did make Top Cut, listen to what the judges say and do not leave the venue until they tell you to. Also, do NOT cancel participation and unlock your box. These steps are important to make sure you know where to be the next day.
This is what the Internationals prizing and Championship Points structure is like.
Going on Stream
One or two highlight matches (usually of players with 0 or 1 losses) will be selected per round for a stream (if there is one). If your match is selected to go on stream, judges will instruct you on what to do, and you should follow their directions.
Dropping
If you for whatever reason decide to finish the tournament early– maybe you need to drop for a personal reason, or you aren’t having fun anymore– don’t just walk off! Check with the judge’s table to get a drop slip. This is a piece of paper that you sign to let the tournament staff know that you’ll be dropping. If you earned Championship Points, you can still get them if you drop.
Saturday (Day 2)
If the event is large enough, Day 2 Swiss will continue for the top players. The judges will notify you of where you should be and at what time you should show up.
Your record will carry over from the previous day of the competition— however, your resistance might not. (Check with an official!) What this means is that if you have 7 wins and 2 losses on the first day, you’ll begin on the second day from that same record.
Top 8 standings is based on both the total record across both days as well as the resistance earned on Day 2. There are usually prizes for all players who play in Day 2 Swiss but don’t reach Top Cut.
Top 8 will begin shortly after the final Day 2 Swiss standings are posted.
The Tournament (Top Cut rounds)
At this point, only a few players will remain in the tournament. If you’re spectating at this point, feel free to skip ahead to the spectator section.
Top Cut players should show up at the time that they’re asked to and follow all directions given by the judges. This might involve a little bit of sitting around while the judges hack check all of the Top Cut players.
At this point, losing a best of 3 means that a player is eliminated from the tournament. Play will continue for two rounds, with a conclusive final battle that will likely be streamed to a crowd. Expect the finals to wrap up around 3pm, but this is a loose estimate.
Top Cut players should check with the judges once they’re out of the tournament for prizes and to collect contact info to get set up with the cash prize payment system.
Sunday (Day 3)
If you’ve been knocked out of the tournament, you’ll want to come back to the venue around 1pm to watch the VGC finals for the Juniors, Seniors, and Masters divisions (or earlier if you’d like to watch TCG). If you’re in the finals yourself, by this point the judges will have told you what to do.
Once VGC Masters are finished with their finals, there will be a brief awards ceremony, and then the venue will close and the tournament officials will begin to take it down.
Spectating and Non-tournament Activities
For spectators or players who took an early exit from the tournament, there are still plenty of fun things to do at the tournament. You’re free to come and go from the tournament venue– if you know people playing, they’ll likely be very grateful if you deliver them food.
Watching Games
There will be a stream setup for you to watch that should have a VGC battle going with commentary. Do not look over players’ shoulders to watch games– this can get you in trouble with a judge. If there are TVs off to the side broadcasting games, these are okay to watch as well. More and more players will also come to watch the games as the tournament continues and more players are eliminated.
Side tournaments
There are often small side tournaments that award prize wall points, which you can exchange at the prize wall for Pokemon-themed merchandise (e.g. cards, plush, et cetera). This area should be clearly marked.
Vendors
There are often vendors selling Pokemon cards and hard-to-find plushies, some of which are imported from Japan. Most of these vendors target trading card game fans, but some are for Pokemon fans in general. At International Championships, these vendors may have their own rooms connected to the hall– you might have to explore for a bit to find them.
Classic game setups
In recent years, there have been setups of classic Pokemon games such as Pokemon Stadium 2, Pokemon Snap, and Pokemon Colosseum. Grab some friends and play some party minigames!
Creative corner
For young ones, there’s usually an art station with crayons and blank sheets where they can draw Pokemon.
Wrapping Up
International Championships can be a long experience if you’re competing. Make sure to get out and explore the city, especially if you’ve travelled!
Attending Worlds
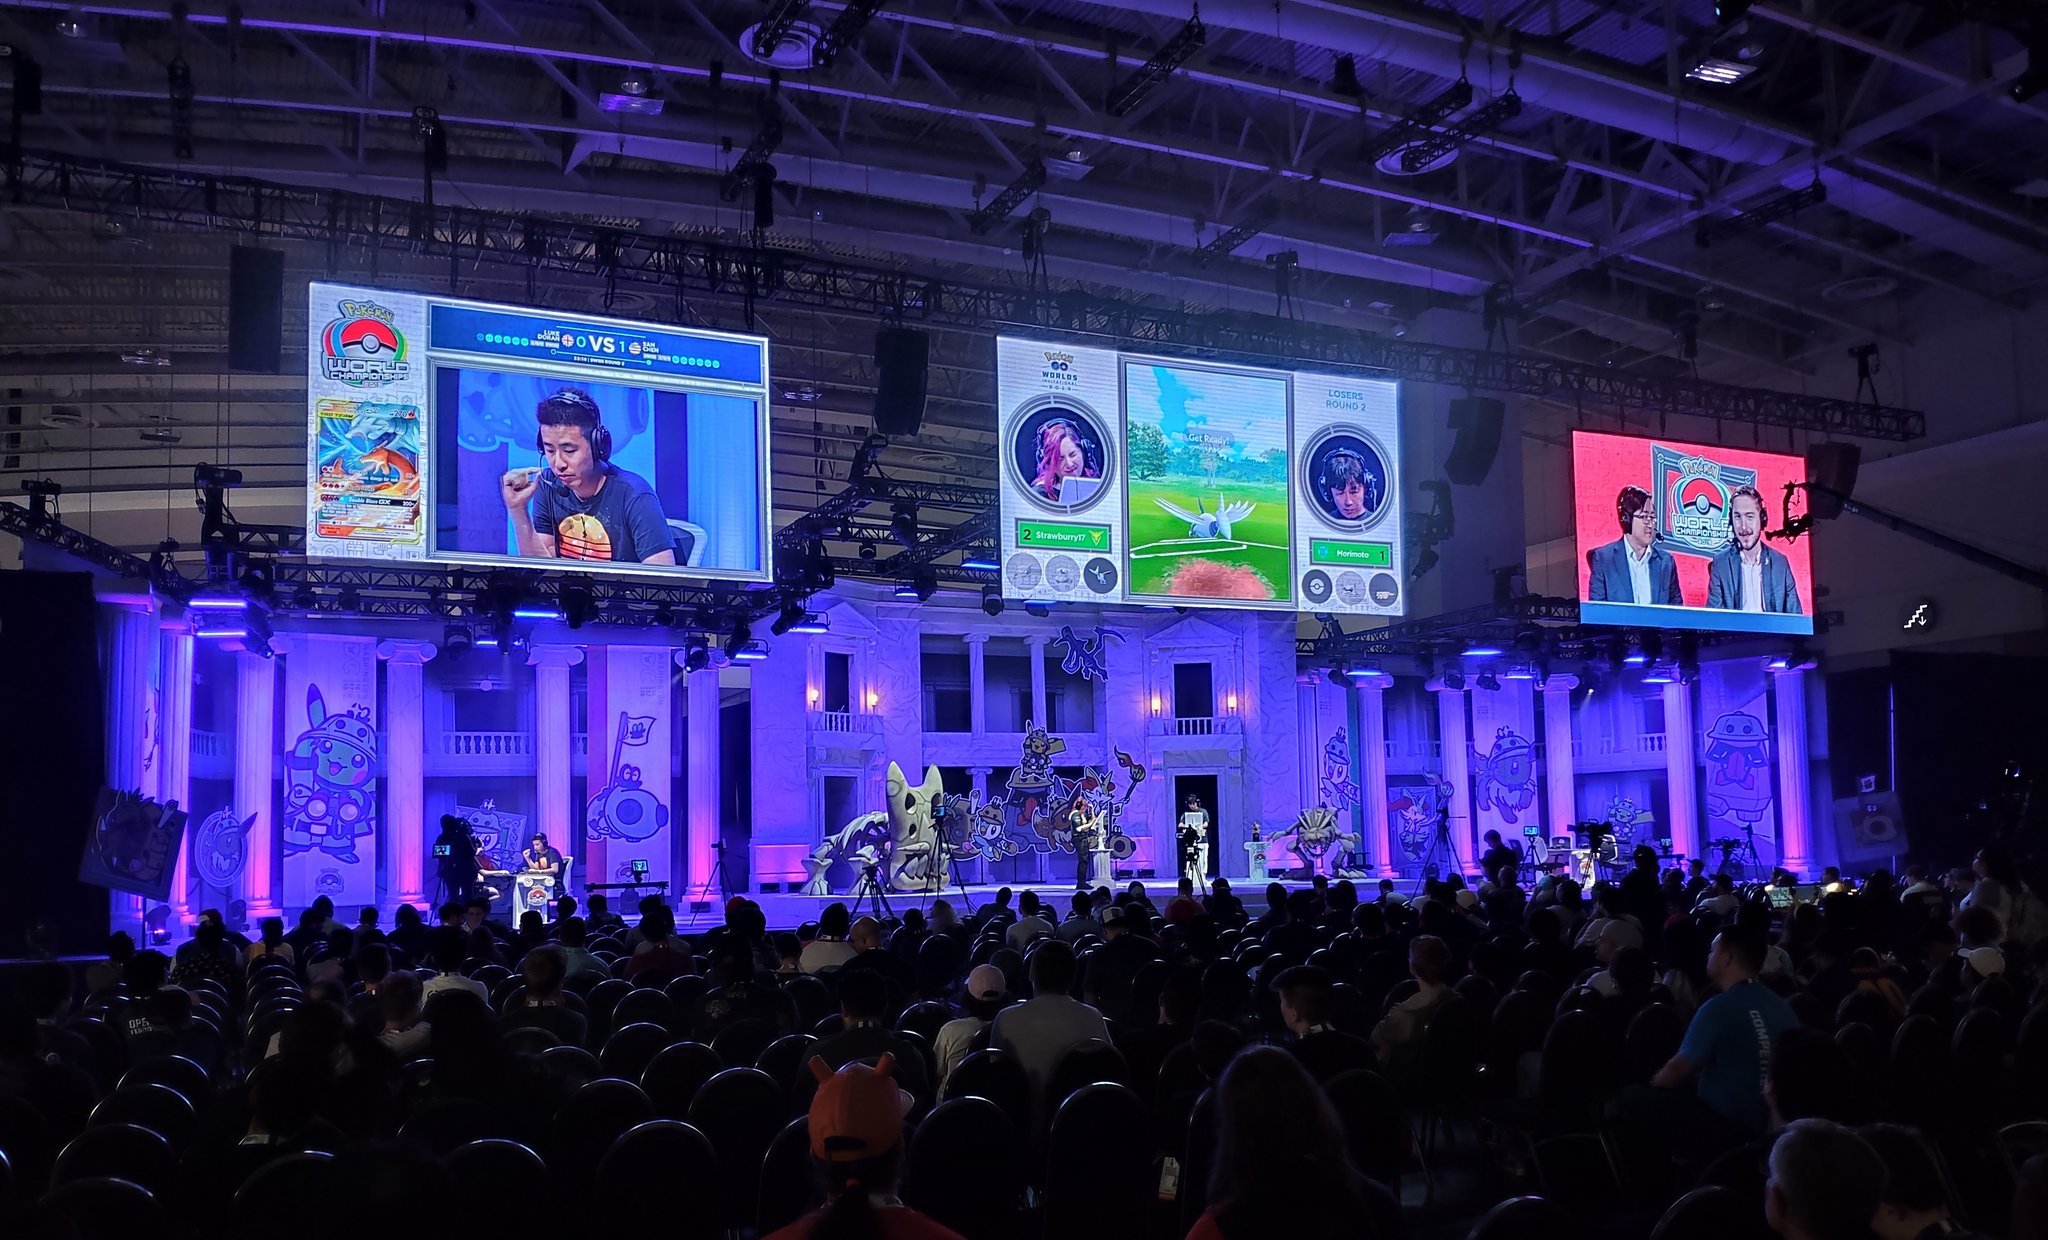 Written by Aaron Traylor
What is it like to attend Worlds?
The Pokémon World Championships are the largest and most prestigious event of the Pokémon circuit. Worlds happens once a year in August, and attracts a large international audience. Unlike every other tournament, it is invite-only– only players who have earned enough Championship Points can compete in the main tournament. However, there is usually a side tournament that awards Championship Points for the next year. Worlds is an exceptional experience whether you are spectating or competing.
Worlds in 2022 will be four days (Thursday-Sunday), which will be different than in prior years. Until the official Pokémon schedule is released, we don’t know how this tournament will be structured. In this article, you can read about how prior Worlds were structured.
What do I have to do before attending Worlds?
If you’re spectating
Worlds requires a spectator’s fee (around 15$.) This will be available on the Pokemon.com website shortly before Worlds. If you are the parent of a child competing, you will not have to pay this fee, and you’ll get one guaranteed for free when your child registers. Check out our spectator’s guide below.
If you’re competing
Instructions will be in your qualification email. Shortly after the North American International Championships, if you’ve qualified, you will receive an email from Pokémon at the email address that is registered to your Pokémon Trainer Club account. Make sure to check your spam and make sure you have the right email registered.
Get the Pokémon that you want.
Travel to the event. Importantly, for Worlds, most competitors must check in on Wednesday before Worlds.There is a late registration time on Thursday morning. If you are directly qualified to Day 2 of Worlds, you will register on Thursday evening with the qualified players from Day 1.
You can read our guide for estimating travel cost here, and a packing list here. Our preferred time to arrive at the event is midday Thursday (the day before the tournament) at the latest– but you might not be able to avoid a late evening arrival. Our preferred time to plan to leave the World Championship is, if driving, midday Sunday at the earliest. If we booked scheduled transportation (e.g. planes/buses), we try to leave Sunday evening at the earliest**.**
Schedule
All times in this schedule are approximate. Check the Pokemon.com website for specifics.
Worlds Schedule
Modern Worlds (pre-2022) have had 3 phases of play:
- Day 1: every player with a Day 1 Qualification plays several rounds of Swiss. Players with 2 losses or less will move on to Day 2.
- Day 2: Players directly qualified to Day 2 begin play, as well as all qualifying players from Day 1. They play several rounds of Swiss.
- Top Cut: All players from Day 2 Swiss with 2 losses or less will advance to Top Cut, which happens on Saturday evening, except for the finals, which happen on Sunday.
Thursday (Before the tournament)
Check-in
The first step of the tournament is check-in, which is the weekend before the tournament. You’ll need your registration details, your player ID, and a government ID to corroborate your registration. You’ll also need your Switch and a team sheet. A team sheet is a piece of physical paper outlining every stat, move, item, and ability of your six Pokémon for that tournament. They’ll have some available in line, but you can also fill them out ahead of time. You’ll hand the team sheet in when you register.
When you check in, you’ll probably have to wait in a line with other competitors– make sure it’s for the video game. When you reach the front of the line, you’ll meet judges that will help you check in. First, they’ll check your online registration. After that, they’ll take your team sheet and use special software to lock your battle box. What this means is that you won’t be able to swap the Pokémon out of the battle box (accessible by pressing X twice in the PC in Pokémon Sword/Shield) until you cancel your participation in the tournament on your Switch.
After that, you’ll be good to go- show up tomorrow at the time that you were told. You’ll have gotten some awesome Worlds swag from the people who checked you in.
Friday (Day 1)
Opening Ceremony
The tournament begins with an opening ceremony, where Junichi Masuda or other Pokémon executives often welcome the competitors personally. They might even announce unreleased details from a new Pokémon game! You won’t want to miss this event.
The Tournament (Swiss rounds)
Immediately after the opening ceremony, the tournament will start, so you should head to the play area. You will be able to check pairings on your phone using the RK9 website, or look for your name on the paper pairings (you’ll be able to spot them by the throng of people crowding around them). You’ll sit down across from your opponent and listen to announcements from the tournament organizer before beginning. Once you’re given the all-clear to start your match, follow the procedure outlined at the table to connect your Switch to your opponent.
You’ll then play a best of three against your opponent. At Regionals, Internationals, and Worlds, your Switch will be plugged in at all times, so don’t worry if it can’t hold a charge well. Once the battles have started, you’re not allowed to use any other electronic devices (if you have a medical concern, talk to a judge beforehand!) It’s okay to use headphones, but they have to be plugged into your Switch. You’re allowed to take notes, but you need to use a clean sheet of paper– you can’t read off anything written beforehand during the battle. It’s also a good idea not to talk to other players except your opponent during the battles, and if you have to do so, talk quietly– other players will be concentrating on their own battles.
During your best of three, a judge will come over to leave a match slip by your table. The first player to win two battles will be the winner, and then both players will sign the match slip. The winner will circle “Winner” and then walk up to the judge’s table to hand in the match slip. If there is any error in the match slip, let the judges know as soon as possible.
After the match is complete, wait for the next round. You should be ready at all times for the next round to start, as it will begin once all players have finished their matches. A round usually takes about an hour to finish, but it can take a little less, or more if there is a significant delay. If you finished in two quick games, you’ll probably have a good amount of time to mill about the hall, grab water or a snack, or use the restroom. If you finished in three long games, you might only have a few minutes before the next round, so if you need to get anything or use the restroom, go quickly. There will probably not be a break for lunch, so don’t plan on being able to go out and grab food.
There will probably be between 8 and 10 rounds of Swiss– to learn more about this tournament format and how this is decided, go to our Swiss technical article here. That means that if Round 1 began at 9:30am, then the day will probably end between 4:30 and 7:30pm, if not later due to slight delays.
At the end of all of the Swiss rounds, if you did qualify to the next day of the competition, you’ll want to follow the judges’ instructions closely. When the judges give you the go-ahead, you can unlock your battle box. Then, figure out where competitors are supposed to be the next day.
If you didn’t qualify, that’s the end of your run in the main tournament, but you can still play in the Open on the next day, which awards Championship Points for the next year– see the Spectating section.
Going on Stream
One or two highlight matches (usually of players with 0 or 1 losses) will be selected per round for a stream (if there is one). If your match is selected to go on stream, judges will instruct you on what to do, and you should follow their directions.
Dropping
If you for whatever reason decide to finish the tournament early– maybe you need to drop for a personal reason, or you aren’t having fun anymore– don’t just walk off! Check with the judge’s table to get a drop slip. This is a piece of paper that you sign to let the tournament staff know that you’ll be dropping. If you earned Championship Points, you can still get them if you drop.
Saturday (Day 2)
The competition in Day 2 of Worlds is especially steep.
Check-In 2
If you qualified for day 2, you’ll have to check in again. You can change your team between Day 1 and Day 2 of Worlds if you so choose.
Your record will not carry over from the previous day of the competition, if you did play.
Worlds players will play several rounds of Swiss (between 5 and 7).
All players with 2 losses or greater will advance to an asymmetrical Top Cut bracket.
The Tournament (Top Cut rounds)
At this point, only a few players will remain in the tournament. If you’re spectating at this point, feel free to skip ahead to the spectator section.
Top Cut players should show up at the time that they’re asked to and follow all directions given by the judges. This might involve a little bit of sitting around. Also, most matches will be streamed or on a side television.
At this point, losing a best of 3 means that a player is eliminated from the tournament. Play will continue until only 2 players remain.
Top Cut players should check with the judges once they’re out of the tournament for prizes and to collect contact info to get set up with the cash prize payment system.
Sunday (Day 3)
The finals are very exciting and are worth watching. If you’ve been knocked out of the tournament, you’ll want to come to the venue early to watch the VGC finals for the Juniors, Seniors, and Masters divisions (maybe around 12– even earlier if you’d like to watch TCG). If you’re in the finals yourself, by this point the judges will have told you what to do.
VGC Masters are the last finals.
Closing Ceremony
Immediately after the finals, there is a closing ceremony where they celebrate the winners. An executive from the Pokémon company will personally hand a trophy to each player. Then, the Worlds location for the next year will be announced, and with that, the tournament will conclude.
Spectating and Non-tournament Activities
For spectators or players who took an early exit from the tournament, there are still plenty of fun things to do at the tournament. You’re free to come and go from the tournament venue– if you know people playing, they’ll likely be very grateful if you deliver them food.
The Open
There is a tournament that starts on Saturday after Worlds that awards Championship Points towards the next season, called the Open (named after the Worlds city, so Nashville Open, London Open, etc). It awards the same amount of Championship Points as a Regional. This is open to all players that are not registered for Day 2 of Worlds and has a small fee for entry. It does not award prize money, but does award trading card packs.
Watching Games
There will be at least one stream setup for you to watch that should have a VGC battle going with commentary. Furthermore, there will be multiple televisions around the competition area that are broadcasting games with chairs. Do not look over players’ shoulders to watch games– this can get you in trouble with a judge. More and more players will come to watch the games as the tournament continues and more players are eliminated.
Worlds Store
There is a store selling official merchandise that is themed around the Worlds host city. There are T-shirts, jerseys, plushies, and other exclusive gear that can only be bought at Worlds. There’s also a small selection of non-exclusive merchandise (plushies, charms, et cetera). Popular items sell out fast, so if attending the store is important to you, you’ll want to line up as soon as it opens. The line can get long (sometimes several hours), so plan accordingly.
Side tournaments
There are often small side tournaments that award prize wall points, which you can exchange at the prize wall for Pokémon-themed merchandise (e.g. cards, plush, et cetera). This area should be clearly marked.
Classic game setups
In recent years, there have been setups of classic Pokémon games such as Pokémon Stadium 2, Pokémon Snap, and Pokémon Colosseum. Grab some friends and play some party minigames!
Creative corner
For young ones, there’s usually an art station with crayons and blank sheets where they can draw Pokémon.
Wrapping Up
Worlds is an incredible experience that usually involves a brand-new city with tons to do, top-level competition, and a lot of Pokémon. Enjoy it!
Championship Points: Details and FAQ
 Written by Aaron Traylor
Earning Championship Points is how you qualify for the World Championships. You can earn them in VGC when you place highly at tournaments. (TCG also has Championship Points, but points only apply to the game that you earn them in). In some certain cases, earning enough of these points can get you bonus prizes and money.
All of this information is available on Pokémon’s VGC page, which is the official authority on points. You should read through the Pokémon page and use the information here as a supplement.
How do I get Championship Points?
You can earn Championship Points by placing well in officially sanctioned Play! Pokemon tournaments – this means Premier Challenges, Midseason Showdowns, Regional Championships and International Championships*. You can read more about these events here.
Do online tournaments ever award Championship Points? Footnote: (*) Rarely, Pokemon will run “International Challenges” as Official Competitions in the Sword and Shield game, and these count for a small amount of Championship Points. These are the only online tournaments that award points.
How many Championship Points does each event award?
The number of points awarded to a player at an event is based on:
-the event type
-the player’s performance (what place do you finish in?)
-the number of players that attend (also referred to as a “kicker”)
You can find tables that show how many points you can expect based on all 3 numbers at the Pokemon.com Championship Points resource.
How do I know what place I’ll get at the tournament?
Your final standing at the tournament is determined by your Swiss record and, if you qualify, your path through Top Cut. (Read more about these tournament phases here).
In most circumstances, the players that reach Top Cut will get points, and sometimes highly placing players who don’t reach Top Cut will get points as well.
When do my Championship Points expire?
At the end of the World Championships, all players’ points totals reset to 0. This means that you’ll need to start all over again once the World Championships happen, whether you’ve qualified or not.
What is a “Best Finish Limit” and how does it affect me?
You can only earn a certain amount of points from each type of tournament that count towards your total Championship Points. For example, if the best finish limit for Premier Challenges is 6, that means only your top 6 Premier Challenges will earn points towards your total.
For example, if these are the Premier Challenge events that I’ve attended:
PC #1 - 30 points
PC#2 - 16 points
PC#3 - 12 points
PC#4 - 8 points
PC#5 - 8 points
PC#6 - 8 points
PC#7 - 8 points
PC#8 - 0 points
My total from these tournaments is 30 + 16 + 12 + 8 + 8 + 8 = 82 points. If I attend a 9th Premier Challenge, and get 30 points from it, my point total will then be 30 + 30 + 16 + 12 + 8 + 8 = 104 points. However, this number doesn’t restrict the points that I would earn from Midseason Showdowns or other events– their best finish limits are calculated separately.
What can I get with Championship Points beyond qualifying for Worlds?
There are rewards for the players who amass the most points in their qualifying region. The four regions are North America (US + Canada), Europe, Latin America, and Oceania (Australia + New Zealand). These rewards are called stipends and pursuing them is informally referred to as being on the snowball (because attending more events helps you earn the stipends, which let you attend more events, thus “snowballing” the points).
If you place in the top 8 during a “season” (the period of time between two International Challenges, excluding the first one but including the second), you will gain a Travel Award to the next International Challenge. If you place in the top 8 until the end of the non-Worlds season (from last Worlds up to and including NAIC), you will gain a Travel Award to attend Worlds. You will also skip the first stage of the competition.
Travel awards are valued around 2,000$-3,500$, and more if you’re under 18. Attempting to gain a stipend is quite challenging and often requires an extreme amount of travel for Pokemon. We don’t necessarily recommend attempting to earn this many points for your first season. You can read more about these awards on the Pokemon website here.
Strategies for Qualifying for Worlds
Written by Aaron Traylor
Do you want to compete in the Pokémon World Championships? Many people play in the Play! Pokémon circuit with the ultimate goal of qualifying to Worlds in August, which is VGC’s largest and most prestigious tournament. You’ll need above a certain amount of Championship Points (CP) in order to qualify and play, though, and that means coming up with a year-long strategy for getting enough points to cross that bar. Here’s our advice on coming up with a plan to get from 0 points to 400 points.
The first thing to keep in mind is to only compete in a way that is healthy for you financially and mentally. It’s important to know beforehand how traveling to tournaments will affect your financial and mental health. Keep in mind the cost of the tournaments that you want to travel to. Also know that traveling every weekend to play in tournaments can be exhausting for many reasons, and may affect your performance and mental health. Make a plan at the beginning of the season for attending events that is safe for you financially and takes how much rest you think you’ll need into account.
The second thing is that there is no “right” way to qualify for Worlds. A player who gets most of their points from small local tournaments qualifies to Worlds just the same as someone who only has high-ranking Regional and International finishes. In fact, most players will get their invites over many weekends rather than breezing through in a few. Get your Worlds invite however is right for you.
Third, championship points are not a sure bet at any tournament, no matter who you are. Due to the nature of how CP are awarded, you may try to make your plan transactional– for example, if I’m going to this Regional, I can expect to finish in the Top 64 and earn 50 CP. While this is a great strategy for eyeballing how many events in general you might plan to attend, there are a lot of different factors that can affect your run at a tournament, many of which are out of your control. We recommend making your plan as general as possible in regards to how the points will be earned.
Finally, keep in mind your carbon footprint! If you can, cut down on the number of flights you plan to take, and carpool and take public transportation as often as possible.
Making a Plan
The CP season begins as soon as the previous year’s Worlds ends (August) and ends immediately after the North American International Championship tournament in July. It’s important to know how many points you have as that deadline approaches.
Your strategy for gaining CP will revolve around three elements:
How easy is it for you to travel to smaller tournaments (Premier Challenges and Midseason Showdowns)?
Points from smaller events can add up quickly. However, you might not live in an area where you can attend that many events. In general, it isn’t sustainable to travel long distances for these events– you should never plan to fly to one. If the closest small event is three or four hours from you, it might be challenging for small events to make up a chunk of your points. On the plus side, these tournaments usually take half a day at most from start to finish.
How easy is it for you to travel to larger tournaments (Regionals and Internationals)?
Larger events award more points, but are less frequent, more expensive, and usually require travel. They also have a more substantial time cost, as a Regional will take up a whole weekend, and Internationals actually begin on Friday. Regionals are spread out evenly throughout each rating zone– if you live in a central place in the US, you may have 3 or 4 Regionals within 8 hours of driving distance. There is only one International in each rating zone (North America, Europe, Latin America, and Oceania), so if you want to travel to an event outside your rating zone, it will take an entire weekend plus travel time– and we don’t endorse flying across the world just to play Pokémon, so we’d recommend you make a trip out of it.
How likely do you think you are to earn points at the events that you travel to?
This is the big question– to know how many events to go to, you need to estimate how each event is going to go for you. Keep in mind that, while local tournaments may be small, there are plenty of strong players at any event that you will attend. However, large events are certainly more challenging. Our advice here is to see each tournament as an opportunity to gain points rather than viewing them transactionally. Go to enough tournaments to give yourself opportunities to earn the points that you’re going to need. It might be hard to estimate your tournament performance before you attend any– you’ll learn to do this with time and practice.
Here is the most common recipe to qualify to Worlds, but again, there is no correct path:
- Attend as many local PC/MSS events as you want to. The points from these events really do add up, and it’s worth trying to get as many points as you can with light travel. This will reduce pressure at larger events and potentially reduce the amount of Regionals you’ll have to play in. However, there’s no guarantee that the points from small events will be “easy”, and local tournaments are often casual but challenging.
- Attend 3-5 Regional events. Regionals are a good mid-level source of points, and you don’t have to reach Top Cut to slowly build your way to an invite. If you do manage to reach Top Cut of a regional, you’ll earn a lot of points. A Regional champion earns half of the points that they need for an invite.
- Attend your region zone’s International Championships. This tournament has the highest number of points for offer– a 6-3 performance at Regionals might earn you 30 or 50 CP, but a 6-3 performance at Internationals might earn you 100 or more. However, International Championships are longer and often more challenging to get to, making them more costly. If you have the financial ability, attending more than one International can make qualifying a breeze.
Here is the “budget” qualification method:
- If you’re trying to qualify for Worlds on a budget, you will need to perform consistently well at your local events– PCs and MSSes.
- In general, it is not going to be possible or practical in most cases to qualify to Worlds off of only PCs and MSSes. You theoretically can get an invite off of mostly these points alone, but it’s challenging depending on how many players there are in your area.
- Don’t forget about the online International Challenges! These each award about as much as an MSS without overlapping on the Best Finish Limit. Furthermore, they’re free, and playable from your living room. The downside is that they’re rather challenging and a bit of a grind.
- If you’re close to a Regional, try to go to it.
- If you’re able to pick one “large” event to go to, pick an International-level tournament if you can. These events award much more points than Regionals, but you’ll only get one shot, so take the event seriously.
What happens if my plan falls apart?
No plan is going to be 100% perfect, and if you find the season speeding by and you’re short of points, don’t worry– it happens to everyone. No one can fully control the outcome of a Pokémon tournament. If you still have tournaments left, you never know how they’re going to go.
At this point, you might be considering booking additional travel to go to more large events to eke out the last points. We would again like to caution you to be aware of how booking last-minute Pokémon travel will affect you financially and mentally, and that there is no sure bet of points from any event. Remember that there is always next year– VGC isn’t going away any time soon! Taking a step back from the circuit and regrouping can mean that you have more financial, time, and mental resources with which to approach the next season.
What if I need a certain amount of points from a tournament to qualify?
You might find yourself in a position where you need a certain number of points from the last tournament you can attend before the July cutoff. Most often, this will be the North American International Championship, but if you can’t attend, your last tournament might be whatever last tournament you can go to before that.
Don’t panic. This situation happens to lots of people. If you need a high number of points from a large tournament to qualify for Worlds, you’ll need to work very hard. If you need a small number of points, we still recommend working hard– however, you might want to take less risks with your tournament preparation. Play a team that you know inside and out that you trust yourself to perform with.
Adjust either of these plans to your needs, and check out our cost guide.
How Much do Pokémon Tournaments Cost?

How Much do Pokemon Tournaments Cost?
Written by Aaron Traylor
Making smart financial choices is one of the most important parts of playing VGC– Pokemon tournaments can be fun to travel to, but travel can be expensive, and you’re not guaranteed to make your money back. This is a guide to understanding the costs of travel to VGC tournaments so that you can prepare for your season as best as possible. All costs in this guide are going to be in US dollars and assume that the reader lives in the USA– we apologize if that doesn’t cover readers from other nations, but we’re only speaking from our own experience.
The most important thing to keep in mind is not to expect to make your money back from the tournament, no matter how well you think you’ll do. Even the most seasoned VGC experts can’t expect to make money at a tournament, as there are a lot of factors that go into a tournament result, many of which are outside a player’s control. Do not factor prize money into your financial analysis– if you do end up winning prize money, you can save it or put it towards a future tournament.
Switch
If you don’t have a Nintendo Switch and a copy of Pokémon Sword / Shield, you’ll need one. A Switch Lite retails for $200 and Pokémon Sword or Shield costs 60$.
Entry Fees
For smaller tournaments– Premier Challenges and Midseason Showdowns– the tournament itself may cost between 5$ and 20$ to sign up.
For larger tournaments– Regionals and Internationals– an entry fee will run you between 50$ and 70$. This covers everything for the actual tournament.
There is no entry fee for the World Championships.
Transportation
If you’re not able to stay at your own home for an event, you’re going to need to figure out how to get to the event.
Driving
Driving is the cheapest option, especially if you’re able to carpool with players from your local region and split gas. Depending on the distance from the event and the mileage of your vehicle, you might not actually need that many tanks of gas. Plan to arrive the day before and leave the Sunday of finals.
Airplanes
Airplanes are sometimes the only option, and are certainly the most expensive. If you’re going to fly to a Regional or larger event, be as smart about booking your tickets as possible. Book early and don’t wait until prices go up. Alberto Lara, seasoned VGC player, wrote an extensive guide to flying to Regionals here. Preferably, you would book your flight in for the day/night before an event (Friday for a Regional, Thursday for an International, or Wednesday for Worlds, and leave on Sunday, but these can be peak times and the tickets may cost more than if you do some smart searching.
Buses
A Greyhound bus (or similar) is a good low-budget option for crossing the country. Make sure that you’re able to get to the bus station from the event easily, as not every convention center is easy to get to.
Trains
In America, it’s pretty hard to get to most events using the Amtrak train network, and although taking a train can drastically reduce your carbon footprint, if you’re worried about cost, it might not be much different than taking an airplane.
Boats
Don’t take a boat to an event.
Lodging
If cost isn’t an issue, we recommend staying as close to the tournament as possible. The difference between a 15 minute walk to your hotel and a 45 minute drive can drastically affect your tournament experience. However, cost is often an issue, and commuting to a convention center (which is often in the middle of a city) can save a lot of money.
Splitting lodging is a great way to save on money at events. Many players split hotel rooms with other players that they know. If you intend on splitting a hotel room, we have two requests: first, make sure you trust every person in your hotel room. Second, don’t sleep on the floor (unless you want to). This will wreck your sleep and is generally not worth saving a buck on your hotel room as it will significantly impact your tournament run.
Homestay
If you have a friend or relative’s home to stay near the event, your lodging will cost very little. However, it’s most likely that you will need to be further from the event, and you’ll need to factor in time and cost of transportation.
Hotels/AirBNBs
Hotels are a big part of the tournament expense. Many convention centers are attached to hotels, which can be convenient but expensive. Budget options are further out, but you might need a car or a rideshare such as Lyft or Uber to get to the tournament, which adds an extra step to the tournament. If you want to save money on food, an AirBNB will often come with a kitchen, which can allow you alternatives to pricey restaurants.
Food
If you’re travelling to an event, you’ll be eating out most of the time, and this expense can add up. Have a rough idea of the restaurants you’ll be going to and how much they’ll cost. Expect to get quick takeout lunch and to eat at a restaurant for dinner every night that you’re there. Convention center food can be expensive, and is usually not very healthy, so we recommend making other plans.
You’ll also want snacks or something to keep you afloat during the tournament.
Packing

Packing for an Event
Written by Wolfe Glick
It can be stressful to remember everything that you’ll think you need for an event, so we’ve got you covered with a complete list. Ultimately, if you have your wallet, your id/passport, your phone, and your Switch, you’ll be okay. That being said, there are many things that you’ll want or need that you probably want to take with you.
For events you aren’t travelling for (Premier Challenges, Midseason Showdowns, or anything where you stay at your home), this list is rather short– you’ll want your cell phone, wallet with ID, Switch, Switch charger, Pokémon Sword/Shield game, a face mask, water bottle, maybe some snacks, and a notebook and pen.
If you’re traveling, we’ve provided a comprehensive list below.
Necessary items
Travelling
Cell Phone
Wallet
Suitcase
Passport (if international) or government ID (if domestic)
Airplane boarding pass (if applicable)
Face masks
Research coronavirus compliance procedures for the train/airline and tournament, and any country-specific guidelines if you travel internationally
- Bring vaccination record if necessary, but don’t if unnecessary.
Optional
Smaller bag
- You’ll want something to carry around your Switch, snacks, charger, et cetera during the tournament. A drawstring bag or large purse is a great bring.
Clothing
Clothes for the days you are there + 1
- Wear clothes that you like and are comfortable in. You’ll be sitting for a long time!
- Consider wearing a neutral unbranded shirt on the day of the competition (unless it’s official Pokemon merchandise). If you make an official stream, and your shirt is branded (e.g. Nike, Supreme, etc) or unofficial merchandise, you’ll have to wear a big baggy Play! Pokemon shirt over what you’re wearing on stream.
Optional
- Bathing suit
- Rain jacket
- Pajamas
- Extra shoes (e.g. for the beach, bring sandals or flip flops)
- Exercise clothes
Toiletries
Deodorant
Toothbrush + Toothpaste
(If applicable) Medications
(If applicable) Contacts + spare glasses
(If applicable) Feminine hygiene products
Optional
- Shampoo and conditioner if you don’t want to use the hotel stuff
- Hairbrush
- Sleeping aids (e.g. mask, melatonin)
Electronics
Switch
Sword and Shield game cartridge (If the digital copy isn’t on your Switch)
Switch charger
- At Regionals, Internationals, and Worlds, your Switch will be plugged in at all times, so don’t worry if it can’t hold a charge well. You’ll still want this for your hotel room.
Phone
Phone charger
Laptop
Laptop charger
Optional
- (Strongly recommended) Headphones that plug into your Switch
- Other electronics + chargers
- Portable charger
Odds and ends
Notebook + two writing utensils
Optional
- (Strongly recommended) Leave space in your bag– you’ll probably pick up odds and ends. Especially if you’re going to Worlds, have a plan for bringing back about another airplane underseat bag’s worth of belongings.
- (Strongly recommended) Reusable water bottle
- Things to entertain yourself with on a car, train, or plane ride (book, audiobook, movies, etc)
- Board games
- Other video games / controllers (e.g. for Melee)
- Gifts for other people
- Good luck charms
- Air mattress (if you’re driving and rooming with a bunch of people)
Tourism and Research (Optional)
- If you’re taking a vacation with your trip, you’ll need items not on this list– e.g. hiking equipment, clothes for nice meals out, etc.
- List of attractions that you’d like to go to
- List of restaurants that look good
- Find fun things to do with friends (e.g. escape rooms, laser tag, bars, board/video games, karaoke)
Things to find once you’re in the tournament city
- Go to a store and get snacks for yourself. You will most likely not get a lunch break or time to leave the venue, so this is essential. Great options are nuts, fruits, granola bars, and energy drinks.
- We recommend having a reusable water bottle, but you might want to track down some bottled water in case you’re not comfortable with the tap in your hotel room.
- If you’re a caffeine addict, make a plan to find coffee on the day of the tournament.
- If you forgot anything, ask the hotel or track down a convenience store.
What is a “Good” Ladder Rating?
Learn about our approach to laddering on Showdown or Battle Stadium.
Written by Aaron Traylor I hear this question quite frequently from players who are perhaps looking for a benchmark to judge themselves against, either on Showdown or on Battle Stadium. This is also one of my least favorite questions to receive, because I don’t really agree with the underlying thought process. Many elements of Pokemon rely on luck, and many more are completely subjective. Pokemon also requires constant learning. When you attempt to sum up all of those different skills into one number, you miss a lot of smaller details about how you’re improving and growing. There is not and will never be one number that you can use to judge your own skill.
Furthermore, I personally focus my VGC goals and aspirations on doing as well in tournaments as I can. Some players take ladder rankings very seriously. For me, the ladder is primarily a place where I can get proof of concept for my teams’ performance. I’d like to know if opponents who don’t know anything about my team can figure out ways to beat me that I didn’t consider when I was building the team. Thus, I rarely have long ladder sessions and quickly move to playing practice best of 3s after I’m sold on the concept behind a team.
“ In 2016 I was rank 1 on both the in game and Showdown ladders with my Nationals team. I then went on to have my worst finish at Nationals at the time.”
— Wolfe
That being said, you came here for an answer. This is how I think about battling through each of the different ladder ratings:
Showdown
The number that most people pay attention to on Showdown is the ELO number, which is a rating system originally designed for chess. It goes up when you win battles, and down when you lose battles, and you’ll earn more for defeating an opponent with a high ELO and less for defeating a low ELO opponent. Showdown provides two other metrics, GXE and Glicko. GXE roughly estimates your odds of defeating the average ladder player. Players who take Showdown ladder very seriously tend to rely on GXE as the most important metric. Glicko is another metric, similar to ELO. You can read more about these rating systems here.
I focus on the ELO metric. Although it is perhaps not the most accurate estimate of a player’s skill, it’s a rough estimation and that works for me. Keep in mind that the ELO range also changes the more people are playing on a ladder.
Battling at 1000 - 1200 ELO: All new accounts start at 1000 ELO. You’ll see some very wild teams in this radius which defy a lot of conventional teambuilding practices. Some of these players come straight from Smogon or other metagames and are giving VGC a try. This range is a good test; can you and your team beat other teams that are so unorthodox that there’s no way you can expect them coming? Battling here is one of the best ways to build up fundamentals and find clean paths to victory. In this range, you’ll probably also find a handful of people from higher ladder who are making new accounts (termed “alts”) and climbing back up the ladder from the default rating.
Battling at 1200 - 1400 ELO: This range is mostly made up of the players who are able to climb further away from the default rating, so battles might be a little more challenging on average. Opponents will be a little bit more willing to hedge guesses based on your team and make predictions. Don’t think that you’re completely clear of oddball teams, either: they are a constant on Pokemon Showdown, no matter your rating.
Battling at 1400 - 1600 ELO: This is the range in which I spend most of my time on most of my accounts. I tend to get good battles that make me think seriously in this range. You can get excellent tournament practice without ever climbing above this range.
Climbing for Top 500: If you’re focusing on ladder, top 500 is a good goal. It is not trivial to make your way through the crazy teams and the good players, and placing in the top 500 requires a consistently high win percentage.
Climbing for Top 100/Top 10: The margin for error is a lot smaller than reaching the Top 500, and will shrink as you climb the ladder. You’ll need to play many more games and beat opponents a much higher percentage of the time. Your opponents will consist of both people who take best of 3 VGC incredibly seriously and people who are trying to beat you in a best of 1 battle however they can.
Climbing for First: Getting to first on the Showdown ladder is about perseverance and making very few mistakes in light of the vast majority of solid players and gimmicky teams that will try to steal your ladder points. Even one loss to bad luck will sink your rating like a stone; the people who tend to try for first on the ladder have ratings that are far above the rest of the players, so, when trying to pass them, you’ll earn very few points for a win and drop a ton for a loss. If this is a goal of yours, it will require serious patience and a lot of focused time.
Battle Stadium
The ingame ladder rating works a little bit differently than Showdown does. First, the ladder resets every month. The Showdown ladder never resets until a new format drops. Furthermore, unlike Showdown, which has an ELO, Battle Stadium only shows your rank. If you reach the Master Ball tier, you get a number, which is your ranking out of all Master Ball players.
A good first goal is reaching the Master Ball tier.
Once you’re in the master ball tier, there are many factors that tie into your ranking. The number of active players can vary depending on the month, and depending on when in the month you play. It’s going to be a lot easier to reach a high ranking on the first few days of the month, as compared to the last few days of the month. That being said, there’s not a “good” ladder rating that we can give you. An ambitious goal is to reach the top 30 at the end of the month so that you can be featured on Liberty Note, a Japanese website.
Words of Caution
- The battles are best of 1, which is a very different environment than you might encounter at a best of 3 tournament. The two battle formats test different skills. Don’t be disappointed if climbing the ladder is challenging.
- The ladder can become very insular, especially near the top. You might play an opponent with a strange strategy multiple times. You might end up overpreparing for a matchup that you play infrequently in the long run.
- Showdown is much faster and has a move undo button, which is very different from in game. It can be challenging to adjust to the differences.
Part 16 — Appendix — SwSh Legacy Setup (VGCGuide In-Game Guide)
Making Your Favorite Pokémon Battle Ready
Written by Scarlet Andrews
Beyond VGC, Pokémon are our friends and partners. Everyone has favorite Pokémon partners from different points in their journeys, and now you can bring them with you into the competitive world, too! Pokémon Sword and Shield allows almost any Pokémon, even those from past generation games, to become ready for competition!
Firstly, if you want to use a Pokémon from a past generation game, you’re going to need to transfer it up to Pokémon Sword and Shield. Albeit long-winded, Pokémon from as far back as the Generation 3 games (Ruby, Sapphire, Emerald, FireRed, LeafGreen) can be moved up to Sword and Shield.
You can find a comprehensive guide to transferring Pokémon here.
After your Pokémon has arrived in the Galar region, go to the Battle Tower and talk to the man next to the elevator at the back. He’ll be able to apply the Battle Ready symbol to your Pokémon - this will make it eligible for Ranked Battles and tournament play. In doing so, the Pokémon will have its moves wiped and replaced with level up moves. This means any Pokémon with event moves will not be able to relearn them, so be careful. Sorry, Eruption Heatran!


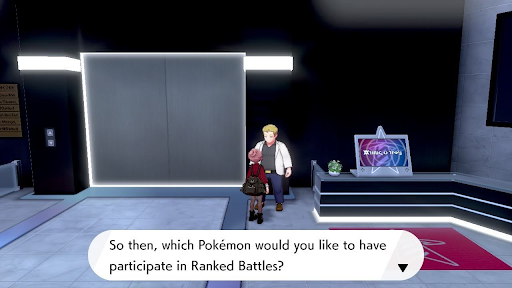
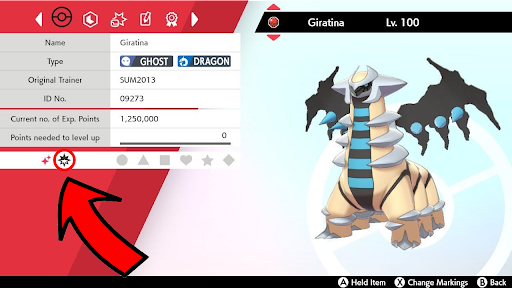
Now that your Pokémon has the Battle Ready symbol, it’s time to make it big and strong!
First, we recommend you level up this Pokémon to Level 100, to allow you to Hyper Train it. You can do this in one of two ways - EXP Candy, or leveling up using Pokejobs and date skipping.
EXP Candy can be obtained from winning Max Raid Battles, or bought for Dynite Ore in the Max Lair. EXP Candy L give 10,000 EXP, while XL Candies give 30,000 EXP. Using EXP Candy is by far the fastest method, so if you have a large supply of it, this is the method we recommend.
Alternatively, you can use Pokejobs and date skipping to level up a lot of Pokémon at once, without expending resources. Find out how to do this here.
Hyper Training
If the Pokémon you transferred does not have the IVs you’re looking for, don’t worry! Any imperfect IVs can be made into a Perfect IV of 31 using Hyper Training! As mentioned before, your Pokémon will need to be Level 100 to undergo Hyper Training.
Hyper Training uses Bottle Caps - one Bottle Cap will raise one stat to a 31 IV, while a Gold Bottle Cap will raise all of a Pokémon’s IVs to 31. Bottle Caps can be bought for BP in the Battle Tower shop or created in the Cram-o-Matic. If you’re feeling lucky, they can be obtained rarely in Max Raid Battles or from the Digging Duo. Gold Bottle Caps, their far rarer cousin, can be obtained from monthly Battle Stadium rewards, events and once again, the Digging Duo.
You can learn more about Hyper Training here.
Mints
If your Pokémon has a less than optimal Nature, you’re going to want to freshen its breath with a Mint! Mints allow you to change your Pokémon’s Nature (or more specifically, change its stats to reflect that nature).
Mints can be bought in the Battle Tower shop for 50 BP each, or can be found in the overworld in various places. More info on Mints and where to find them can be found here.
EV Training
EVs are an incredibly important part of training a Pokémon for VGC - a Pokémon’s EV spread makes a world of difference on the KOs it can take and the attacks it can survive. EV training in Sword and Shield is a lot easier than in previous games due to changes made to Vitamins (HP UP, Protein, etc) - they can now boost a stat all the way to its maximum. You can find out more about how to EV train here.
Transferring Egg Moves
Before Sword and Shield, Egg Moves were finicky at best and aggravating at worst. Sword and Shield, however, introduced the ability to transfer Egg Moves across Pokémon provided they are of the same species.
For example, if you have an Incineroar with Fake Out, you can put it into the Pokémon Nursery with another Incineroar (this Incineroar must have an open move slot - you can use the Move Deleter, found in Pokémon Centers, to do this). Walk or cycle around a little, and then go back - your Incineroar will now both know Fake Out!
Both Pokémon must be of the same exact species for this to work - for example, Incineroar cannot pass Fake Out to Torracat, and vice versa. You can learn more about Egg Moves here.
Dynamax Candy
This step is only applicable to Pokémon being used for formats where Dynamaxing is allowed. Dynamax Candy impacts the increase in health when Dynamaxing. Dynamax Candy can be found through raids, or can be purchased in the Max Lair. We recommend making all your Pokémon Dynamax Level 10 - you never know when you may need to Dynamax that Indeedee! Find out more about Dynamax Candy here.
Max Soup
A final, optional step - in Pokémon Sword and Shield, a certain few Pokémon are capable of Gigantamaxing. However, not all Charizard can Gigantamax, for example - they must specifically have the Gigantamax Symbol to be capable of doing so. In the Isle of Armor DLC, Max Mushrooms were introduced, and along with them, Max Soup. Feeding a Pokémon Max Soup (made with 3 Max Mushrooms, which can be found around the Isle of Armor after completing Max Raid Battles) makes it capable of Gigantamaxing in battle. Find out more about Max Soup here.
Conclusion
Now you’re ready to battle with your favorite Pokémon - try them out on the Battle Stadium Doubles ladder or even in a tournament!
Abilities
Written by Scarlet Andrews
If you already have your perfect Pokémon, but it has the wrong Ability, skip to the Changing Abilities section by clicking here.
Intro to Abilities
Abilities are a crucial part of VGC, and ensuring your Pokémon have the correct ones is imperative to success. It’s all well and good clicking Aqua Jet into your Coalossal until you find out it doesn’t have Steam Engine! But how do we get the Abilities we want onto our Pokémon, even the elusive Hidden Abilities?
Every Pokémon has up to 3 Ability slots up to two standard Abilities, and in most cases a Hidden Ability (often abbreviated as HA).
Before starting the breeding process, you should have in mind the Ability you’re looking for, and whether it’s a Hidden Ability or not. For this example, we’re going to breed a Gothita with Shadow Tag, which is its Hidden Ability.
If it’s a Hidden Ability, you’re going to need to obtain that Pokémon with its Hidden Ability first, before breeding down for a competitive-ready one. In Pokémon Sword and Shield, Hidden Abilities can be obtained through Max Raids and Dynamax Adventures.
Getting the Parent
Hidden Ability Gothitelle, for example, can be found in two Max Raid Dens in the Wild Area - both of which pull from the same pool of Pokémon. Info on this den can be found here. To catch this Gothitelle, I’m going to put a Wishing Piece into one of the Max Raid Dens shown at the bottom of the Serebii page. I’m looking for a red beam to come out of it - Gothitelle is not available in the rare purple beam here. Thankfully, purple beams are only a 10% chance. If you do by chance get a purple beam, feel free to defeat the den and try again.


Once I get a red beam, I’m going to ‘date skip’ for a Gothitelle raid. This is done by pressing Invite Others in the den, changing the date on your Switch, and then backing out of the den and reopening it. This will only work if a Wishing Piece was used to create the beam! I’ll repeat this step until I get a raid for the Pokémon I want - in this case, Gothitelle. I’ll defeat the Gothitelle raid and catch it in the type of Pokeball I want my future Gothita to be in. When playing offline, all Max Raid Battles (except events) have 100% catch rate, so there’s no need to worry about failing the capture. After this step, make sure to double check that the Pokémon you caught has the Ability you want. If it does, great! If not, repeat this step or go to the Changing Abilities section.


Passing Down Abilities
Now you’ve got the parent, you’re going to want to head to the Pokémon Nursery of your choosing. The one you choose is personal preference alone - it has no impact on the breeding itself.
The process for breeding a Pokémon with the desired Ability follows mostly the same process as breeding for IVs and Natures, as mentioned in their respective guides.
During breeding, the chance to pass down the parent’s Ability is dependent on the combination of parents. The female parent will have an 80% chance to pass down her Ability (60% if it is the Hidden Ability). Otherwise, the Ability will not be passed down, and the offspring will have one of its non-Hidden Abilities selected at random. Pokémon that have had their Ability changed using an Ability Capsule or Ability Patch will pass down their current Ability, not their original Ability.

Here’s our Shadow Tag Gothita! It has perfect IVs in everything except Attack, and just needs a Timid Mint!
Special Abilities
Some Pokémon have special Abilities that cannot be changed. These include Own Tempo Rockruff (only Rockruff with this Ability can evolve into Dusk form Lycanroc), Battle Bond Greninja, and Power Construct Zygarde. Zygarde’s Ability can only be changed using the Zygarde Cube.
Changing Abilities
Got your perfect Pokémon, but with the wrong Ability? No need to worry! Two items exist to help you - the Ability Capsule and the Ability Patch! Both items that can be purchased in Pokémon Sword and Shield. They are consumed after use, but you can purchase them as many times as you want.
The Ability Capsule, which allows you to change a Pokémon’s non-Hidden ability to its other non-Hidden Ability, can be bought for 50 BP at the Battle Tower, or 50 Dynite Ore in the Crown Tundra’s Max Lair. Other means of obtaining Ability Capsules can be found here.
The Ability Patch, introduced in the Crown Tundra DLC, allows you to change a Pokémon’s non-Hidden Ability to its Hidden Ability. They can be purchased for 200 Dynite Ore at the Max Lair. You can also get one for free if you show Peonia a Necrozma caught in Dynamax Adventures. Dynite Ore can be a little tricky to get in large quantities, but the best way to farm it is to play Endless Dynamax Adventures, with friends if possible.
Unfortunately, as of Sword and Shield, a Pokémon with its Hidden Ability cannot have its Ability changed to one of its non-Hidden Abilities.
Catching Perfect Legendaries
Written by Scarlet Andrews
Although not allowed in every VGC format, Legendary Pokémon are powerful creatures that can make a huge impact in battle. There are three types of Legendary Pokémon: Restricted, Sub-Legendary and Mythical.
Restricted Legendaries are immensely powerful and are usually restricted to one or two on a team at any given time. Pokémon such as Kyogre and Xerneas are monstrous attackers capable of sweeping teams single-handedly.
Sub-Legendaries, while not as strong as Restricteds, can be very powerful in either offensive or supportive roles, or sometimes even both! Pokémon like Regieleki and Tapu Fini have seen great success with a great variety of sets.
Also included in the Sub-Legendary category are Ultra Beasts - these alien Pokémon utilize their otherworldly ability Beast Boost, gaining +1 to their highest stat after taking a KO. Almost all of the Ultra Beasts have seen success in some form in VGC, but especially Nihilego, Celesteela, Kartana and Stakataka.
Finally, we have Mythical Pokémon - these mysterious creatures have never been allowed for use in VGC due to how difficult they can be to obtain. Maybe this is a good thing, though - Pokémon like Magearna and Marshadow would surely be incredibly powerful!
Now, you may be left with the question - how do I get Legendary Pokémon for myself?
Obtaining VGC-ready Legendary Pokémon
The first step here is figuring out which Legendary you’re looking to catch, and how to find it in Sword and Shield.
Most Legendaries in Sword and Shield are available through Dynamax Adventures. Any Legendaries not found in Dynamax Adventures will have their locations detailed here.
At the bottom of this page you can find listings for all Legendary Pokémon that can be encountered as final bosses in Dynamax Adventures.
Dynamax Adventures
Looking for perfect Legendaries in Dynamax Adventures requires a little more attention than other methods like Soft Resetting, but is also far more engaging.
First, you’ll need the path for the Legendary you’re looking for. There are a few ways to get a specific path: searching for a random adventure and getting lucky, asking people online, or buying it from Peonia. We recommend asking online - it tends to be much faster! Peonia will sometimes offer to sell you a path for a few Dynite Ore, so you should check if she has the path you (or a friend) might be looking for. In the case that a friend is looking for a path you’ve already completed and caught the Legendary from, you can put that Legendary at the front of your party and talk to Peonia - she’ll sell you the path for it again. The Legendary must be the one you caught in the Max Lair, and you will not be able to catch the Legendary again at the end of the Dynamax Adventure.
After getting the path, you’re all set to embark on your Dynamax Adventure! There’s a relatively big range in difficulty depending on the final boss Pokémon. Click here for a list of all available encounters in Dynamax Adventures - you’ll be wanting to pick Pokémon that have moves that can hit the final boss for super effective damage. Keep an eye out for moves like Wide Guard, too - quite a few of the bosses love to click spread moves, and this should help keep them in check.
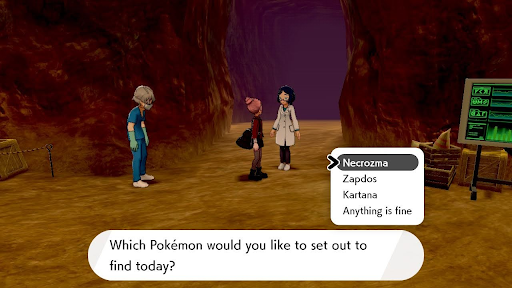
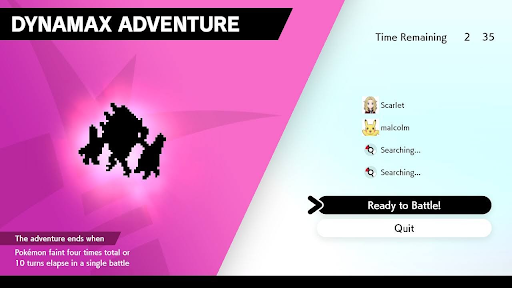
Make sure to catch all Pokémon you find in Dynamax Adventures as they have an extremely high shiny rate (1/300, 1/100 with Shiny Charm). The Pokémon do not appear shiny in battle - only on the summary screen at the end. Even if you have no interest in shinies, they may make great bartering chips in trading later on! Also, all Pokémon from Dynamax Adventures have 4 or more perfect IVs - they’re very useful for breeding!
Upon defeating the Legendary, you’ll be presented with a summary screen. Here, you’ll be shown all the Pokémon you caught during the adventure, and be given the chance to choose one to keep. You’ll be able to view their stats and nature before choosing - we’re going to use this to calculate the Pokémon’s IVs and decide whether we want to keep it or not. Create a new team on Pokémon Showdown, and add the Legendary you just caught. Adjust it to Level 70 and set it to the Nature it has in game. Next, tweak the IVs on any stats that don’t match what you have in game - the Necrozma I caught had an Attack stat of 156 and a Special Defense stat of 136, so I reduced those IVs until they hit the numbers I had in game.
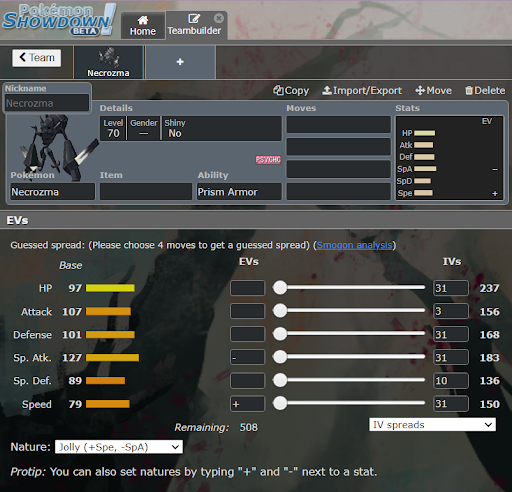


You can repeat this process as many times as you like - you’ll get up to 10 Dynite Ore per Dynamax Adventure. I chose not to keep this Necrozma as I was looking for 0 Speed.
Wild Encounters
Legendaries encountered in the wild in Sword and Shield: Articuno-G, Zapdos-G, Moltres-G, Cobalion, Terrakion, Virizion, Keldeo
Getting the stats you’re looking for on wild encounters (as well as static encounters and gifts) is a lot faster than Dynamax Adventures. For wild encounters, find the Pokémon you’re looking for in the Overworld, and then make sure to save your game. Then, run into the Pokémon to battle it. Catch the Pokémon and then check its stats using the Judge function in the PC. You can then reset to your save if it doesn’t have the stats you want (such as if you need a Speed or Attack stat of 0). Wild Legendaries will have minimum 3 perfect IVs.
Wild encounters are the only Legendaries in Sword and Shield that can have Marks.

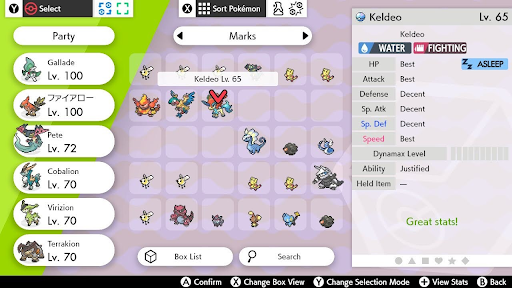
Static Encounters
Legendaries that are Static Encounters in Sword and Shield: Eternatus, Zacian, Zamazenta, Calyrex, Glastrier*, Spectrier*, Regirock, Regice, Registeel, Regieleki, Regidrago, Regigigas
Resetting static encounters is nearly identical in method to resetting wild encounters. Save in front of the Legendary you wish to reset for (you’ll need to do this before any cutscenes that Legendary has that lead directly into their battle), battle and catch the Legendary, and then check its stats with the Judge function in the PC.
* Encountered as part of Calyrex Ice Rider and Calyrex Shadow Rider, the fusion uses Calyrex’s IVs. The horses have their own separate IVs that can be viewed when separated with the Reins of Unity.
Gift Pokémon
Legendaries received as gifts in Sword and Shield: *Type:Null,*Cosmog, Poipole
Resetting gift encounters is, once again, nearly identical to resetting wild and static encounters. Save in front of the person who gives the gift you wish to reset for (the lady in the Battle Tower for Type:Null, the grandma in the house for Cosmog, and the lady in the Max Lair for Poipole), receive the gift, and then check its stats with the Judge function in the PC. All three of these gifts cannot be shiny..
Mystery Gift Pokémon are often locked to a set of stats, and cannot be reset for in Sword and Shield regardless.
Changing Formes
If the Legendary you’ve been looking for has alternate formes, you’ll need to change it to the forme you’re looking for before taking it into battle. Most forme transformations are done by using an item on the Pokémon - you can get these items by showing the Pokémon to the market salesman in Stow-on-Side.
This includes:
DNA Splicers (Kyurem)
N-Solarizer / N-Lunarizer (Necrozma)
Zygarde Cube (Zygarde)
Douse / Chill / Shock / Burn Drive (Genesect)
Adamant Orb (Dialga)
Lustrous Orb (Palkia)
Griseous Orb (Giratina)
Soul Dew (Latias / Latios)
Reveal Glass (Tornadus / Thundurus / Landorus)
Silvally’s Memory items are obtained along with the Type:Null gift in the Battle Tower.
Dynamax Candy and Max Mushroom Soup
Written by Max Gelman
Dynamax, the “gimmick” of Generation 8. Everyone has an opinion on it after Sword and Shield did away with Mega Evolution and Z-Moves. Is it a good thing? A bad thing? A cash grab? Regardless of what you think, Dynamax has proved a central tenet of VGC in this generation by essentially combining the previous two gimmicks.
As the game describes, Dynamax allows you to make your Pokémon huge for three turns and use Max Moves that can dynamically change stats, set weather and terrain, and spawn other field conditions. But what does it actually mean to make a Pokémon “huge?” And in VGC formats with Dynamax, how can you make the most out of this phenomenon?
Enter two new items introduced with SwSh and its DLC: Dynamax Candy and Max Mushrooms.
Dynamax Candy
Dynamax serves more than just the aesthetic purpose of taking advantage of the Switch’s HD graphics. When a Pokémon is Dynamaxed, its HP stat increases. How much it increases depends on how much Dynamax Candy it’s been given. In Dynamax formats, you’ll want to give as much Candy to your Pokémon as the game allows — 10 pieces — which will double your Pokémon’s HP stat while Dynamaxed.
Let’s take a look at how to do this in-game.
One can determine how much Dynamax Candy a Pokémon has eaten by pulling up that Pokémon’s Summary, or by going to the Box. There will be a bar in these areas that shows a Pokémon’s “Dynamax Level,” which is just the game’s way of saying “this is how much Candy you’ve fed this Pokémon.” Here’s what that looks like for a Pokémon that hasn’t eaten any:

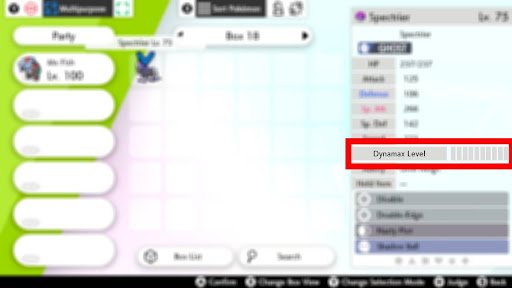

As you can see with the highlighted rectangles, the Dynamax Level bar for this Spectrier is empty. If I were to Dynamax this in a battle, its HP would only increase by 50%. In VGC, where battles take place at Level 50, my Spectrier would have 175 HP. But if I Dynamaxed it like this, it would have 263 HP instead of 350. That’s a lot of health I’m giving up! Check out Bulbapedia here for a deeper explanation.
But feeding my Spectrier some Dynamax Candy is simple. I go to my Bag, select 10 Candies from the list, and feed.

If I go back to the Summary or the Box, I can see that my mission has been a success.
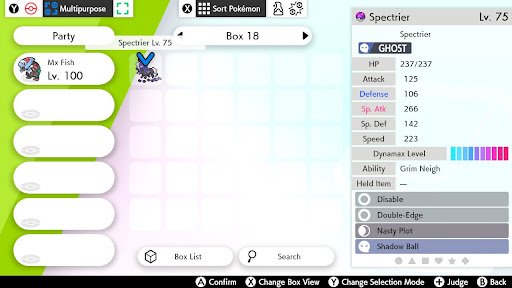

That’s all there is to Dynamax Candy! It’s a quick and straightforward process, but can sometimes be forgotten when putting a team together, so make sure you don’t forget this important step. Otherwise you’ll be fighting with Pokémon that don’t have as much bulk as they could.
When putting together a full team for a tournament or event, many players choose to fully feed their Pokemon all 10 Dynamax Candy — including Pokémon generally used as support members like Whimsicott, Amoonguss and Grimmsnarl. The general consensus is to be prepared for a worst-case scenario where you’ll be forced to Dynamax one of these Pokémon, and you want to have as much health as possible.
If you’re ever running short on Dynamax Candy, you can obtain more through Raid Battles. Another feature added in Generation 8, Raids give out a varying amount of Dynamax Candy, generally between one and three pieces each. Some rare (Blissey, Delibird) or special event Raids (Mewtwo) can give out even more. Battling in five-star Raids, or uncommon purple beam raids, are usually the fastest way to get more Candy.
Lastly, for restricted formats, remember that Zacian, Zamazenta and Eternatus will not need Dynamax Candy as they cannot Dynamax.
Max Mushroom Soup
For Pokémon that can also Gigantamax, there’s a similar process that needs to be taken into account as well: Max Mushrooms.
Let’s say you want to build a team around G-Max Venusaur, a very popular Pokémon throughout most Generation 8 VGC formats. You’ve bred the perfect Bulbasaur with the right nature, IVs and ability, and you’ve trained it up to be the Venusaur with the EVs you want. But you still need to make it capable of Gigantamaxing.
If you’ve completed the Isle of Armor storyline, you’ll be able to do this quick and easy. Go to the Dojo and talk to this character. He’ll ask for three Max Mushrooms, which he’ll then feed to your Venusaur as Max Soup. You now have a Venusaur capable of Gigantamaxing! Check your Venusaur’s summary for the special Gigantamax symbol next to its name. If you ever change your mind, you can undo the process for another three mushrooms.


Max Mushrooms are once again collected by completing Raid Battles. The mushrooms spawn around the Isle of Armor, with a new cluster popping up after every three Raids. So if you ever run low on Dynamax Candy or Max Mushrooms, you can kill two birds with one stone by completing more and more Raids.
There’s one final wrinkle here involving Urshifu, the Pokémon introduced as the Isle of Armor mascot. In order to make an Urshifu capable of Gigantamaxing, you’ll also need to provide the NPC with one helping of Max Honey. You’ll obtain a Max Honey by finishing the Isle of Armor story, but if you’d like another, you can get one by battling Vespiquen in Raid Battles at the six dens on Honeycalm Island.

Now that you know how to use Dynamax Candy and Max Mushrooms, you can fully take advantage of Dynamax in battle!
EV Training
Written by Max Gelman
Effort Values, or EVs for short, are some of the most powerful tools available for all forms of competitive Pokémon battling, and for VGC in particular. The multitude of ways you can customize your Pokémon through EV training can vastly change its role on a team.
Throughout Sword and Shield VGC formats, one prominent example has been Dragapult. If we think back to early VGC on the Switch, many Dragapults would run an EV spread to maximize their Attack and Speed stats. These Dragapults would primarily function as offensive threats and take advantage of Dynamax, putting a lot of pressure on opposing trainers.
But as time went on, Dragapult also found a role as a supportive Pokémon, most notably on teams centered around Coalossal. In both Players Cup 1 and Players Cup 2, the winning squads each featured a Dragapult with more EVs invested into their HP and Defense stats than attack.
Many Pokémon throughout VGC history have seen their roles shift depending on how they’re EV’ed. For an in-depth explanation of how and why EV training can do this, check out this video here. But how do we actually EV train our Pokémon to prepare them for VGC battles? Keep on reading to find out!
The Vitamin and Feather Method
Essentially, EVs are stat point increases. The more EVs you put into a certain stat for a Pokémon, the higher the corresponding stat will be. In your Sword and Shield games, different items will give your Pokémon these EVs, or they can be collected by defeating wild Pokémon. For a detailed explanation of EV mechanics, check out these articles from Serebii here and here. Note that all VGC battles take place at Level 50 instead of Level 100.
What you need to know for VGC purposes is that every Pokémon can earn a maximum of 510 EVs, and utilize 508 EVs (because it’s the nearest multiple of 4). Each stat can gain a maximum of 252 EVs, meaning you can only fully train two stats per Pokémon. At Level 50, a stat will increase by one point after it gains its first four EVs, and then continue to increase by one point after every eight EVs. In other words, your Pokémon will get one extra point in the Speed stat at 4, 12, 20, 28 EVs and so on.
In the Dragapult example I mentioned earlier, trainers would typically give their Dragapults 252 EVs in Attack and 252 EVs in Speed. That still left 4 usable EVs remaining — trainers generally put these in HP or one of the defensive stats to gain the extra stat point, rather than use a Dragapult with only 504 EVs.
There are several ways to EV train your Pokémon in Sword and Shield, but we’re going to recommend a method involving vitamins and feathers. With the right resources, EV training can become a seemingly daunting task into something that takes only a few minutes.
Vitamins have existed in Pokémon games since Generation 1, but Sword and Shield marked the first games where there is no limit to how many vitamins you can give your Pokémon. This can make EV training quick and easy!
There are six types of vitamins, each of which give 10 EVs in a single stat:
- HP Up — HP
- Protein — Attack
- Iron — Defense
- Calcium — Special Attack
- Zinc — Special Defense
- Carbos — Speed
Feathers, meanwhile, have been around since Generation 5 when they were called Wings. Like vitamins, there are six types of feathers. But these only give 1 EV for their corresponding stats:
- Health Feather — HP
- Muscle Feather — Attack
- Resist Feather — Defense
- Genius Feather — Special Attack
- Clever Feather — Special Defense
- Swift Feather — Speed
In order to purchase vitamins, you’re going to need a lot of money and Watts. To quickly obtain these things, as well as the best places to find Feathers, check out this article on finding items.
Once you have all the resources you need, and you know the spread you want, it’s time to EV train! Let’s say you saw how powerful an offensive Dragapult could be and want to use one on your own team. You’ve already bred your Dreepy for the right IVs, Nature and Ability, and you’re ready to go. Here is my Dreepy that I’ll EV train along with you:

To get a Dragapult with the classic 252 Attack, 252 Speed, 4 HP EV spread, I’ll need to purchase 25 Proteins and 25 Carbos. I can do so through the Pokeshop nearest the entrance to Wyndon or at the vending machines in the Isle of Armor Dojo. (To obtain the vending machines, be sure to check out the item primer guide and the Watts Section — you’ll need 400,000 Watts.) Because the Dojo offers vitamins at a lower price when buying in bulk, I’ll head over there.
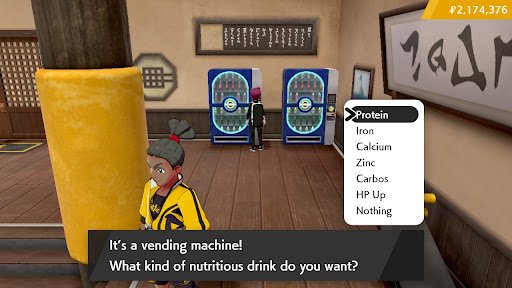
Make sure your Dreepy is in your party when you give them vitamins and feathers! This can’t be done from the box. After purchasing all the vitamins I need, I can go to my bag, select them and shove them down this baby’s tiny throat feed them to Dreepy. Luckily for us, we can give Dreepy all 25 Proteins at once, instantly raising its attack EVs to 250. To finish off the attack stat, feed your Dreepy two Muscle Feathers to push it to 252. We then repeat the same step for the speed stat with Carbos and Swift Feather.
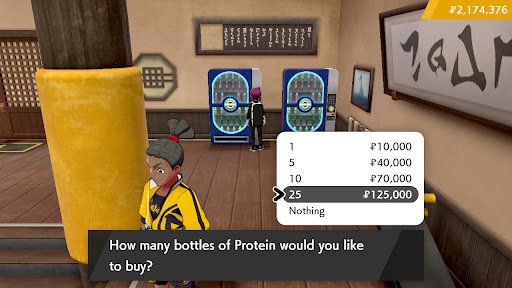


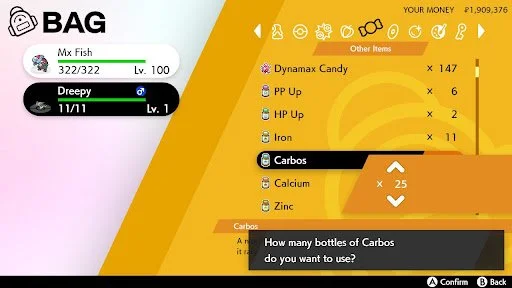
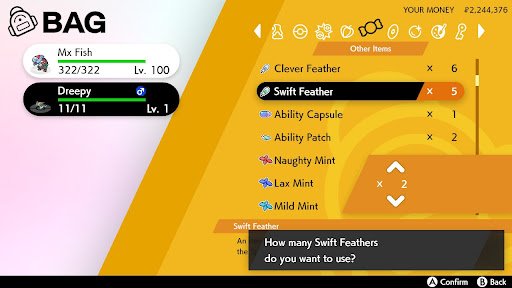
(Note: You can also save your Feathers by using 26 Proteins instead of 25. Because the EV cap is 252, you won’t push your Dreepy to 260 Attack EVs — it will simply stop at 252.)
To wrap up your Dreepy’s EV training, feed it an HP Up or four Health feathers. And that’s it! You now have a fully EV trained Dreepy that’s ready to be leveled up to a Dragapult. You can see that our mission has been a success by going to the Dreepy’s summary and pressing the Y button when looking at its stats. When a stat is EV’ed to its maximum, it will sparkle.
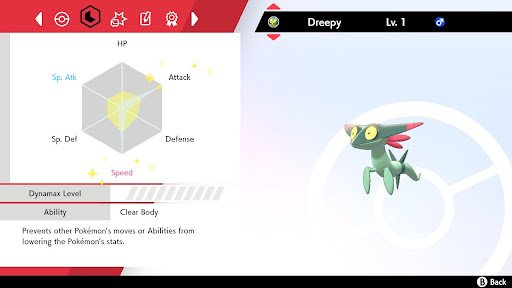
Not every Pokémon will be running one of these offensive spreads, which you may hear referred to as “max max.” As I mentioned earlier, there are many different ways to EV train a Pokémon, with Dragapult in particular able to fill a variety of roles on a team.
Let’s say instead of wanting to use Dragapult as an offensive threat, you wanted to build your own supportive Dragapult. You saw the power of Coalossal in the first two Players Cups and wanted to obtain all the Pokémon for yourself. If basing your own team off these two champions, your Dragapult spread is going to look a lot different than a “max max” Dragapult!
For example, the spreads on Santi’s and Wolfey’s Dragapults utilized more defensive EVs.
Rather than build an offensive Dragapult, let’s build Wolfey’s supportive Dragapult. We’ll need a different set of vitamins and feathers to do so, as the spread is much more intricate.
We’ll head back to the Isle of Armor vending machines and purchase vitamins in bulk. Notice that you can only buy vitamins in groups of 5, 10 or 25 if you don’t buy one at a time. Rather than 25 Proteins and 25 Carbos, we’ll instead select the option to buy 25 HP Ups, 15 Carbos, 10 Zinc and 5 Iron. These amounts will be the most efficient to EV train and save your cash.
When EV training something that isn’t “max max,” you’ll need to be careful to not go over the EVs you want. So, when building our own Wolfey Dragapult, let’s make sure we don’t go too quickly.
First, we can get the easy stuff out of the way. We’ll give Dreepy 23 HP Ups and six Health Feathers, getting the biggest amount of EVs off the table immediately. Then we can do the same for the speed stat, giving Dreepy 15 Carbos and 14 Swift Feathers. I personally prefer to EV one stat at a time, but you can give all the vitamins at once as well, feeding Dreepy the 23 HP Ups and 15 Carbos before giving the Feathers.
If you paid close attention to the previous screenshots, I actually don’t have enough Swift Feathers to complete this! If you’re in a time crunch, you may not have time to find extra Feathers and have to EV train through defeating wild Pokémon. I’ll explain more about this in a bit, but first let’s finish EV training the Dreepy’s other stats.
We now have a Dreepy with 236 HP EVs and 150 Speed EVs. For Attack, we don’t need any Protein and can simply give Dreepy four Muscle Feathers. For Defense, we can give either two Iron and eight Resist Feathers, or three Iron, using those extra two EVs out of the 510 available here. Then to finish, we feed Dreepy seven Zinc and six Clever Feathers.
Our Dreepy is almost finished! With all that vitamin and feather feeding we’ve been doing, our Dreepy’s EV spread now looks like this:
But we still need to finish EV training Dreepy’s speed stat. As I mentioned earlier, EVs can be earned by defeating Pokémon in the wild, so we’ll have to finish Dreepy’s training by doing that and finishing off the last of our Swift Feathers.
EV Training With Wild Pokémon
Every time your Pokémon earns experience, it doesn’t just get EXP. points — it also earns EVs. Each wild Pokémon gives out a certain number of EVs based on its species. In older games, EV training was largely accomplished by defeating dozens of wild Pokémon to get the desired stats, with the process expedited through multiplier methods like Power Items, Pokerus, the Macho Brace, Horde Battles and SOS Battles. Thankfully, we now have unlimited vitamin usage in Sword and Shield!
For EV training purposes in Sword and Shield VGC, you’ll likely only be battling wild Pokémon when you run out of Feathers, like what’s happened with this Dreepy. Fortunately, there are several locations we can utilize to defeat low-level wild Pokémon that each give out one EV point in a specific stat, making this as painless a process as possible.
With this Dreepy, we still need 11 more EVs in the speed stat to complete the Wolfey spread. Use the remaining three Swift Feathers you have, then fly to Route 1 and defeat 11 Rookidees. This way, we can earn the last three speed EVs after using up all our Feathers.
Here are our recommended EV training locations, should you need to do so in other stats. Each of these Pokémon give out one EV in their respective stats once they’ve been defeated.
Route 1:
- HP: Skwovet
- Def: Wooloo
- Sp. Def: Nickit
- Speed: Rookidee
Route 2:
- HP: Skwovet, Yamper
- Attack: Chewtle
- Sp. Def: Nickit
- Speed: Rookidee, Zigzagoon
Route 3:
- Attack: Growlithe, Tyrogue
- Def: Rolycoly
- Sp. Def: Gossifleur
- Speed: Zigzagoon, Trubbish, Stunky
Route 8, Steamdrift Way
- HP: Snorunt
- Sp. Atk: Snom
- Speed: Sneasel
The Dreepy does not need to defeat the Pokémon itself. Thanks to the Generation 8 EXP. Share, it will earn EV points from wild Pokémon battles as long as it’s in your party. EV multipliers like Power Items and Pokerus (explained more in depth below) only apply to the Pokémon holding them.
And now the Dreepy is finished! You can double check that everything is correct by looking at this article here.
Resetting or Adjusting EVs
For most Pokémon, you’ll likely be starting from scratch when you’re EV training. But some Pokémon, such as Legendary Pokémon and Ultra Beasts, cannot be bred. If you had previously EV trained a Legendary Pokémon like Groudon, but want to use it on a new team with a new EV spread, you’ll have to either reset or adjust the Groudon’s EVs or catch a separate Groudon with a blank EV slate.
Sometimes, you won’t have the ability to catch a whole new Groudon. That’s OK! Only one is supposed to exist anyways, right? We can take our old Groudon and reset its EVs with a very simple method.
In the Isle of Armor DLC, Sword and Shield introduced an NPC that can completely wipe any Pokémon’s given EVs back to zero. All you need is 10 Armorite Ore, which can be acquired through Max Raid Battles on the Isle of Armor. This character is located on one of the islands near the Dojo, just off the coast.

There may be another scenario where the new Groudon EV spread you want is very similar to the old spread, and only needs a few simple adjustments. Rather than reset all of your EVs and start from scratch, there are certain Berries that can reduce the amount of EVs in a given stat. These effectively serve as anti-vitamins, reducing EVs by 10 in one stat:
- Pomeg Berry — HP
- Kelpsy Berry — Attack
- Qualot Berry — Defense
- Hondew Berry — Special Attack
- Grepa Berry — Special Defense
- Tamato Berry — Speed
Let’s say you want your Groudon to have less defensive EVs and more speed. If you know the amount of EVs you want to reduce, you can give your Pokémon the respective berries, and then feed it vitamins and Feathers to get back to the magic 508 number.
Here’s a quick example. I have a Groudon with the following spread from an old team that I used in a GS Cup ladder tournament several months ago. The spread is as follows:
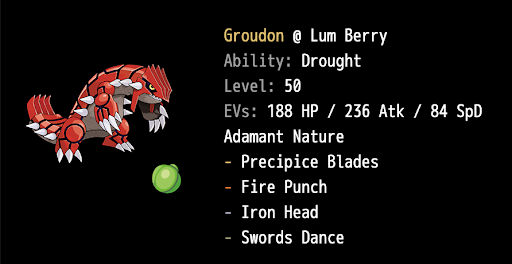
I’ve decided, however, that I now want to make my Groudon faster in order to outspeed Calyrex-Shadow Rider in Tailwind. This Groudon currently has a speed stat of 110, and maximum speed Calyrex-Shadow is 222 speed. In order to hit the right number under Tailwind, which doubles your team’s speed for four turns, I’d need to add two points to my speed stat to reach that threshold — ergo, 12 speed EVs. That way, Groudon’s speed stat will be 112 without Tailwind, and 224 once doubled. I figure I can lower my HP stat by two points to accomplish this.
Here’s how I can go about this: I’ll need to feed Groudon two Pomeg Berries, reducing its HP EVs by 20. Then, I can feed Groudon one Carbos and two Swift Feathers to get the speed stat I need, using the methods described above.
You’ll notice that I still have eight EVs left, and that my Groudon’s HP EVs are currently at 168. I won’t be able to put all eight EVs back into HP, however. Remember our EV math at Level 50 — after your first four EV points in a stat, you gain your next stat points after every eight EVs. The same holds true for lowering EVs.
Because we’re well past the first four HP EVs, and because I reduced the Groudon’s HP EVs by 20 instead of 16, I’ve actually reduced my Groudon’s overall HP stat by three points even though I didn’t lower its EVs by 24. To get back that extra point, I can re-feed my Groudon four Health Feathers to get back to the number I intended.
But I have another 4 EVs left. I can put these into Groudon’s defense stat, because — recalling the Level 50 math again — adding four EVs to any other area would not increase that stat. The final, adjusted Groudon spread would look like this:
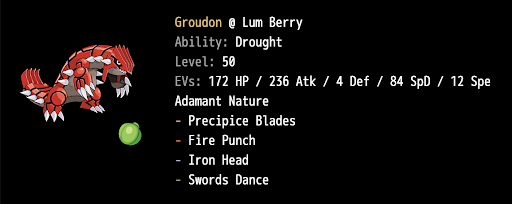
You’ll sometimes hear players describe a phenomenon called “wasting EVs.” In general, it refers to this math issue where you’ll find yourself needing to put those extra four EVs in that last stat to reach 508.
A simple trick can help you remember when you’re wasting EVs or not — if you have everything EV trained in three or five stats, you will not waste EVs; but if you have everything EV trained the way you want in only four stats, you’ll only hit 504 instead of 508 and are guaranteed to have four EVs left over. It’s just the way the EV math works out.
Other EV Training Methods
There are a couple other EV training methods you can use. If you want to feel like it’s Black and White again, feel free to give the Pokerus and Power Item method a try. You can read a deeper explanation of that method here (the mechanics of the items remain the same).
Trainers can also EV train their Pokémon using a combination of the Poke Jobs feature and the Date Skipping exploit. This is similar to the Hyper Training method, as explained here, but instead of EXP your Pokémon obtain EVs. Check out this article to see which Pokejobs correspond to each stat.
Hyper Training
Written by Max Gelman
Originally introduced in Sun and Moon, Hyper Training returned in Sword and Shield to continue allowing a more accessible competitive experience. Functionally, this lets players boost a Pokémon’s IVs up to the maximum of 31 in each stat, if the Pokémon is at Level 100. The feature is unlocked at the Battle Tower after you take down the undefeated Champion. For more details on Hyper Training mechanics, check out this Bulbapedia page.
For VGC purposes, how often is Hyper Training used? When might a player prefer to Hyper Train their Pokémon rather than breed something with the right IVs already set at Level 1? Generally, there are four scenarios where Hyper Training is utilized over breeding:
- Using a Legendary, sub-Legendary or Ultra Beast such as Kyogre, Landorus or Kartana
- Using a Pokémon distributed in a special event
- Boosting the stats of a shiny or marked Pokémon that might not have the proper IVs
- Bringing up a favorite Pokémon from an old game
The process of Hyper Training itself is fairly simple, but sometimes you don’t have your Pokémon ready at Level 100 right away. If you’ve battled in enough Raids you could potentially give your Pokémon enough EXP Candy to get to Level 100 immediately, but if you don’t have this in hand, things can get tricky. Luckily, there’s a nifty method using the Pokejobs feature that can take care of this.
(If you already have your Level 100 Pokémon ready to be Hyper Trained, feel free to skip to the bottom to read the explanation.)
By taking advantage of an exploit in the Switch settings, you can quickly raise your Pokémon to Level 100 through a method known as date-skipping. Doing this fools your Switch into thinking a full day has passed, allowing you to reap the benefits of a 24-hour Pokejob in a manner of seconds. Here’s how it works.
We’ll start with a shiny Litten that I bred while trying to prepare an Incineroar for an older team. By checking the IV Judge function in the Box (unlocked after winning your first six battles in the Battle Tower and beating Leon) we can see that it has the maximum 31 IV in most stats, but its HP and Special Attack need to be Hyper Trained.
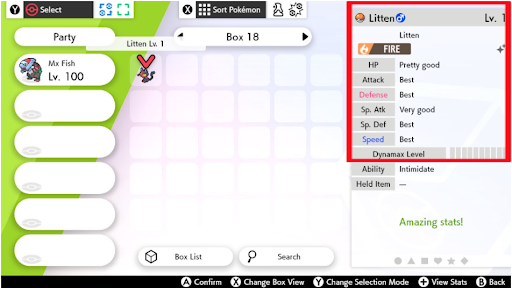
In order to Hyper Train this Litten, I’ll first need to fly to the Hammerlocke City Pokemon Center nearest the Wild Area and give it a Lucky Egg, giving it an even bigger experience boost than it’d normally receive in Pokejobs. Next, I proceed to the PC in the Pokémon Center, select the Pokejobs option, look for a job with a 10-star rating and choose “Whole Day.”
These jobs give out the most experience and also allow up to 30 Pokémon to be sent at once. If you have several Legendaries that need to be leveled up to Level 100, you can train them all at the same time as well.

Now that I’ve selected the job, I can send Litten off on its merry way for the next 24 hours… or so it thinks. Instead, I’ll be leaving the Pokémon Center and heading to the Wild Area, toward the Raid Den closest to the entrance. Then I’ll join the Raid, but press the Switch’s Home button once my device starts searching and go to the System Settings section from the main menu.
It doesn’t matter if you’re connected to the Internet or not, but things will move quicker if you’re on Local Wireless.
Once I’m in System Settings, I scroll all the way down to System and then select Date and Time. I select the option to advance the Switch’s date to exactly one day ahead, and head back into the game. The software will still be searching for Raid partners while you’re doing this, including when you relaunch your copy of Sword or Shield.
After returning to the game, I exit the Raid screen, since I wasn’t looking for a partner anyways. When I’m able to move around in the Wild Area again, I’ll see two things: the weather will change and the Den will start to glow. That means the date-skipping worked! I can head back to the Pokémon Center and retrieve my Litten.
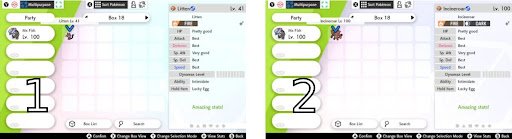
As you can see, my Litten has gained all the experience of a 24-hour Pokejob in a very short timespan. To get your Pokémon to Level 100, keep repeating this step until you can’t level up any farther. In between the Pokejobs, I will also give my Litten two Rare Candies so it can evolve into Torracat and then Incineroar, as Pokémon cannot evolve in Pokejobs.
(If you skipped the previous section about the date-skipping method, start here.)
Ok, I have my Level 100 Pokémon and I’ve beaten the Champion. I’m ready to Hyper Train my Incineroar. What comes next? You’ll need one of two items in order to complete your Hyper Training: Bottle Caps and Gold Bottle Caps.
Bottle Caps raise one stat to the maximum 31 IV and can be acquired from the Digging Duo in the Wild Area, from certain Raid Battles, or purchased from the BP Shop at the Battle Tower. You can also create Bottle Caps at the Cram-o-Matic in the Isle of Armor.
Gold Bottle Caps, meanwhile, raise all of a Pokémon’s IVs to 31. You can also find them from the Digging Duo but they’re much rarer. Both types of Bottle Caps can be further acquired as monthly rewards from the in-game Wi-Fi battling system under Victory Station, both in Single and Double Battles.
Once you have your Bottle Caps, head to the Battle Tower and find this character on the right side of the building. This NPC will perform the Hyper Training on your Pokémon. For my Incineroar, I want to boost two stats. I can use either the Gold Bottle Cap to boost both at the same time, or I can use regular Bottle Caps to do them individually.

Additionally, if I’m building an Incineroar that won’t be using any special attacking moves, such as Snarl or Burning Jealousy, I can save my Bottle Caps for another Pokémon and only boost its HP.
And that’s it! I’ve successfully Hyper Trained my Incineroar and its IVs are ready to go. There are other steps I’ll need to take to fully prepare this Incineroar for tournament play, but for now I’m satisfied with my Hyper Training. You’ll notice that the text in the Judge function has changed to read “Hyper Trained!” in my Incineroar’s HP stat.
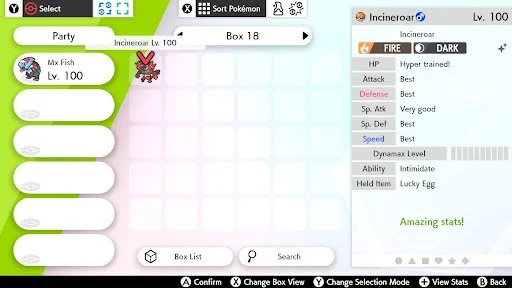
I touched on this a bit earlier, but if you have enough EXP Candies to level up your Pokémon to Level 100, our recommendation is to use this method rather than date-skipping. It’s much faster and a lot less tedious, but if you’re short on Candy there’s no harm in skipping dates.
IV Breeding
Written by Scarlet Andrews
Individual Values (IVs) are an incredibly important component of getting a Pokémon ready for competitive battles. With the exception of Hyper Training, Pokémon’s IVs are unable to be changed after they are born - this means that Pokémon must be specifically bred to have good IVs.
This process requires a little setup, but once you get into the swing of things, IV breeding is easy, especially if you’re lucky!
Getting Started
Here’s a list of things you’ll need to get started with IV breeding. You can click on each one for an explanation of how and where to get them.
- Access to the IV Judge function
- Perfect IV Ditto(s)
- The Oval Charm (Optional)
- A Destiny Knot
- An Everstone
- Power Items (Weight, Bracer, Belt, Lens, Band, Anklet) (Optional)
- A Pokemon with the Flame Body, Magma Armor or Steam Engine Ability (Optional)
IV Judge
The first step to getting Pokémon with perfect IVs is being able to check those IVs without hassle. Thankfully, there is a feature for this in the games - the Judge function. You can gain access to this feature by defeating Leon in the Battle Tower for the first time, at Rank 4. In Pokémon HOME, the Judge function is part of the Premium Plan.
The Judge function will show phrases that represent the Pokémon’s IVs - some vague, some exact. The table below shows what each phrase means.
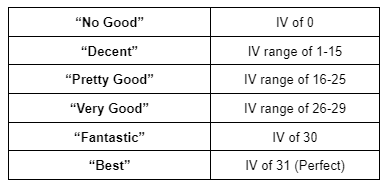
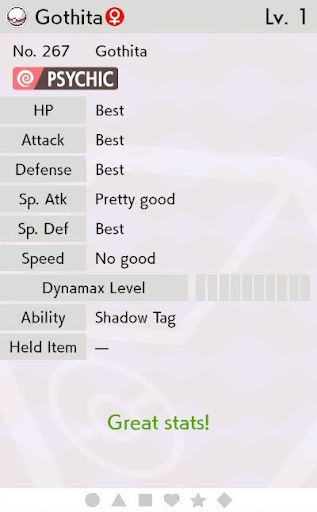
Here’s the Judge screen for a Gothita I bred earlier - using the table, we can see it has an IV of 0 in Speed - this is good, as I wanted this Gothitelle to be as slow as possible due to it running Trick Room. It has a 31 IV in HP, Attack, Defense and Special Defense - great! I want 31 IVs in all of its defensive stats. The Attack stat is somewhat irrelevant, but optimally I’d prefer a lower Attack stat due to Gothitelle having a weakness to Foul Play. However, it also has a “Pretty Good” Special Attack IV - considering this Gothitelle will also be running Psychic, I’d prefer a Special Attack IV of 31. With all of this in mind, I’m going to keep trying for a better Gothita.
The Quest for the Perfect Ditto
Now that we can visualize IVs, it’s time to gather the things we need to get started with breeding. The first (and most important) one is one of the Pokémon we will be using in almost all of our breeding - Ditto! Not just any Ditto, though - a Ditto with perfect IVs.
Why Ditto, you ask? Ditto is able to breed with any Pokémon (except those in the No Eggs Discovered Egg Group), which means it is an incredibly flexible breeding tool and can be used in almost all situations.
We highly recommend getting at the very least a Ditto with 6 31 IVs - this is incredibly useful and will be used in almost all your breeding. Beyond that, we also recommend getting a Ditto with 5 31 IVs and a 0 IV in Speed - this will help immensely when breeding Pokémon intended to be used under Trick Room.
“How do I get these Dittos?” you may be asking -
Oval Charm
The Oval Charm is a very useful Key Item that speeds up breeding by increasing the chance for an Egg to be produced. You can obtain it by defeating GAME FREAK’s Morimoto in the Hotel Ionia in Circhester after defeating the Champion. He appears as a Police Officer character and can be found on the second floor of the eastern branch of the hotel. He will challenge you to a Double Battle and Dynamax his Snorlax at the first opportunity.
Important Items
There are a handful of extremely useful items for breeding, some of which are downright mandatory and some heavily situational. Here’s what they are, and how to get them:
Destiny Knot

The Destiny Knot is by far the most important item when breeding Pokémon - when held by either parent, it randomly selects 5 stats between both parents and passes those IVs down to the offspring.
For example, it could select the mother’s 31 IVs in Special Attack and Speed, and the father’s 31 IVs in HP and Defense, as well as the father’s 0 IV in Attack, producing a baby with 4 perfect 31 IVs, as well as a 0 IV in Attack. The sixth IV will be randomly generated.
This item is incredibly important - without it, only 3 IVs between the parents are passed down to the offspring. This allows you to breed a perfect Ditto with a less than optimal Pokémon and get far better offspring within just a few tries.
You can purchase Destiny Knots for 10 BP at the BP Shop in Hammerlocke Pokémon Center. For other locations, click here.
Everstone

The Everstone is also an important tool in breeding - it passes the holder’s Nature down to the offspring, 100% of the time. This can be incredibly useful when trying to pass down a certain Nature along with good IVs! Find out how to get an Everstone here.
Power Items

Power Items are a little more situational than the Destiny Knot and Everstone - they will pass down the holder’s IV for the relevant stat to the offspring. This is useful when trying to force a 0 Speed offspring for Trick Room, and sometimes when trying to get a Special Attacker with 0 Attack IV. Otherwise, we recommend using a Destiny Knot!
Here’s a list of which item correlates to which stat:

Power Items can be bought at the BP Shop in Hammerlocke Pokemon Center.
Keep Those Eggs Warm!
Another aspect of breeding that can be sped up is the time it takes to hatch eggs. Keeping them warm and cozy is the answer to this - having a Pokémon with the Ability Flame Body, Magma Armor or Steam Engine will make eggs hatch twice as fast.
The easiest way to achieve this is to catch a Carkol in Galar Mine - they always have either Flame Body or Steam Engine. However, if you’d prefer to use different Pokémon, here are lists of Pokémon that have Flame Body, Magma Armor and Steam Engine.

Breeding
Now that you’ve collected all the resources you need, you’re ready to start getting some Eggs! Here’s a step by step guide to the average breeding process:
Initial Step:
Go to a Pokemon Nursery (either Wild Area or Route 5 - it makes no difference)
Select the parents (usually, this will be a Ditto and a Pokémon in the evolutionary line of the offspring you want to produce)
Equip them with items (often Ditto will hold a Destiny Knot, and if you have the desired Nature already, the other Pokémon will hold an Everstone)
Drop them off at the Pokémon Nursery


Hatching Step:
Talk to her to collect an Egg
Cycle around until the lady outside crosses her arms


Cycle around and hatch them
Repeat until you have 5 Eggs in your party
(you can keep the Pokemon in the Nursery)

Repeat Hatching Step until you get results you’re happy with


This is a basic outline for breeding, and assumes that both parents have good IVs. If one parent has imperfect IVs, breed until you get an offspring that is significantly better than the parent, and then swap it out for the parent in the Nursery.
Additional Information
Egg Moves
Some Pokémon can only learn certain moves through being bred with other species that learn those moves - these are called Egg Moves. Some of these are incredibly important in VGC, such as Incineroar’s Fake Out and Parting Shot. Find out more about Egg Moves here.
Regional Variants
Holding an Everstone will allow a Pokémon to pass down its Regional Variation if it is not in its native Region. For example, an Alolan Vulpix holding an Everstone will produce Alolan Vulpix offspring in Galar, while without the Everstone, the Vulpix would all be Kantonian.
However, this can cause problems if you want to pass down a Nature at the same time - we recommend getting a Ditto with the Nature you want, putting an Everstone on it and breeding them until you get the Regional Variant Pokémon with the right Nature to circumvent this.
Breeding for Shiny Pokémon
If you have an interest in Shiny Pokémon, there are a few additional steps you can take when setting up the breeding process. First, we recommend you get a perfect Ditto that is from a different language game to yours - for example, if you are playing in English, you could get a Japanese Ditto. You can use this Ditto as you would any other, however breeding it with a Pokémon of your game’s native language will heavily increase your Shiny odds. (1/4096 -> 1/682.7, 1/512 with Shiny Charm)
Additionally, you can obtain the Shiny Charm, which also greatly increases your odds of obtaining a Shiny Pokémon, by completing the Galar Pokedex and talking to the Janitor on the far left of the 2nd floor of Ionia Hotel’s western branch.
Moves
Written by Max Gelman
Moves can sometimes be an afterthought when putting your team together in-game, but putting the wrong moves on your Pokémon can end up being a huge mistake. If you’re all set on what moves you want your Pokémon to learn, one of the first things you should be doing before building in-game is checking the Serebii.net Pokedex pages to determine how a Pokémon can learn each move. Later in the guide, we’ll demonstrate how to do this.
There are several different ways your Pokémon can learn moves, most commonly through leveling up. But there are times in VGC when the moveset you want to run comprises moves obtained through entirely different methods. These methods include:
- TMs and TRs
- Move Tutors/Move Relearner
- Egg Moves
TMs and TRs are fairly self-explanatory, but it’s still important to check which of your Pokémon’s potential moves might need to be acquired through this procedure. TRs in particular can throw a wrench into in-game team building, as they bring back the pre-Generation 5 mechanic of a one-time use item. If you run out of a certain TR that you need for your team, you’ll have to find another one.
Check out Serebii here to make sure you know where TMs can be found if you’re missing one. Serebii also has a list of TRs here, but these can be a bit trickier to find as they’re usually rewards for winning Max Raid battles. You can also purchase TRs from the Watts salespeople in the Wild Area and the Crown Tundra DLC, which rotate every day. You can also create TRs using the Cram-o-Matic on the Isle of Armor DLC, and a list of recipes can be found here.
If you’re in a pinch and need a TR, we recommend checking the Watts shops first, then seeing where you can win one in a Raid. If push comes to shove, the Cram-o-Matic method can work, but you’ll generally need more resources that you might not have.
Move Tutors have been slimmed down from previous generations, but they still prove an important part of in-game team building. In the base Sword and Shield game, there are only four move tutors, two of whom teach moves that see prominent use in Generation 8 VGC formats.
The first is the Tutor that teaches Draco Meteor. All Dragon-type Pokémon are eligible to learn this move, and you can find this Tutor on the left side of the hot springs in Circhester. Examples of Pokémon that frequently used Draco Meteor in VGC 2020 and 2021 are Duraludon, Kingdra, Regidrago and Kyurem-White.

The second is the Tutor who teaches starter Pokémon their elemental Hyper Beams: Frenzy Plant, Hydro Cannon and Blast Burn. Starter Pokémon from all regions are able to learn these moves. With Generation 8 bringing Max Moves and G-Max forms for the Kanto starters, many players opt to use these moves when applicable.
This rang particularly true for G-Max Charizard, when Aaron Traylor used Blast Burn to win the first Regional tournament of 2020. Hydro Cannon also saw lots of use on Primarina and G-Max Blastoise throughout the formats. You can find this Tutor in Wyndon, standing in the park on the east side of town leading up to the Stadium.

There are also Move Tutors for the moves Steel Beam (which, similar to Draco Meteor, can only be learned by Steel-type Pokémon) and the elemental Pledge Moves that can be learned by the starters. These moves don’t see a lot of use in VGC, but if you’d like to use them their Tutors can be found in Motostoke and Hammerlocke, respectively. Check their locations at Serebii here.
The Isle of Armor, however, added a fifth Move Tutor with one new move for each of the 18 types. Some of these moves generally have not seen use in VGC — things like the Bug-type move Skitter Smack and the Dragon-type move Scale Shot. But others, like Grass-type Grassy Glide and Fire-type Burning Jealousy, have been used by many players, particularly on Rillaboom and Torkoal, respectively.
This move Tutor requires you to spend five Armorite Ore every time you teach a Pokémon one of these moves. You can find the Tutor in the Dojo near the back door.

If you ever want to reteach a move that a Pokémon had once forgotten, you can visit the Move Relearner in any Pokémon Center. This can prove particularly useful if you’ve brought up a Pokémon from an old game and needed to give it the Battle Ready mark, which erases its current moveset and replaces it with what it would be had it leveled up naturally in Sword and Shield. The Move Relearner is located on the left sides of Pokémon centers.
Egg Moves require the most effort of the bunch. Getting your Pokémon the right egg move can be a quick process if you already have the right parent, but if you don’t, you may find yourself at a loss. There will also likely be times where you’ve decided on your team, and decided on all your moves, but don’t realize until you start building in-game that one of the moves you really need is an Egg Move that’s difficult to obtain (I know I’ve done this!).
The important thing to remember when breeding for Egg Moves is this: if you breed two different species of Pokémon, the resulting Egg will be the same species as the mother. So if you’re looking to pass down an Egg Move through multiple Pokémon and the Egg Groups don’t always match up, you’ll need a male Pokémon with the right Egg Move and a female in the correct Egg Group.
First we’ll try a simple example. Let’s say I want to build a Rillaboom in-game and I know I want it to have Fake Out. I’m not sure how Rillaboom learns Fake Out, so I proceed to the Rillaboom Pokedex page on Serebii. I don’t see it scrolling through the Level Up moves or TMs/TRs, so I check the Egg Moves close to the bottom (you can also use the Control+F shortcut to search “Fake Out”). Lo and behold, there it is!

But how would I get Fake Out onto my Rillaboom? The first thing I should do is click this “Details” button on the Serebii page to see what Pokémon can pass down Fake Out in the Day Care Center.

That will take me to a page where I can see which parents can pass down after learning Fake Out through Leveling Up, or after being bred Fake Out for itself. The easier method is to use one of the Pokémon in the top row here, if you have one.
After checking this list, I’ll go to my box and look for a male Pokémon that learns Fake Out through Leveling Up and a female Grookey, Thwackey or Rillaboom. Luckily, I have a male Alolan-Persian in my box as well as a female Rillaboom. I can place these Pokémon together in the Day Care and receive a Grookey that knows Fake Out!


Next, in order to get Fake Out onto the Grookey I want, I’ll have to put the two Grookeys together in the Day Care. This is because Generation 8 added a new mechanic regarding Egg Moves that makes the whole process simpler: two Pokémon of the same species can pass Egg Moves to each other in the Day Care. These Pokémon can be different genders as well.
If you have a Grookey with Fake Out, but the wrong IVs, Nature or Ability, you can simply put this Grookey in the Day Care with your competitively bred Grookey. The same is true for a competitively bred Rillaboom that doesn’t know Fake Out, and another Rillaboom that does. The easiest way to do this is at the Day Care on Route 5 — drop them off and ride your Bike one lap on the bridge to the east. That should be enough time to pass over Fake Out.

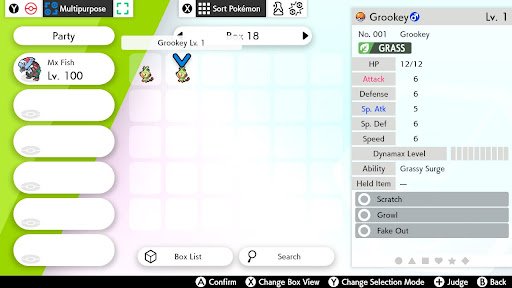
There may be some instances where you want to get an Egg Move onto your Pokémon, but it won’t have any parents that learn the desired move through Leveling Up, only more breeding. In order to properly breed the move onto your Pokémon, you’ll need to do the above previous step through multiple evolution lines. Let’s take a look at an example.
If, prior to the release of the Crown Tundra DLC, you wanted to run Ancient Power on your Charizard, you would have needed to perform this method. We can see that the only Charizard parents who learn Ancient Power through their natural movepool are the Tyrantrum and Aurorus lines, which were not introduced before the October 2020 DLC release. There are, however, some other Pokémon that could have learned it through breeding.

Still pretending this is taking place before Crown Tundra, we’ll immediately cross the Mudkip line off the list. Next, we can check the Marowak, Lapras and Tyranitar lines to see which of their parents learn Ancient Power by Leveling Up. Here’s what we find.
Marowak:

Lapras:

Tyranitar:

Looking here, we’ll also be able to cross Marowak and Tyranitar off the lists, as their Ancient Power parents are the same as Charizards. But you’ll notice Lapras has a few parents able to pass down the move (pre-Crown Tundra) in G-Corsola, Cursola and Gastrodon. Now, we can come up with a plan.
First, we’ll need to get Ancient Power onto the Lapras. Remember: the egg will be the same species as the female parent, so we’re going to need a male Gastrodon that knows Ancient Power and a female Lapras. Once we have these, we can breed Lapras Eggs until we get a male Lapras with Ancient Power. Then, we can breed that male Lapras with a female Charizard to get Ancient Power into the evolution line that we want.
And that’s it! You now have a Charmander that knows Ancient Power. If this Charmander is different from the one you want to use in competitive battles, toss both of them in the Day Care and ride around until the Egg Move has passed laterally.
Let’s put everything together now. Say you want to use Rillaboom on your newest VGC team, and you know you want it to have the following moveset:

How might you go about building this? Check Serebii first! By looking at Rillaboom’s Pokedex page, I can see that Fake Out is an Egg Move, Grassy Glide is a Tutor move from the Isle of Armor, U-Turn is a TM and Wood Hammer is a Level Up move.
To build this Rillaboom in-game, Fake Out should be the top priority — you don’t want to get everything right with your Rillaboom and then realize you missed the Egg Move. So, I can breed a Grookey using the illustrated method above, and then level it up until it evolves or learns Wood Hammer. Once I have these two moves, I can proceed to teaching it Grassy Glide at the Move Tutor and U-Turn with the TM.
You can do the following three in any order you want. But things will go faster if you’re feeding your baby Grookey lots of EXP. Candy at the beginning of the process rather than the end.
One last VGC tip regarding moves: many players prefer to use PP Ups and PP Maxes to maximize the amount of PP they have for each move. This is because sometimes players will end up in prolonged matches that may take a while, and the longer they can stave off Struggle, the better.
Using these items is not necessary and can sometimes drain in-game resources, but if you ever need PP Ups, you can buy them from the BP Shop in the central Hammerlocke Pokémon Center. You can also win PP Ups and PP Maxes with the lottery in any Pokémon Center.
Natures
Written by Scarlet Andrews
Natures are an important part of ensuring your Pokémon are ready to compete - a 10% increase to a stat (and 10% decrease to another) makes a huge difference!
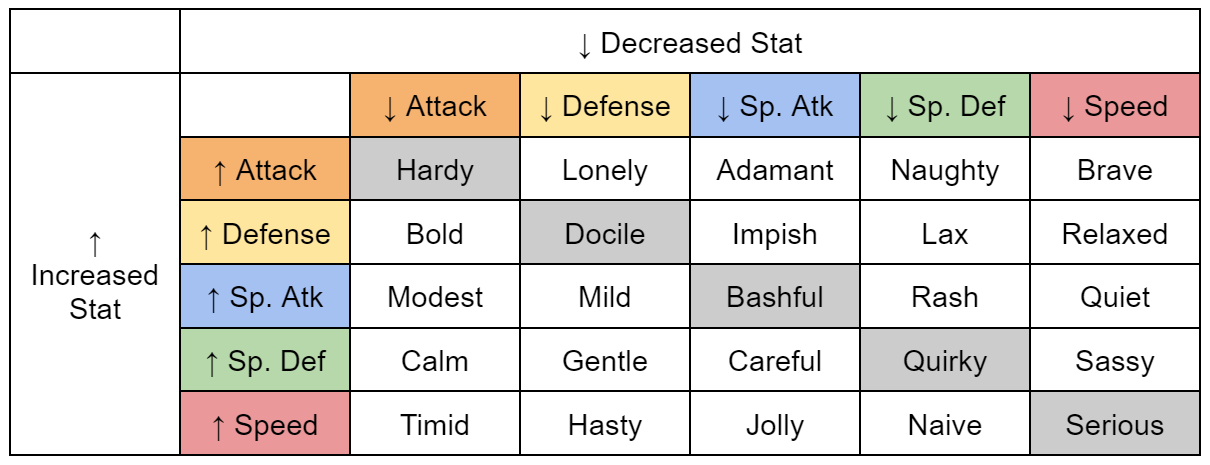
How to Find Wild Pokémon with the Desired Nature
Amongst a vast array of other handy quality of life changes in Pokémon Sword and Shield, Game Freak chose to make the Synchronise Ability a good bit more useful. If the Pokémon at the front of your party (regardless if it is healthy or fainted) has the Synchronise ability, all wild Pokémon you find will have the same Nature. Please note that this uses the Pokémon’s original Nature, ignoring any Mints that it has consumed. If you’re not sure what your Pokémon’s original Nature is, you can check on the fourth page of its Summary menu.
Breeding Down Natures
Passing down a Pokémon’s Nature during breeding is incredibly easy. If one of the parents holds an Everstone, its original Nature will be passed down to the offspring 100% of the time. Keep in mind that if a Regional Variant Pokémon holds an Everstone, for example an Alolan Vulpix, it will pass down its forme to the offspring as well as the Nature.
Changing Natures
Also in Generation 8’s wave of quality of life changes came the magnificent Mints! Mints come in 21 different flavors - one for each Nature that has an impact on stats, as well as the Serious Mint. Using a Mint on a Pokémon changes its stats to reflect the Nature the Mint represents.
Mints do not change the Pokémon’s original Nature - for example, if you are using a ‘Pinch’ Berry (Figy, Wiki, Aguav, Mago or Iapapa Berry) on a minted Pokémon, you will need to check its original Nature to ensure the Berry does not confuse it on consumption.
Obtaining Mints
There are two ways to obtain Mints in Pokémon Sword and Shield. The first is purchasing them in the left-most Battle Tower shop for 50 BP each.
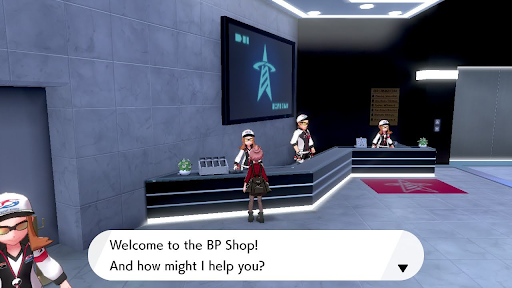

The second option is Mint farming - there is a small island in the Insular Sea just southwest of Honeycalm Island where Mints spawn as sparkling spots! On this island, there are 6 sparkling spots - 5 of them have a high chance to be Mints, and one is always a Galarica Twig.
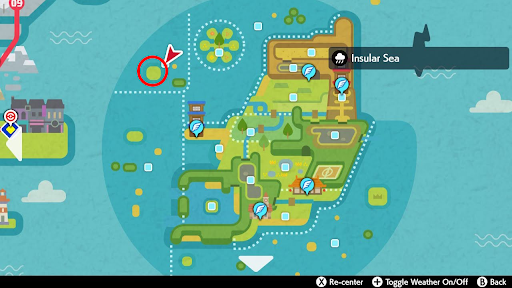
You can repeatedly obtain these items by following this guide:
- Do a loop around the island and pick up all the items (locations below)
- Approach the Max Raid Den on the island and throw in a Wishing Piece.
- Skip forward a day (guide here)
- Open Camp or encounter a Wild Pokemon - this will respawn all the items.
- Repeat as many times as you want!
Please note that although Mints have a high chance to spawn in these spots, sometimes you will receive items like Energy Powder, Jars of Honey or Wishing Pieces instead.
The items can be found in the following locations:
Location 1: Gives +Speed Nature Mints (Timid, Hasty, Jolly, Naive)
Location 3: Gives +Sp. Atk Nature Mints (Modest, Mild, Rash, Quiet)
Location 2: Gives +Defense Nature Mints (Bold, Impish, Lax, Relaxed)
Location 4: Gives +Attack Nature Mints (Lonely, Adamant, Naughty, Brave)

Location 5: Gives +Sp. Def Nature Mints (Calm, Gentle, Careful, Sassy)
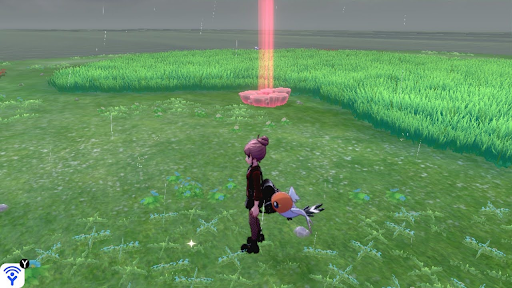
Bonus Locations:
Galarica Twigs: Behind the tree
Pomeg Berries: Berry Tree

0 Iv

What 0 IV Pokemon do I Catch?
Written by Aaron Traylor
For the most part, you’re going to want your Pokémon’s IVs to be maxed out at 31. However, there are some niche situations where you want your Pokémon to have IVs that are as low as they can go– down to 0.
What Pokémon do I want to catch at 0 Speed IVs?
In Pokémon Sword and Shield, you often only get one opportunity to catch certain Pokémon, such as legendaries like Stakataka and Glastrier. An important part of Trick Room teams is Pokémon that have 0 Speed IVs so that they move first under Trick Room. If you’re going through your game catching legendaries, and you’d like to play a Trick Room team in the future, we’ve listed out every single-capture Pokémon that you might want to catch at 0 Speed IVs. Know that having 0 Speed IVs isn’t a hard and fast rule– slow Pokémon will likely work in Trick Room no matter what– but if you’re a perfectionist, we got you.
Know that lots of Legendary Pokémon can work in Trick Room, even if you don’t see them on this list. We’ve added a “priority” column so that you know how important having the 0 Speed IV is for this Pokémon, but again, it’s not a hard and fast rule.
Important: at Level 50, 0 and 1 Speed IV are the same!
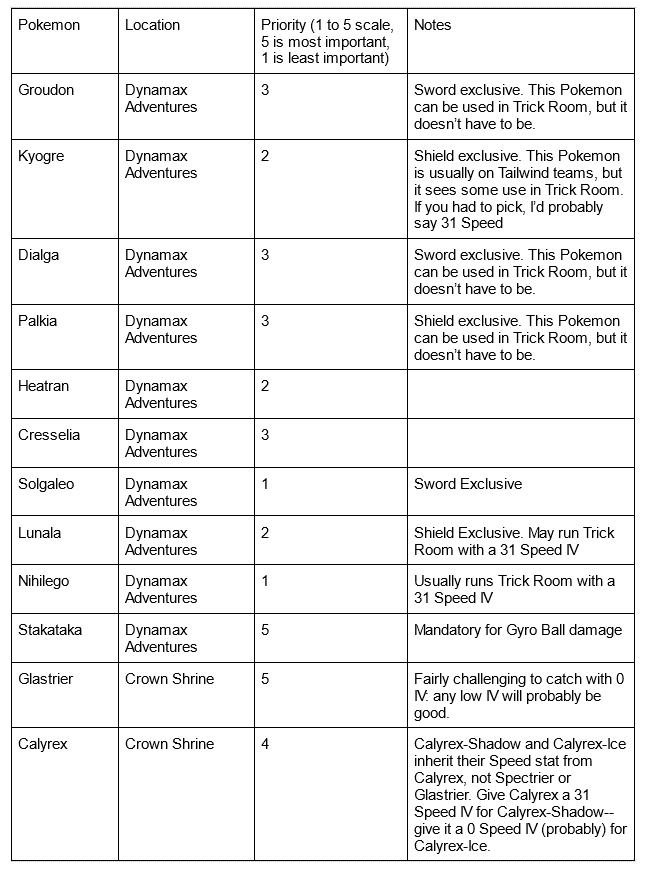
What Pokémon do I want to catch at 0 Attack IVs?
In general, having 0 Attack IVs on a Special Attacking Pokémon is a luxury, not a necessity– it matters in very few scenarios. Those scenarios are 1) if your opponent has the move Foul Play, or 2) if your Pokémon might get confused and hit itself in confusion. We don’t really recommend this for legendary Pokémon, because you’ll need to perform (on average) 16 resets for each time you want to catch a Pokémon with 0 Attack IVs.
The answer is, if you’re a perfectionist, “any Pokémon you won’t want using its Attack stat”. For Pokémon that you only have one opportunity to catch, a good rule is if the Special Attack stat is at or higher than the Attack stat, you might want 0 Attack IV on it. If you don’t mind as much, it probably won’t come up on the ladder or in a tournament.
What Pokémon do I want to catch at 0 Special Attack IVs?
The only Pokémon that are necessary to catch at 0 Special Attack IVs are those that are going to be hitting their partner Pokémon with a Special Attacking move, such as Dragapult using Surf onto Gigantamax Coalossal to activate its Steam Engine. Generally, this will not be legendary Pokémon, so don’t worry about catching them with 0 Special Attack IV. Otherwise, it is not necessary to catch any Pokémon with a 0 Special Attack IV.
Where to Find Items and Resources?
Where to Find Items and Resources
Written by Max Gelman
There are several resources you’ll need in order to build your team in-game. From Watts to cash, from BP to Armorite Ore, it can all be overwhelming. Here’s a quick primer to getting your game ready with plenty of all the necessary resources.
Watts
Though Watts have been around since the introduction of Sword and Shield, they became a much more important resource once the Isle of Armor DLC was released. In particular, you can buy all Vitamins on the cheap from vending machines after giving Honey 400,000 Watts.
In order to quickly gain a large number of Watts, you can head to the Digging Pa character on the Isle of Armor. In exchange for seven pieces of Armorite Ore, he’ll dig up lots of Watts. There may be instances where the amount reaches in the hundreds of thousands, so if you’re ever short on Watts, be sure to visit the Training Lowlands.
You can also use Watts to purchase TRs and other items from salespeople in the Wild Area and Crown Tundra, as well as trading them for apricorns with NPCs around the Isle of Armor.
Money
It’s a central feature of all Pokémon games: most items cost money. But what if you run out of money? Do you simply shout ‘I Declare Bankruptcy!’ and give up?
Rather than take the Michael Scott route, you can follow a couple simple methods to get a lot of cash, fast. The easiest method is to use your excess Watts. If you bike around the Wild Area and chat with the Watts salespeople, sometimes you’ll see Luxury Balls for sale. If you have enough Watts, you can buy up to 999 Luxury Balls and sell them to PokeShops. This will net you roughly $1.4 million in in-game money!
Another method is to farm cash using G-Max Meowth. By giving this Meowth an Amulet Coin, re-fighting the Champion Cup or Galarian Star Tournament in Wyndon and repeatedly using the Meowth’s G-Max Move, you can get $99,999 after each battle. This method may prove a bit more tedious than the Luxury Ball method, but if you’re out of Watts and Armorite Ore it can prove a solid substitute.
BP (battle Points)
BP is used to purchase most battle items, Mints and the Power Items necessary to pass down certain IVs in breeding. The easiest way to accumulate large amounts of BP quickly is to play Ranked Battles — by reaching Rank Master Ball in either Single Battles or Double Battles, you can gain 600 BP when the in-game ladders reset every month.
If you find yourself unable to reach Master Ball, you can also gain BP from the Battle Tower. Here, you can use the default rental teams provided by the game — or other rental teams made by real people — to quickly amass BP through relatively easy fights against the computer.
Battle Items
Most items used in battle — such as Assault Vest and Life Orb — can be found in various locations throughout the game. To quickly check these locations, use the ItemDex catalogue at Serebii.net here. But some are only available at BP Shops at the central Hammerlocke Pokémon Center and the Battle Tower. If you’re ever in need of a certain item, be sure to check these lists at Serebii here and here, respectively.
Berry Trees
Sometimes you’ll want your Pokémon to hold certain berries that can reduce damage from super effective moves. Other times, you’ll want to reduce your Pokémon’s EVs using the berry method. These types of berries can only be found on Berry Trees throughout the Galar Region. If you ever need to find a certain berry and don’t know where to look, check out this list from Serebii here for all the Berry Tree locations. Note the Berry Trees located on the Isle of Armor that only give out EV-reducing berries.
Armorite Ore
Introduced in the Isle of Armor DLC, Armorite Ore is an important resource in order to use Move Tutor moves and reset EVs. Like BP, you can obtain Armorite Ore every month as ranked battle rewards. But you can also obtain the Ore by grinding Max Raid Battles on the Isle of Armor.
Dynite Ore
Introduced in the Crown Tundra DLC, Dynite Ore is an important resource to obtain Ability Patches to change a Pokémon’s Ability to its Hidden Ability. You’ll need 200 Dynite Ore to obtain an Ability Patch from the shop at the Dynamax Adventures cavern, and you can grind the Endless Adventures to quickly get more Ore. Endless Adventures are unlocked after completing the Crown Tundra story and three regular Dynamax Adventures.
For a full list of purchasable items using Dynite Ore, check out this Serebii page here.
How to Check Everything is Correct
Written by Max Gelman
Congratulations, you’ve done it. You’ve built your very own team in-game! Well done. It’s taken a lot of effort and you should feel proud of yourselves. But if you’re planning on using this team in a tournament — either in an online circuit or at an in-person event — we’re not done just yet.
Tournament hosts will usually require participants to submit a “Team Sheet” listing all the relevant information regarding your Pokémon: Items, Abilities, Stats, etc. And because in-person events ask for the exact in-game stats for your Pokémon at the level they’re at, it’s important to double check all of your hard work. Here’s the best way to do that.
You’re going to want to have your Box open with all your prepped Pokémon easily accessible. You’re also going to want to have the website Pokémon Showdown open with all of your Pokémon loaded in the Teambuilder. For this example, we’ll use a team that gained some popularity toward the end of the Series 9 format that I built in-game to use for myself.


For VGC formats, Pokémon Showdown presets everything to Level 50, but 5 of my 6 Pokémon in-game are at Level 100. In order to properly check the stats, I can set the Pokémon to Level 100 on Showdown by clicking “Level” next to their sprite and setting it to 100.


Once you’ve done this, you’ll notice the stats have changed but the EVs remain the same. This is because the Venusaur on Showdown is now representing how the equivalent EVs would translate at Level 100. Take a look at the column on the bottom right.

These should now match my Venusaur’s in-game stats. Even though you can easily check your Pokémon’s EVs on their respective Summary pages by pressing the Y button, you can’t see the exact numbers unless a certain stat has the maximum 252 EVs (when it sparkles). For this team, I’ll now set the other four Pokémon to Level 100 in Showdown.
Now I can go through each of the Pokémon to ensure everything is correct. It’s easiest to do from the Box screen where you can see all of the numbered stats, items and Ability all at once. Let’s take a look at my Venusaur first.

Everything looks good here! The stats in Showdown match up with the stats shown in my game, the Item and Ability are correct and the moves are good as well. And I’ve made sure to feed my Venusaur all of its Dynamax Candy. It’s important to note that you cannot see G-Max symbols from this page, so check out the Summary page if you’re using a G-Max form and confirm there. Let’s take a look at Registeel next.

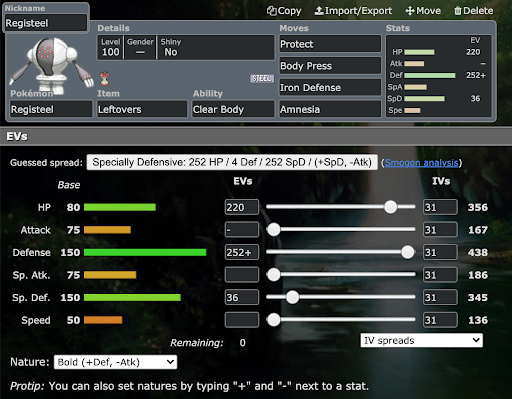
Well, here the stats and moves all look good, as do the Dynamax Candy and Ability. But it looks like I’ve forgotten my item! Per my teambuilder, I need to give my Registeel its Leftovers, and then everything will be A-OK. Next up is Torkoal.


Everything looks good here too! Two out of three ain’t bad. Moving on to Landorus-T…


The stats and moves are good here too, but it looks like I forgot to change my Landorus-T’s item over to Life Orb. It’s important that I caught this mistake here because had I entered the tournament with Assault Vest instead, I would not have been able to click Swords Dance or Max Guard when Dynamaxed. After giving Landorus-T the proper item, I’ll check Grimmsnarl.


Because my Grimmsnarl is Level 50 in my game, I don’t have to do any level adjustments here. Everything looks good here too, so last up will be Porygon2.


Things are looking great here too! I was even able to calculate the correct Attack IV by referencing the in-game Porygon2 with its Showdown counterpart. Since I don’t have any physical attacking moves, the Attack IV doesn’t matter to me, but I should still enter the in-game stat as is. With everything verified, I can safely enter all the correct info into my team sheet for the tournament. It’s a good thing I caught those mistakes!
It’s important to note that, in your game, you don’t have to have everything at Level 50 or Level 100 when checking stats with Showdown. It is, however, much easier because it’s at these levels where the EV math is the cleanest. If you’re in a pinch, you can also input all the stats manually into a damage calculator website and look at the in-game levels that way.
As mentioned before, double checking everything is extremely important because the penalties for incorrect information can be severe. If you mistakenly entered something incorrectly and then played with a different move or item, you may be disqualified from the event or be forced to play with the set you didn’t prepare. I would not have been happy if I’d had to play with Assault Vest Landorus-T when I meant to use Life Orb, and I imagine you wouldn’t either!
Some online tournament circuits don’t require the exact in-game stats, but rather what’s called a “PokePaste” or “Paste” of your team. This is something that can be created at the website Pokepast.es and Showdown has an easy button where you can export teams. If you scroll all the way down in your team after selecting it from the teambuilder, you’ll see a button that looks like this:

And here’s what that paste looks like!

If you’re starting off with a paste you got from a friend, you can also import the Pokemon into Showdown by pasting the URL into your teambuilder after clicking “New Team” and the “Import from Text or URL” button and then clicking Save.


Coming From Breeding Or Shiny Hunting
Start here if your main experience with Pokemon is breeding or shiny hunting.
Written by Aaron Traylor If you enjoy any part of catching Pokémon in the games– breeding, shiny hunting, catching Pokémon in cool Poke Balls, or mark hunting– those skills are all useful for a VGC player. Aaron, Wolfe, and I actually all started out with Pokémon breeding trading-shops way back in the day! Many VGC players catch Pokémon with cool accoutrements to show off on the ladder or when they head to a big tournament. Here’s our tips for how you can go from catching enthusiast to VGC battler.
Get your favorites battle-ready
As of Pokémon Sword and Shield, a trainer will make any transferred Pokémon from an old generation “battle-ready”, which means that you can compete with it. We’ve seen people win with their favorite Pokémon from Ruby and Sapphire, games released in 2002! We have a guide for getting your transferred Pokémon ready for battle here, but do know that the process will remove any of their special egg or transfer moves– you can only use moves that that Pokémon can learn in the most recent Pokémon generation.
If you have a special Pokémon you want to build around, that’s great! We have a guide to figuring out the best way to use a Pokémon competitively. Although some Pokémon might be easier to win with than others, you can make a team based around any Pokémon.
It’s easier than ever to train new competitive Pokémon
Pokémon Sword and Shield make it much, much easier than past games to take any Pokémon and get it ready for battle. No matter how long it takes you to hatch eggs or go through raid dens to find a shiny, training that Pokémon to be usable in competitive Pokémon will take a fraction of the time. Check out our guide on training your Pokémon competitively to learn more.
Start with the staples
There are certain Pokémon that will be useful in lots of VGC formats, and if you start with these Pokémon first, you’ll save a lot of time when it’s time to make a team. Check out the usage stats to see some of the Pokémon that appear a lot of times across different formats to get some ideas.
Be ready to change things up
VGC formats change quickly– in the Sword and Shield era, the format will change every 2 or 3 months. This means that you’ll pretty constantly want new Pokémon on your team or to train your old Pokémon in new ways (click here for a guide). There are always more Pokémon to breed, catch, and train up!
Conclusion
Seeing the Pokémon you caught fight in a live competition is a rewarding feeling. When you play VGC, there will always be more Pokémon to breed, catch, customize, and train. Give VGC a try and use your Pokémon to rise to the top!
EXAMPLE
For Dallas Regionals in 2020, we wanted Marks on our Pokemon– if a Pokemon has a Mark, it has a special message when it’s sent out in battle! We spent a lot of time in the week before the tournament hunting for our favorite Marks. Of course, we coordinated our nicknames to match what we got. This is one of the fun ways you can customize your Pokemon.